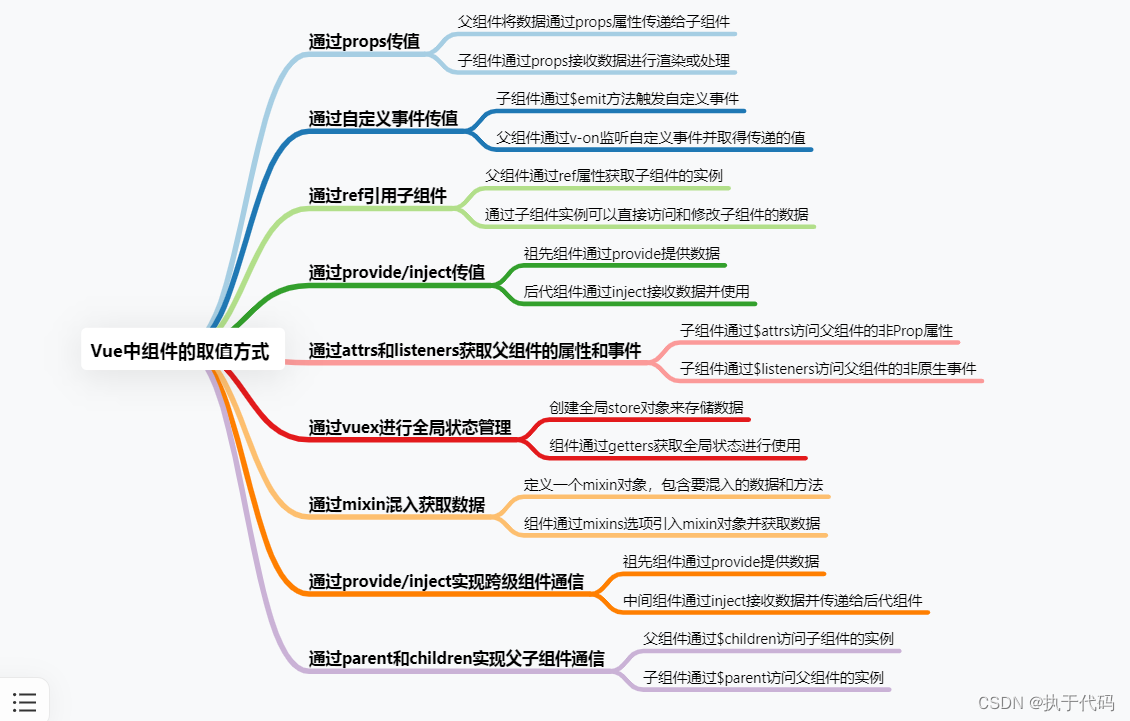
vue中组件的传递取值方式总结
vue中组件的传递取值方式总结
Survive by day and develop by night.
talk for import biz , show your perfect code,full busy,skip hardness,make a better result,wait for change,challenge Survive.
happy for hardess to solve denpendies.
目录

概述
需求:
设计思路
实现思路分析
1.父子传参
父组件通过props属性将数据传递给子组件的步骤如下:
- 在父组件中定义要传递的数据,并将其作为props属性传递给子组件。例如:
import React from 'react';
import ChildComponent from './ChildComponent';

class ParentComponent extends React.Component {
  render() {
    const data = "Hello, world!";
    return (
      <div>
        <ChildComponent message={data} />
      </div>
    );
  }
}

export default ParentComponent;
- 在子组件中接收通过props传递的数据。例如:
import React from 'react';

class ChildComponent extends React.Component {
  render() {
    return (
      <div>
        <p>{this.props.message}</p>
      </div>
    );
  }
}

export default ChildComponent;
在子组件中,可以通过this.props来访问传递的数据,这里的this.props.message即为父组件传递的数据。
通过以上步骤,父组件就可以将数据通过props属性传递给子组件了。
2.vue 子组件接收数据进行渲染或处理
在Vue.js中,子组件可以通过props属性来接收父组件传递过来的数据进行渲染或处理。下面是一个例子:
在父组件中,我们定义一个属性并传递给子组件:
<template>
  <div>
    <child-component :message="message"></child-component>
  </div>
</template>

<script>
import ChildComponent from './ChildComponent.vue';

export default {
  components: {
    ChildComponent
  },
  data() {
    return {
      message: 'Hello, World!'
    };
  }
};
</script>
在子组件中,我们通过props接收父组件传递的数据,并进行渲染或处理:
<template>
  <div>
    <p>{{ message }}</p>
    <button @click="reverseMessage">Reverse</button>
  </div>
</template>

<script>
export default {
  props: ['message'],
  methods: {
    reverseMessage() {
      this.message = this.message.split('').reverse().join('');
    }
  }
};
</script>
在子组件中,我们使用props: ['message']来定义一个props属性,这样就可以接收父组件传递过来的message数据。然后我们可以在子组件的模板中使用{{ message }}来渲染这个数据。
另外,我们还可以在子组件中定义方法来处理这个数据。在这个例子中,我们定义了一个reverseMessage方法,用于反转message数据。当点击按钮时,会调用这个方法来改变message的值。
总结一下,子组件可以通过props属性来接收父组件传递过来的数据,并且可以在组件的模板和方法中使用这些数据进行渲染和处理。
3.父组件通过v-on监听自定义事件并取得传递的值
在父组件中,你可以通过v-on指令来监听子组件触发的自定义事件,并取得传递的值。以下是一个示例:
父组件模板:
<template>
  <div>
    <h2>父组件</h2>
    <p>{{ message }}</p>
    <child-component
      v-on:custom-event="handleCustomEvent">
    </child-component>
  </div>
</template>
父组件脚本:
<script>
import ChildComponent from './ChildComponent.vue';

export default {
  components: {
    ChildComponent
  },
  data() {
    return {
      message: ''
    }
  },
  methods: {
    handleCustomEvent(value) {
      this.message = value;
    }
  }
}
</script>
子组件模板:
<template>
  <div>
    <h2>子组件</h2>
    <button v-on:click="emitCustomEvent">触发自定义事件</button>
  </div>
</template>
子组件脚本:
<script>
export default {
  methods: {
    emitCustomEvent() {
      const value = 'Hello, World!';
      this.$emit('custom-event', value);
    }
  }
}
</script>
在父组件中使用v-on指令监听子组件的custom-event事件,并在父组件的handleCustomEvent方法中接收传递的值。然后将值赋给父组件的message属性,从而动态更新父组件的模板中的message内容。当子组件中的按钮被点击时,会触发自定义事件,并将’value’传递给父组件。
4.ref引用子组件
要在 Vue 中通过 ref 引用子组件,可以按照以下步骤进行操作:
- 在父组件中,使用
ref属性给子组件命名。例如:<child-component ref="child"></child-component> - 在父组件中,可以通过
this.$refs来访问子组件的实例。例如:this.$refs.child可以获取到子组件的实例。 - 使用子组件实例的属性或方法来传递值。例如:
this.$refs.child.value = 'Hello'可以在子组件中设置一个名为value的属性,并将其值设置为'Hello'。
下面是一个完整的例子:
<template>
  <div>
    <child-component ref="child"></child-component>
    <button @click="passValue">传递值给子组件</button>
  </div>
</template>

<script>
import ChildComponent from './ChildComponent.vue';

export default {
  components: {
    ChildComponent
  },
  methods: {
    passValue() {
      this.$refs.child.value = 'Hello';
      console.log(this.$refs.child.value); // 输出 'Hello'
    }
  }
}
</script>
<!-- ChildComponent.vue -->
<template>
  <div>
    {{ value }}
  </div>
</template>

<script>
export default {
  data() {
    return {
      value: ''
    }
  }
}
</script>
在上面的例子中,父组件通过 ref 属性给子组件命名为 child,然后在 passValue 方法中,通过 this.$refs.child.value 来设置子组件的 value 属性,并将其值设置为 'Hello'。最后,我们可以在子组件中显示 value 的值。
5.通过provide/inject传值
在Vue中,可以使用provide和inject来在父组件和子组件之间进行值的传递。
首先,在父组件中,使用provide来提供要传递的值。例如:
// 父组件
provide() {
  return {
    message: 'Hello, Vue!'
  };
}
然后,在子组件中,使用inject来注入传递的值。例如:
// 子组件
inject: ['message'],
mounted() {
  console.log(this.message); // 输出: Hello, Vue!
}
在这个例子中,父组件通过provide提供了message的值为'Hello, Vue!',子组件通过inject将message注入到子组件中,并在mounted生命周期钩子中使用。
需要注意的是,provide和inject并不是响应式的,也就是说如果提供的值发生变化,子组件不会自动更新。如果需要实现响应式的值传递,可以考虑使用props和emit来实现。
6.attrs和listeners
在Vue中,您可以使用$attrs和$listeners来获取父组件传递的属性和事件。
$attrs是一个包含了父组件传递的所有属性的对象。您可以在子组件的模板中通过v-bind指令将$attrs中的属性绑定到子组件的相应属性上。例如:
<template>
  <div>
    <p>{{ $attrs.foo }}</p>
    <p>{{ $attrs.bar }}</p>
  </div>
</template>
在上面的例子中,父组件可以通过以下方式传递属性给子组件:
<child-component foo="Hello" bar="World"></child-component>
子组件将会显示父组件传递的属性值。
$listeners是一个包含了父组件传递的所有事件监听器的对象。您可以在子组件的模板中通过v-on指令将$listeners中的事件绑定到子组件的相应事件上。例如:
<template>
  <button v-on="$listeners">{{ $attrs.buttonText }}</button>
</template>
在上面的例子中,父组件可以通过以下方式传递事件给子组件:
<child-component buttonText="Click me" @click="handleClick"></child-component>
当子组件的按钮被点击时,父组件定义的handleClick方法将会被调用。
请注意,$attrs和$listeners只会包含没有被子组件的props和事件监听器所接收的属性和事件。如果您希望将父组件的所有属性和事件传递给子组件,可以使用v-bind="$attrs"和v-on="$listeners"来简化代码。例如:
<template>
  <child-component v-bind="$attrs" v-on="$listeners"></child-component>
</template>
这样,父组件的所有属性和事件都会被传递给子组件。
7.通过vuex进行全局状态管理
创建全局store对象来存储数据
8.Vue mixin
Vue mixin 可以用来共享组件之间的代码。您可以在 mixin 中定义一个方法来获取数据,并在需要这些数据的组件中混入这个 mixin。
首先,定义一个 mixin,例如:
// myMixin.js
export default {
  methods: {
    fetchData() {
      // 获取数据的代码
      return fetch('https://api.example.com/data')
        .then(response => response.json())
        .then(data => {
          // 处理数据
          // 返回处理后的数据
          return data;
        });
    }
  }
}
然后,在需要获取数据的组件中混入这个 mixin:
// MyComponent.vue
import myMixin from './myMixin';

export default {
  mixins: [myMixin],
  created() {
    this.fetchData().then(data => {
      // 在这里处理获取的数据
    });
  }
}
上述代码中,MyComponent 组件混入了 myMixin,created 生命周期钩子中调用了 fetchData 方法来获取数据,并在 then 中进行数据处理。
混入的方法会被合并到组件中,因此您可以在组件中直接调用混入的方法。混入的数据和方法会在组件的实例中生效。
9.通过provide/inject实现跨级组件通信
在Vue中,可以使用provide和inject来实现跨级组件通信。provide是在父组件中声明数据,而inject是在子组件中注入数据。
下面是一个示例:
// 父组件
<template>
  <div>
    <child-component></child-component>
  </div>
</template>

<script>
import ChildComponent from './ChildComponent.vue';

export default {
  components: {
    ChildComponent
  },
  provide() {
    return {
      message: 'Hello from parent component'
    };
  }
};
</script>
// 子组件
<template>
  <div>
    <grand-child-component></grand-child-component>
  </div>
</template>

<script>
import GrandChildComponent from './GrandChildComponent.vue';

export default {
  components: {
    GrandChildComponent
  },
  inject: ['message']
};
</script>
// 孙子组件
<template>
  <div>
    <p>{{ message }}</p>
  </div>
</template>

<script>
export default {
  inject: ['message']
};
</script>
在上面的示例中,父组件通过provide提供了一个名为message的数据,子组件通过inject注入了这个数据,并在模板中展示出来。孙子组件也通过inject注入了message数据,并展示出来。
这样,父组件的数据就可以通过inject在子组件和孙子组件中共享和使用了,实现了跨级组件通信。
10.parent和children实现父子组件通信
在Vue中,父子组件间的通信可以通过props和事件来实现。
-
使用props向子组件传递数据:
在父组件中,可以通过props属性将数据传递给子组件。子组件中可以通过this.$props访问传递过来的属性。// Parent.vue <template> <div> <Child :message="message" /> </div> </template> <script> import Child from './Child.vue'; export default { components: { Child }, data() { return { message: 'Hello from Parent!' }; } }; </script> // Child.vue <template> <div> <p>{{ message }}</p> </div> </template> <script> export default { props: ['message'], mounted() { console.log(this.$props.message); // Output: Hello from Parent! } }; </script> -
使用事件向父组件传递数据:
在子组件中,可以通过$emit方法触发一个自定义事件,并将数据作为参数传递给父组件。父组件可以通过@event-name的方式监听子组件触发的事件,并在对应方法中处理数据。// Parent.vue <template> <div> <Child @update-message="updateMessage" /> </div> </template> <script> import Child from './Child.vue'; export default { components: { Child }, data() { return { message: '' }; }, methods: { updateMessage(newMessage) { this.message = newMessage; } } }; </script> // Child.vue <template> <div> <button @click="sendMessage">Send Message</button> </div> </template> <script> export default { methods: { sendMessage() { this.$emit('update-message', 'Hello from Child!'); } } }; </script>
通过props和事件,父子组件之间就可以实现双向通信。父组件可以向子组件传递数据,子组件也可以通过触发事件的方式向父组件传递数据。
参考资料和推荐阅读
参考资料
官方文档
开源社区
博客文章
书籍推荐
欢迎阅读,各位老铁,如果对你有帮助,点个赞加个关注呗!同时,期望各位大佬的批评指正~,如果有兴趣,可以加文末的交流群,大家一起进步哈
本文来自互联网用户投稿,该文观点仅代表作者本人,不代表本站立场。本站仅提供信息存储空间服务,不拥有所有权,不承担相关法律责任。 如若内容造成侵权/违法违规/事实不符,请联系我的编程经验分享网邮箱:chenni525@qq.com进行投诉反馈,一经查实,立即删除!
- Python教程
- 深入理解 MySQL 中的 HAVING 关键字和聚合函数
- Qt之QChar编码(1)
- MyBatis入门基础篇
- 用Python脚本实现FFmpeg批量转换
- 以ACM32F403为主控的车载电动尾门案例分析
- SpringMVC(七)RESTful案例
- 【Docker】离线一键式安装docker、docker-compose
- 【DWJ_1703225514】基于Sklearn航空公司服务质量分析
- Visual Studio(VS)常用快捷键(最详细)
- 你一定用的上的MySQL批量插入技巧
- 终极解决Flutter项目运行ios项目报错Without CocoaPods, plugins will not work on iOS or macOS.
- LeNet
- Ebullient第一阶段开发小结
- 低代码开发:数字化转型的引擎