springcloud之网关
写在前面
源码 。
本文一起看下spring cloud gateway微服务网关组件。
1:为什么需要微服务网关
为了承载高流量,nginx因为其占用内存少,超强的并发能力,所以一般是我们作为流量入口的不二之选,一般我们也会通过dns轮询机制来实现nginx的横向扩展,以及keepalive+vip的方式对nginx所主从,避免主张,所以,架构可能如下:
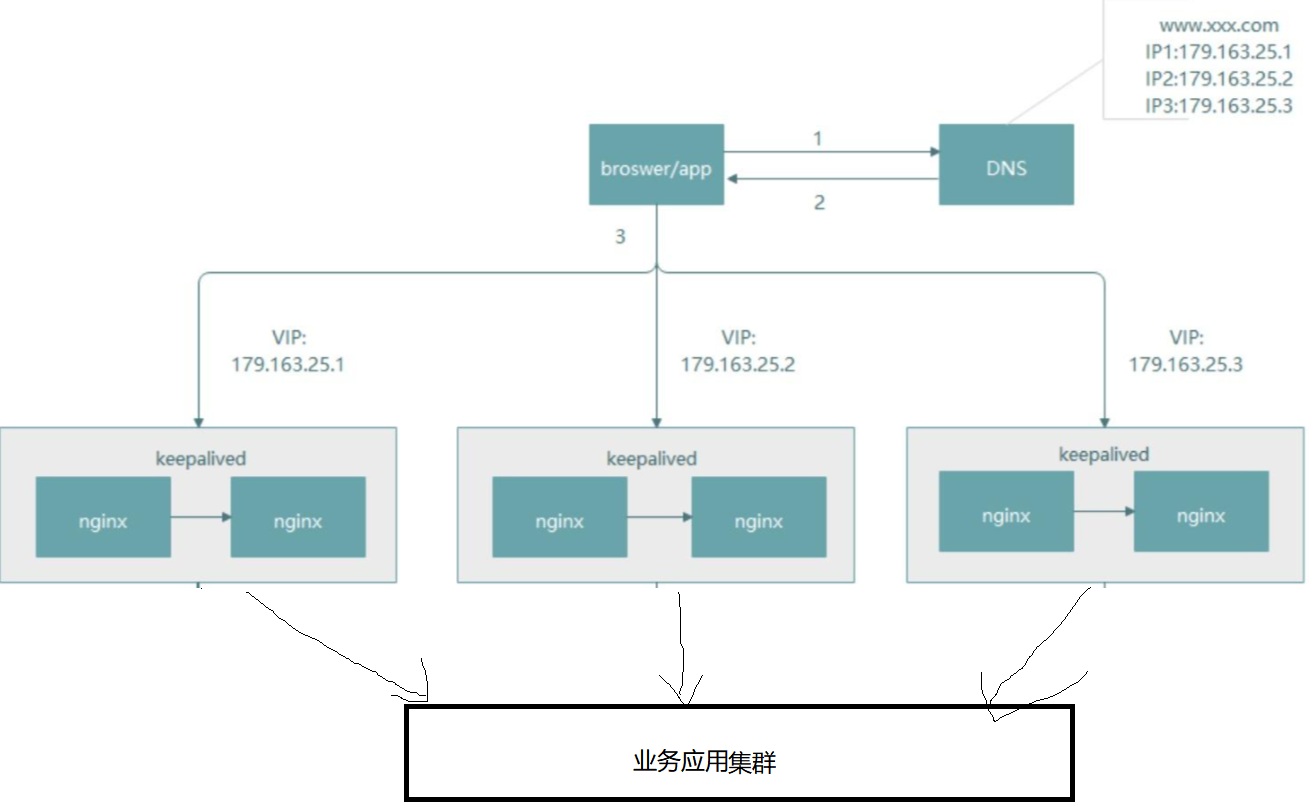
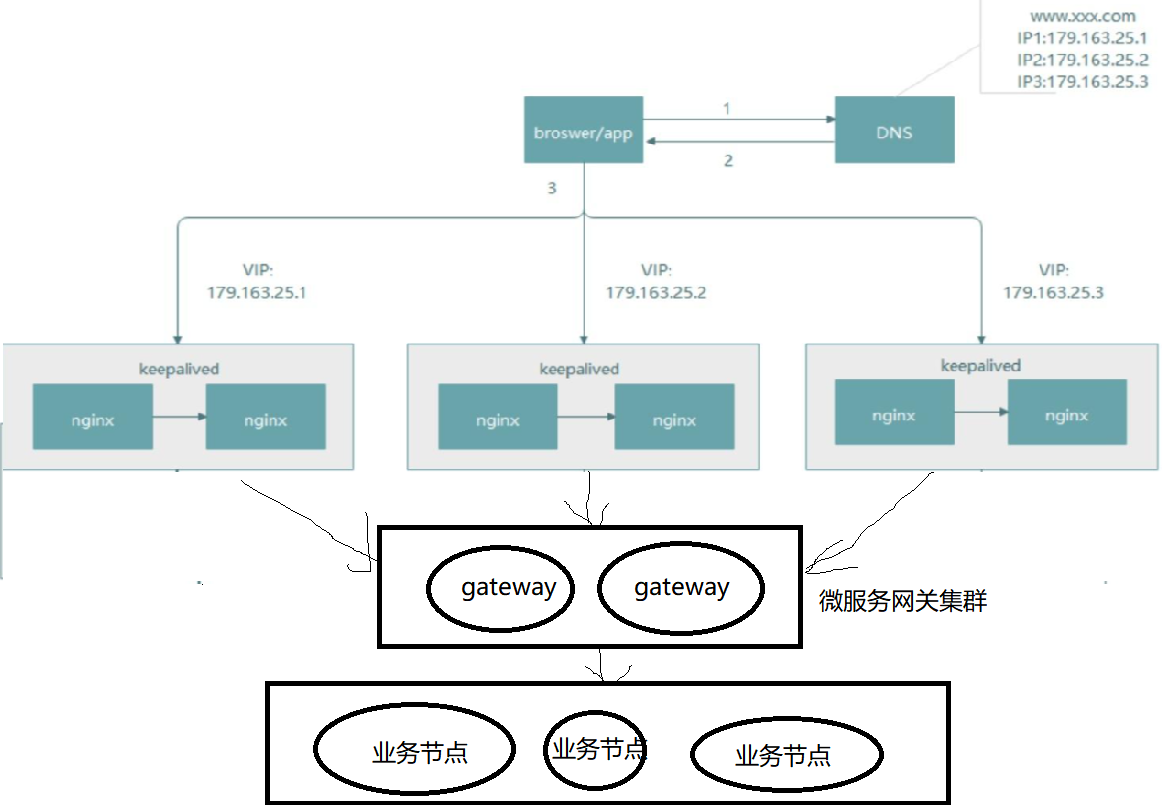
此时nginx直接访问到我们的业务节点,假定此时我们是一个有三个节点的集群,但是春节到了需要增加到10个节点,此时我们就需要停掉ngixn,并修改其配置,然后重启,不仅这种业务需要的情况,,删除节点也需要去修改nginx的配置,类似这样的操作会严重影响到用户体验,以及SLO 指标,说不定还会影响到我们的钱袋子(部分节点宕机,导致事故)。在计算机领域,有一句话,没有什么事是不能通过加一层解决的,这里我们也来加一层,而加这一层需要能够完美的解决上述提到的问题,即要能够做到动态伸缩,异常节点剔除等。本文要分析的spring cloud gateway也正是提供了这些功能,因为其实际上也是一个微服务,所以一般我们叫做微服务网关,因为是一个微服务所以能够完美的融入到spring cloud的技术体系中,后端业务的增加和删除都可以通过nacos注册中心实现动态感知和剔除,当然自己也会注册到nacos中,此时架构可能如下图:
先来看下sprin cloud gateway核心概念:
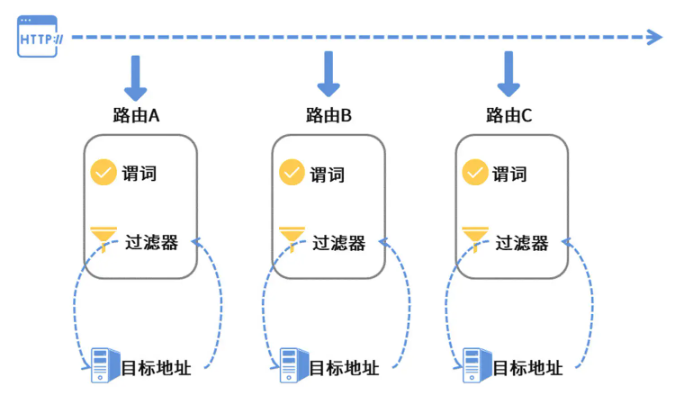
1:路由
    指定要访问的目标服务名称,可以有很多个路由
2:谓词
    匹配路由的规则
3:过滤器
    调用具体接口前要执行的过滤操作
结构如下图:
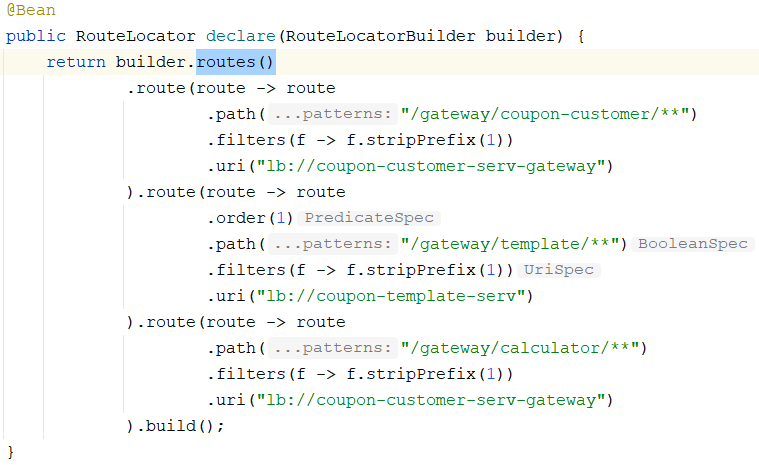
程序可能如下:
二者对比如下图:

接下来我们就来详细看下spring cloud gateway组件吧!
2:声明路由的方式
三种方式,java代码,yaml,动态路由,如下:
- java代码
@Bean
public RouteLocator declare(RouteLocatorBuilder builder) {
    return builder.routes()
            .route("id-001", route -> route
                    .path("/geekbang/**")
                    .uri("http://time.geekbang.org")
            ).route(route -> route
                    .path("/test/**")
                    .uri("http://www.test.com")
            ).build();
}
- yaml
spring:
  cloud:
    gateway:
      routes:
        - id: id-001
          uri: http://time.geekbang.org
          predicates:
            - Path=/geekbang2/**
        - uri: http://www.test.com
          predicates:
            - Path=/test2/**
- 动态路由
基于nacos,生产上建议采用这种方式。
3:谓词都有哪些
通过谓词来匹配路由。
- 寻址谓词
通过请求地址,请求方法等,最终返回True则命中:
.route("id-001", route -> route
      .path("/geekbang/**")
      .and().method(HttpMethod.GET, HttpMethod.POST)
      .uri("http://time.geekbang.org")
- 请求参数谓词
通过请求参数,header参数,cookie参数等,匹配,如下:
.route("id-001", route -> route
    // 必须包含cookie,并且值满足规则
    .cookie("myCookie", "regex")
    // 必须包含头myHeaderA
    .and().header("myHeaderA")
    // 必须包含头myHeaderB,且值等于regex
    .and().header("myHeaderB", "regex")
    // 验证param
    .and().query("paramA")
    .and().query("paramB", "regex")
    // Header 中的 Host满足某些规则
    .and().remoteAddr("远程服务地址")
    // Header 中的 Host满足某些规则
    .and().host("pattern1", "pattern2")
- 时间谓词
考虑秒杀的场景,某段时间内路由到某个接口,如下:
.route("id-001", route -> route
   // 在指定时间之前
   .before(ZonedDateTime.parse("2022-12-25T14:33:47.789+08:00"))
   // 在指定时间之后
   .or().after(ZonedDateTime.parse("2022-12-25T14:33:47.789+08:00"))
   // 或者在某个时间段以内
   .or().between(
        ZonedDateTime.parse("起始时间"),
        ZonedDateTime.parse("结束时间"))
- 自定义谓词
继承抽象类org.springframework.cloud.gateway.handler.predicate.AbstractRoutePredicateFactory.
4:跨域配置
- 什么是跨域规则
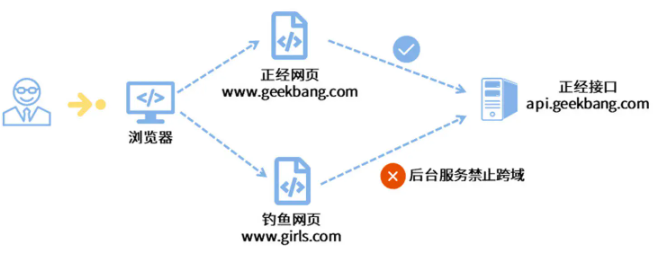
在了解如何配置跨域规则之前,我需要先为你讲一讲什么是浏览器的“同源保护策略”,当从域名aa.com发送求到bb.com域名的话,浏览器会先发送一个options请求询问bb.com是否支持跨域,如果是no,则浏览器会禁止访问,这就是同源保护策略。这种请求方式叫做跨域请求,参考下图:
配置可能如下:
server:
  port: 30000
spring:
    ...
    gateway:
      discovery:
        ...
      # 跨域配置
      globalcors:
        cors-configurations:
          '[/**]':
            # 授信地址列表
            allowed-origins:
              - "http://localhost:10000"
              - "https://www.geekbang.com"
            # cookie, authorization认证信息
            expose-headers: "*"
            allowed-methods: "*"
            allow-credentials: true
            allowed-headers: "*"
            # 浏览器缓存时间
            max-age: 1000
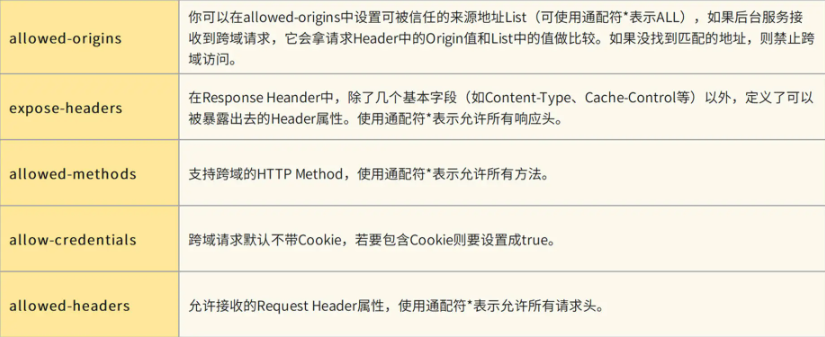
其中allowed-origin最重要,工程上建议给出一个具体的列表而非*。
5:实战
5.1:简单路由
首先我们新建一个middleware的模块作为我们的网关项目(实际场景肯定是创建一个全新的项目然后上传到一个全新的git仓库中),首先引入依赖:
<dependency>
    <groupId>org.springframework.cloud</groupId>
    <artifactId>spring-cloud-starter-gateway</artifactId>
</dependency>
...详细参考源码
接着创建配置文件applicatin.yml:
server:
  port: 30000
  error:
    include-message: always

spring:
  cloud:
    nacos:
      discovery:
        server-addr: 192.168.10.62:8858
        heart-beat-interval: 5000
        heart-beat-timeout: 15000
        cluster-name: Cluster-A
        namespace: dev
        group: myGroup
        register-enabled: true
        watch:
          enabled: true
        watch-delay: 30000
bootstrap.yml:
spring:
  application:
    name: coupon-gateway
  cloud:
    nacos:
      config:
        server-addr: 192.168.10.62:8858
        file-extension: yml
        namespace: dev
        timeout: 5000
        config-long-poll-timeout: 1000
        config-retry-time: 100000
        max-retry: 3
        refresh-enabled: true
        enable-remote-sync-config: true
接着在nacos创建dataId为coupon-gateway的配置项:

暂时没用,内容可先随便写。然后来定义路由信息:
@Bean
public RouteLocator declare(RouteLocatorBuilder builder) {
    return builder.routes()
            .route(route -> route
                    .path("/gateway/coupon-customer/**")
                    .filters(f -> f.stripPrefix(1))
                    .uri("lb://coupon-customer-serv-gateway")
            ).route(route -> route
                    .order(1)
                    .path("/gateway/template/**")
                    .filters(f -> f.stripPrefix(1))
                    .uri("lb://coupon-template-serv")
            ).route(route -> route
                    .path("/gateway/calculator/**")
                    .filters(f -> f.stripPrefix(1))
                    .uri("lb://coupon-customer-serv-gateway")
            ).build();
}
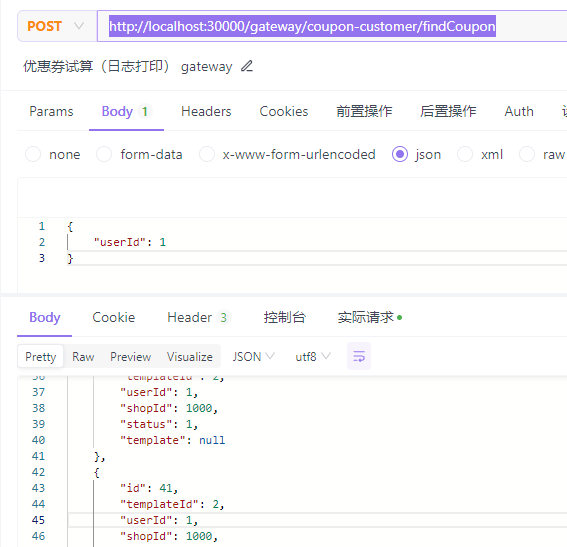
如下访问:
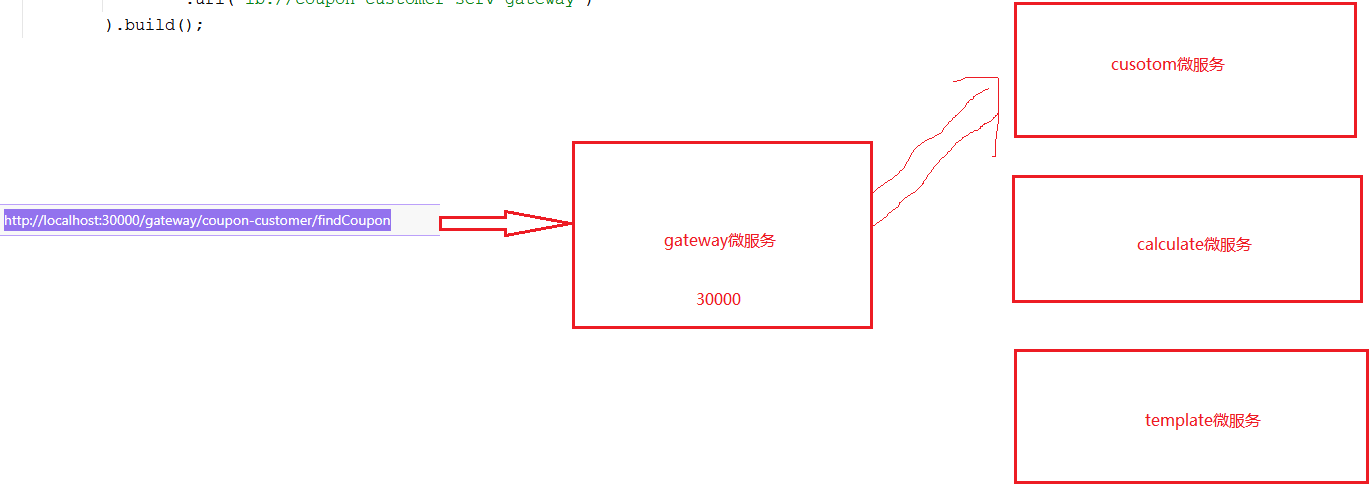
匹配路由过程如下:

5.2:动态路由
本部分看下如何讲路由信息配置在nacos中,实现配置动态的刷新。
首先我们来定义负责加载路由信息的服务类:
@Slf4j
@Service
public class GatewayService {

    @Autowired
    private RouteDefinitionWriter routeDefinitionWriter;

    @Autowired
    private ApplicationEventPublisher publisher;

    public void updateRoutes(List<RouteDefinition> routes) {
        if (CollectionUtils.isEmpty(routes)) {
            log.info("No routes found");
            return;
        }

        routes.forEach(r -> {
            try {
                routeDefinitionWriter.save(Mono.just(r)).subscribe();
                publisher.publishEvent(new RefreshRoutesEvent(this));
            } catch (Exception e) {
                log.error("cannot update route, id={}", r.getId());
            }
        });
    }
}
接着定义监听nacos配置更新的监听器:
@Slf4j
@Component
public class DynamicRoutesListener implements Listener {

    @Autowired
    private GatewayService gatewayService;

    @Override
    public Executor getExecutor() {
        log.info("getExecutor");
        return null;
    }

    // 使用JSON转换,将plain text变为RouteDefinition
    @Override
    public void receiveConfigInfo(String configInfo) {
        log.info("received routes changes {}", configInfo);

        List<RouteDefinition> definitionList = JSON.parseArray(configInfo, RouteDefinition.class);
        gatewayService.updateRoutes(definitionList);
    }
}
定义启动时加载nacos配置的类,同时注册监听器(也可以在其他地方做):
@Slf4j
@Configuration
@Component
public class DynamicRoutesLoader implements InitializingBean {

    @Autowired
    private NacosConfigManager configService;

    @Autowired
    private NacosConfigProperties configProps;

    @Autowired
    private DynamicRoutesListener dynamicRoutesListener;

    private static final String ROUTES_CONFIG = "routes-config.json";

    @Override
    public void afterPropertiesSet() throws Exception {
        // 首次加载配置
        String routes = configService.getConfigService().getConfig(
                ROUTES_CONFIG, configProps.getGroup(), 10000);
        dynamicRoutesListener.receiveConfigInfo(routes);

        // 注册监听器
        configService.getConfigService().addListener(ROUTES_CONFIG,
                configProps.getGroup(),
                dynamicRoutesListener);
    }

}
程序中用到了routes-config.json配置项,所以需要我们在nacos中进行配置:
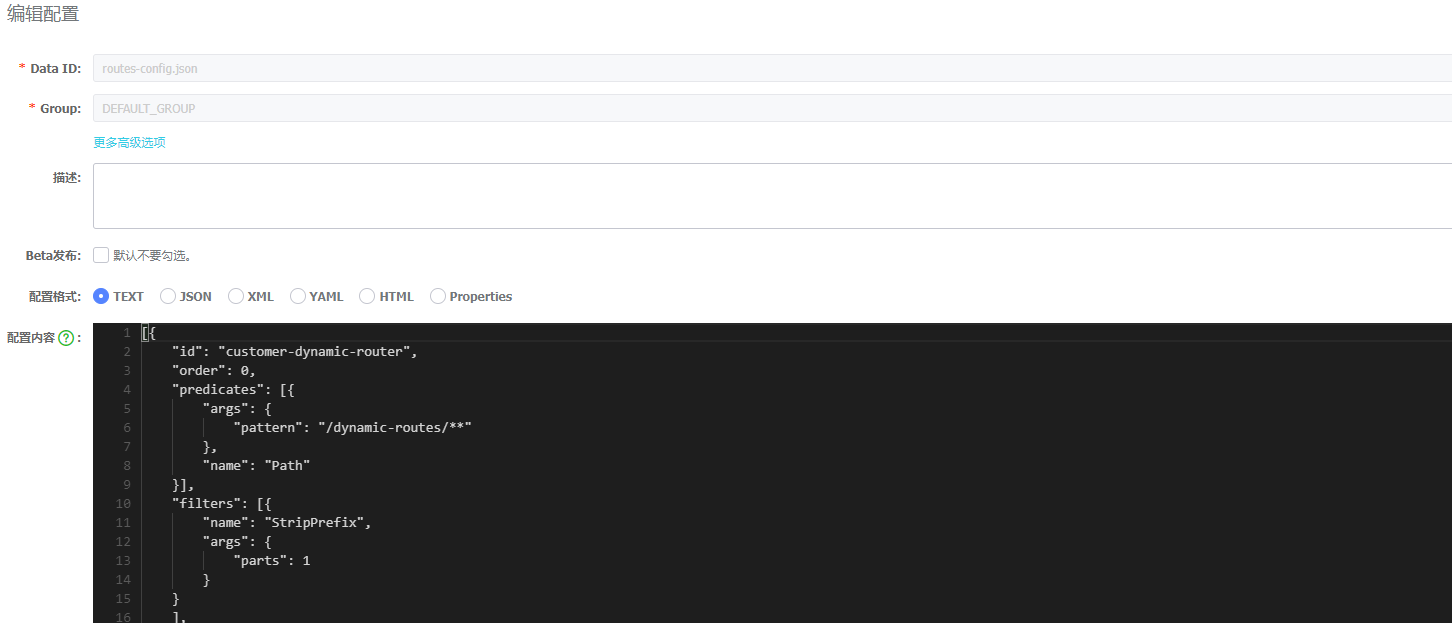
[{
    "id": "customer-dynamic-router",
    "order": 0,
    "predicates": [{
        "args": {
            "pattern": "/dynamic-routes/**"
        },
        "name": "Path"
    }],
    "filters": [{
        "name": "StripPrefix",
        "args": {
            "parts": 1
        }
    }
    ],
    "uri": "lb://coupon-customer-serv-gateway"
}]
启动后访问:
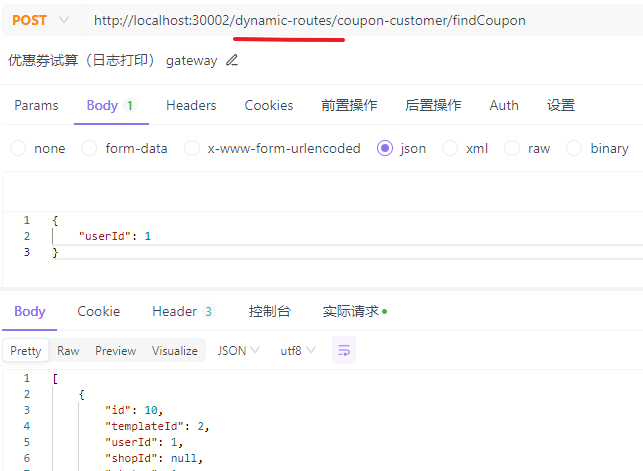
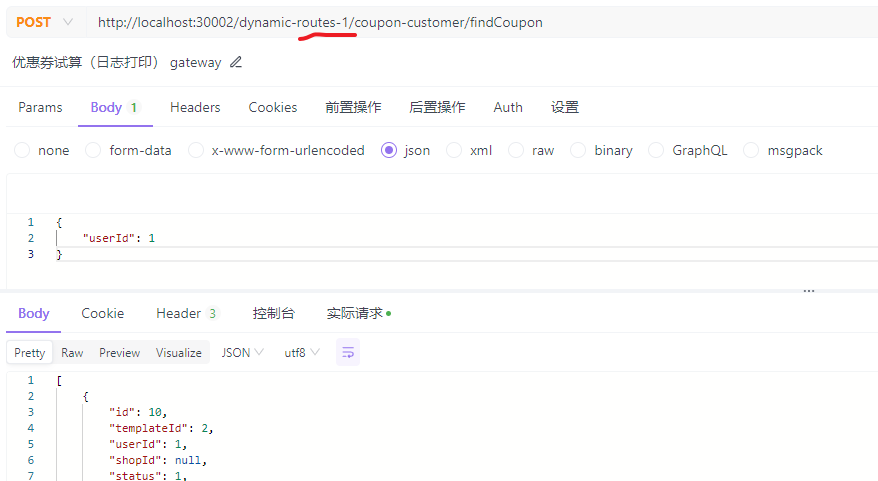
动态修改配置:

测试:
写在后面
参考文章列表
本文来自互联网用户投稿,该文观点仅代表作者本人,不代表本站立场。本站仅提供信息存储空间服务,不拥有所有权,不承担相关法律责任。 如若内容造成侵权/违法违规/事实不符,请联系我的编程经验分享网邮箱:chenni525@qq.com进行投诉反馈,一经查实,立即删除!
- Python教程
- 深入理解 MySQL 中的 HAVING 关键字和聚合函数
- Qt之QChar编码(1)
- MyBatis入门基础篇
- 用Python脚本实现FFmpeg批量转换
- python中的元组与字典总结 每行都有注释 小白也能看懂
- react组件
- 大容量交流中间继电器RXMK1 RK225052 220VAC 板前接线带座 JOSEF约瑟
- 中国电子学会2023年09月份青少年软件编程Scratch图形化等级考试试卷一级真题(含答案)
- GFS 分布式文件系统
- C#MQTT编程02--报文格式
- C++中的计算几何与图形处理
- 2024年宜昌市中级职称评定条件学历资历条件是什么?
- JVM篇--垃圾回收高频面试题
- 高耐用性广西桉木工地模板 — 建筑模板专业批发厂家