【SpringBoot】mybatis基础操作
mybatis入门
1.mybatis准备操作
创建数据库:
CREATE DATABASE mybatis_test DEFAULT CHARACTER SET utf8mb4;
-- 使?数据数据
USE mybatis_test;
-- 创建表[用户表]
DROP TABLE IF EXISTS userinfo;
CREATE TABLE `userinfo` (
`id` INT ( 11 ) NOT NULL AUTO_INCREMENT,
`username` VARCHAR ( 127 ) NOT NULL,
`password` VARCHAR ( 127 ) NOT NULL,
`age` TINYINT ( 4 ) NOT NULL,
`gender` TINYINT ( 4 ) DEFAULT '0' COMMENT '1-男 2-? 0-默认',
`phone` VARCHAR ( 15 ) DEFAULT NULL,
`delete_flag` TINYINT ( 4 ) DEFAULT 0 COMMENT '0-正常, 1-删除',
`create_time` DATETIME DEFAULT now(),
`update_time` DATETIME DEFAULT now(),
PRIMARY KEY ( `id` )
) ENGINE = INNODB DEFAULT CHARSET = utf8mb4;
-- 添加用户信息
INSERT INTO mybatis_test.userinfo ( username, `password`, age, gender, phone )
VALUES ( 'admin', 'admin', 18, 1, '18612340001' );
INSERT INTO mybatis_test.userinfo ( username, `password`, age, gender, phone )
VALUES ( 'zhangsan', 'zhangsan', 18, 1, '18612340002' );
INSERT INTO mybatis_test.userinfo ( username, `password`, age, gender, phone )
VALUES ( 'lisi', 'lisi', 18, 1, '18612340003' );
INSERT INTO mybatis_test.userinfo ( username, `password`, age, gender, phone )
VALUES ( 'wangwu', 'wangwu', 18, 1, '18612340004' );
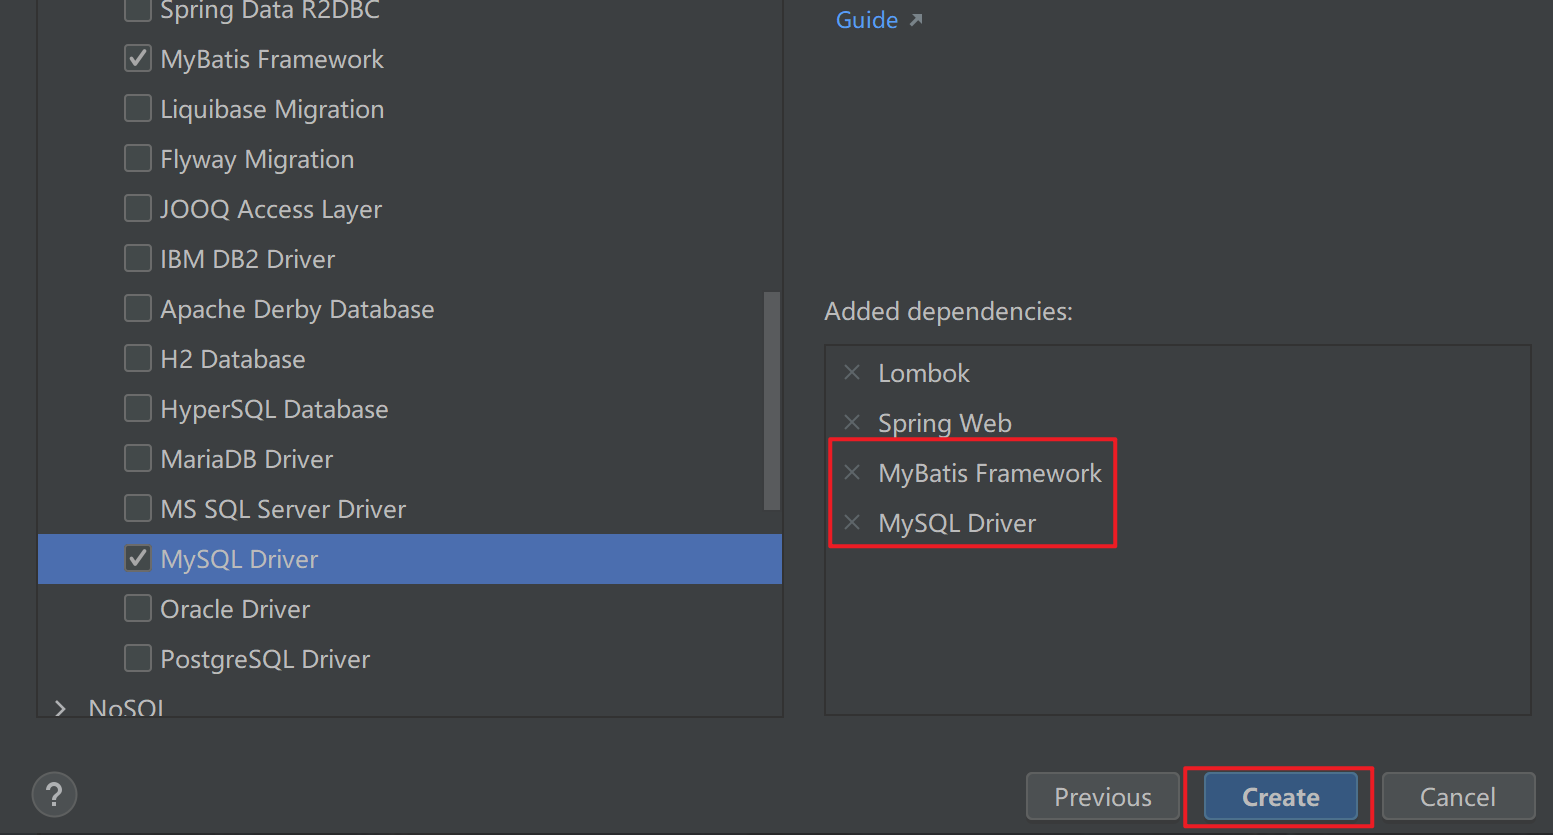
创建项目添加依赖:

创建实体类:
@Data
public class UserInfo {
    private Integer id;
    private String username;
    private String password;
    private Integer age;
    private Integer gender;
    private String phone;
    private Integer deleteFlag;
    private Date createTime;
    private Date updateTime;
}
配置文件,配置连接数据库的属性:
spring:
  datasource:
    url: jdbc:mysql://127.0.0.1:3306/mybatis_test?characterEncoding=utf8&useSSL=false
    username: root
    password: abc123
2.写持久层代码
@Mapper
public interface UserMapper {
    @Select("select * from userinfo")//方法实现
    public List<UserInfo> getAll();//方法声明
}
3.编写测试类
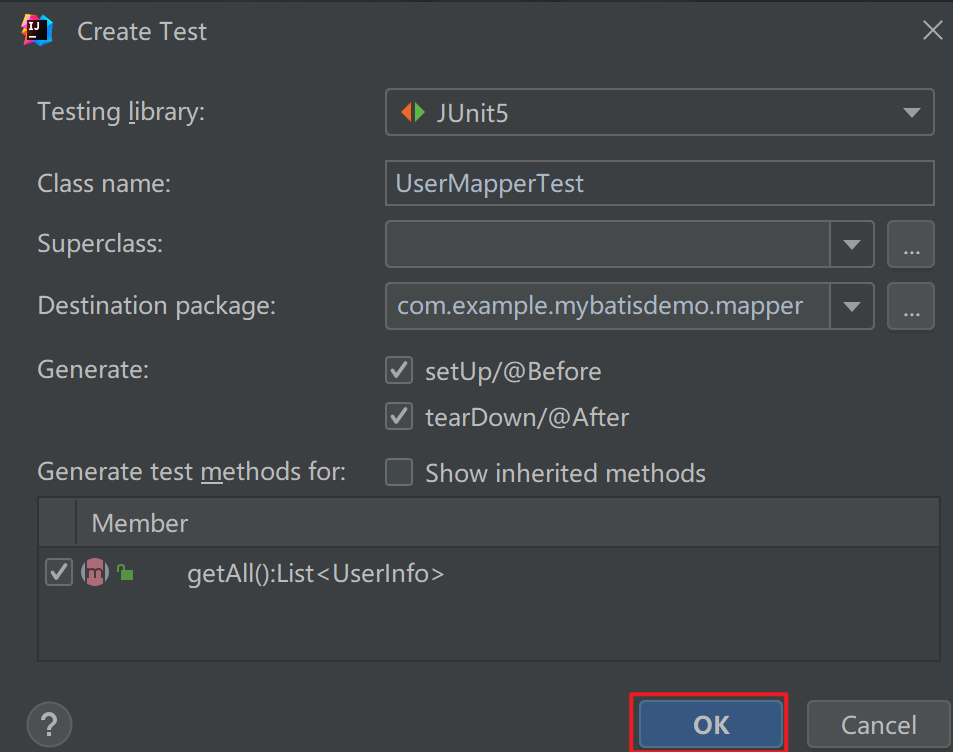
在持久层代码中右击,点击Generate->点击Test

然后勾选如下图,点击OK.就创建了测试类,就可以在测试类中编写测试代码

@Slf4j
@SpringBootTest //启动spring容器
class UserMapperTest {
    @BeforeEach //每个测试方法之前运行
    void setUp() {
        log.info("setUp");
    }
    @AfterEach //每个测试方法之后运行
    void tearDown() {
        log.info("tearDown");

    }
    @Autowired
    private UserMapper userMapper;
    @Test //测试方法
    void getAll() {
        List<UserInfo> userInfoList = userMapper.getAll();
        log.info(userInfoList.toString());
    }
}
mybatis注解基础操作
1.配置打印日志
配置MyBatis日志打印,建议只出现在开发环境中,不要出现在线上环境
mybatis:
  configuration: # 配置打印 MyBatis 日志
    log-impl: org.apache.ibatis.logging.stdout.StdOutImpl
    map-underscore-to-camel-case: true #配置驼峰自动转换
2.增加
我们增的时候需要进行传递参数。返回值为受影响的行数。
实体层代码:
@Insert("insert into userinfo (username,password,age,gender,phone)" +
        "values (#{username},#{password},#{age},#{gender},#{phone})")
Integer insert(UserInfo userInfo);
测试类中的测试代码:
@Test
void insert() {
    UserInfo userInfo = new UserInfo();
    userInfo.setUsername("张三");
    userInfo.setPassword("123456");
    userInfo.setAge(18);
    userInfo.setGender(1);
    userInfo.setPhone("1234444444");
    System.out.println(userMapper.insert(userInfo));
}
如果我们增加的时候使用@Param进行对象重命名就会报错:
@Insert("insert into userinfo (username,password,age,gender,phone)" +
        "values (#{username},#{password},#{age},#{gender},#{phone})")
Integer insert(@Param("userInfo") UserInfo userInfo);
要想解决这个问题#{…}需要使?参数.属性来获取
@Insert("insert into userinfo (username,password,age,gender,phone)" +
        "values (#{userInfo.username},#{userInfo.password},#{userInfo.age},#{userInfo.gender},#{userInfo.phone})")
Integer insert(@Param("userInfo") UserInfo userInfo);
上面返回值为受影响的行数。要想返回的是自增Id需要使用@Options注解。keyProperty表示自增ID赋值给哪个字段。
@Options(useGeneratedKeys = true,keyProperty = "id")
@Insert("insert into userinfo (username,password,age,gender,phone)" +
        "values (#{userInfo.username},#{userInfo.password},#{userInfo.age},#{userInfo.gender},#{userInfo.phone})")
Integer insert(@Param("userInfo") UserInfo userInfo);
测试类中的代码:
@Test
void insert() {
    UserInfo userInfo = new UserInfo();
    userInfo.setUsername("张三");
    userInfo.setPassword("123456");
    userInfo.setAge(18);
    userInfo.setGender(1);
    userInfo.setPhone("1234444444");
    Integer result = userMapper.insert(userInfo);
    System.out.println("insert方法执行结果:" + result + ", 自增id:" + userInfo.getId());
}
3.删除
使用@Delete注解,实体层代码:
@Delete("delete from userinfo where id = #{id}")
Integer delete(Integer id);
测试类中的代码:
@Test
void delete() {
    userMapper.delete(6);
}
4.修改
使用@Update注解,实体层代码:
@Update("update userinfo set age = #{age} where id = #{id}")
Integer update(UserInfo userInfo);
测试类中的代码:
@Test
void update() {
    UserInfo userInfo = new UserInfo();
    userInfo.setId(5);
    userInfo.setAge(38);
    userMapper.update(userInfo);
}
5.查找
查询全部用户和根据id查询用户,实体层代码:
企业开发中,尽量不要使用*,需要查询哪些字段,就写哪些字段。如果需要全量的字段,就全部写完。
@Select("select id, username, password, age, gender, phone, delete_flag, create_time, update_time from userinfo")
public List<UserInfo> selectAll();
@Select("select id, username, password, age, gender, phone, delete_flag, create_time, update_time from userinfo where id = #{id}")
public List<UserInfo> selectOne(Integer id);
测试类中的代码:
@Test
void selectOne() {
    System.out.println(userMapper.selectOne(1));
}

@Test
void selectAll() {
    System.out.println(userMapper.selectAll());
}
查的时候数据库中的字段名称和java类中的属性名称相互对应,如果不同我们可以采用以下三种方式去解决:
1.起别名(不建议)
@Select("select id, username, password, age, gender, phone, delete_flag as deleteFlag, create_time as createTime, update_time as updateTime from userinfo")
public List<UserInfo> selectAll();
2.使用@Results注解
如果字段和Java属性名称一样,可以省略。
@Results(id = "BaseMap",value = {
        @Result(column = "delete_flag",property = "deleteFlag"),
        @Result(column = "create_time",property = "createTime"),
        @Result(column = "update_time",property = "updateTime")
})
@Select("select id, username, password, age, gender, phone, delete_flag, create_time, update_time from userinfo")
public List<UserInfo> selectAll();
@Results(id = "BaseMap")//复用Results定义
@Select("select id, username, password, age, gender, phone, delete_flag, create_time, update_time from userinfo where id = #{id}")
public List<UserInfo> selectOne(Integer id);
3.使用配置文件,自动转驼峰
这个必须java类中的属性,和数据库中的字段是相对应的。如果不是就建议用注解的方式
mybatis:
  configuration: # 配置打印 MyBatis日志
    log-impl: org.apache.ibatis.logging.stdout.StdOutImpl
    map-underscore-to-camel-case: true #配置驼峰自动转换
mybatis XML配置文件基础操作
1.配置连接字符串和MyBatis
spring:
  datasource:
    url: jdbc:mysql://127.0.0.1:3306/mybatis_test?characterEncoding=utf8&useSSL=false
    username: root
    password: abc123
    driver-class-name: com.mysql.cj.jdbc.Driver
mybatis:
  configuration: # 配置打印 MyBatis日志
    log-impl: org.apache.ibatis.logging.stdout.StdOutImpl
    map-underscore-to-camel-case: true #配置驼峰自动转换
# 配置 mybatis xml 的文件路径,在 resources/mapper 创建所有表的 xml 文件
  mapper-locations: classpath:mapper/**Mapper.xml
classpath中的文件路径和文件夹名是在resources创建的文件夹是相对应的。

xml文件中的内容:
<?xml version="1.0" encoding="UTF-8"?>
<!DOCTYPE mapper PUBLIC "-//mybatis.org//DTD Mapper 3.0//EN" "http://mybatis.org/dtd/mybatis-3-mapper.dtd">
<mapper namespace="com.example.mybatisdemo.mapper.UserXMLMapper">
    <select id="selectAll" resultType="com.example.mybatisdemo.entity.UserInfo">
        select * from userinfo
    </select>
</mapper>
实体层的代码:
import java.util.List;
@Mapper
public interface UserXMLMapper {
    List<UserInfo> selectAll();
}
测试类代码:
@SpringBootTest
class UserXMLMapperTest {
    @Autowired
    UserXMLMapper userXMLMapper;
    @Test
    void selectAll() {
        System.out.println(userXMLMapper.selectAll());
    }
}

如果出现没有找到对应的实现,可能原因:
- xml和接口定义的方法名称不一致
- mapper的路径配置和xml的路径不一样
- xml namespace写错了
2.增加
实体层java代码:
Integer insert(UserInfo userInfo);
xml代码:
<insert id="insert">
    insert into userinfo(username,password,age,gender,phone)
    values (#{username},#{password},#{age},#{gender},#{phone})
</insert>
我们用XML文件进行书写sql代码,返回的数据时影响的行数,要想获取插入数据的自增id.我们做如下改变:
<insert id="insert" useGeneratedKeys="true" keyProperty="id">
    insert into userinfo(username,password,age,gender,phone)
    values (#{username},#{password},#{age},#{gender},#{phone})
</insert>
我们对参数重命名也会产生和注解的方式一样报错,解决方式也是#{}内部使用对象.属性的方式进行解决。
实体层代码:
Integer insert(@Param("userInfo") UserInfo userInfo);
xml文件代码:
<insert id="insert" useGeneratedKeys="true" keyProperty="id">
    insert into userinfo(username,password,age,gender,phone)
    values (#{userInfo.username},#{userInfo.password},#{userInfo.age},#{userInfo.gender},#{userInfo.phone})
</insert>
3. 删除
实体层代码:
Integer delete(Integer id);
xml文件代码
<delete id="delete">
    delete from userinfo where id = #{id}
</delete>
4. 修改
实体层代码:
Integer update(UserInfo userInfo);
xml文件代码
<update id="update">
    update userinfo set gender = #{gender} where id = #{id}
</update>
测试类代码:
@Test
void update() {
    UserInfo userInfo = new UserInfo();
    userInfo.setId(9);
    userInfo.setGender(2);
    System.out.println(userXMLMapper.update(userInfo));
}
5.查找
使用xml文件查找,数据库字段和java类的属性之间和只用注解有相同的问题,字段名和属性名不同就不能进行映射
我们有三种解决方法:
- sql字段起别名
- 定义Result
- 配置自动转驼峰
第一条和第三条。和上面使用注解的解决方式是一样的。
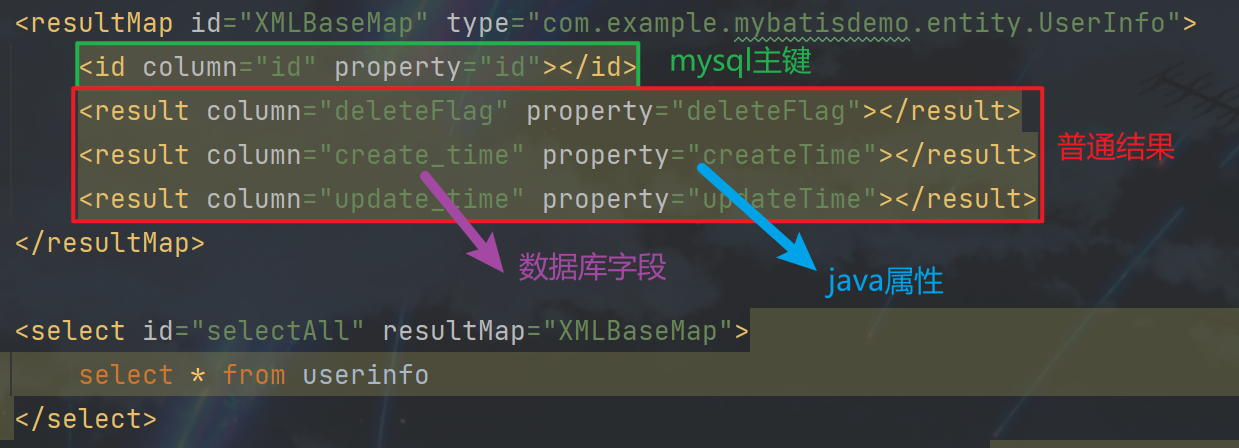
主要介绍第二种定义Result
<resultMap id="XMLBaseMap" type="com.example.mybatisdemo.entity.UserInfo">
    <id column="id" property="id"></id>
    <result column="deleteFlag" property="deleteFlag"></result>
    <result column="create_time" property="createTime"></result>
    <result column="update_time" property="updateTime"></result>
</resultMap>

<select id="selectAll" resultMap="XMLBaseMap">
    select * from userinfo
</select>

其他查询操作
1.多表查询
多表查询操作,在工作中尽量避免使用多表查询,尤其是对性能要求非常高的项目。多表查询必然是慢的。
多表查询准备工作:
创建数据库表:
-- 创建文章表
DROP TABLE IF EXISTS articleinfo;
CREATE TABLE articleinfo (
	id INT PRIMARY KEY AUTO_INCREMENT,
	title VARCHAR ( 100 ) NOT NULL,
	content TEXT NOT NULL,
	uid INT NOT NULL,
	delete_flag TINYINT ( 4 ) DEFAULT 0 COMMENT '0-正常, 1-删除',
	create_time DATETIME DEFAULT NOW(),
	update_time DATETIME DEFAULT NOW()
) DEFAULT CHARSET 'utf8mb4';
-- 插入测试数据
INSERT INTO articleinfo ( title, content, uid ) VALUES ( 'Java', 'Java正文', 1
);
创建实体类:
@Data
public class ArticleInfo {
    Integer id;
    String title;
    String content;
    Integer uid;
    String deleteFlag;
    Date createTime;
    Date updateTime;
}
创建多表查询结果的实体类:
@Data
@ToString(callSuper = true)
public class ArticleInfoVO extends ArticleInfo{
    String username;
    Integer age;
}
多表查询的实体层:
@Mapper
public interface ArticleMapper {
    //根据文章Id获取作者相关信息
    @Select("select * from articleinfo ta " +
            " left join userinfo tu on ta.uid = tu.id where ta.id = #{id}")
    ArticleInfoVO selectArticleAndUserById(Integer id);
}
多表查询的测试代码:
@SpringBootTest
class ArticleMapperTest {
    @Autowired
    ArticleMapper articleMapper;
    @Test
    void selectArticleAndUserById() {
        System.out.println(articleMapper.selectArticleAndUserById(1));
    }
}
2.#{}和${}
使用#和使用KaTeX parse error: Expected 'EOF', got '#' at position 13: 都可以进行获取变量的值。#?{}是预编译SQL,{}是即时SQL.
使用#{}通过名字查询用户
@Select("select * from userinfo where username = #{username}")
List<UserInfo> selectByName(String username);
使用KaTeX parse error: Expected 'EOF', got '#' at position 14: {}通过名字查询用户,使用#?时,如果参数为String,会…不会,$符号是直接拼接,如果是字符串类型,需要加上‘’
@Select("select * from userinfo where username = '${username}'")
List<UserInfo> selectByName(String username);

排序时,不能使用#{},如果使用#会给参数加上",使用排序的时候必须使用#{},但是#{}不安全会造成sql注入。使用之前需要进行参数检验。使用排序的时候一共就两种可能,也可以设置两个方法,或者使用参数校验是否是两个参数中的一个
@Select("select * from userinfo order by id ${sort}")
List<UserInfo> selectUserBySort(String sort);
使用模糊查询不能直接使用#{}因为会自动加上’',使用${}会有sql注入的问题。
模糊查询使用CONCAT来连接字符串。可以避免字符串拼接造成的sql注入。
@Select("select * from userinfo where username like CONCAT('%',#{username},'%')")
List<UserInfo> selectUserByLike(String username);
#{}和${}的区别。
其中之一就是预编译SQL和即时SQL的区别
- 预编译SQL性能更高
- 预编译SQL不存在SQL注入的问题
排序时不能使用#{}。表名,字段名等作为参数时,也不能使用#。模糊查询时,如果使用#,需要搭配mysql的内置函数,concat,而不能直接使用。
实际开发中,能使用#的,都使用#。使用$时,一定要考虑到SQL注入的问题。
本文来自互联网用户投稿,该文观点仅代表作者本人,不代表本站立场。本站仅提供信息存储空间服务,不拥有所有权,不承担相关法律责任。 如若内容造成侵权/违法违规/事实不符,请联系我的编程经验分享网邮箱:chenni525@qq.com进行投诉反馈,一经查实,立即删除!