Qt 信号槽原理 - 多线程时槽函数调用时机
Qt 信号槽跨线程时发生了什么?事件循环中发生了什么?通过源码简单了解一下吧
前言
上一篇文章介绍了单线程下,信号和槽机制中槽函数的同步调用,即槽函数就在信号函数中被调用了。而多线程下,信号调用和接收对象可能是跨线程的,这就涉及了 Qt 的事件机制,通过 postEvent 来把与槽函数调用相关的事件投递给接收对象
本文依然是通过源码来介绍这个 QMetaCallEvent 事件是如何从这个线程投递到另一个线程然后最终被处理的。涉及到的代码函数比较多,需要花一点时间,可以边看边记一下函数调用顺序
一 槽函数相关事件的投递
下面的代码是上篇文章中 doActivate 函数的异步处理部分,当代码判断这次信号槽是跨线程、QObject::connect 的第五个参数显式给出是 QueuedConnection 或 BlockingQueuedConnection 这三种情况时,就需要进行异步处理。
1. 阻塞队列连接
看 else if 的那个分支
连接类型指定 BlockingQueuedConnection 的时候,在这里可以看到使用了一个信号量,用来阻塞当前线程,直到槽函数被执行,所以有一个 Blocking 修饰
// determine if this connection should be sent immediately or
// put into the event queue
if ((c->connectionType == Qt::AutoConnection && !receiverInSameThread)
    || (c->connectionType == Qt::QueuedConnection)) {
    queued_activate(sender, signal_index, c, argv);
    continue;
#if QT_CONFIG(thread)
} else if (c->connectionType == Qt::BlockingQueuedConnection) {
    if (receiverInSameThread) {
        qWarning("Qt: Dead lock detected while activating a BlockingQueuedConnection: "
        "Sender is %s(%p), receiver is %s(%p)",
        sender->metaObject()->className(), sender,
        receiver->metaObject()->className(), receiver);
    }
    QSemaphore semaphore;
    {
        QBasicMutexLocker locker(signalSlotLock(sender));
        if (!c->receiver.loadAcquire())
            continue;
        QMetaCallEvent *ev = c->isSlotObject ?
            new QMetaCallEvent(c->slotObj, sender, signal_index, argv, &semaphore) :
            new QMetaCallEvent(c->method_offset, c->method_relative, c->callFunction,
                               sender, signal_index, argv, &semaphore);
        QCoreApplication::postEvent(receiver, ev);
    }
    semaphore.acquire();
    continue;
#endif
}
2. 队列连接
连接类型不是 BlockingQueuedConnection 的时候,另外调用了一个函数
下面是简略的 queued_activate ,最后一行就是 postEvent,事件投递完后就直接走了,不会阻塞
static void queued_activate(QObject *sender, int signal, QObjectPrivate::Connection *c, void **argv)
{
	...
	QMetaCallEvent *ev = c->isSlotObject ?
	    new QMetaCallEvent(c->slotObj, sender, signal, nargs) :
	    new QMetaCallEvent(c->method_offset, c->method_relative, c->callFunction, sender, signal, nargs);
	void **args = ev->args();
	int *types = ev->types();
	...
	QCoreApplication::postEvent(c->receiver.loadRelaxed(), ev);
}
还是强调一下吧,是信号函数被调用时所在的线程与接收对象所在的线程比较,不是发送对象所在的线程和接收对象所在的线程比较
二 生产者 QCoreApplication::postEvent
下面就是关键的 postEvent 的实现了,应该是获取接收对象所在线程的数据 data ,首先上锁,然后往这个 data 中的一个链表 postEventList 添加一个 event ,然后解锁,最后 wakeUp
这不就是生产者消费者模式吗
记住这里的 postEventList
void QCoreApplication::postEvent(QObject *receiver, QEvent *event, int priority)
{
	...
	auto locker = QCoreApplicationPrivate::lockThreadPostEventList(receiver);

	QThreadData *data = locker.threadData;
	...
	data->postEventList.addEvent(QPostEvent(receiver, event, priority));
	...
	locker.unlock();

	QAbstractEventDispatcher* dispatcher = data->eventDispatcher.loadAcquire();
    if (dispatcher)
        dispatcher->wakeUp();
}
三 从 main 函数开始
在这里我还是想从 main 函数开始往下挖,可以了解投递之前,这个线程在干什么

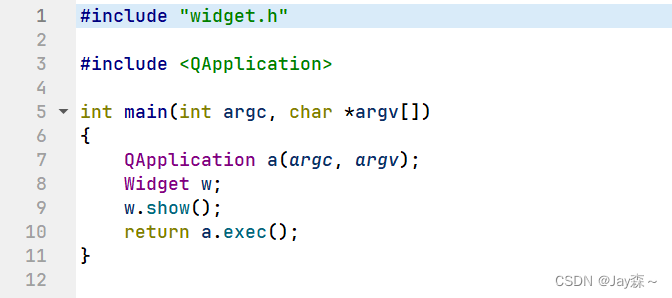
熟悉的 main 函数,这里最神秘的就是这个 a.exec() 了,就是它在这里 “阻塞” 着
1. QApplication::exec
这个函数其实是 QApplication 类的一个静态函数,看代码很清晰,一层一层调用到 QCoreApplication::exec()
static int exec();

int QApplication::exec()
{
    return QGuiApplication::exec();
}
int QGuiApplication::exec()
{
#ifndef QT_NO_ACCESSIBILITY
    QAccessible::setRootObject(qApp);
#endif
    return QCoreApplication::exec();
}
下面是 QCoreApplication::exec() 的具体内容
int QCoreApplication::exec()
{
    if (!QCoreApplicationPrivate::checkInstance("exec"))
        return -1;
    QThreadData *threadData = self->d_func()->threadData;
    if (threadData != QThreadData::current()) {
        qWarning("%s::exec: Must be called from the main thread", self->metaObject()->className());
        return -1;
    }
    if (!threadData->eventLoops.isEmpty()) {
        qWarning("QCoreApplication::exec: The event loop is already running");
        return -1;
    }
    threadData->quitNow = false;
    QEventLoop eventLoop;
    self->d_func()->in_exec = true;
    self->d_func()->aboutToQuitEmitted = false;
    int returnCode = eventLoop.exec();
    threadData->quitNow = false;
    if (self)
        self->d_func()->execCleanup();
    return returnCode;
}
关键是这里的 QEventLoop,这里又来了一个 exec()
	QEventLoop eventLoop;
    self->d_func()->in_exec = true;
    self->d_func()->aboutToQuitEmitted = false;
    int returnCode = eventLoop.exec();
	...
	return returnCode;
2. QEventLoop::exec
下面继续看代码,我们想要的 while 循环就在这里面了
int QEventLoop::exec(ProcessEventsFlags flags)
{
	...
 	while (!d->exit.loadAcquire())
        processEvents(flags | WaitForMoreEvents | EventLoopExec);

    ref.exceptionCaught = false;
    return d->returnCode.loadRelaxed();
}
不看别的(看不懂),关键就是这个 while 循环了。先不着急看 processEvents,这个 while 循环怎么退出呢,这里有一个 QEventLoop::exit() 函数,来改变 exit(这里很多 loadXxx() 和 storeXxx() 函数其实是原子操作,分别用来 load 获取变量值,store 修改变量值,就是读和写),当然还有其它的函数
void QEventLoop::exit(int returnCode)
{
	...
 	d->returnCode.storeRelaxed(returnCode);
    d->exit.storeRelease(true);
    threadData->eventDispatcher.loadRelaxed()->interrupt();
    ...
}
所以 Qt 的桌面应用程序就是在这里循环处理事件,没有退出时,一直在这里循环执行
3. QEventLoop::processEvents
下面是具体的 processEvents ,这里涉及到了一个 eventDispatcher,事件派发器,事件派发器是 Qt 框架中实现事件驱动编程的核心机制之一
从代码可以看出,这个事件派发器和线程数据绑定着的
bool QEventLoop::processEvents(ProcessEventsFlags flags)
{
    Q_D(QEventLoop);
    auto threadData = d->threadData.loadRelaxed();
    if (!threadData->hasEventDispatcher())
        return false;
    return threadData->eventDispatcher.loadRelaxed()->processEvents(flags);
}
4. QAbstractEventDispatcher
这个事件派发器又有一个 processEvents 函数,它是 QAbstractEventDispatcher 一个虚函数,那具体的实现呢?
先看一下 QThreadData 的部分成员,这个 postEventList 没有忘记吧
对于事件派发器,在 QThreadData 里面也只是一个基类指针,没看见具体的子类,接着往下看
class QAbstractEventDispatcher {
...
virtual bool processEvents(QEventLoop::ProcessEventsFlags flags) = 0;
...
}

class QThreadData {
	...
 	QStack<QEventLoop *> eventLoops;
    QPostEventList postEventList;// !!!
    QAtomicPointer<QThread> thread;
    QAtomicPointer<void> threadId;
    QAtomicPointer<QAbstractEventDispatcher> eventDispatcher;
    ...
}
其实 threadData 中具体的事件派发器由这个函数得到(在哪里调用就别在意了)
(2024.1.5 更新:具体的事件派发器还有很多,这里片面了,但不影响原理)
QAbstractEventDispatcher *QThreadPrivate::createEventDispatcher(QThreadData *data)
{
    Q_UNUSED(data);
#if defined(Q_OS_DARWIN)
    bool ok = false;
    int value = qEnvironmentVariableIntValue("QT_EVENT_DISPATCHER_CORE_FOUNDATION", &ok);
    if (ok && value > 0)
        return new QEventDispatcherCoreFoundation;
    else
        return new QEventDispatcherUNIX;
#elif !defined(QT_NO_GLIB)
    const bool isQtMainThread = data->thread.loadAcquire() == QCoreApplicationPrivate::mainThread();
    if (qEnvironmentVariableIsEmpty("QT_NO_GLIB")
        && (isQtMainThread || qEnvironmentVariableIsEmpty("QT_NO_THREADED_GLIB"))
        && QEventDispatcherGlib::versionSupported())
        return new QEventDispatcherGlib;
    else
        return new QEventDispatcherUNIX;
#else
    return new QEventDispatcherUNIX;
#endif
}
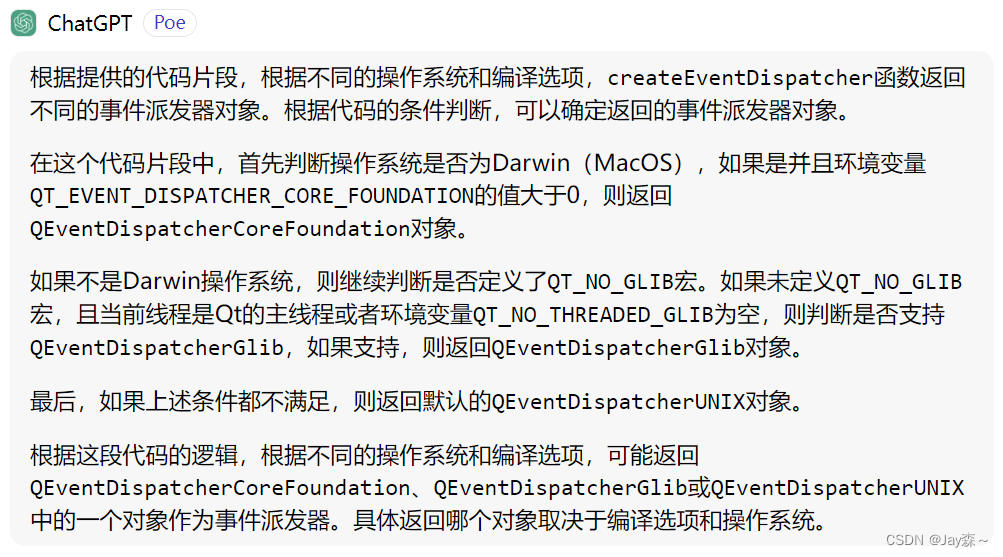
就是根据不同条件创建一个具体的事件派发器,这里看一下 gpt 的解释吧

我也不懂,那我们就以 QEventDispatcherUNIX 为例看一看吧,反正原理都一样
5. 消费者 QEventDispatcherUNIX::processEvents
OK,现在回到 QEventLoop,一次 while 循环中事件派发器调用一次 processEvents
bool QEventLoop::processEvents(ProcessEventsFlags flags)
{
    Q_D(QEventLoop);
    auto threadData = d->threadData.loadRelaxed();
    if (!threadData->hasEventDispatcher())
        return false;
    return threadData->eventDispatcher.loadRelaxed()->processEvents(flags);
}
QEventDispatcherUNIX::processEvents 非常复杂,这里给出关键的几行,看见 sendPostedEvents ,从名字就猜得到,是对通过 postEvent() 获得的事件进行发送动作,也就是对 postEventList 进行遍历发送了
前面的 postEvent 是生产者函数,这里事件派发器的 processEvents 就是消费者函数了,其中就有一些唤醒、睡眠动作,但是代码太难,具体我还是看不懂
bool QEventDispatcherUNIX::processEvents(QEventLoop::ProcessEventsFlags flags)
{
	...
	auto threadData = d->threadData.loadRelaxed();
    QCoreApplicationPrivate::sendPostedEvents(nullptr, 0, threadData);
    ...
}
6. QCoreApplicationPrivate::sendPostedEvents
这个 sendPostedEvents 有 160 来行,这里给出大家想看到的。茫茫代码中我看到了一位故人,一个熟悉的数据结构 postEventList ,那么下面熟悉的剧情,遍历!
void QCoreApplicationPrivate::sendPostedEvents(QObject *receiver, int event_type,
                                               QThreadData *data)
{
    ...

	while (i < data->postEventList.size()) {
		...

        const QPostEvent &pe = data->postEventList.at(i);
        ++i;
		...

        // first, we diddle the event so that we can deliver
        // it, and that no one will try to touch it later.
        pe.event->posted = false;
        QEvent *e = pe.event;
        QObject * r = pe.receiver;
        ...
        // after all that work, it's time to deliver the event.
        QCoreApplication::sendEvent(r, e);
    }
    ...
}
7. QCoreApplication::sendEvent
下面就是一系列发送的调用过程了
bool QCoreApplication::sendEvent(QObject *receiver, QEvent *event)
{
    Q_TRACE(QCoreApplication_sendEvent, receiver, event, event->type());
    if (event)
        event->spont = false;
    return notifyInternal2(receiver, event);
}

bool QCoreApplication::notifyInternal2(QObject *receiver, QEvent *event)
{
	...
    if (!selfRequired)
        return doNotify(receiver, event);
    return self->notify(receiver, event);
}

bool QCoreApplication::notify(QObject *receiver, QEvent *event)
{
    // no events are delivered after ~QCoreApplication() has started
    if (QCoreApplicationPrivate::is_app_closing)
        return true;
    return doNotify(receiver, event);
}

static bool doNotify(QObject *receiver, QEvent *event)
{
	...
    return receiver->isWidgetType() ? false : QCoreApplicationPrivate::notify_helper(receiver, event);
}
一直调用到了 QCoreApplicationPrivate::notify_helper ,关键就看里面的注释,涉及了事件过滤器 EventFilters 和事件 event
bool QCoreApplicationPrivate::notify_helper(QObject *receiver, QEvent * event)
{
    // Note: when adjusting the tracepoints in here
    // consider adjusting QApplicationPrivate::notify_helper too.
    Q_TRACE(QCoreApplication_notify_entry, receiver, event, event->type());
    bool consumed = false;
    bool filtered = false;
    Q_TRACE_EXIT(QCoreApplication_notify_exit, consumed, filtered);
    // send to all application event filters (only does anything in the main thread)
    if (QCoreApplication::self
            && receiver->d_func()->threadData.loadRelaxed()->thread.loadAcquire() == mainThread()
            && QCoreApplication::self->d_func()->sendThroughApplicationEventFilters(receiver, event)) {
        filtered = true;
        return filtered;
    }
    // send to all receiver event filters
    if (sendThroughObjectEventFilters(receiver, event)) {
        filtered = true;
        return filtered;
    }
    // deliver the event
    consumed = receiver->event(event);
    return consumed;
}
这里可以看到,如果一个对象注册了一个事件过滤器,事件就会先在那里面处理,如果处理了,sendThroughObjectEventFilters 返回 true,没有会返回 false,由对象自己处理
8. QObject::event
我们下面看 receiver->event(event) ,从信号函数那里投递过来的事件是 QEvent::MetaCall
bool QObject::event(QEvent *e)
{
    switch (e->type()) {
    ...
    case QEvent::MetaCall:
        {
            QAbstractMetaCallEvent *mce = static_cast<QAbstractMetaCallEvent*>(e);
            if (!d_func()->connections.loadRelaxed()) {
                QBasicMutexLocker locker(signalSlotLock(this));
                d_func()->ensureConnectionData();
            }
            QObjectPrivate::Sender sender(this, const_cast<QObject*>(mce->sender()), mce->signalId());
            mce->placeMetaCall(this);
            break;
        }
    ...
}
最后那不就是槽函数要被调用了,下面看 QMetaCallEvent::placeMetaCall,是不是和信号函数那里的 doActivate 一样的三个函数,后面的调用可以看上一篇文章,这里就不放代码了
void QMetaCallEvent::placeMetaCall(QObject *object)
{
    if (d.slotObj_) {
        d.slotObj_->call(object, d.args_);
    } else if (d.callFunction_ && d.method_offset_ <= object->metaObject()->methodOffset()) {
        d.callFunction_(object, QMetaObject::InvokeMetaMethod, d.method_relative_, d.args_);
    } else {
        QMetaObject::metacall(object, QMetaObject::InvokeMetaMethod,
                              d.method_offset_ + d.method_relative_, d.args_);
    }
}
总结
写了这么多,其实就是从一个函数开始一直查看它的调用,也没啥技术含量,就一流水账,写这么多主要是想把这些东西都整理在一块,方便我和大家了解、学习
1. 最后的心得
最后总结一点我的心得吧:
- 信号槽是否跨线程,是通过比较信号函数调用时所在的线程和接收对象所在的线程比较,不是发送对象所在的线程和接收对象所在的线程比较
一个对象可能在主线程被创建,但是可以通过 moveToThread 来转移到另一个线程中,主线程还是可以访问这个对象的,但另一个线程肯定也在使用这个对象,那么两个线程访问同一资源就必须进行线程同步了。主线程访问这个对象,调用他的方法是在主线程中执行,另一个线程调用它的方法(比如经典的继承 QThread 重写 run 函数,在这里面调用)是在这一条执行线程中,如果方法里面有发送信号函数的动作,那这个信号函数的调用就和这个对象所在的线程没关系了
- Qt 是通过 QEventLoop 实现事件机制的
事件循环涉及到了事件派发器(event dispatcher)、事件投递(post event)、事件发送(send event)、事件过滤(event filter)、事件处理(event),按照源码来应该没错吧
事件过滤器可以选择处理事件并返回 true,表示事件已经被过滤器处理了;如果事件过滤器不处理事件,则返回 false,事件会继续传递到目标对象
- 学习多线程,先学习基础的锁、条件变量同步原语,通过生产者消费者模式入门
- QThread 怎么使用?继承还是 moveToThread
其实对于 QThread 来说,我们熟知的 run 函数,它是一个虚函数,但不是纯虚函数,在 QThread::run 中本身实现的就是只调用了一个 QThread::exec,其实也是在调用 QEventLoop::exec ,和上面 main 函数里的 a.exec() 一个道理,上面介绍的顺序在我们新开的 QThread 线程里是一样的
为什么很多人建议使用 moveToThread,如果继承 QThread 重写 run 函数的话,你大概会在里面写一个 while 循环,这就把线程阻塞在这个函数里了,你从主线程投递一个槽函数事件当然不能处理了,而使用 moveToThread ,QThread run 里面就是一个事件循环,不会不小心导致事件处理不了了,当然你在 moveToThread 后,在里面又调用了一个 while 死循环的函数,结果和重写 run 一样,那怎么解决呢,有一个方法,我可以自己在 while 循环里处理事件啊,我非要让 Qt 来帮我吗,那直接在 while 循环里加一行QCoreApplication::processEvents(),当然这是万不得已的办法
所以,对于我个人的看法,其实两种方法没啥优劣区分,关键是你怎么用,最重要的就是知道当前这个线程执行到哪了?是我自己实现的方法里,还是在事件循环里面
2. 结语
花了整整一天的时间重温了一遍信号槽,感谢大家能看到最后,本人也只是简单的引用了一下源码,存在疑问的可以自行翻看在线源码 Code browser,如果发现有错误,欢迎友好讨论,友好点~
整理的这些东西希望能帮你理解信号槽和事件机制,谢谢
本文来自互联网用户投稿,该文观点仅代表作者本人,不代表本站立场。本站仅提供信息存储空间服务,不拥有所有权,不承担相关法律责任。 如若内容造成侵权/违法违规/事实不符,请联系我的编程经验分享网邮箱:chenni525@qq.com进行投诉反馈,一经查实,立即删除!
- Python教程
- 深入理解 MySQL 中的 HAVING 关键字和聚合函数
- Qt之QChar编码(1)
- MyBatis入门基础篇
- 用Python脚本实现FFmpeg批量转换
- 力扣225. 用队列实现栈【附进阶版】
- Python经典游戏 唤醒你童年记忆
- linux开发板树莓派下载vnc远程桌面
- SSM+mysql电影推荐系统-计算机毕业设计源码030873
- H5 拍照上传图片,压缩图片方法 ImageCompressor
- SELF自动化指令集构建代码实现
- docker安装mysql
- js中深拷贝与浅拷贝的区别?如何实现一个深拷贝?(收藏好,用时好找)
- 宏任务与微任务执行顺序及对比记录
- 【LeetCode】数组精选17题——双指针、滑动窗口、前缀和