如何实现TensorFlow自定义算子?
在上一篇文章中 Embedding压缩之基于二进制码的Hash Embedding,提供了二进制码的tensorflow算子源码,那就顺便来讲下tensorflow自定义算子的完整实现过程。
前言
制作过程基于tensorflow官方的custom-op仓库以及官网教程,并且在Ubuntu和MacOS系统通过了测试。
官方提供的案例虽然也涵盖了整个流程,但是它过于简单,自己遇到其他需求的实现可能还得去翻阅资料。而基于上一篇文章的二进制码Hash编码的算子实现,是能够满足大部分自定义需求的,并且经过测试是支持tensorflow1.x和2.x的。
文章中的代码只是展示了核心部分,并不是完整代码,全部放出来的话会显示得十分冗长。完整代码可前往下面的任一git仓库:
目录结构
整个项目的目录结构如下,下面会对每一个文件进行讲述其作用:
├── Makefile
└── tensorflow_binary_code_hash
    ├── BUILD
    ├── __init__.py
    ├── cc
    │   ├── kernels
    │   │   ├── binary_code_hash.h
    │   │   ├── binary_code_hash_kernels.cc
    │   │   ├── binary_code_hash_kernels.cu.cc
    │   │   └── binary_code_hash_only_cpu_kernels.cc
    │   └── ops
    │       └── binary_code_hash_ops.cc
    └── python
        ├── __init__.py
        └── ops
            ├── __init__.py
            ├── binary_code_hash_ops.py
            └── binary_code_hash_test.py
前置依赖
make

g++

cuda


tensorflow
无需源码安装,pip安装的情况下已通过测试。
-
cuda与tensorflow之间版本已兼容,直接pip安装
-
cuda与tensorflow之间版本不兼容
a. 新建Python环境:
conda create -n <your_env_name> python=<x.x.x> cudatoolkit=<x.x> cudnn -c conda-forgeb. 现有Python环境:
conda install cudatoolkit=<x.x> cudnn -c conda-forge -n <your_env_name>执行以上步骤后,再进行pip安装
-
当然,你仍然可以选择源码编译安装: https://www.tensorflow.org/install/source
Step1. 定义运算接口
对应文件:tensorflow_binary_code_hash/cc/ops/binary_code_hash_ops.cc。
这里需要将接口注册到 TensorFlow 系统,通过对 REGISTER_OP 宏的调用来可以定义运算的接口。
你可以在这里定义算子所需要的输入,和设置输出的格式。接口内容如下,主要包括两个部分:
- 定义输入。Input部分为输入张量,Attr部分是其他非张量的参数,Output则是输出张量。规定了输入张量hash_id和输出张量bh_id的类型是T,T为32位和64位的整型。strategy参数则是枚举,只能是succession或者skip;
- 在Lmabdas函数体里面可以定义输出的shape。
#include "tensorflow/core/framework/op.h"
#include "tensorflow/core/framework/shape_inference.h"

using namespace tensorflow;

REGISTER_OP("BinaryCodeHash")
    .Attr("T: {int64, int32}")
    .Input("hash_id: T")
    .Attr("length: int")
    .Attr("t: int")
    .Attr("strategy: {'succession', 'skip'}")
    .Output("bh_id: T")
    .SetShapeFn([](::tensorflow::shape_inference::InferenceContext* c) {
      // 这里进行输入的校验和指定输出的shape
      return Status::OK();
    });
比如,输出的shape需要由输入的shape和其他参数决定,而不是官方样例里的输出跟输入的shape一样。
下面的代码则是如何获取参数的值:
int length;
c->GetAttr("length", &length);
再有获取输入的信息和输入的校验,最后指定输出的shape,在这里,可以定义动态shape,即有些维度可以是未知的size,用-1表示。
// 获取输入张量的形状,并检验输入的维度数>=1
shape_inference::ShapeHandle input_shape;
TF_RETURN_IF_ERROR(c->WithRankAtLeast(c->input(0), 1, &input_shape));
// 获取输入张量的维度数
int input_rank = c->Rank(input_shape);
// 创建新的形状列表
std::vector<shape_inference::DimensionHandle> output_shape;
for (int i = 0; i < input_rank; ++i) {
    output_shape.push_back(c->Dim(input_shape, i));
}
// 添加一个额外的维度
output_shape.push_back(c->MakeDim(block_num));
// 将output_shape指定为输出张量的形状,则输出比输入多一维,类似于embedding_lookup
c->set_output(0, c->MakeShape(output_shape));
Step2. 实现运算内核
Step2.1 定义计算头文件
对应文件:tensorflow_binary_code_hash/cc/kernels/binary_code_hash.h。
这里是C++的头文件,只包括计算逻辑的仿函数(函数对象)BinaryCodeHashFunctor的声明,没有具体实现。
包括输入张量in和输出张量out,其他则是一些非张量参数。这里其他参数对于到时cuda运算内核就很重要,因为cuda显存的数据其实都是从内存拷贝过去的,即这些参数对应的实参,因此仿函数的参数要齐全。
#include <string>

namespace tensorflow {
namespace functor {

template <typename Device, typename T>
struct BinaryCodeHashFunctor {
  void operator()(const Device& d, int size, const T* in, T* out, int length, int t, bool succession);
};
}  // namespace functor
}  // namespace tensorflow
Step2.2 cpu运算内核
对应文件:tensorflow_binary_code_hash/cc/kernels/binary_code_hash_kernels.cc。
这里主要包括三部分:
- 计算逻辑的仿函数具体实现
- 运算内核的实现类
- 内核注册
2.2.1 计算仿函数实现
在这里实现BinaryCodeHashFunctor具体的计算逻辑,输入张量的数据通过指针变量in来访问,然后将计算结果写入到输出张量对应的指针变量out。
这里需要注意的是输入张量和输出张量都是一维的形式,即压平的数据。
// CPU specialization of actual computation.
template <typename T>
struct BinaryCodeHashFunctor<CPUDevice, T> {
  void operator()(const CPUDevice& d, int size, const T* in, T* out, int length, int t, bool succession) {
    // 实现自己的计算逻辑
  }
};
2.2.2 内核实现类
在这里,运算内核实现类需要继承OpKernel,如下面的代码
- 在构造函数里面,可以对非张量参数进行详细的检验;
- 在Compute重载函数完成所有计算工作。
#include "binary_code_hash.h"
#include "tensorflow/core/framework/op_kernel.h"

// OpKernel definition.
// template parameter <T> is the datatype of the tensors.
template <typename Device, typename T>
class BinaryCodeHashOp : public OpKernel {
 public:
  explicit BinaryCodeHashOp(OpKernelConstruction* context) : OpKernel(context) {
    // 参数校验
  }

  void Compute(OpKernelContext* context) override {
    // 实现自己的内核逻辑
  }

  private:
    int length_;
};
构造函数。下面的代码展示了非张量参数赋值给成员变量、参数的校验。
explicit BinaryCodeHashOp(OpKernelConstruction* context) : OpKernel(context) {
  OP_REQUIRES_OK(context, context->GetAttr("length", &length_));

  OP_REQUIRES(context, length_ > 0,
              errors::InvalidArgument("Need length > 0, got ", length_));
}
Compute函数。
Compute函数中访问输入张量内容和输入张量检验。
const Tensor& input_tensor = context->input(0);

// 检验输入张量是否为一维向量
OP_REQUIRES(context, TensorShapeUtils::IsVector(input_tensor.shape()),
             errors::InvalidArgument("BinaryCodeHash expects a 1-D vector."));
Compute函数中为输出张量分配内存和定义输出的shape,在这里就不能使用动态shape,则所有维度的size都需要是明确的。
Tensor* output_tensor = NULL;
// 输出张量比输入张量多一个维度
tensorflow::TensorShape output_shape = input_tensor.shape();
output_shape.AddDim(block_num);  // Add New dimension
OP_REQUIRES_OK(context, context->allocate_output(0, output_shape, &output_tensor));
最后,Compute函数里面启动计算内核仿函数。这里留意下,这里喂给仿函数的实参,到时是会拷贝到显存的,即上面提到的,这里喂给cpu的数据跟后面喂给cuda的是一样的。
BinaryCodeHashFunctor<Device, T>()(
        context->eigen_device<Device>(),
        static_cast<int>(input_tensor.NumElements()),
        input_tensor.flat<T>().data(),
        output_tensor->flat<T>().data(),
        length_, t_, strategy_ == "succession");
2.2.3 内核注册
CPU和CPU内核都需要在这里进行注册。
这里还包括对上面运算接口定义(tensorflow_binary_code_hash/cc/ops/binary_code_hash_ops.cc)中的T进行约束,因为上面Attr中的T不属于算子函数的参数,因此需要在这里进行对应指定int32和int64。
// Register the CPU kernels.
#define REGISTER_CPU(T)                                          \
  REGISTER_KERNEL_BUILDER(                                       \
      Name("BinaryCodeHash").Device(DEVICE_CPU).TypeConstraint<T>("T"), \
      BinaryCodeHashOp<CPUDevice, T>);
REGISTER_CPU(int64);
REGISTER_CPU(int32);
// Register the GPU kernels.
#ifdef GOOGLE_CUDA
#define REGISTER_GPU(T)                                          \
  extern template struct BinaryCodeHashFunctor<GPUDevice, T>;           \
  REGISTER_KERNEL_BUILDER(                                       \
      Name("BinaryCodeHash").Device(DEVICE_GPU).TypeConstraint<T>("T"), \
      BinaryCodeHashOp<GPUDevice, T>);
REGISTER_GPU(int32);
REGISTER_GPU(int64);
Step2.3 cuda运算内核
对应文件:tensorflow_binary_code_hash/cc/kernels/binary_code_hash_kernels.cu.cc。
这里需要包括两个东西:
- CUDA计算内核
- BinaryCodeHashFunctor仿函数的具体实现
2.3.1 CUDA计算内核
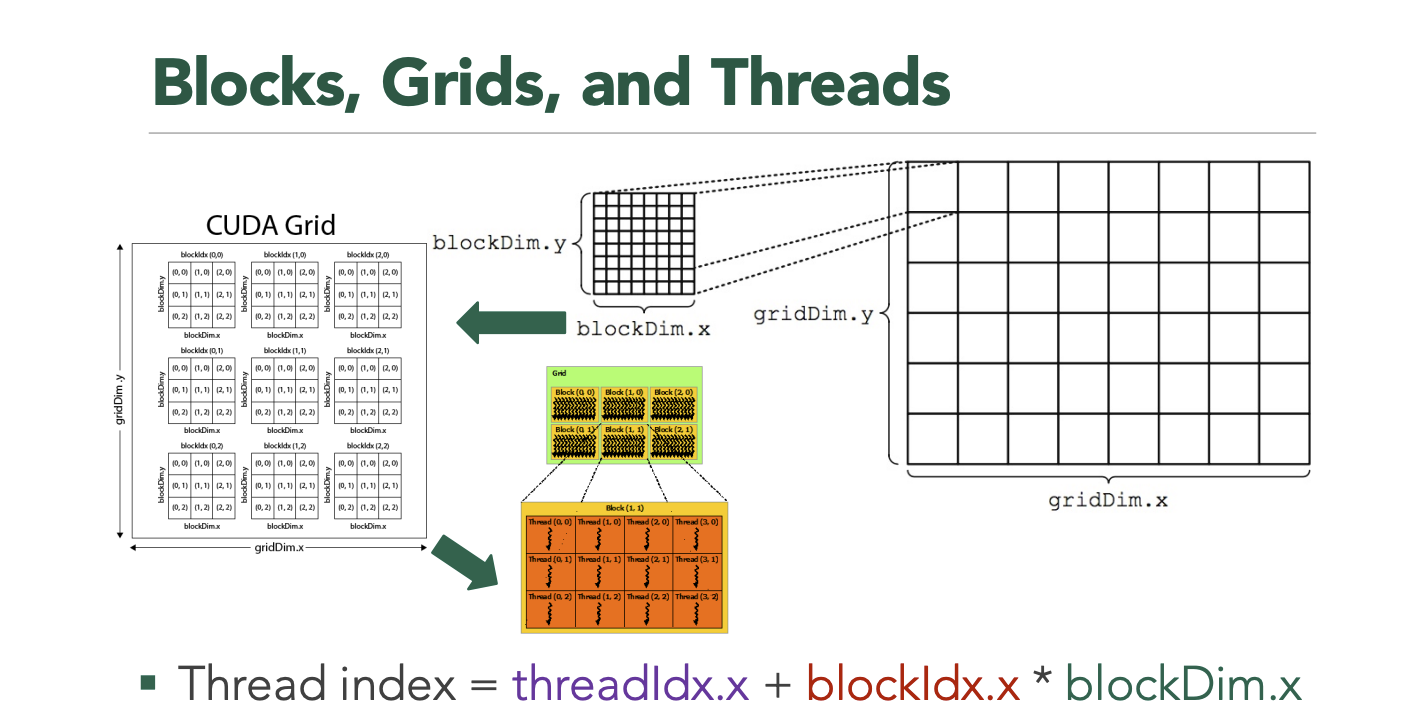
这是属于CUDA的核函数,带有声明符号__global__。与前面CPU内核中的计算仿函数类似,输入张量的数据通过指针变量in来访问,然后将计算结果写入到输出张量对应的指针变量out。但不同的是输入张量的访问涉及到CUDA中的grid、block和线程的关系,下面的代码则是简单地实现了所有数据的遍历。
// Define the CUDA kernel.
// Cann't use c++ std.
template <typename T>
__global__ void BinaryCodeHashCudaKernel(const int size, const T* in, T* out, int length, int t, bool succession) {
  for (int i = blockIdx.x * blockDim.x + threadIdx.x; i < size;
       i += blockDim.x * gridDim.x) {
    // 实现自己的计算逻辑
    // out[i] = 2 * ldg(in + i);
}

2.3.2 CUDA内核仿函数
在这里定义了CUDA计算内核的启动,其实跟上述的CPU内核实现类,即tensorflow_binary_code_hash/cc/kernels/binary_code_hash_kernels.cc中的Compute重载函数。只是不同的是这里不需要获取输入和参数,因为CUDA是直接由CPU内存拷贝过去。
// Define the GPU implementation that launches the CUDA kernel.
template <typename T>
struct BinaryCodeHashFunctor<GPUDevice, T> {
  void operator()(const GPUDevice& d, int size, const T* in, T* out, int length, int t, bool succession) {
    // std::cout << "@@@@@@ Runnin CUDA @@@@@@" << std::endl;
    // Launch the cuda kernel.
    //
    // See core/util/cuda_kernel_helper.h for example of computing
    // block count and thread_per_block count.
    int block_count = 1024;
    int thread_per_block = 20;
    BinaryCodeHashCudaKernel<T>
        <<<block_count, thread_per_block, 0, d.stream()>>>(size, in, out, length, t, succession);
  }
};
Step3. 编译
对应文件:Makefile。
CXX := g++

# 待编译的算子源码文件
BINARY_CODE_HASH_SRCS = tensorflow_binary_code_hash/cc/kernels/binary_code_hash_kernels.cc $(wildcard tensorflow_binary_code_hash/cc/kernels/*.h) $(wildcard tensorflow_binary_code_hash/cc/ops/*.cc)

# 获取tensorflow的c++源码位置
TF_CFLAGS := $(shell $(PYTHON_BIN_PATH) -c 'import tensorflow as tf; print(" ".join(tf.sysconfig.get_compile_flags()))')
TF_LFLAGS := $(shell $(PYTHON_BIN_PATH) -c 'import tensorflow as tf; print(" ".join(tf.sysconfig.get_link_flags()))')

# 对于新版本的tensorflow, 需要使用新标准, 比如tensorflow2.10则需指定-std=c++17
CFLAGS = ${TF_CFLAGS} -fPIC -O2 -std=c++11
LDFLAGS = -shared ${TF_LFLAGS}

# 编译目标so文件位置
BINARY_CODE_HASH_GPU_ONLY_TARGET_LIB = tensorflow_binary_code_hash/python/ops/_binary_code_hash_ops.cu.o
BINARY_CODE_HASH_TARGET_LIB = tensorflow_binary_code_hash/python/ops/_binary_code_hash_ops.so

# 编译命令: binary_code_hash op
binary_code_hash_op: $(BINARY_CODE_HASH_TARGET_LIB)
$(BINARY_CODE_HASH_TARGET_LIB): $(BINARY_CODE_HASH_SRCS) $(BINARY_CODE_HASH_GPU_ONLY_TARGET_LIB)
	$(CXX) $(CFLAGS) -o $@ $^ ${LDFLAGS}  -D GOOGLE_CUDA=1  -I/usr/local/cuda/targets/x86_64-linux/include -L/usr/local/cuda/targets/x86_64-linux/lib -lcudart
执行 make binary_code_hash_op 对算子源文件进行编译,就可以得到相关的so文件, tensorflow_binary_code_hash/python/ops/_binary_code_hash_ops.so、tensorflow_binary_code_hash/python/ops/_binary_code_hash_ops.cu.o。
Python调用
对应文件:tensorflow_binary_code_hash/python/ops/binary_code_hash_ops.py、tensorflow_binary_code_hash/python/ops/binary_code_hash_test.py。
经过上一步编译生成了算子的so文件之后,我们就可以在Python中引入自定义的算子函数进行使用。
在这两个Python文件中,包括了算子的调用和算子执行的测试单元。其中最为关键的算子导入代码如下:
from tensorflow.python.framework import load_library
from tensorflow.python.platform import resource_loader

binary_code_hash_ops = load_library.load_op_library(
        resource_loader.get_path_to_datafile('_binary_code_hash_ops.so'))
binary_code_hash = binary_code_hash_ops.binary_code_hash
可以直接使用make执行测试脚本:make binary_code_hash_test。也可以选择进入目录,手动执行Python脚本。
CPU版本
对于没有GPU资源的小伙伴,也提供了纯CPU版本的算子实现。
- 定义运算接口与GPU版本通用:
tensorflow_binary_code_hash/cc/ops/binary_code_hash_ops.cc。 - 实现运算内核则对应文件:
tensorflow_binary_code_hash/cc/kernels/binary_code_hash_only_cpu_kernels.cc - 其编译命令也包含在Makefile文件中,对应执行:
make binary_code_hash_cpu_only - 最终生成的so文件则是:
tensorflow_binary_code_hash/python/ops/_binary_code_hash_cpu_ops.so
完整代码
本文来自互联网用户投稿,该文观点仅代表作者本人,不代表本站立场。本站仅提供信息存储空间服务,不拥有所有权,不承担相关法律责任。 如若内容造成侵权/违法违规/事实不符,请联系我的编程经验分享网邮箱:chenni525@qq.com进行投诉反馈,一经查实,立即删除!
- Python教程
- 深入理解 MySQL 中的 HAVING 关键字和聚合函数
- Qt之QChar编码(1)
- MyBatis入门基础篇
- 用Python脚本实现FFmpeg批量转换
- 金和OA C6 UploadFileEditorSave.aspx 文件上传漏洞复现
- [RK-Linux] RK3399使用RK开源SPL,修改U-Boot为FIT打包方式,裁剪trust分区
- MAX-4/11/03/016/08/1/1/00元件温度性能对模块温度特性的影响
- python3.x编码解码unicode字符串
- 【操作系统篇】正在持续写入的日志如何清理?
- 2023-12-19 二叉搜索树的最小绝对差和二叉搜索树的众数和二叉树的最近公共祖先
- 【FAQ】运动健康服务云侧数据常见问题及解答
- 【Mac】HomeBrew安装与使用
- 如何查看关键词在谷歌上某地的排名
- 【HarmonyOS】ArkTS语言介绍与组件方式运用