Basal前端梳理
Basalt前端逻辑梳理
TBB安装参考
https://zhuanlan.zhihu.com/p/480823197
代码注释参考
https://blog.csdn.net/qq_39266065/article/details/106175701#t7
光流追踪参考
https://blog.csdn.net/weixin_41738773/article/details/130282527
VI Odometry
KLT tracking
原理
为了实现快速、鲁棒和准确的光流追踪,为了强度尺度不变性,将逆合成方法和强度缩放不变的patch dissimilarity 范数相结合。一些作者建议对光照不变光流使用零均值归一化互相关(ZNCC),但我们使用[21]中定义的局部缩放平方差和(LSSD),其计算成本少于备选方案。
vio的视觉前端我们采用基于像素块的inverse compositional光流方法, 并且采用**locally-scaled sum of squared differences (LSSD)**作为衡量像素块光度一致性的误差计算方法。
这里把像素块跟踪问题建模为求解图像 I t I_t It?和 I t + 1 I_{t+1} It+1?上对应像素块的2维仿射矩阵 T ∈ S E ( 2 ) T\in SE(2) T∈SE(2)
代价函数为:

I
t
(
x
)
I_t(x)
It?(x)表示像素x处的强度值,$\Omega
表示图像区域
,
表示图像区域,
表示图像区域,\overline{I_{t}}
表示区域
表示区域
表示区域\Omega $内的平均像素强度值。
为了剔除错误的像素匹配,这里采用了交叉跟踪 I t ? I t + 1 I_t\Longleftrightarrow I_{t+1} It??It+1?的方法。原文就说不想用阈值,而是用这种双向检验的方式来剔除外点。
processFrame()→addPoint()
每个50size的cell提取一个特征点
输入图像金字塔构建
金字塔构建+图像下采样
  inline void setFromImage(const ManagedImage<T>& other, size_t num_levels) {
    orig_w = other.w;
    image.Reinitialise(other.w + other.w / 2, other.h);
    image.Fill(0);
    lvl_internal(0).CopyFrom(other);

    for (size_t i = 0; i < num_levels; i++) {
      const Image<const T> l = lvl(i);
      Image<T> lp1 = lvl_internal(i + 1);
      subsample(l, lp1);
    }
  }
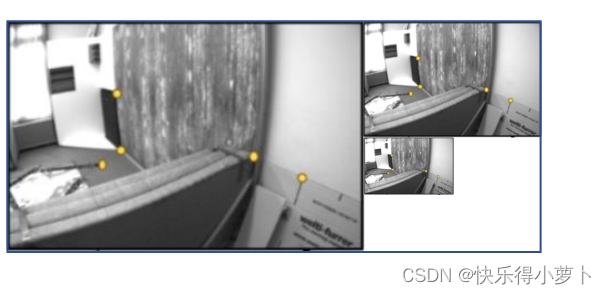
得到三层拼接得到的图像金字塔
插值取图像里的像素灰度值
双线性插值:
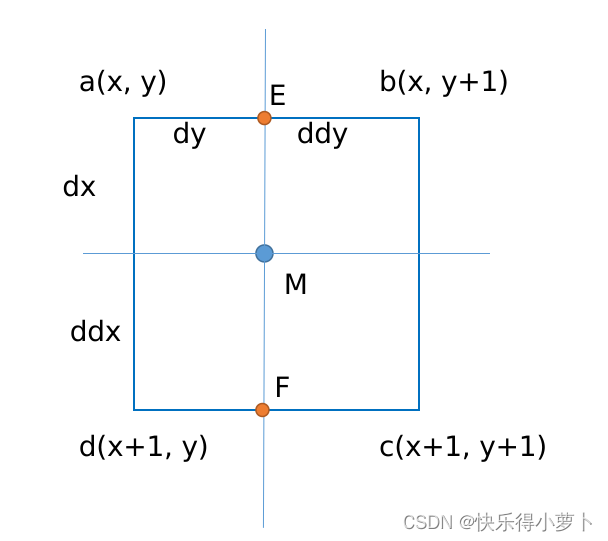
当有一点M位于内部时利用线性插值
E = d y 1 ( b ? a ) + a = d y ? b + d d y ? a F = d y 1 ( d ? c ) + c = d y ? c + d d y ? d M = d x 1 ( F ? E ) + E = d x ? d y ? c + d x ? d d y ? d + d d x ? d y ? b + d d x ? d d y ? a E=\frac{dy}{1}(b-a)+a=dy*b+ddy*a\\ F=\frac{dy}{1}(d-c)+c=dy*c+ddy*d \\ M=\frac{dx}{1}(F-E)+E=dx*dy*c+dx*ddy*d+ddx*dy*b+ddx*ddy*a E=1dy?(b?a)+a=dy?b+ddy?aF=1dy?(d?c)+c=dy?c+ddy?dM=1dx?(F?E)+E=dx?dy?c+dx?ddy?d+ddx?dy?b+ddx?ddy?a
template <typename S>
  inline S interp(S x, S y) const {
    static_assert(std::is_floating_point_v<S>,
                  "interpolation / gradient only makes sense "
                  "for floating point result type");

    BASALT_BOUNDS_ASSERT(InBounds(x, y, 0));
    // 下采样后的(int)
    int ix = x;
    int iy = y;
    S dx = x - ix;// 小数的部分
    S dy = y - iy;
    S ddx = S(1.0) - dx;// 负的小数字部分
    S ddy = S(1.0) - dy;
    // 双线性插值
    return ddx * ddy * (*this)(ix, iy) + ddx * dy * (*this)(ix, iy + 1) +
           dx * ddy * (*this)(ix + 1, iy) + dx * dy * (*this)(ix + 1, iy + 1);
  }
光度残差的计算
inline bool residual(const Image<const uint16_t> &img,
                       const Matrix2P &transformed_pattern,
                       VectorP &residual) const {
    Scalar sum = 0;
    int num_valid_points = 0;
    // 对pattern的每一个数据进行计算 这里还没有做差,只是求取了每个pattern在像素处的值
    for (int i = 0; i < PATTERN_SIZE; i++) {
      if (img.InBounds(transformed_pattern.col(i), 2)) {// 在图像边界里面
        residual[i] = img.interp<Scalar>(transformed_pattern.col(i));
        sum += residual[i];// 求总和值
        num_valid_points++;
      } else {
        residual[i] = -1;// 不存在图像的就是-1
      }
    }
    // all-black patch cannot be normalized
    if (sum < std::numeric_limits<Scalar>::epsilon()) {// 小于优化的值了 return
      residual.setZero();
      return false;
    }
    int num_residuals = 0;
    // 对于pattern的每个点进行计算
    for (int i = 0; i < PATTERN_SIZE; i++) {
      if (residual[i] >= 0 && data[i] >= 0) {// 有数的
        const Scalar val = residual[i];// 这地方相当于做类型转换
        residual[i] = num_valid_points * val / sum - data[i];// 归一化后再相减
        num_residuals++;
      } else {
        residual[i] = 0;
      }
    }
    return num_residuals > PATTERN_SIZE / 2;// 超过一半的值才是符合的
  }
雅可比计算(对应pattern原图位置中的雅可比)
目的:减小计算量,反向光流是在上一帧上计算,因此只需要计算一遍
理论:
对应单个像素的光流$\frac{\partial I}{\partial se2}=\frac{\partial I}{\partial p}*\frac{\partial p}{\partial se2}$
其中
?
I
?
p
\frac{\partial I}{\partial p}
?p?I?这部分是在特征点处的图像梯度,图像是离散表达,因此实际上是采用定义计算的,
f
′
(
x
)
=
f
(
x
+
Δ
x
?
f
(
x
)
)
Δ
x
f'(x)=\frac{f(x+\Delta x - f(x))}{\Delta x}
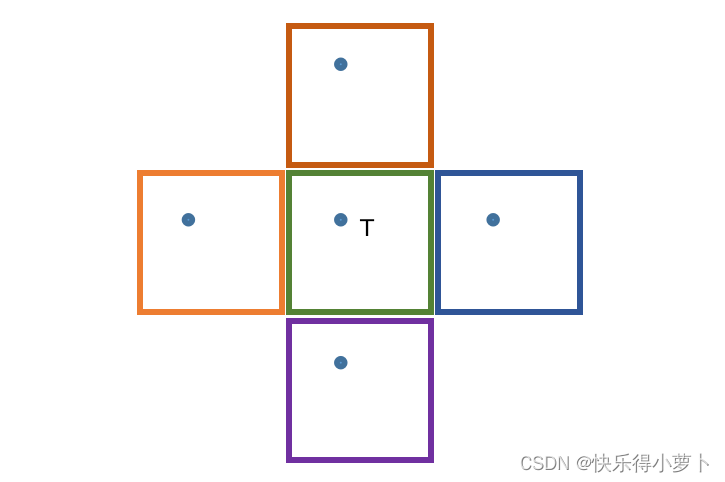
f′(x)=Δxf(x+Δx?f(x))?,简单来说,取相邻像素差作为图像梯度。但是为了保证精度,Basalt做了线性插值。如图所示,求T点的图像梯度的时候对利用上下插值出的点求取出其图像梯度,再利用其上下插值出的计算竖直方向的梯度。
另一部分 ? p ? s e 2 \frac{\partial p}{\partial se2} ?se2?p?是像素位移对特征点在图像坐标系中位姿se2的导数,对于第i个pattern在图像坐标系下的位置 p = p o s + s e 2 ? p a t t e r n p=pos+se2*pattern p=pos+se2?pattern其中se(2)由so(2)和一个二维位置组成 [ c o s θ ? s i n θ s i n θ c o s θ ] \begin{bmatrix} cos\theta&-sin\theta\\ sin\theta&cos\theta \end{bmatrix} [cosθsinθ??sinθcosθ?]
p对pos的导数是单位阵,对s e 2 se2se2中的旋转求导数需要稍微推倒一下对矩阵中的θ求导为 [ ? s i n θ ? c o s θ c o s θ ? s i n θ ] \begin{bmatrix} -sin\theta&-cos\theta\\ cos\theta&-sin\theta \end{bmatrix} [?sinθcosθ??cosθ?sinθ?],可以看到其正好与原矩阵是反过来的。(哪反过来了?)
图像梯度 ? I ? p \frac{\partial I}{\partial p} ?p?I?计算
template <typename S>
  inline Eigen::Matrix<S, 3, 1> interpGrad(S x, S y) const {
  ......

    Eigen::Matrix<S, 3, 1> res;
    const T& px0y0 = (*this)(ix, iy);
    const T& px1y0 = (*this)(ix + 1, iy);
    const T& px0y1 = (*this)(ix, iy + 1);
    const T& px1y1 = (*this)(ix + 1, iy + 1);
    // 插值的像素
    res[0] = ddx * ddy * px0y0 + ddx * dy * px0y1 + dx * ddy * px1y0 +
             dx * dy * px1y1;

    const T& pxm1y0 = (*this)(ix - 1, iy);
    const T& pxm1y1 = (*this)(ix - 1, iy + 1);

    S res_mx = ddx * ddy * pxm1y0 + ddx * dy * pxm1y1 + dx * ddy * px0y0 +
               dx * dy * px0y1;

    const T& px2y0 = (*this)(ix + 2, iy);
    const T& px2y1 = (*this)(ix + 2, iy + 1);

    S res_px = ddx * ddy * px1y0 + ddx * dy * px1y1 + dx * ddy * px2y0 +
               dx * dy * px2y1;
    // x 方向梯度
    res[1] = S(0.5) * (res_px - res_mx);

    const T& px0ym1 = (*this)(ix, iy - 1);
    const T& px1ym1 = (*this)(ix + 1, iy - 1);

    S res_my = ddx * ddy * px0ym1 + ddx * dy * px0y0 + dx * ddy * px1ym1 +
               dx * dy * px1y0;

    const T& px0y2 = (*this)(ix, iy + 2);
    const T& px1y2 = (*this)(ix + 1, iy + 2);

    S res_py = ddx * ddy * px0y1 + ddx * dy * px0y2 + dx * ddy * px1y1 +
               dx * dy * px1y2;
    // y 方向梯度
    res[2] = S(0.5) * (res_py - res_my);

    return res;
  }
se2及整体梯度
template <typename ImgT>
  static void setDataJacSe2(const ImgT &img, const Vector2 &pos, Scalar &mean,
                            VectorP &data, MatrixP3 &J_se2) {
  ......
    Jw_se2.template topLeftCorner<2, 2>().setIdentity();
    // 对于每个pattern内部的点进行计算
    for (int i = 0; i < PATTERN_SIZE; i++) {
      Vector2 p = pos + pattern2.col(i);// 位于图像的位置

      // Fill jacobians with respect to SE2 warp
      Jw_se2(0, 2) = -pattern2(1, i);
      Jw_se2(1, 2) = pattern2(0, i);

      if (img.InBounds(p, 2)) {
        Vector3 valGrad = img.template interpGrad<Scalar>(p);
        J_se2.row(i) = valGrad.template tail<2>().transpose() * Jw_se2;// 链式法则
        grad_sum_se2 += J_se2.row(i);
        num_valid_points++;
      } else {
        data[i] = -1;
      }
    }
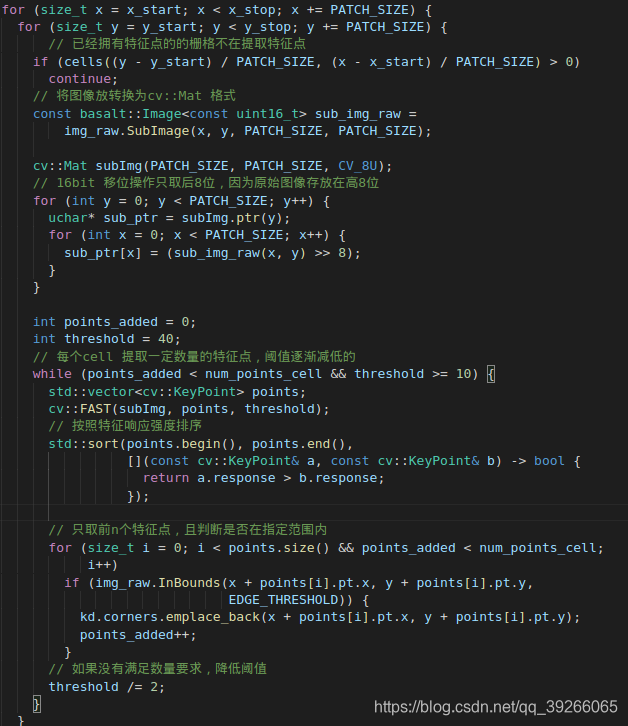
detectKeyPoints
只对左目提点,右目的特征点靠前后帧追踪和左右目光流。
降阈值的思路可以参考
trackPoint
inline bool trackPoint(const basalt::ManagedImagePyr<uint16_t> &old_pyr,
const basalt::ManagedImagePyr<uint16_t> &pyr,
const Eigen::AffineCompact2f &old_transform,
Eigen::AffineCompact2f &transform) const
点的描述
本文来自互联网用户投稿,该文观点仅代表作者本人,不代表本站立场。本站仅提供信息存储空间服务,不拥有所有权,不承担相关法律责任。 如若内容造成侵权/违法违规/事实不符,请联系我的编程经验分享网邮箱:chenni525@qq.com进行投诉反馈,一经查实,立即删除!
- Python教程
- 深入理解 MySQL 中的 HAVING 关键字和聚合函数
- Qt之QChar编码(1)
- MyBatis入门基础篇
- 用Python脚本实现FFmpeg批量转换
- cpp_10_多重继承_钻石继承_虚继承
- 【滑动窗口】C++算法:可见点的最大数目
- 数据库性能优化的解决方案
- Linux用户、用户组
- 智慧机房建设浪潮:2024年动环监控系统厂家排名出炉
- vue-cli-service requires Node ^12.0.0 || >= 14.0.0
- vscode的文件和文件夹的警告标志如何消去
- react18框架笔记
- 什么是云服务器ECS - 云服务器 ECS - 阿里云
- 第2章 JavaScript基本语法