redis的搭建及应用(三)-Redis主从配置
发布时间:2023年12月27日
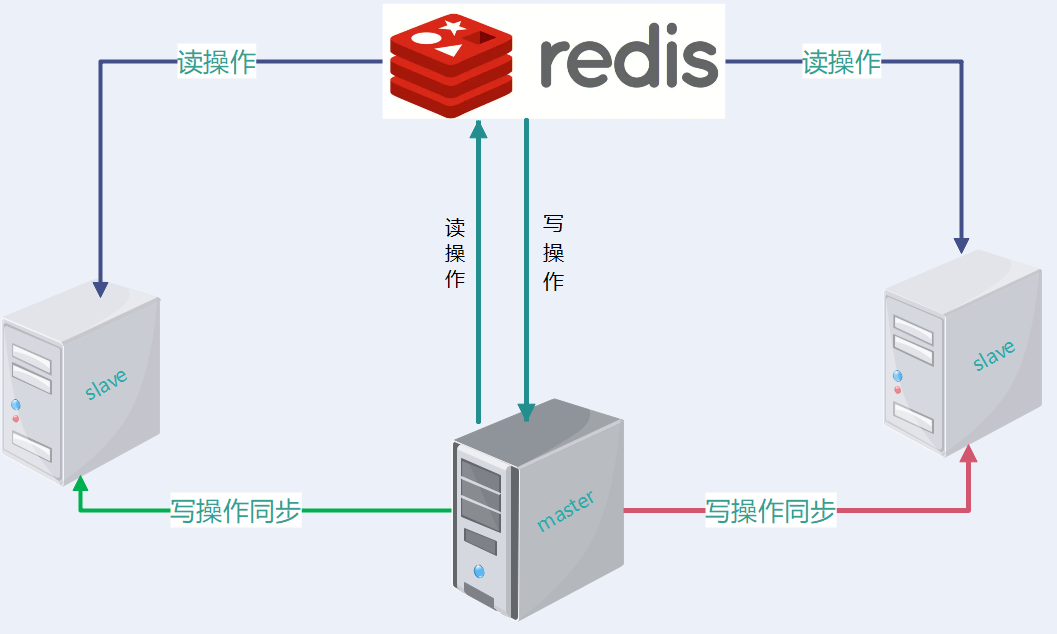
Redis主从配置
为提升Redis的高可用性,需要搭建多个Redis集群以保证高可用性。常见搭建方式有:主从,哨兵集群等,本节我们搭建一主二从的多Redis架构。
redis主从安装1主2从的方式配置,以端口号为redis的主从文件夹。
主(master): 6379
从(slave): 6380, 6381
redis主服务器(master:6379)
使用vim工具打开配置文件,修改里面的内容。
NETWORK模块
################################## NETWORK #####################################
47
48 # By default, if no "bind" configuration directive is specified, Redis listens
49 # for connections from all available network interfaces on the host machine.
50 # It is possible to listen to just one or multiple selected interfaces using
51 # the "bind" configuration directive, followed by one or more IP addresses.
52 # Each address can be prefixed by "-", which means that redis will not fail to
53 # start if the address is not available. Being not available only refers to
54 # addresses that does not correspond to any network interfece. Addresses that
55 # are already in use will always fail, and unsupported protocols will always BE
56 # silently skipped.
57 #
58 # Examples:
59 #
60 # bind 192.168.1.100 10.0.0.1 # listens on two specific IPv4 addresses
61 # bind 127.0.0.1 ::1 # listens on loopback IPv4 and IPv6
62 # bind * -::* # like the default, all available interfaces
63 #
64 # ~~~ WARNING ~~~ If the computer running Redis is directly exposed to the
65 # internet, binding to all the interfaces is dangerous and will expose the
66 # instance to everybody on the internet. So by default we uncomment the
67 # following bind directive, that will force Redis to listen only on the
68 # IPv4 and IPv6 (if available) loopback interface addresses (this means Redis
69 # will only be able to accept client connections from the same host that it is
70 # running on).
71 #
72 # IF YOU ARE SURE YOU WANT YOUR INSTANCE TO LISTEN TO ALL THE INTERFACES
73 # JUST COMMENT OUT THE FOLLOWING LINE.
74 # ~~~~~~~~~~~~~~~~~~~~~~~~~~~~~~~~~~~~~~~~~~~~~~~~~~~~~~~~~~~~~~~~~~~~~~~~
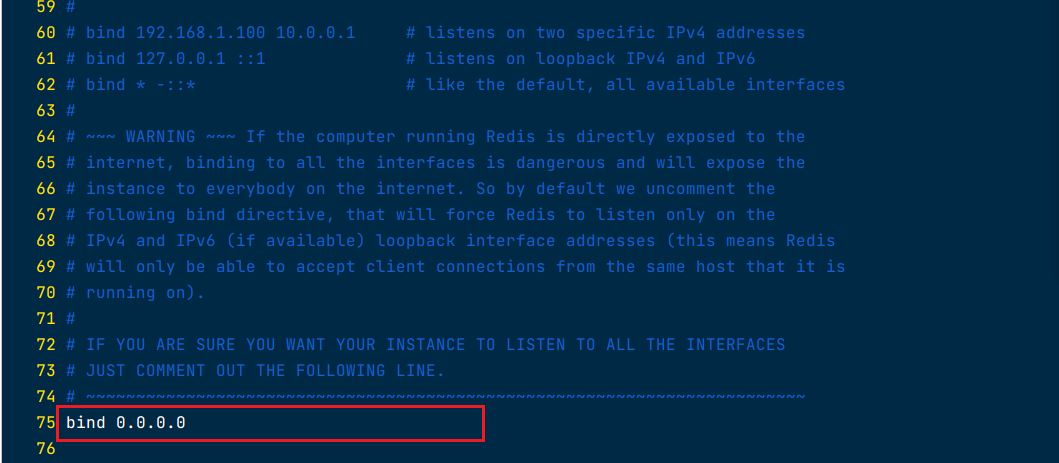
75 bind 127.0.0.1 -::1
修改ip绑定地址为全网可访问。
bind *0.0.0.0 全网可访问
75 bind 0.0.0.0
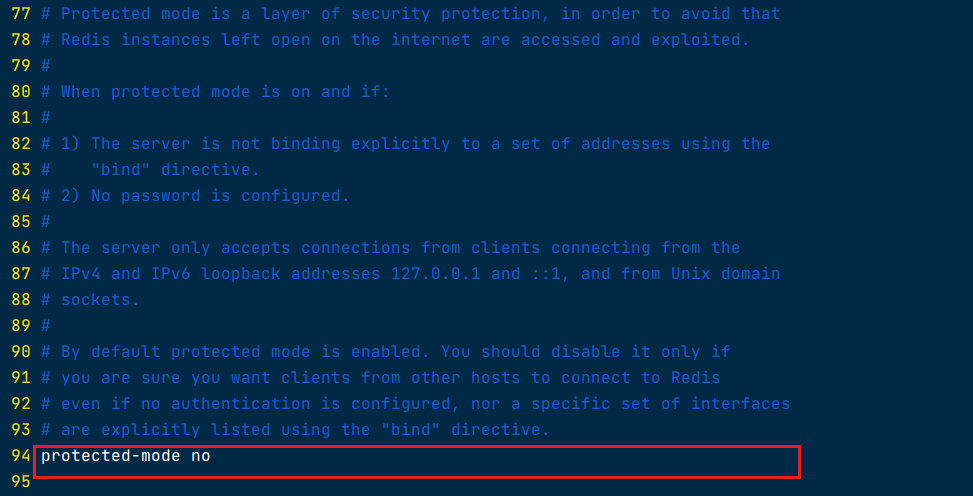
protected-mode
  77 # Protected mode is a layer of security protection, in order to avoid that
  78 # Redis instances left open on the internet are accessed and exploited.
  79 #
  80 # When protected mode is on and if:
  81 #
  82 # 1) The server is not binding explicitly to a set of addresses using the
  83 #    "bind" directive.
  84 # 2) No password is configured.
  85 #
  86 # The server only accepts connections from clients connecting from the
  87 # IPv4 and IPv6 loopback addresses 127.0.0.1 and ::1, and from Unix domain
  88 # sockets.
  89 #
  90 # By default protected mode is enabled. You should disable it only if
  91 # you are sure you want clients from other hosts to connect to Redis
  92 # even if no authentication is configured, nor a specific set of interfaces
  93 # are explicitly listed using the "bind" directive.
  94 protected-mode yes
- 保护模式是一个避免你在互联网(外网)访问redis的机制。
- 当启用保护模式,而且没有密码时,服务器只接受来自IPv4地址(127.0.0.1)、IPv6地址(::1)或Unix套接字本地连接。(没密码+保护模式启动=本地访问)
- 默认是开启的
94 protected-mode no
修改日志
修改日志级别为DEBUG
 293 # Specify the server verbosity level.
 294 # This can be one of:
 295 # debug (a lot of information, useful for development/testing)
 296 # verbose (many rarely useful info, but not a mess like the debug level)
 297 # notice (moderately verbose, what you want in production probably)
 298 # warning (only very important / critical messages are logged)
 299 loglevel notice

修改日志的输出位置
定义日志文件的输出位置到/var/log/redis.log
 301 # Specify the log file name. Also the empty string can be used to force
 302 # Redis to log on the standard output. Note that if you use standard
 303 # output for logging but daemonize, logs will be sent to /dev/null
 304 logfile ""

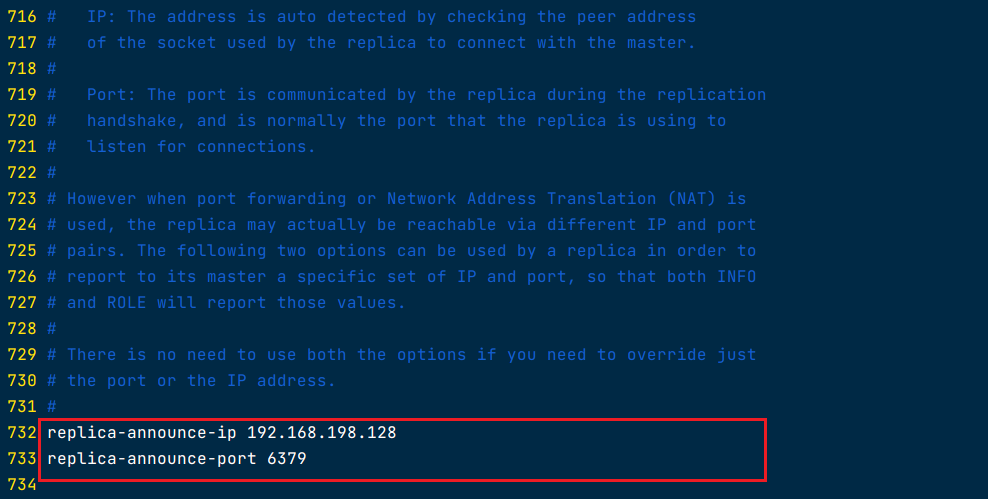
配置本机ip和端口
主服务器部署在Docker或者其他网络代理工具,会使主服务器的ip,端口改变时,可以在配置// 文件中声明主服务器原始的ip和端口。
定义replica-announce-ip 和端口
tip: ip,port是linux的ip地址和端口号(不是容器内部ip,否则外界不能访问)。
192.168.xxx.yyy —linux服务器的ip地址
706 # A Redis master is able to list the address and port of the attached
 707 # replicas in different ways. For example the "INFO replication" section
 708 # offers this information, which is used, among other tools, by
 709 # Redis Sentinel in order to discover replica instances.
 710 # Another place where this info is available is in the output of the
 711 # "ROLE" command of a master.
 712 #
 713 # The listed IP address and port normally reported by a replica is
 714 # obtained in the following way:
 715 #
 716 #   IP: The address is auto detected by checking the peer address
 717 #   of the socket used by the replica to connect with the master.
 718 #
 719 #   Port: The port is communicated by the replica during the replication
 720 #   handshake, and is normally the port that the replica is using to
 721 #   listen for connections.
 722 #
 723 # However when port forwarding or Network Address Translation (NAT) is
 724 # used, the replica may actually be reachable via different IP and port
 725 # pairs. The following two options can be used by a replica in order to
 726 # report to its master a specific set of IP and port, so that both INFO
 727 # and ROLE will report those values.
 728 #
 729 # There is no need to use both the options if you need to override just
 730 # the port or the IP address.
 731 #
 732 # replica-announce-ip 5.5.5.5
 733 # replica-announce-port 1234
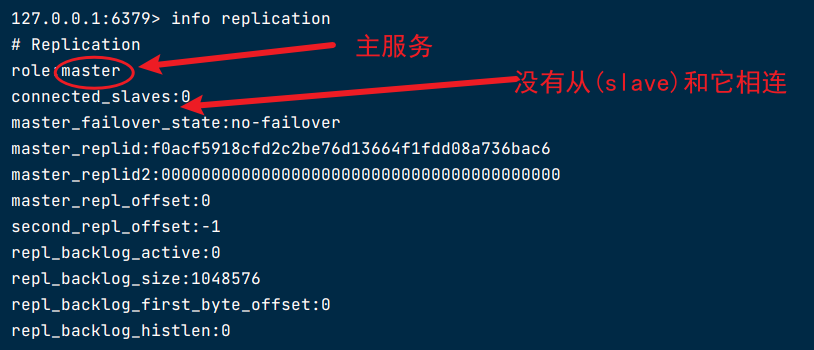
查看redis状态
127.0.0.1:6379> info replication
# Replication
role:master
connected_slaves:0
master_failover_state:no-failover
master_replid:9ab01d97e6c3f5bd43ea60ddfc7cc42dddfa5fc4
master_replid2:0000000000000000000000000000000000000000
master_repl_offset:0
second_repl_offset:-1
repl_backlog_active:0
repl_backlog_size:1048576
repl_backlog_first_byte_offset:0
repl_backlog_histlen:0
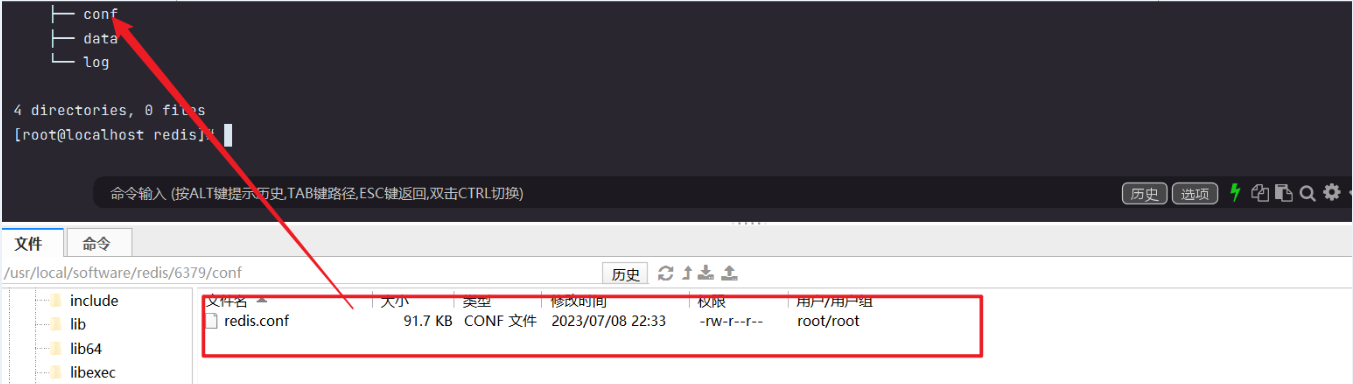
redis从服务器配置(6380)
配置6380/conf/redis.conf文件
上传配置文件redis.conf
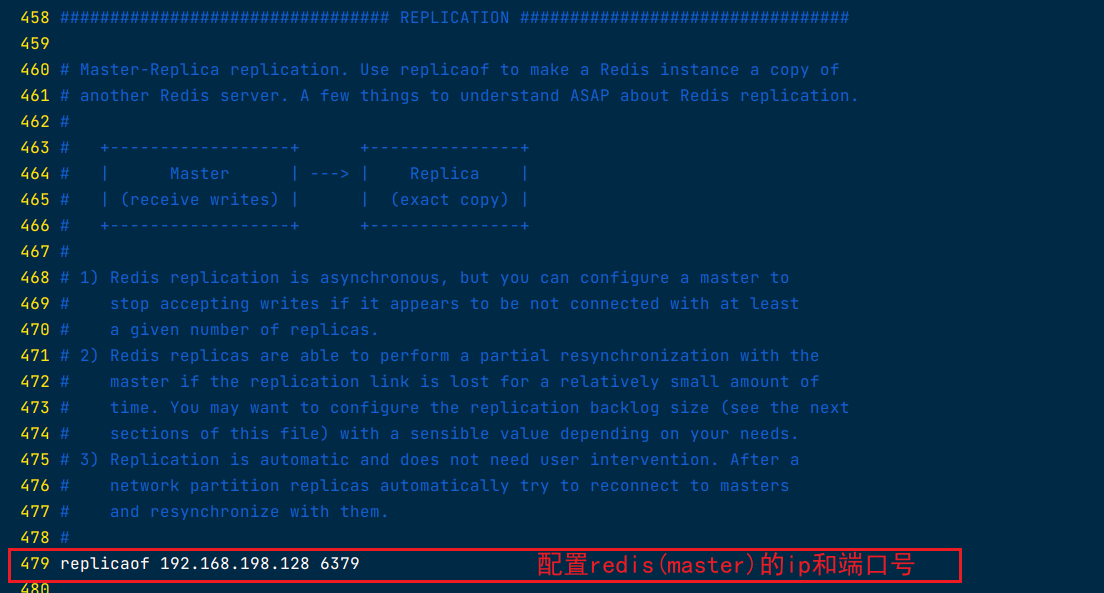
配置主从 Master-Replica replication
 458 ################################# REPLICATION #################################
 459
 460 # Master-Replica replication. Use replicaof to make a Redis instance a copy of
 461 # another Redis server. A few things to understand ASAP about Redis replication.
 462 #
 463 #   +------------------+      +---------------+
 464 #   |      Master      | ---> |    Replica    |
 465 #   | (receive writes) |      |  (exact copy) |
 466 #   +------------------+      +---------------+
 467 #
 468 # 1) Redis replication is asynchronous, but you can configure a master to
 469 #    stop accepting writes if it appears to be not connected with at least
 470 #    a given number of replicas.
 471 # 2) Redis replicas are able to perform a partial resynchronization with the
 472 #    master if the replication link is lost for a relatively small amount of
 473 #    time. You may want to configure the replication backlog size (see the next
 474 #    sections of this file) with a sensible value depending on your needs.
 475 # 3) Replication is automatic and does not need user intervention. After a
 476 #    network partition replicas automatically try to reconnect to masters
 477 #    and resynchronize with them.
 478 #
 479 # replicaof <masterip> <masterport>
配置从只读
在配置文件末尾添加: slave-read-only yes(旧版本),新版本默认为从只读。

配置服务器ip地址
修改redis.conf文件中的replica-announce-ip/port为本机(linux)的ip和docker映射的地址。
 732 replica-announce-ip 192.168.198.128
 733 replica-announce-port 6380

创建运行容器
docker run -it \
--name redis_6380 \
--privileged \
-p 6380:6379 \
--network wn_docker_net \
--ip 172.18.12.11 \
--sysctl net.core.somaxconn=1024 \
-e TIME_ZONE="Asia/Shanghai" -e TZ="Asia/Shanghai" \
-v /usr/local/software/redis/6380/conf/redis.conf:/usr/local/etc/redis/redis.conf \
-v /usr/local/software/redis/6380/data/:/data \
-v /usr/local/software/redis/6380/log/redis.log:/var/log/redis.log \
-d redis \
/usr/local/etc/redis/redis.conf
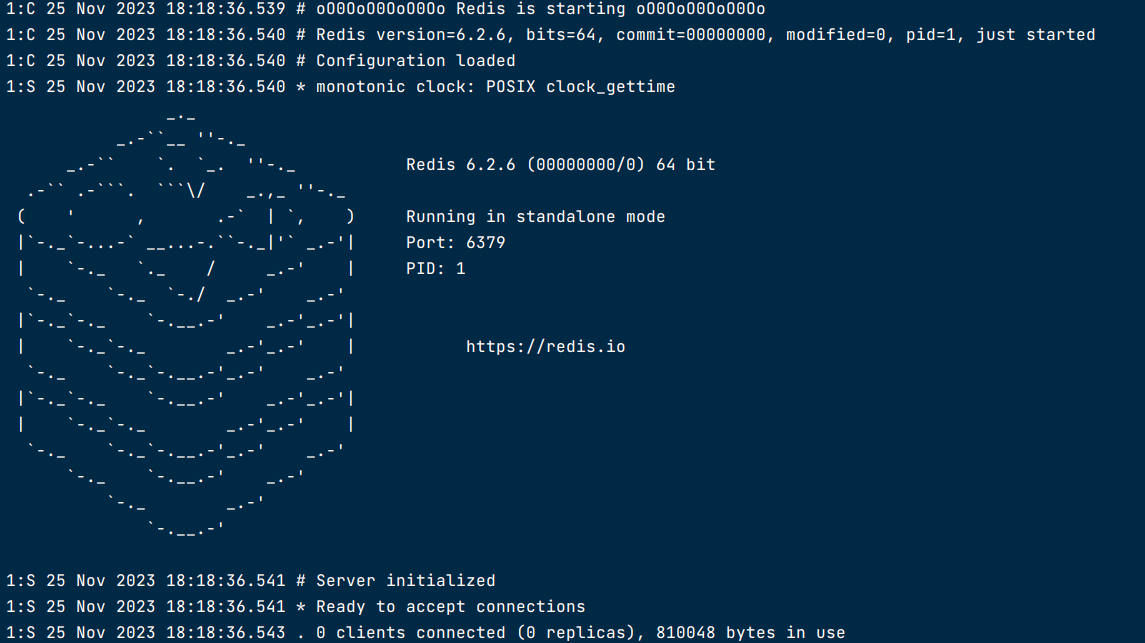
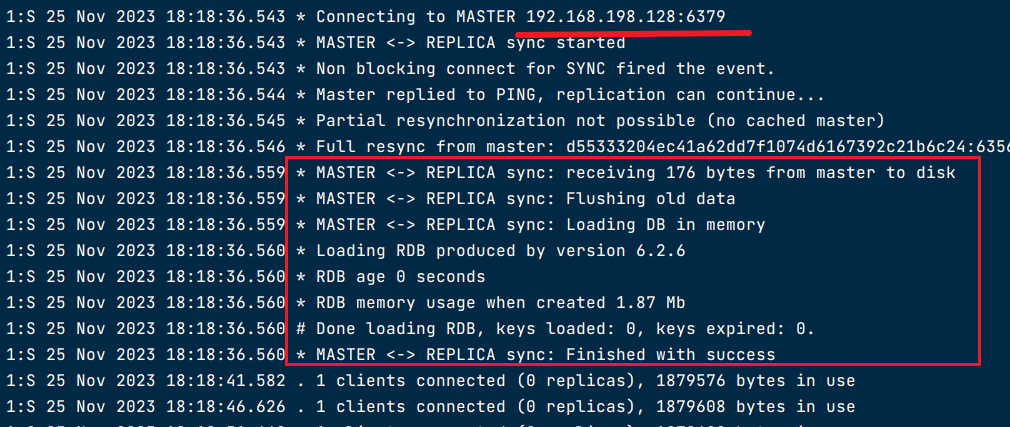
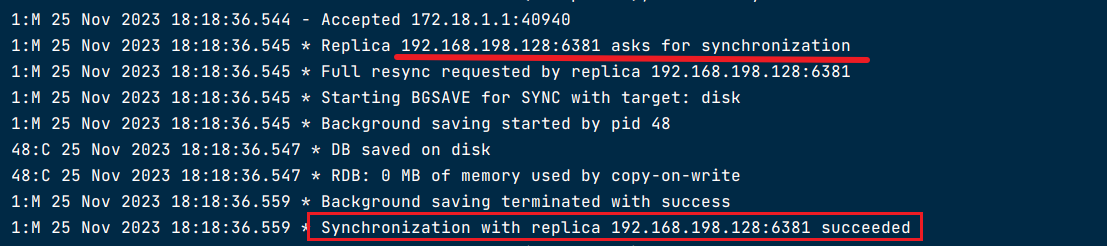
查看启动日志
- 启动信息
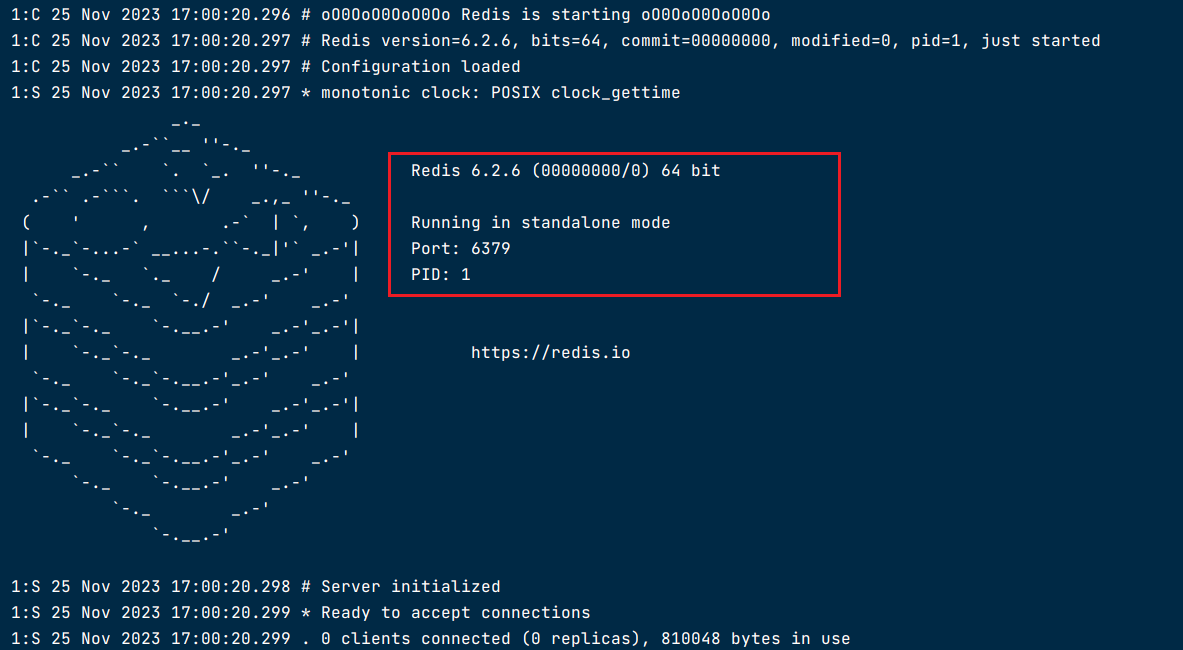
- 主从连接信息
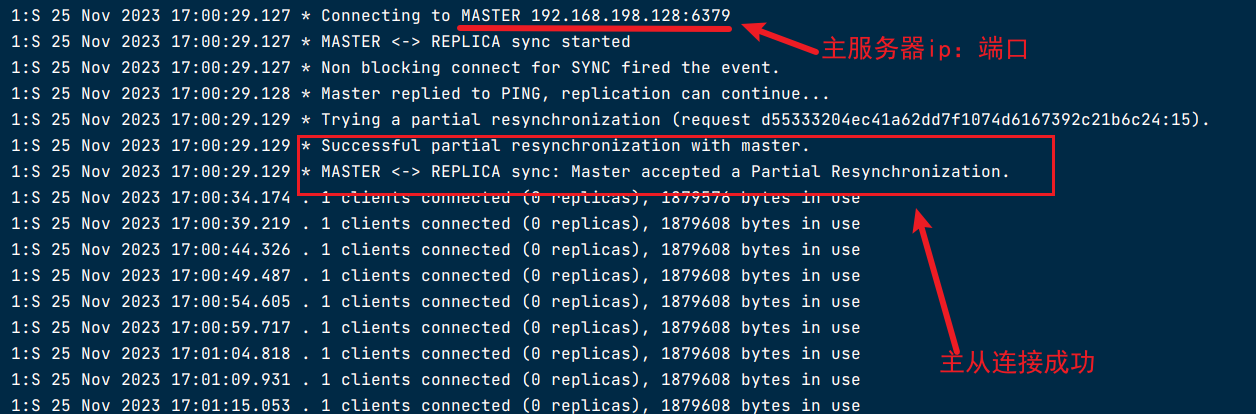
- 检查master(6379)服务器日志

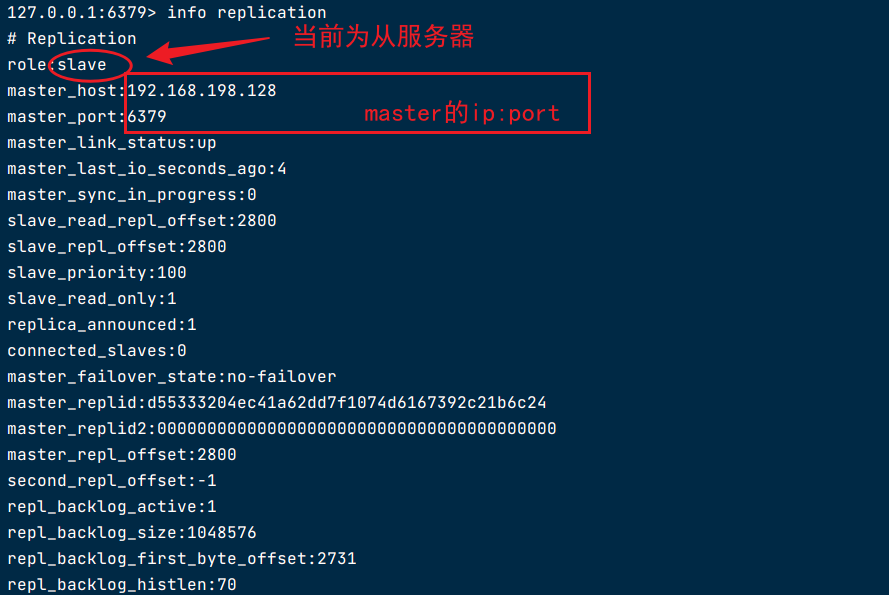
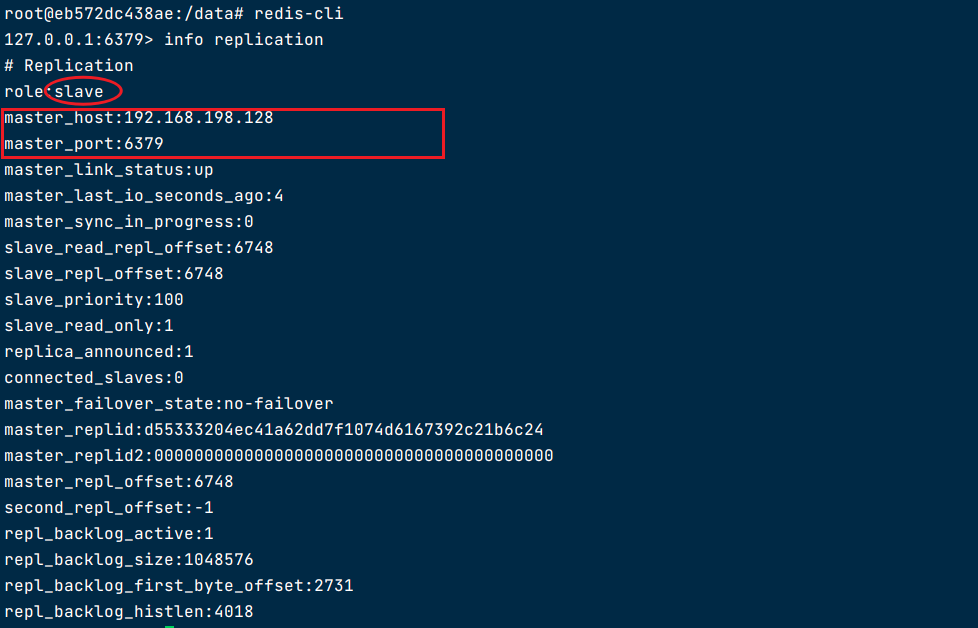
进入redis-cli查看主从状态
[root@localhost conf]# docker exec -it redis_6380 bash
root@eb572dc438ae:/data# redis-cli

127.0.0.1:6379> info replication
# Replication
role:slave
master_host:192.168.198.128
master_port:6379
master_link_status:up
master_last_io_seconds_ago:4
master_sync_in_progress:0
slave_read_repl_offset:2800
slave_repl_offset:2800
slave_priority:100
slave_read_only:1
replica_announced:1
connected_slaves:0
master_failover_state:no-failover
master_replid:d55333204ec41a62dd7f1074d6167392c21b6c24
master_replid2:0000000000000000000000000000000000000000
master_repl_offset:2800
second_repl_offset:-1
repl_backlog_active:1
repl_backlog_size:1048576
repl_backlog_first_byte_offset:2731
repl_backlog_histlen:70
第二个redis从服务器(6381)
配置6380/conf/redis.conf文件
上传配置文件redis.conf
配置主从 Master-Replica replication
 458 ################################# REPLICATION #################################
 459
 460 # Master-Replica replication. Use replicaof to make a Redis instance a copy of
 461 # another Redis server. A few things to understand ASAP about Redis replication.
 462 #
 463 #   +------------------+      +---------------+
 464 #   |      Master      | ---> |    Replica    |
 465 #   | (receive writes) |      |  (exact copy) |
 466 #   +------------------+      +---------------+
 467 #
 468 # 1) Redis replication is asynchronous, but you can configure a master to
 469 #    stop accepting writes if it appears to be not connected with at least
 470 #    a given number of replicas.
 471 # 2) Redis replicas are able to perform a partial resynchronization with the
 472 #    master if the replication link is lost for a relatively small amount of
 473 #    time. You may want to configure the replication backlog size (see the next
 474 #    sections of this file) with a sensible value depending on your needs.
 475 # 3) Replication is automatic and does not need user intervention. After a
 476 #    network partition replicas automatically try to reconnect to masters
 477 #    and resynchronize with them.
 478 #
 479 # replicaof <masterip> <masterport>
配置服务器ip地址
修改redis.conf文件中的replica-announce-ip/port为本机(linux)的ip和docker映射的地址。
 732 replica-announce-ip 192.168.198.128
 733 replica-announce-port 6381

配置从只读
在配置文件末尾添加: slave-read-only yes(旧版本),新版本默认为从只读。
创建运行容器
docker run -it \
--name redis_6381 \
--privileged \
-p 6381:6379 \
--network wn_docker_net \
--ip 172.18.12.12 \
--sysctl net.core.somaxconn=1024 \
-e TIME_ZONE="Asia/Shanghai" -e TZ="Asia/Shanghai" \
-v /usr/local/software/redis/6381/conf/redis.conf:/usr/local/etc/redis/redis.conf \
-v /usr/local/software/redis/6381/data/:/data \
-v /usr/local/software/redis/6381/log/redis.log:/var/log/redis.log \
-d redis \
/usr/local/etc/redis/redis.conf
查看启动日志
- 启动信息
- 主从连接信息
- 检查master(6379)服务器日志
进入redis-cli查看主从状态
[root@localhost log]# docker exec -it redis_6380 bash
root@eb572dc438ae:/data# redis-cli
127.0.0.1:6379> info replication
# Replication
role:slave
master_host:192.168.198.128
master_port:6379
master_link_status:up
master_last_io_seconds_ago:4
master_sync_in_progress:0
slave_read_repl_offset:6748
slave_repl_offset:6748
slave_priority:100
slave_read_only:1
replica_announced:1
connected_slaves:0
master_failover_state:no-failover
master_replid:d55333204ec41a62dd7f1074d6167392c21b6c24
master_replid2:0000000000000000000000000000000000000000
master_repl_offset:6748
second_repl_offset:-1
repl_backlog_active:1
repl_backlog_size:1048576
repl_backlog_first_byte_offset:2731
repl_backlog_histlen:4018
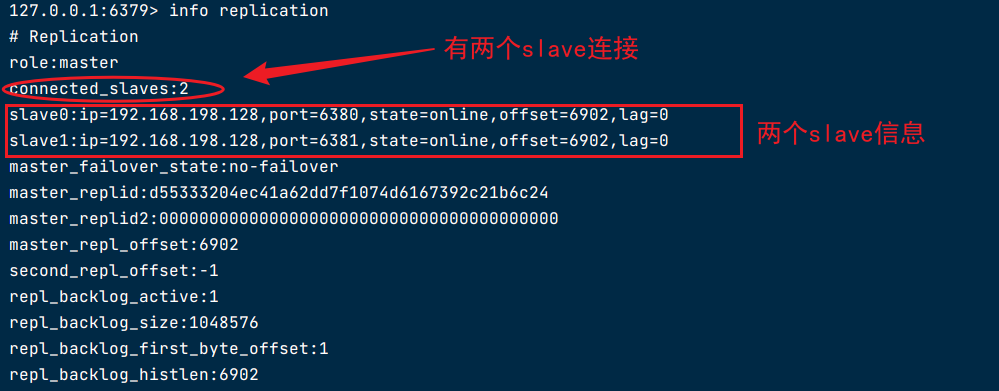
进入master查看主从信息
[root@localhost log]# docker exec -it redis_6379 bash
root@751e44287904:/data# redis-cli
127.0.0.1:6379> info replication
# Replication
role:master
connected_slaves:2
slave0:ip=192.168.198.128,port=6380,state=online,offset=6902,lag=0
slave1:ip=192.168.198.128,port=6381,state=online,offset=6902,lag=0
master_failover_state:no-failover
master_replid:d55333204ec41a62dd7f1074d6167392c21b6c24
master_replid2:0000000000000000000000000000000000000000
master_repl_offset:6902
second_repl_offset:-1
repl_backlog_active:1
repl_backlog_size:1048576
repl_backlog_first_byte_offset:1
repl_backlog_histlen:6902
文章来源:https://blog.csdn.net/qq_36115196/article/details/135224131
本文来自互联网用户投稿,该文观点仅代表作者本人,不代表本站立场。本站仅提供信息存储空间服务,不拥有所有权,不承担相关法律责任。 如若内容造成侵权/违法违规/事实不符,请联系我的编程经验分享网邮箱:chenni525@qq.com进行投诉反馈,一经查实,立即删除!
本文来自互联网用户投稿,该文观点仅代表作者本人,不代表本站立场。本站仅提供信息存储空间服务,不拥有所有权,不承担相关法律责任。 如若内容造成侵权/违法违规/事实不符,请联系我的编程经验分享网邮箱:chenni525@qq.com进行投诉反馈,一经查实,立即删除!
最新文章
- Python教程
- 深入理解 MySQL 中的 HAVING 关键字和聚合函数
- Qt之QChar编码(1)
- MyBatis入门基础篇
- 用Python脚本实现FFmpeg批量转换
- LeetCode-数组-矩阵问题-中等难度
- 【5G 接口协议】N2接口协议NGAP(NG Application Protocol)介绍
- 蓝牙驱动程序错误的疑难问题解决办法(离谱的错误,已经解决)
- websocket 介绍
- Qt对话框上
- 将yolov8的检测框从正框修改为旋转框需要做那些修改?
- HashMap最全面试题 连环15问
- datax不支持对hive hdfs(ha)高可用 的hdfsreader(即无法读取到HDFS多节点高可用).
- C#,入门教程(18)——分支语句(switch-case)的基础知识
- 网站数据统计基础:PV、UV与IP的解读