别小看Python的【print】函数,这些高级用法你知道吗?
发布时间:2023年12月17日
文章目录
引言
Python的print函数,不仅是编写代码时的得力助手,更是我们快速洞察变量值、呈现关键信息的明亮灯塔。除了基础的输出功能,print函数还拥有一系列深藏不露的高级技巧,它们如同魔法一般,等待有心人的探索。让我们一同走进这个神秘的魔法世界,解锁print函数的无限可能,让你在Python编程中如鱼得水,游刃有余。
技巧1:格式化输出
示例1:使用%s来插入字符串,使用%d来插入整数
示例代码:
name = "John Smith"
age = 25
print("My name is %s and I am %d years old." % (name, age))
打印结果

在上面的代码中,我们使用%s来插入name变量的值,使用%d来插入age变量的值。
示例2:使用字符串的format()方法
示例代码:
name = "John Smith"
age = 25
print("My name is {} and I am {} years old.".format(name, age))
打印结果

在上面的代码中,我们使用{}来指定需要插入的变量位置,然后在调用format()方法时传入相应的变量。
示例3:使用f-string格式化输出
示例代码:
name = "John Smith"
age = 25
print(f"My name is {name} and I am {age} years old.")
打印结果

在上面的代码中,我们直接在字符串中使用{}来指定需要插入的变量位置,然后在调用print()函数时直接传入相应的变量。
技巧2:控制输出文本的颜色
在Python中,我们可以使用ANSI转义序列来改变打印文本的颜色。
示例代码:
# 定义颜色代码
colors = {
    'red': '\033[91m',
    'green': '\033[92m',
    'yellow': '\033[93m',
    'blue': '\033[94m',
    'magenta': '\033[95m',
    'cyan': '\033[96m',
    'white': '\033[97m',
    'default': '\033[99m',
    'light_gray': '\033[37m',
    'dark_gray': '\033[90m',
}

# 重置颜色代码
reset_color = '\033[0m'

# 需要打印的字符串
text = "My name is John Smith and I am 25 years old."

# 循环遍历所有颜色并打印字符串
for color_name, color_code in colors.items():
    print(color_code + text + reset_color)
    print(f"The above text is printed in {color_name}.")
打印结果
My name is John Smith and I am 25 years old.
The above text is printed in red.
My name is John Smith and I am 25 years old.
The above text is printed in green.
My name is John Smith and I am 25 years old.
The above text is printed in yellow.
My name is John Smith and I am 25 years old.
The above text is printed in blue.
My name is John Smith and I am 25 years old.
The above text is printed in magenta.
My name is John Smith and I am 25 years old.
The above text is printed in cyan.
My name is John Smith and I am 25 years old.
The above text is printed in white.
My name is John Smith and I am 25 years old.
The above text is printed in default.
My name is John Smith and I am 25 years old.
The above text is printed in light_gray.
My name is John Smith and I am 25 years old.
The above text is printed in dark_gray.
在上面的代码中,我们使用10种不同的颜色来打印同样的字符串,并在每次打印后输出所使用的颜色名称。在每次打印后,它都会使用reset_color变量来重置颜色,以确保后续的输出不会受到之前颜色的影响。
技巧3:将打印结果重定向至文本文件
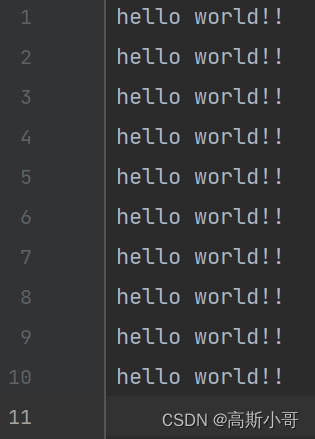
示例1:将指定字符串重复N次输出到文本文件中, 每个字符串各占一行
text = "hello world!!"

N = 10
# 使用print的file参数将输出重定向到文本文件
with open('output.txt', 'w') as file:
    for i in range(N):
        print(text, file=file)
运行结果

在上面的代码中,我们打印10次同样的字符串hello world!!,并将打印结果保存在文本文件output.txt中。
示例2:将列表[1,2,3,4,5]中的元素依次输出到文本文件中, 元素之间用制表符间隔
示例代码:
my_list = [1, 2, 3, 4, 5]

with open('output.txt', 'w') as file:
    for v in my_list:
        print(v, file=file, end='\t')
运行结果

在上面的代码中,将列表[1,2,3,4,5]中的元素依次输出到文本文件output.txt中, 通过end参数指定元素之间用制表符间隔。
技巧4:自定义分隔符和结束符
默认情况下,print函数使用空格作为参数之间的分隔符,使用换行符作为结束符。可以通过sep和end参数来自定义分隔符和结束符。
示例代码:
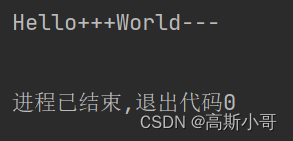
print("Hello", "World", sep="+++", end="---")
运行结果

在上面的代码中,我们指定利用seq参数指定+++作为分隔符,利用end参数指定---作为结束符。
结束语
- 亲爱的读者,感谢您花时间阅读我们的博客。我们非常重视您的反馈和意见,因此在这里鼓励您对我们的博客进行评论。
- 您的建议和看法对我们来说非常重要,这有助于我们更好地了解您的需求,并提供更高质量的内容和服务。
- 无论您是喜欢我们的博客还是对其有任何疑问或建议,我们都非常期待您的留言。让我们一起互动,共同进步!谢谢您的支持和参与!
- 我会坚持不懈地创作,并持续优化博文质量,为您提供更好的阅读体验。
- 谢谢您的阅读!
文章来源:https://blog.csdn.net/qq_41813454/article/details/135045886
本文来自互联网用户投稿,该文观点仅代表作者本人,不代表本站立场。本站仅提供信息存储空间服务,不拥有所有权,不承担相关法律责任。 如若内容造成侵权/违法违规/事实不符,请联系我的编程经验分享网邮箱:chenni525@qq.com进行投诉反馈,一经查实,立即删除!
本文来自互联网用户投稿,该文观点仅代表作者本人,不代表本站立场。本站仅提供信息存储空间服务,不拥有所有权,不承担相关法律责任。 如若内容造成侵权/违法违规/事实不符,请联系我的编程经验分享网邮箱:chenni525@qq.com进行投诉反馈,一经查实,立即删除!
最新文章
- Python教程
- 深入理解 MySQL 中的 HAVING 关键字和聚合函数
- Qt之QChar编码(1)
- MyBatis入门基础篇
- 用Python脚本实现FFmpeg批量转换
- Hdfs java API
- Http与Tcp协议的原理以及应用
- C //练习 4-8 假定最多只压回一个字符。请相应地修改getch与ungetch这两个函数。
- Permutation Importance重要性
- Python爬虫实战 | 爬取拼多多商品的详情价格SKU数据
- GBASE南大通用-Command 构 造 函 数 (String, GBaseConnection, GBaseTransaction)
- Python-- if...else
- Linux系统安装和基本使用
- 东南大学博士,华为上班5年,月薪达到4万4000,年终奖近10万
- 2024.1.24 GNSS 学习笔记