Vue3,Pinia
一. Vue3的优势
1. 更容易维护
组合式API,更好的TypeScript支持
2. 更快的速度
1. 重写diff算法;2. 模板编译优化;3. 更高效的组件初始化
3. 更小的体积
1. 良好的TreeShaking;2. 按需引入
4. 更优的数据响应式
Proxy
二. Vue2 vs Vue3
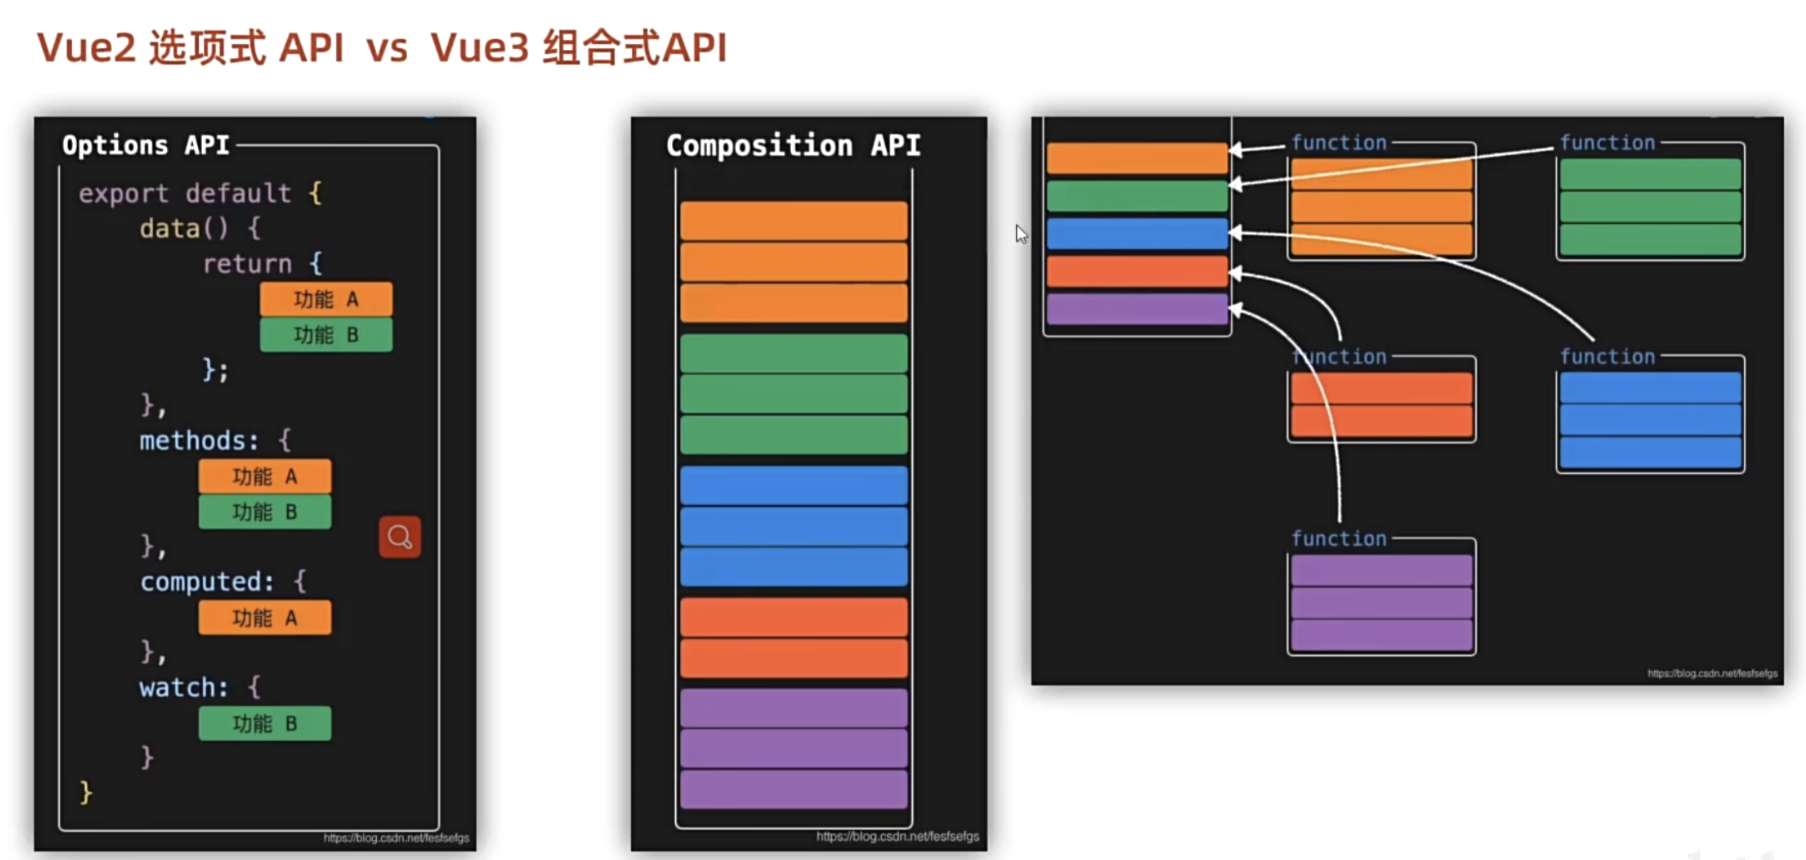
Vue2选项式API
整个配置项中,有着一个一个的选项,data是一个选项,methods是一个选项,computed是一个选项等等。如果我们要实现一个功能,需要分散式的将代码散落到各个配置项当中。例如我们实现一个功能A,我们需要在data里面提供功能A的数据,在methods里面写功能A相关的方法,再加个计算属性computed。当要实现的功能越来越多,写的代码越来越多的时候,它们之间的互相对应就会使得将来项目非常难以维护。
选项式API(Options API)
export default {
? ? ? ? data() {
? ? ? ? ? ? ? ? return {
? ? ? ? ? ? ? ? ? ? ? ? 功能A
? ? ? ? ? ? ? ? ? ? ? ? 功能B
????????????????}
????????},
? ? ? ? methods: {
? ? ? ? ? ? ? ? 功能A
? ? ? ? ? ? ? ? 功能B
????????},
? ? ? ? computed: {
? ? ? ? ? ? ? ? 功能A
????????},
? ? ? ? watch: {
? ? ? ? ? ? ? ? 功能B
????????}
}
Vue3组合式API
直接将同功能相关的所有内容进行集中式的管理
组合式API(Composition API)
功能A相关的数据的声明
功能A相关的方法的提供
功能A相关的计算属性
功能B相关的数据的声明
功能B相关的方法的提供
功能B相关的计算属性
举例:需求:点击按钮,让数字+1
// vue2中的写法
<script>
export default {
    data() {
        return {
            count: 0
        }
    },
    methods: {
        addCount(){
            this.count++
        }
    }
}
</script>

// vue3中的写法
<script setup>
import { ref } from 'vue'
const count = ref(0)
const addCount = () => count.value++
</script>
三. create-vue搭建Vue3项目
create-vue是Vue官方新的脚手架工具,底层切换到了vite(下一代构建工具),为开发提供极速响应。
以前用Vue-cli创建项目,它的底层是webpack。
现在用create-vue创建项目,它的底层是vite。
1. 前提环境
已安装16.0或更高版本的Node.js
node -v
2. 创建一个Vue应用
npm init vue@latest
这一指令将会安装并执行create-vue?
四. 项目目录和关键文件
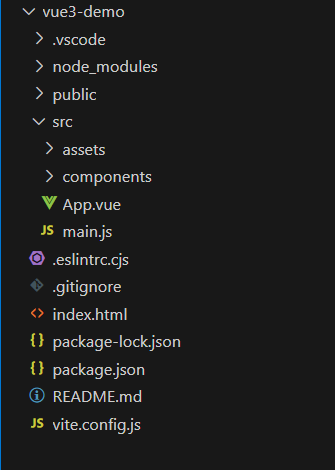
关键文件:
1. vite.config.js -项目的配置文件 基于vite的配置
2. package.json-项目包文件 核心依赖变成了3.x和vite
3. main.js-入口文件createApp函数创建应用实例
3. app.vue-根组件
? ? ? ? 变化一:脚本script和模板template顺序调整
? ? ? ? 变化二:模板template不再要求唯一根元素
? ? ? ? 变化三:脚本script添加setup标识支持组合式API
5. index.html-单页入口,提供id为app的挂载点
main.js文件?
//1. 从vue中按需导入createApp函数
// createApp函数的作用:创建vue的“单页面应用程序实例”
import { createApp } from ‘vue’

//2. 导入待渲染的App组件
import App from ‘./App.vue’

//3. 调用createApp()函数,返回值是“单页面应用程序的实例”,用常量spa_app接收
//同时把App组件作为参数传给createApp函数,表示把App渲染到index.htnl页面上
const spa_app = createApp(App)

//4. 调用spa_app实例的mount方法,用来指定vue实际要控制的区域
spa_app.mount(‘#app’)
五. setup选项?
1. setup的执行时机,比beforeCreate还要早
2. 也正是因为执行时机太早,setup函数中拿不到this(this是undefined)
<script>
export default {
    setup() {

    },
    beforeCreate() {

    }
}
</script>
setup选项中写代码的特点 :提供的任何数据或函数,想要在模板中应用,必须return
<script>
export default {
    setup() {
        // 数据
        const message = 'this is message'
        // 函数
        const logMessage = () =>{
            console.log(message)
        }
        return {
            message.
            logMessage
        }
    }
}
</script>

<template>
  <div>{{ message }}</div>
  <button @click="logMessage">按钮</button>
</template>如果每次都要return,会很麻烦,所以提供了<script setup>语法糖
// 语法糖写法
<script setup>
// 数据
const message = 'this is message'
// 函数
const logMessage = () => {
    console.log(message)
}
</script>
setup语法糖原理?
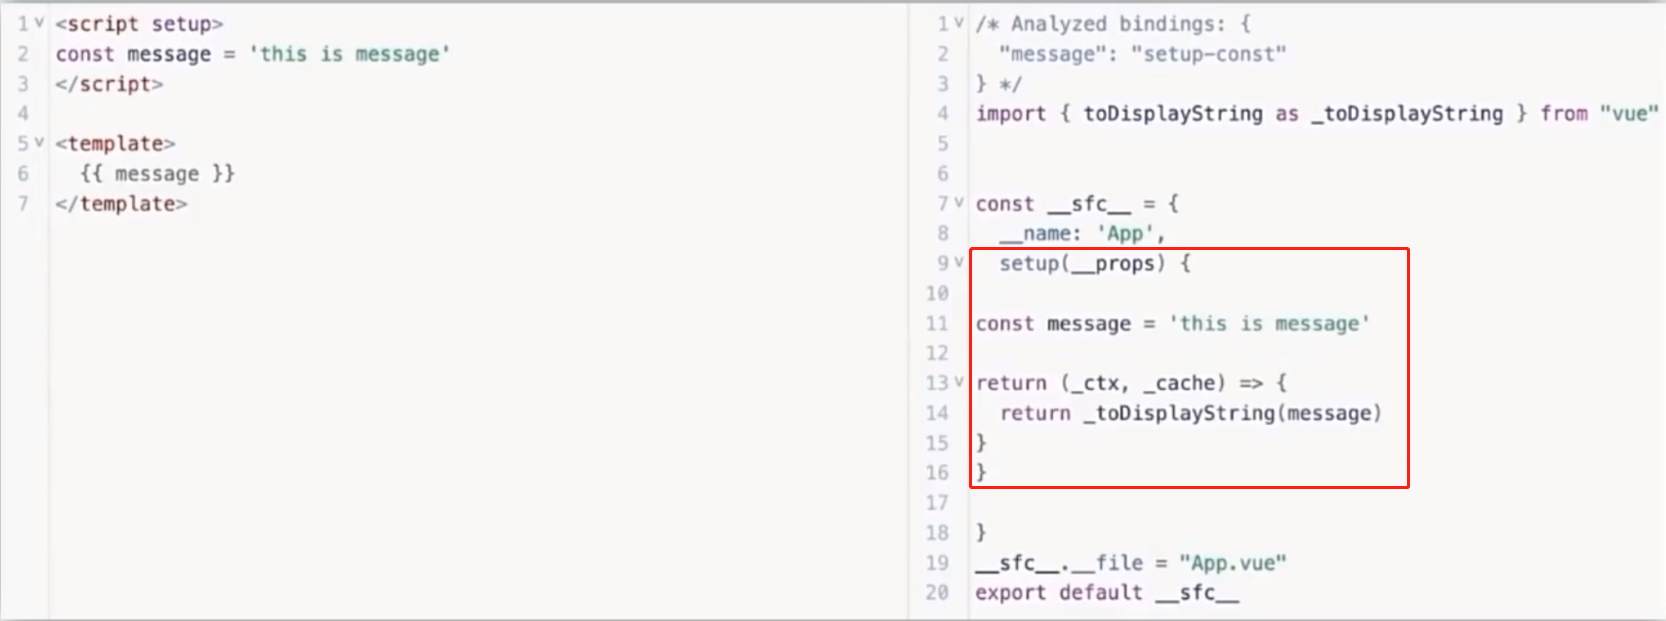
六. reactive和ref函数
reactive()
接受对象类型数据的参数传入并返回一个响应式的对象
<script>
// 导入
import { reactive } from 'vue'

// 执行函数 传入参数 变量接收
const state = reactive(对象类型数据)

</script>


// 举例
<script setup>
import { reactive } from 'vue'
const state = reactive({
  count:100
})
const setCount =()=> {
  state.count++
}
</script>
<template>
  <div>{{ state.count }}</div>
  <button @click="setCount">+1</button>
</template>
ref()
接收简单类型或者对象类型的数据传入并返回一个响应式的对象
<script setup>
// 导入
import { ref } from 'vue'

// 执行函数 传入参数 变量接收
const count = ref(简单类型或者复杂类型数据)

</script>
ref()它其实是在原有传入数据的基础上,外层包了一层对象,包成了复杂类型,底层包成复杂类型之后,再借助reactive实现的响应式。
<script setup>
import { ref } from 'vue'
const count = ref(0)
console.log(count)
</script>
在脚本中通过.value访问数据?
<script setup>
import { ref } from 'vue'
const count = ref(0)
// 在脚本中访问数据通过.value
console.log(count.value)
</script>
在template中不需要加.value就可以访问数据?
<script setup>
import { ref } from 'vue'
const count = ref(0)
console.log(count.value)
</script>

<template>
  // 在template中,.value不需要加(帮我们扒了一层)
  <div>{{ count }}</div>
</template>
对数据进行加一操作
<script setup>
import { ref } from 'vue'
const count = ref(0)
console.log(count.value)
const setCount = () => {
  // 要用.value
  count.value++
}
</script>

<template>
  <div>
    <div>{{ count }}</div>
    <button @click="setCount">+1</button>
  </div>
</template>
七. computed
计算属性基本思想和Vue2的完全一致,组合式API下的计算属性只是修改了写法
<script setup>
// 导入
import { computed } from 'vue'

// 执行函数 变量接收 在回调参数中return计算值
const computedState = computed(()=>{
    return 基于响应式数据做计算之后的值
})
</script>
<script setup>
import {ref, computed } from 'vue'
const list=ref([1,2,3,4,5,6,7,8,9])
const computedList = computed(() => {
return list.value.filter(item=>item>2)
})
</script>
<template>
<div>
<div>原始数据:{{ list }}</div>
<div>计算后的数据:{{ computedList }}</div>
</div>
</template>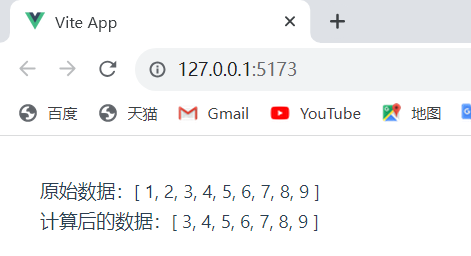
当修改数据时,计算属性动态更新?
<script setup>
import {ref, computed } from 'vue'
const list=ref([1,2,3,4,5,6,7,8,9])
const computedList = computed(() => {
  return list.value.filter(item=>item>2)
})

//定义一个修改数组的方法
const addFn = () => {
  list.value.push(666)
}
</script>

<template>
  <div>
    <div>原始数据:{{ list }}</div>
    <div>计算后的数据:{{ computedList }}</div>
    <button @click="addFn">修改</button>
  </div>
</template>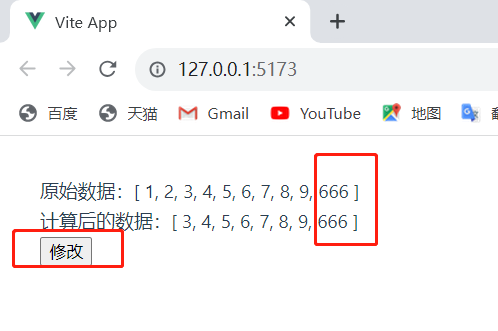
注意:
1. 计算属性当中不应该有副作用:计算属性它整个函数当中应该只包含关于数据的计算过程,不应该包括其他的,比如异步请求,比如操作dom等等
2. 避免直接修改计算属性的值
八. watch
侦听一个或者多个数据的变化,数据变化时执行回调函数?
监听单个数据的变化?
<script>
// 导入watch
import { ref, watch } from 'vue'
const count = ref(0)

// 调用watch侦听变化
watch(count ,(newValue.oldValue) => {
    console.log(`count发生了变化,老值为${oldValue},新值为${newValue}`)
})
</script>
监听多个数据的变化?
<script>
import { ref, watch } from 'vue'
const count = ref(0)
const name = ref('cp')

watch( [count,name],([newCount, newName],[oldCount, oldName])=>{
    console.log('count或name变化了', [newCount, newName],[oldCount, oldName])
})
</script>
举个例子:同时监听count和nickname的变化?
<script setup>
import { ref,watch } from 'vue'
const count = ref(0)
const nickname = ref('张三')

const changeCount = () => {
  count.value++
}
const changeNickname = () => {
  nickname.value='李四'
}

watch([count,nickname], ([newCount,newNickName],[oldCount,oldNickName]) => {
  console.log('变了', [newCount, newNickName], [oldCount, oldNickName])
})
</script>

<template>
  <div>
    <div>{{ count }}</div>
    <button @click="changeCount">改数字</button>
    <div>{{ nickname }}</div>
    <button @click="changeNickname">改昵称</button>
  </div>
</template>
额外参数1:immediate(立即执行)
在侦听器创建时立即触发回调,响应式数据变化之后继续执行回调
const count = ref(0)
watch(count,()=>{
  console.log('count发生了变化')
},{
  immediate: true
})
额外参数2:deep(深度监听),默认watch进行的是浅层监视
const ref1 = ref(简单类型)→可以直接监视
const ref2 = ref(复杂类型)→监视不到复杂类型内部数据的变化
<script setup>
import { ref,watch } from 'vue'

const userInfo = ref({
  name: 'zs',
  age:18
})
const setUserInfo = () => {
  // 修改了userInfo.value,修改了对象的地址,才能监视到
  // userInfo.value = { name: 'ls', age: 50 }
  userInfo.value.age++
}

watch(userInfo, (newValue) => {
  console.log(newValue)
}, {
  deep:true
})
</script>

<template>
  <div>
    <div>{{ userInfo }}</div>
    <button @click="setUserInfo">修改信息</button>
  </div>
</template>
精确监听对象的某个属性
// 需求:在不开启deep的前提下,监听age的变化,只有age变化时,才执行回调
const info = ref({
    name: 'cp',
    age: 18
})

// 第一个参数写成函数的写法,返回要监听的具体属性
watch( () => info.value.age, (newVal, oldVal) => console.log('age发送变化了') )
九. Vue3的生命周期API
| 选项式API | 组合式API |
| beforeCreate/created | setup |
| beforeMount | onBeforeMount |
| mounted | onMounted |
| beforeUpdate | onBeforeUnmount |
| updated | onUpdated |
| beforeUnmount | onBeforeUnmount |
| unmounted | onUnmounted |
以前往created里面写的,现在都写到setup里面
vue3中销毁阶段就不叫destoryed了,就叫onUnmounted了
十. 父子通信
组合式API下的父传子
基本思想:父组件中给子组件绑定属性,子组件内部通过props选项接收
对于局部组件,导入进来就能用?
// 父组件
<script setup>
// 引入子组件
import SonComVue from './son-com.vue'
</script>
<template>
  <!--绑定属性message -->
  <sonComVue message="this is app message"></sonComVue>
</template>


// 子组件
<script setup>
// 2. 通过 defineProps“编译宏”接收子组件传递的数据
const props = defineProps({
    message: String
})
</script>
<template>
  {{ message }}
</template>
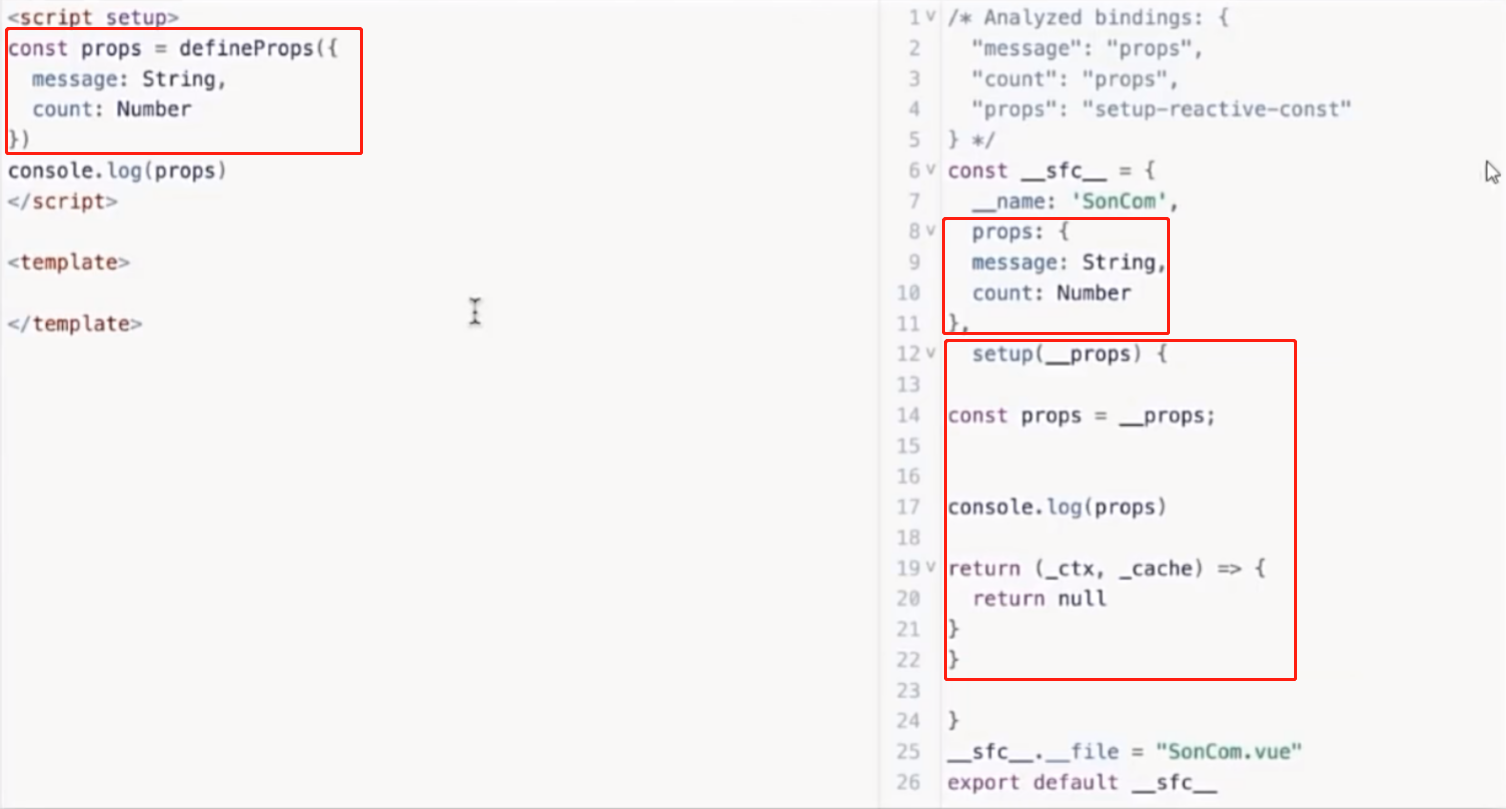
defineProps原理:就是编译阶段的一个标识,实际编译器解析时,遇到后会进行编译转换
组合式API下的子传父
基本思想:父组件中,给子组件标签通过@绑定事件,子组件内部通过emit方法触发事件。
// 父组件
<script setup>
//引入子组件
import sonComVue from './son-com.vue'
const getMessage = (msg) => {
    console.log(msg)
}
</script>

<template>
  <!-- 1. 绑定自定义事件-->
  <sonComVue @get-message="getMessage" />
</template>


//子组件
<script setup>
//2. 通过defineEmits编译宏生成emit方法
const emit = defineEmits(['get-message'])
const sendMsg = () => {
  //3. 触发自定义事件,传递参数
  emit('get-message', 'this is son msg' )
}
</script>
<template>
  <button @click="sendMsg">sendMsg</button>
</template>
十一. 模板引用
通过ref标识获取真实的dom对象或者组件实例对象
模板引用的时机是组件挂载完毕
如何使用:以获取dom为例
<script>
import { ref } from 'vue'
// 1. 调用ref函数得到ref对象
const h1Ref = ref (null)
</script>

<template>
  <!-- 2. 通过ref标识绑定ref对象-->
  <h1 ref="h1Ref">我是dom标签h1</h1>
</template>
例如点击按钮让光标聚焦?
<script setup>
import TestCom from '@/components/test-com.vue'
import { onMounted, ref } from 'vue'
const inp = ref(null)
const clickFn=() => {
  inp.value.focus()
}
</script>

<template>
  <div>
    <input ref="inp" type="text">
    <button @click="clickFn">点击让输入框聚焦</button>
  </div>
</template>
defineExpose()
默认情况下,<script setup>语法糖下组件内部的属性和方法是不开放给父组件访问的。
可以通过defineExpose编译宏指定哪些属性和方法允许使用
<script>
import { ref } from 'vue'
const testMessage = ref('this is test msg')
defineExpose({
    testMessage
})
</script>
十二. provide和inject
顶层组件向任意的底层组件传递数据和方法,实现跨层级组件通信
1. 顶层组件通过provide函数提供数据
provide('key', 顶层组件中的数据)
2. 底层组件通过inject函数获取数据
const message = inject('key')?
跨层传递响应式数据?
// 顶层组件
provide('app-key', ref对象)

// 底层组件
const message = inject('app-key')
跨层传递方法?
顶层组件可以向底层组件传递方法,底层组件调用方法修改顶层组件中的数据
// 顶层组件
const setCount = () =>{
    count.value++
}
provide('setCount-key', setCount)

// 底层组件
const setCount = inject('setCount-key')
十三. Vue3.3新特性defineOptions
defineOptions宏,主要用来定义Options API的选项。
可以用defineOptions定义任意的选项,props,emits,expose,slots除外,因为这些可以用defineXXX来做到。
<script setup>
defineOptions({
    name:'Foo',
    inheritAttrs: false,
    //...更多自定义属性
})
</script>
十四. Vue3中的v-model和defineModel
在Vue3中,自定义组件上使用v-model,相当于传递一个modalValue属性,同时触发update:modelValue事件.
<Child v-model="isVisible">
// 相当于
<Child :modelValue="isVisible" @update:modelValue="isVisible=$event">
// 父组件
<template>
<MyInput v-model="txt"></MyInput>
</template>
// 子组件
<script setup>
defineProps({
modelValue: String
})
const emit = defineEmits(['update:modelValue'])
</script>
<template>
<div>
<input type="text" :value="modelValue" @input="e=> emit('update:modelValue',e.target.value)">
</div>
</template>defineModal(试验性质的特性)
<script setup>
import { defineModal } from 'vue'
const modelValue = defineModal()
modelValue.value++
</script>

// 使用defineModal需要在vite.config.js中配置
plugins:[
  vue({
    script:{
      defineModal: true
    }
  }),
]
// 开完记得重启项目
十五. Pinia
Pinia是Vue的最新状态管理工具,是Vuex的替代品
1. 提供更简单的API(去掉了mutation)
2. 提供符合,组合式的API(和Vue3新语法统一)
3. 去掉了modules的概念,每一个store都是一个独立的模块
4. 配合TypeScript更加友好,提供可靠的类型推断?
手动添加Pinia到Vue项目
// 1. 使用Vite创建一个空的Vue3项目
npm create vue@latest

// 2. 按照官方文档安装pinia到项目中
import { createApp } from 'vue'
import {createPinia} from 'pinia'
import App from './App.vue'
// 创建pinia实例
const pinia = createPinia()
// 可以这样写
// createApp(App).use(pinia).mount('#app')
// 也可以这样写
const app = createApp(App)
app.use(pinia).mount('#app')Pinia基础使用-计数器案例
1. 定义store
2. 组件使用store?
// 这里是store文件夹下的counter.js
import { defineStore } from 'pinia'
import { computed, ref } from 'vue'

// 定义store defineStore(仓库的唯一标识,()=>{...})
export const useCounterStore=defineStore('counter', () => {
    // 声明数据 state-count
    const count =ref(0)
    // 声明操作数据的方法 action
    const addCount = () => count.value++
    const subCount=()=>count.value--
    //声明基于数据派生的计算属性getters
    const double=computed(()=>count.value*2)
    // 声明数据state-msg
    const msg = ref('hello pinia')
    return {
        count,
        addCount,
        subCount,
        double,
        msg
    }
})

// 这里是components文件夹下的Son1Com.vue组件
<script setup>
import { useCounterStore } from '@/store/counter'
const counterStore= useCounterStore
</script>
<template>
    <div>
        我是Son1.vue-0-{{ counterStore.count }}-{{ counterStore.double }}
        <button @click="counterStore.addCount">+</button>
    </div>
</template>
?Pinia-action异步实现
// 这里是store文件夹下的channel.js
import { defineStore } from 'pinia'
import { ref } from 'vue'
import axios from 'axios'
export const useChannelStore = defineStore('channel', () => {
    // 声明数据state
    const channerList = ref([])
    // 声明操作数据的方法action
    const getList = async () => {
        const {data:{data}} = await axios.get('http://geek.itheima.net/v1_0/channels')
        channerList.value=data.channels
    }
    //声明基于数据派生的计算数据getters
    return {
        channerList,
        getList
    }
})
Pinia-storeToRefs方法?
import { storeToRefs } from 'pinia'

// 使用storeToRefs()为每一个响应式属性创建引用
const { count , msg } = storeToRefs(counterStore)
const { channelList } = storeToRefs(channelStore)

// action可以直接解构
const { getList } = channelStore
Pinia持久化插件
// 使用前确保自己已经安装了Pinia

// 1. 安装插件
npm i pinia-plugin-persistedstate

// 2. main.js使用
import persist from 'pinia-plugin-persistedstate'

...
app.use(createPinia().use(persist))

// 3. store仓库中,开启
// 在第三个参数里面加上 (第一个参数是唯一标识,第二个参数是里面的核心逻辑)
persist: true
// 可以自己配key
persist:{
    key:'xiaoxiong-counter'
}
// 可以自己配存储
persist:{
    storage: sessionstorage
}
// 用path 指定哪些state中的哪些数据持久化
persist :{
    paths:['count']
}
十六. 路由语法的不同
vue-Router3路由的初始化?
import VueRouter from 'vue-router'

// 初始化vue-router3.x(Vue2)
const router = new VueRouter({
    mode:'history',
    routes: [],
})
export default router
vue-Router4路由的初始化
import { createRouter, createWebHistory } from 'vue-router'
// 初始化 vue-router4.x(Vue3)
const router = createRouter({
  // 1. history模式:createWebHistory 地址栏不带#
  // 2. hash模式:createWebHashHistory 地址栏带#
  history: createWebHistory(import.meta.env.BASE_URL),
  routes: []
})

export default router
在Vue3的CompositionAPI中
1. 获取路由对象router useRouter
? ? ? ? const router = useRouter()
2. 获取路由参数route useRoute
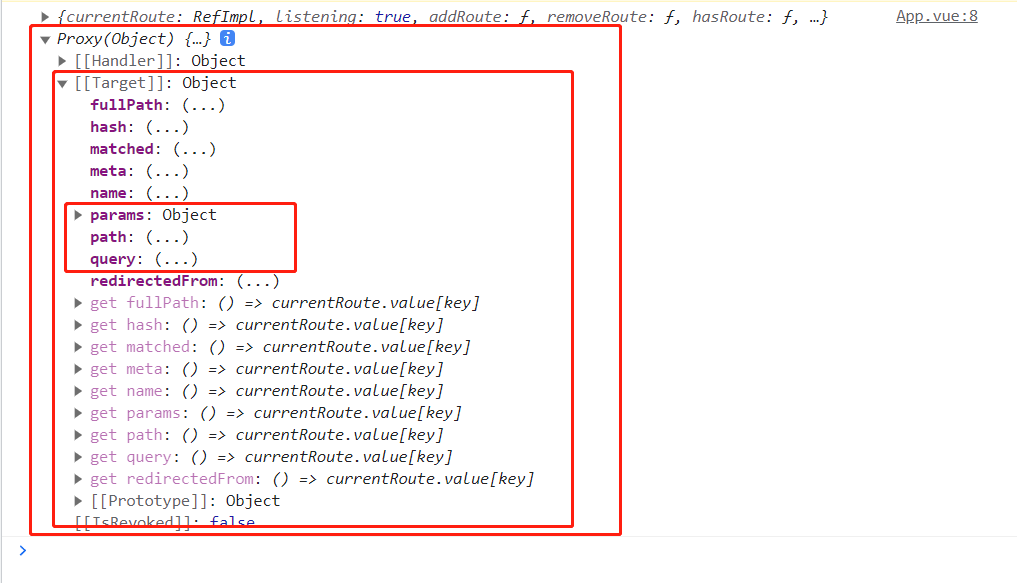
? ? ? ? const route = useRoute()
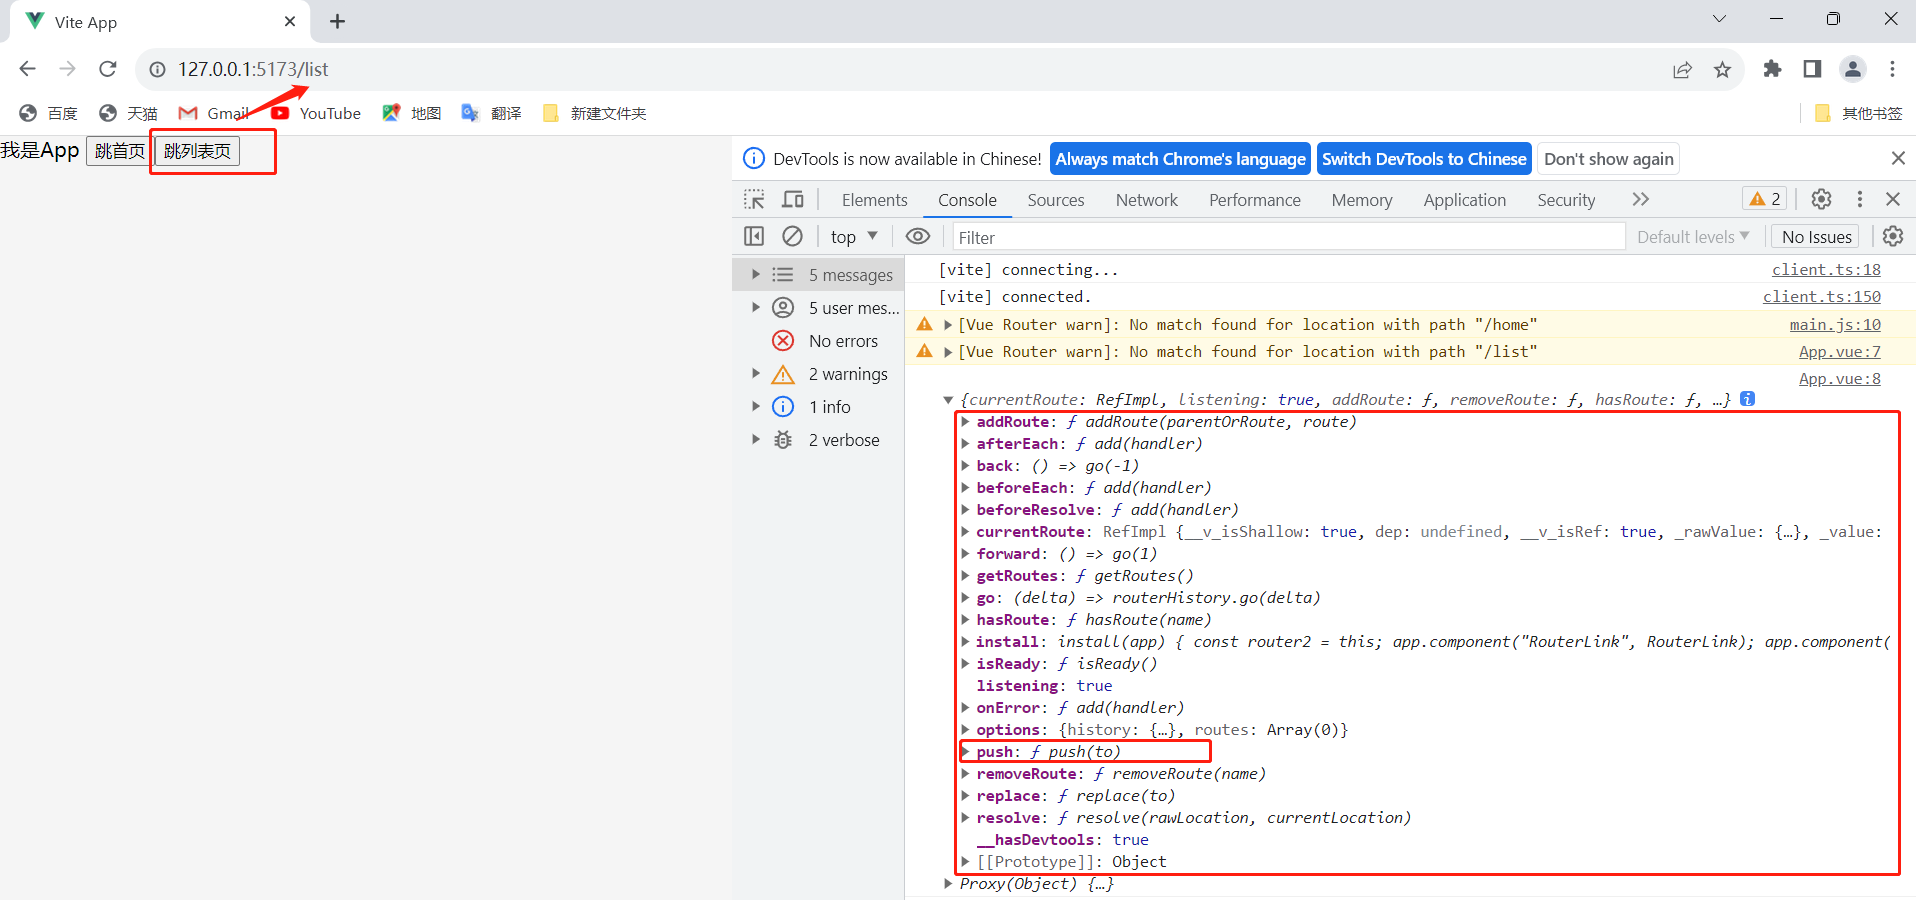
<script setup>
import { useRouter, useRoute } from 'vue-router'
const router = useRouter()
const route = useRoute()

const goList = () => {
  router.push('/list')
  console.log(router, route)
}
</script>

<template>
  <div>
    我是App
    <button @click="$router.push('/home')">跳首页</button>
    <button @click="goList">跳列表页</button>
  </div>
</template>
 ?
?
?
?
本文来自互联网用户投稿,该文观点仅代表作者本人,不代表本站立场。本站仅提供信息存储空间服务,不拥有所有权,不承担相关法律责任。 如若内容造成侵权/违法违规/事实不符,请联系我的编程经验分享网邮箱:chenni525@qq.com进行投诉反馈,一经查实,立即删除!
- Python教程
- 深入理解 MySQL 中的 HAVING 关键字和聚合函数
- Qt之QChar编码(1)
- MyBatis入门基础篇
- 用Python脚本实现FFmpeg批量转换
- 张量(Tensor)维度尺寸对不齐(Expected size xx but got size xx for tensor)
- Mysql四种事务隔离级别(简易理解)
- 计算机报错mfc100.dll丢失的修复教程,一招搞定电脑找不到dll问题
- 【SAP-PP】生产订单导入问题--完成日期向前推了一天
- Oracle 19c OCP 082考场真题讲解第14题
- ocker ps -a 要求只显示自己想要的信息
- CANoe中的AutoSequence
- git拉取远程分支到本地
- 80多套 Python 数据可视化炫酷大屏模板,全网最新、最多,最全、最酷、最炫大数据可视化模板
- Leetcode1143. 最长公共子序列