数据结构与算法—哈希表
发布时间:2023年12月18日
哈希表
1. 问题引出
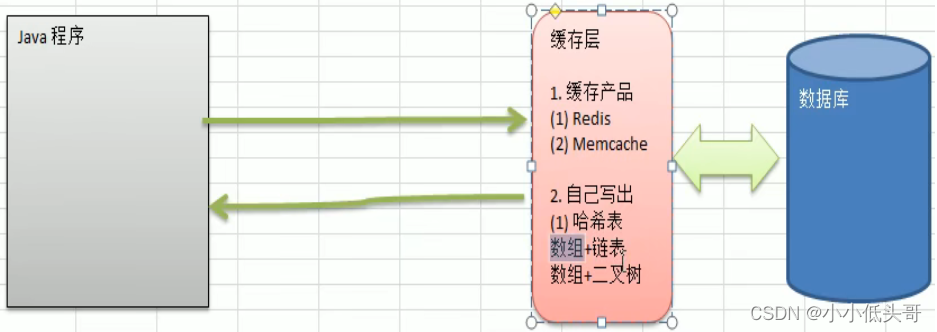
??看一个实际需求,google公司的一个上机题:有一个公司,当有新的员工来报道时,要求将该员工的信息加入(id,性别,年龄等),当输入该员工的id时,要求查到该员工的所有信息。要求: 不使用数据库,尽量节省内存,速度越快越好=>哈希表(散列)。
2. 基本介绍
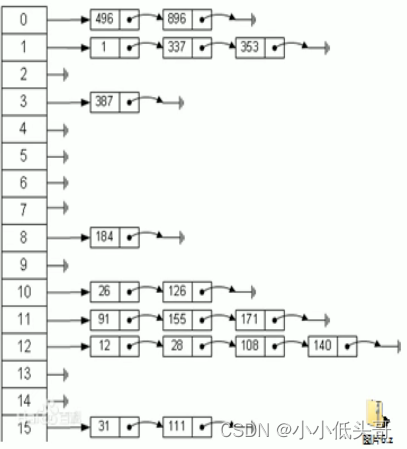
??散列表 (Hash table,也叫哈希表),是根据关键码值(Key value)而直接进行访问的数据结构。也就是说,它通过把关键码值映射到表中一个位置来访问记录,以加快查找的速度。这个映射函数叫做散列函数,存放记录的数据叫做散列表。


3. 应用实例
题目:有一个公司,当有新元哦概念股来报道时,就将该员工的信息加入(id,name),当输入该员工的id时,要求找到该员工的所有信息
要求:不使用数据库,速度越快越好 => 哈希表

代码如下[包含 增 删 查]
class HashTab {  //哈希表
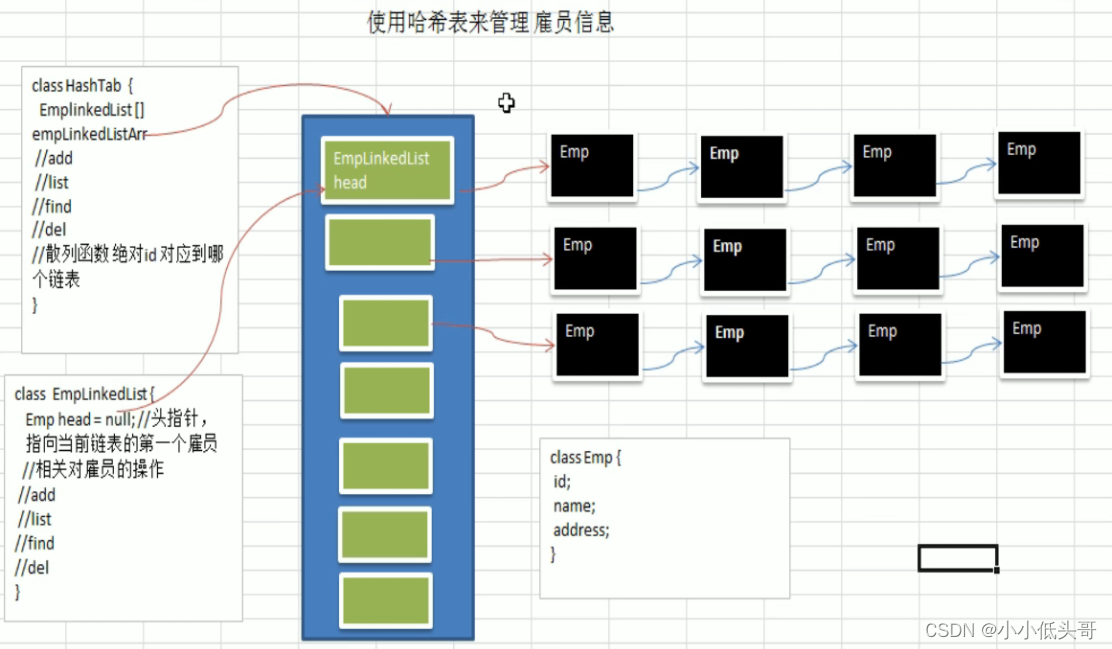
    //定义大小为size的EmpLinkedList数组
    private int size;
    private EmpLinkedList[] empLinkedLists;

    public HashTab(int size) {
        this.size = size;
        //设置大小
        empLinkedLists = new EmpLinkedList[size];
        //但是注意!!!
        //数组大小虽然决定了 但是数组里的元素默认初始化为null
        //即每个EmpLinkedList = null;
        //需要初始化
        for (int i = 0; i < size; i++) {
            empLinkedLists[i] = new EmpLinkedList();//初始化每个元素链表
        }
    }

    public void findEmpById(int no) {  //通过Id找对象
        //empLinkedLists[hashFun(no)] 找到对应的链表
        //.find(no) 在对应的链表中找相应的节点
        empLinkedLists[hashFun(no)].find(no);
    }

    public void delete(int no){ //根据编号删除对应元素
        //empLinkedLists[hashFun(emp.getId())] 找到对应的链表
        //.delete在对应的链表中删除节点
        empLinkedLists[hashFun(no)].delete(no);
    }

    public void add(Emp emp) {   //添加元素到哈希表中
        //empLinkedLists[hashFun(emp.getId())] 找到对应的链表
        //.add添加对象到对应的链表中
        empLinkedLists[hashFun(emp.getId())].add(emp);
    }

    public void list() { //显示哈希表中的数据
        for (int i = 0; i < size; i++) {
            empLinkedLists[i].list(i);   //依次显示每一条链表的数据
        }
    }

    public int hashFun(int no) {   //散列函数 用来决定数据放哪一个链表
        return no % size;   //返回编号对size的取模
    }
}

class EmpLinkedList {    //定义Emp链表
    private Emp head = null;    //定义头节点

    public void add(Emp emp) {   //添加新员工 直接添加到最后一个位置
        if (head == null) {   //如果头节点是空的
            head = emp; //直接把头节点指向次员工
            return;
        }
        Emp temp = head;
        while (temp.getNext() != null) {//遍历到最后一个节点退出循环
            temp = temp.getNext();   //继续下一个节点
        }
        //退出循环后 此节点指向最后一个节点
        temp.setNext(emp);  //将最后一个节点next指向新的节点
    }

    public void delete(int no) { //根据no号删除对应的节点
        if (head == null) {
            System.out.println("此处无垠三变量");
            return;
        } else if (head.getId() == no) {   //如果头节点就是要删除的对象
            head = head.getNext();  //则直接头节点后移就行了
            return;
        }

        Emp temp = head;
        while (temp.getNext() != null) {
            if (temp.getNext().getId() == no) { //如果下一个节点是删除的节点
                temp.setNext(temp.getNext().getNext()); //将temp的next指向后面第二位
                break;
            }
            temp = temp.getNext();  //否则后移 继续判断下一位
        }
    }

    public void find(int no) {   //查找对应no是否存在
        if (head == null) {
            System.out.println("目标不存在");
            return;
        }
        Emp temp = head;
        while (temp != null) {//遍历每一个节点
            if (temp.getId() == no) { //说明找到了对应的目标
                System.out.println(temp);   //输出对应的信息
                return;
            }
            temp = temp.getNext();   //继续下一个节点
        }
        //正常退出循环后 说明目标不存在
        System.out.println("目标不存在");
    }

    public void list(int no) { //显示链表
        if (head == null) {   //说明为空
            System.out.println("第" + (no + 1) + "条链表为空");
            return;
        }
        Emp temp = head;
        System.out.print("第" + (no + 1) + "条链表:");
        while (temp != null) {//遍历每一个节点
            System.out.print(temp + " ");
            temp = temp.getNext();   //继续下一个节点
        }
        System.out.println();
    }
}

class Emp {  //定义Emp节点

    private int Id; //编号
    private String name;    //名字
    private Emp next;   //指向下一个节点 默认为null

    public Emp(int id, String name) {   //构造器
        Id = id;
        this.name = name;
    }

    public Emp getNext() {
        return next;
    }

    public void setNext(Emp next) {
        this.next = next;
    }

    public int getId() {
        return Id;
    }

    public void setId(int id) {
        Id = id;
    }

    public String getName() {
        return name;
    }

    public void setName(String name) {
        this.name = name;
    }

    @Override
    public String toString() {
        return "{" +
                "Id=" + Id +
                ", name='" + name + '\'' +
                ", next=" + (next == null ? null : next.hashCode()) +
                '}';
    }
}
其实整个代码不难理解,就是在链表的基础上,创建了多个链表进行管理。看韩老师敲一遍代码,自己就能敲出来了。
文章来源:https://blog.csdn.net/weixin_49429082/article/details/135051628
本文来自互联网用户投稿,该文观点仅代表作者本人,不代表本站立场。本站仅提供信息存储空间服务,不拥有所有权,不承担相关法律责任。 如若内容造成侵权/违法违规/事实不符,请联系我的编程经验分享网邮箱:chenni525@qq.com进行投诉反馈,一经查实,立即删除!
本文来自互联网用户投稿,该文观点仅代表作者本人,不代表本站立场。本站仅提供信息存储空间服务,不拥有所有权,不承担相关法律责任。 如若内容造成侵权/违法违规/事实不符,请联系我的编程经验分享网邮箱:chenni525@qq.com进行投诉反馈,一经查实,立即删除!
最新文章
- Python教程
- 深入理解 MySQL 中的 HAVING 关键字和聚合函数
- Qt之QChar编码(1)
- MyBatis入门基础篇
- 用Python脚本实现FFmpeg批量转换
- 数模学习day08-拟合算法
- C++ //练习 2.5 指出下述字面值的数据类型并说明每一组内几种字面值的区别:
- [NOIP2006 提高组] 作业调度方案(待修改)
- 如何进行继电器负载测试
- C++项目之酒店客房管理系统架构——设计模式应用场景详解(上)
- 非父子组件通信的方法
- linux信号量封装
- 万店时代新茶饮“封场围猎”,古茗赴港IPO以备战?
- Armv8-M的TrustZone技术之内存属性单元
- LC 2807. 在链表中插入最大公约数