CentoS 解决Tor浏览器Tor网络被封禁的问题
一,安装Tor浏览器教程(转载)
本文章主要讲Tor网络被封禁的问题,tor的安装教程直接转载,我会详细讲被封禁的问题
准备
- 安装 tor
服务器上装的是Centos 7 系统,在这里就只记录Centos 7 的安装方式。其它系统的安装方式大同小异,具体可以google一下。
- 首先 update 一下 yum 源,添加 tor 的 repo
sudo yum install epel-release sudo yum install tor- 安装完成以后,启动 tor 服务
?
?
sudo systemctl start tor # 启动 tor 服务 sudo systemctl enable tor # 设置开机自启
 sudo systemctl status tor # 查看 tor 运行状态,显示为 active 表示启动成功,服务正在运行

?

?- 配置 tor 服务 这一步网上的教程里面一般讲的不是很详细,中间遇到的坑会比较多。
- 先测试一下是否可以连接 tor 代理服务
sudo yum install nc echo -e 'AUTHENTICATE' | nc 127.0.0.1 9051不出意外,输出应该是 Connection refused。
这里使用的 netcat 用来测试 tor 代理端口的连接情况,具体关于 netcat 的介绍,可以 google 一下
要解决上面的问题,我们需要先配置一下 tor 服务的 ControlPort
echo "ControlPort 9051" >> /etc/tor/torrc # 这里的端口可以自定义,设置完成后记得打开防火墙打开该端口的监听Tor 的配置文件目录为 etc/tor/torrc,可以使用 vim 在配置文件末尾添加或者只用命令写入文件末尾(vim 修改避免命令不熟悉出错)。重启 tor 服务
sudo systemctl restart tor再用 netcat 测试一遍
echo -e "AUTHENTICATE" | nc 127.0.0.1 9051 # 输出 515 Authentication failed: Wrong length on authentication cookie.网上很多教程在设置完 ControlPort 这一步就停止了,其实这里还有一个坑,就是我们要设置一个 HashedControlPortPassword,即端口密码。这个密码是 tor 通过 hash 生成的密码。生成方式非常简单,使用 tor 来生成即可:
echo HashedControlPassword $(tor --hash-password "my password" | tail -n 1) >> /etc/tor/torrc # 使用 tor --hash-password + 你设置的密码生成 hash 密码,然后追加写入到配置文件的最后一行这里建议命令使用不熟悉的还是用 vim 的方式手动写入,免得少打一个 “>” 符号,把文件覆盖掉了。
查看一下写入情况:
tail -n -2 /etc/tor/torrc
 # ControlPort 9051
# HashedControlPassword 16:........
 # 看到上面那两行,即表示写入成功,我们重启 tor 服务 systemctl restart tor
再次使用 netcat 测试一下:
echo -e 'AUTHENTICATE "my password"' | nc 127.0.0.1 9051
# 250 OK
至此,配置已经大功告成。
-
测试 tor 服务的使用
- 测试一下服务器的公网IP和使用 tor 代理访问的 IP,看看 tor 服务是否生效
curl http://icanhazip.com # 你的公网 IP torify curl http://icanhazip.com # tor 代理访问的 IP- 切换 IP 测试:这里有两种方式,第一种是通过命令行进行切换:
-
再运行一次上面的命令看下IP有没有成功切换? ???????echo -e 'AUTHENTICATE "my password"\r\nsignal NEWNYM\r\nQUIT' | nc 127.0.0.1 9051 # 第一段 echo -e 'AUTHENTICATE "my password"' 为测试服务连通性 # signal NEWNYM 命令表示 切换IP # QUIT 命令表示 断开连接 ?
torify curl http://icanhazip.com
 # 如无意外,这次输出的 IP 应该是成功切换后的 IP
至此, tor 代理配置全部完成。
二,解决Tor浏览器Tor网络被封禁的问题(重点)
一般安装还会出现一下错误
13-11-17 19:52:24.300 [NOTICE] Bootstrapped 10%: Finishing handshake with direc Tor y server
13-11-17 19:53:49.300 [WARN] Problem bootstrapping. Stuck at 10%: Finishing handshake with directory server. (DONE; DONE; count 10; recommendation warn; host [host] at xxx.xxx.xxx.xx:xxx)
13-11-17 19:53:49.300 [WARN] 10 connections have failed:
13-11-17 19:53:49.300 [WARN]  9 connections died in state handshaking (TLS) with SSL state SSLv2/v3 read server hello A in HANDSHAKE
13-11-17 19:53:49.300 [WARN]  1 connections died in state connect()ing with SSL state (No SSL object)
说明 Tor 和目录服务器无法完成 TLS 握手
需要安装网桥
安装教程:
??????http://www.github.com/Yawning/obfs4
从这个链接下载obfs4
cd obfs4 #进入obfs4目录
go build -o obfs4proxy/obfs4proxy ./obfs4proxy
cp ./obfs4proxy/obfs4proxy /usr/bin/obfs4proxy
这就安装成功了
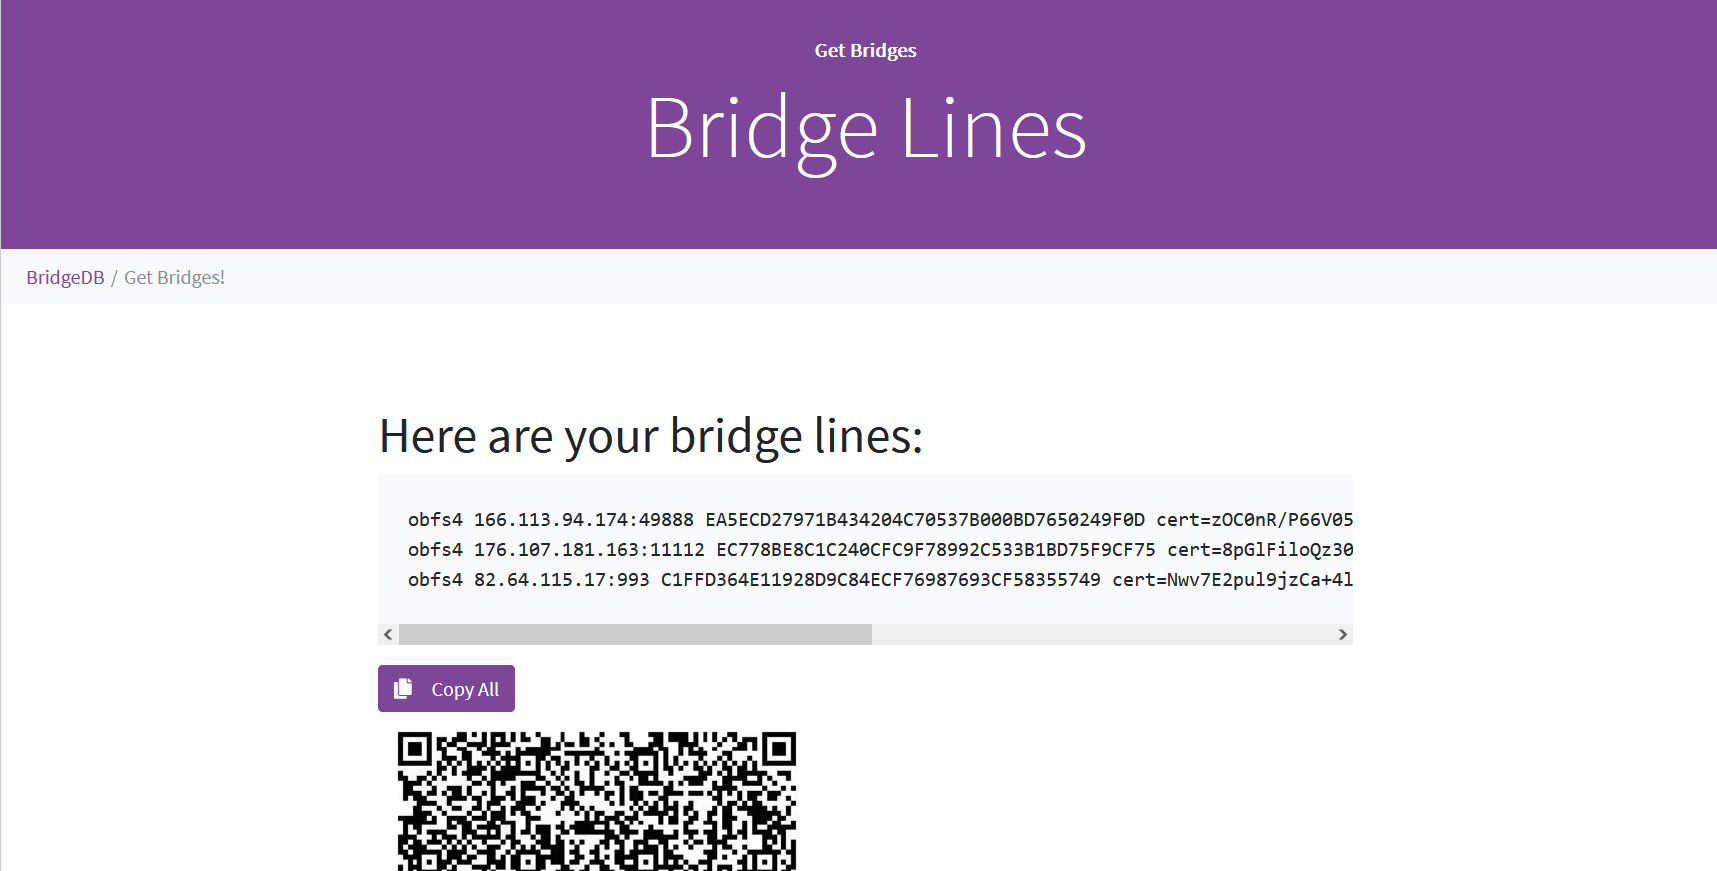
获取obfs4网桥:
输入验证码后会有如下画面

复制网桥
进入/etc/tor/torrc?文件
ClientTransportPlugin obfs4 exec /usr/bin/obfs4proxy
Bridge obfs4 77.116.217.120:59126 5A1C6F3FEB89849001EDBFF45C17025E9C6324A3 cert=NyiABUP2ym213/zjXUVcBqe/HaGHnz6no30XXynqkDCFo9+bKTt+8JdWN6zUygHESaVPEw iat-mode=0
#这一行是网桥地址,将之前获取的贴贴在Bridge后面
UseBridges 1
重启Tor
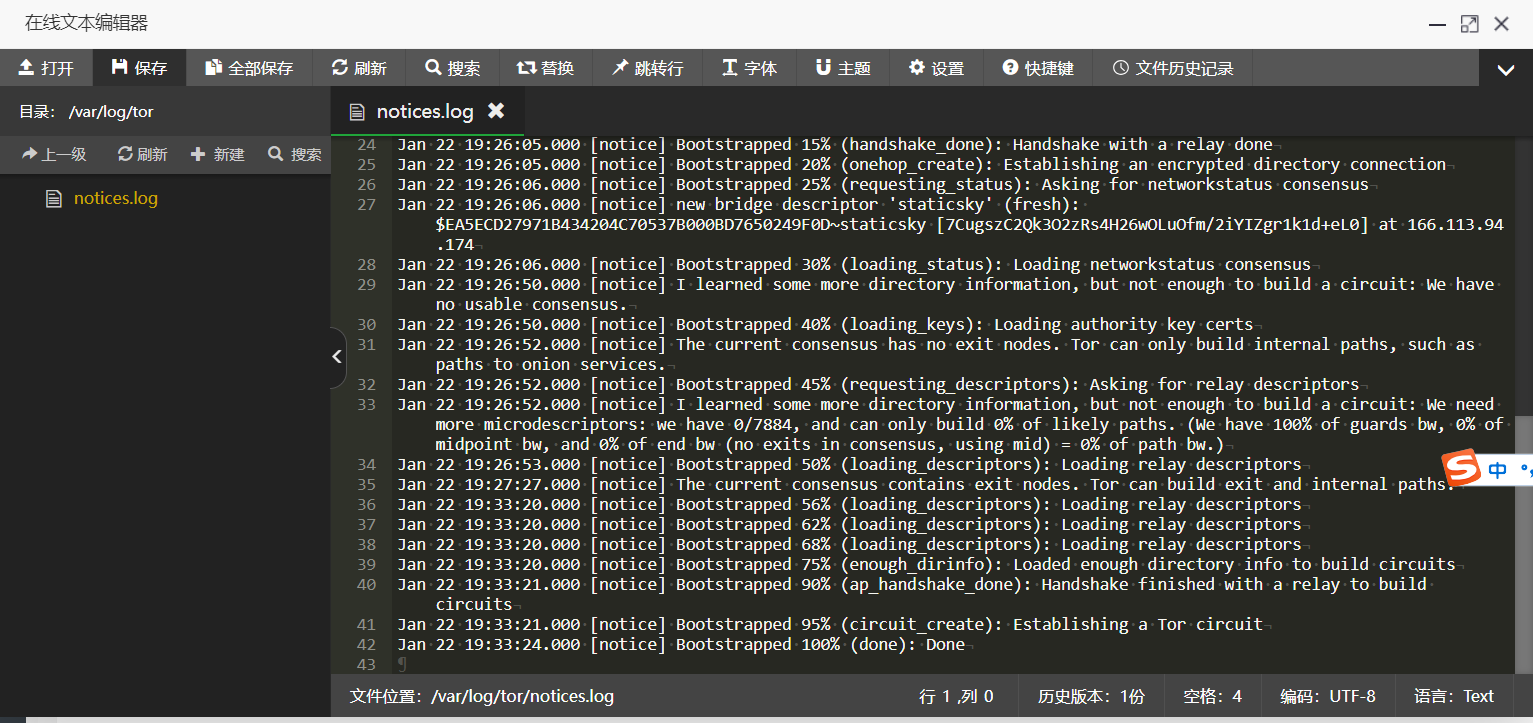
systemctl restart tor?可以看到日志

连接完成
本文来自互联网用户投稿,该文观点仅代表作者本人,不代表本站立场。本站仅提供信息存储空间服务,不拥有所有权,不承担相关法律责任。 如若内容造成侵权/违法违规/事实不符,请联系我的编程经验分享网邮箱:chenni525@qq.com进行投诉反馈,一经查实,立即删除!
- Python教程
- 深入理解 MySQL 中的 HAVING 关键字和聚合函数
- Qt之QChar编码(1)
- MyBatis入门基础篇
- 用Python脚本实现FFmpeg批量转换
- 【NLP论文】02 TF-IDF 关键词权值计算
- OpenCV:绘制图像中目标的最小外接矩形及交点直线
- 恒悦sunsite博客2023年总结及2024年展望
- [C#]使用winform部署PP-MattingV2人像分割onnx模型
- 公告确认!四维图新旗下杰发科技获得某国际知名电子厂商定点
- 如何读取csv文件中的复杂多层嵌套字典(基于pandas)
- 掌握Spring MVC拦截器整合技巧,实现灵活的请求处理与权限控制!
- 学习记录10-L6406E报错处理
- Jmeter测试关联接口
- Poi实现复杂Excel导出,理解POI操作Excel思路!!!