双因子认证(Two-factor authentication)
一、简介
简言之,双因素身份验证(也称为“两步验证”)是指身份验证涉及两个阶段——通常是除了常规密码)之外的某种一次性密码(OTP:One-Time Password)。网上银行已经使用这种方法很长一段时间了,最近这种方法也在全网流行起来。还有其他可用的方法,但基于时间的一次性密码(TOTP)非常常用。有几个移动应用程序支持该标准,Google Authenticator就是其中之一(Android、iOS)
摘抄自:https://vaadin.com/blog/two-factor-authentication-with-google-authenticator
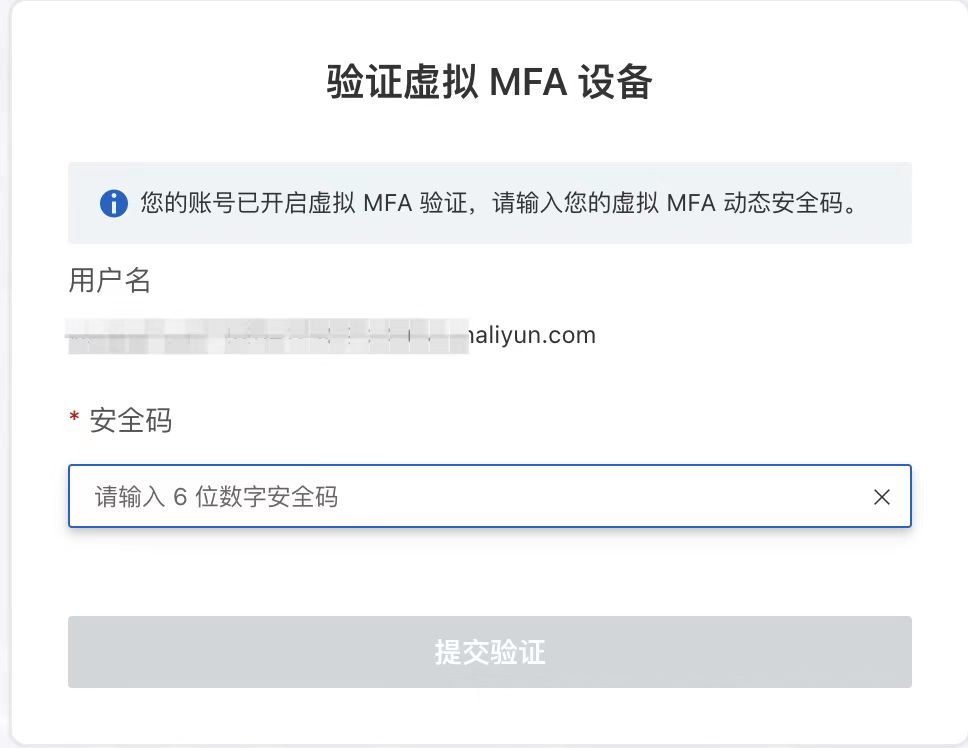
下图就是一个使用场景。( MFA(Multi-Factor Authentication)


二、TOTP
1、什么是TOTP
TOTP:全称是"基于时间的一次性密码"(Time-based One-time Password)。它是公认的可靠解决方案,已经写入国际标准RFC6238。
2、TOTP的简单原理
TOTP基于具有时间戳计数器的OTP(一次性密码),其算法公式为TOTP=HMAC-SHA-1(K, (T - T0)/X),其中K为共享密钥,T为当前时间戳,T0为开始的时间戳,X为时间步长(或者叫时间窗口)。
- **密钥生成:**在为帐户设置TOTP时,将生成一个唯一的密钥。该密钥在用户设备和认证服务器之间共享。
- **时间同步:**用户设备和认证服务器需要同步到相同的时间源。TOTP算法依赖于当前时间来生成一次性密码。
- **OTP生成:**TOTP算法将密钥和当前时间结合起来,应用Hash函数生成一次性密码。此密码通常包含6-8位数字,并具有有限的有效期,例如30或60秒。
- **OTP验证:**当用户尝试登录时,输入常规密码以及由TOTP应用程序或设备生成的一次性密码。然后,认证服务器根据共享密钥和当前时间独立生成预期的OTP。如果用户输入的OTP与服务器生成的OTP匹配,则授权访问。
3、Java实现
import org.apache.commons.codec.binary.Base32;
import javax.crypto.Mac;
import javax.crypto.spec.SecretKeySpec;
import java.nio.ByteBuffer;
import java.time.Instant;
public class TestTOTP {
public static void main(String[] args) throws Exception {
    //生成Code
    int code = generalCode();
    //正确的情况
    verifyCode(code);
    //错误的情况
    verifyCode(666666);
}

/**
 * 基于TOTP生成Code
 */
public static int generalCode() throws Exception {
String base32Key = "123456";
long timestamp = Instant.now().getEpochSecond() / 60; // 每30秒变化一次验证码

ByteBuffer buffer = ByteBuffer.allocate(8);
buffer.putLong(timestamp);
byte[] timeBytes = buffer.array();

Base32 base32 = new Base32();
SecretKeySpec secretKeySpec = new SecretKeySpec(base32.decode(base32Key), "HmacSHA1");
Mac mac = Mac.getInstance("HmacSHA1");
mac.init(secretKeySpec);
byte[] hmacBytes = mac.doFinal(timeBytes);

int offset = hmacBytes[hmacBytes.length - 1] & 0xF;
int otp = ((hmacBytes[offset] & 0x7F) << 24) |
((hmacBytes[offset + 1] & 0xFF) << 16) |
((hmacBytes[offset + 2] & 0xFF) << 8) |
(hmacBytes[offset + 3] & 0xFF);
otp %= 1000000; // 生成6位验证码
System.out.println("TOTP: " + otp);
return otp;
}

/**
 * 校验Code是否正确
 */
public static void verifyCode(int userOTP) throws Exception {
    String base32Key = "123456";

    long timestamp = Instant.now().getEpochSecond() / 60; // 每30秒变化一次验证码
    ByteBuffer buffer = ByteBuffer.allocate(8);
    buffer.putLong(timestamp);
    byte[] timeBytes = buffer.array();

    Base32 base32 = new Base32();
    SecretKeySpec secretKeySpec = new SecretKeySpec(base32.decode(base32Key), "HmacSHA1");
    Mac mac = Mac.getInstance("HmacSHA1");
    mac.init(secretKeySpec);
    byte[] hmacBytes = mac.doFinal(timeBytes);

    int offset = hmacBytes[hmacBytes.length - 1] & 0xF;
    int otp = ((hmacBytes[offset] & 0x7F) << 24) |
    ((hmacBytes[offset + 1] & 0xFF) << 16) |
    ((hmacBytes[offset + 2] & 0xFF) << 8) |
    (hmacBytes[offset + 3] & 0xFF);
    otp %= 1000000; // 生成6位验证码

    if (otp == userOTP) {
        System.out.println("Verification successful!");
    } else {
        System.out.println("Verification fail!");

    }
}
三、Google双因子认证
1、流程

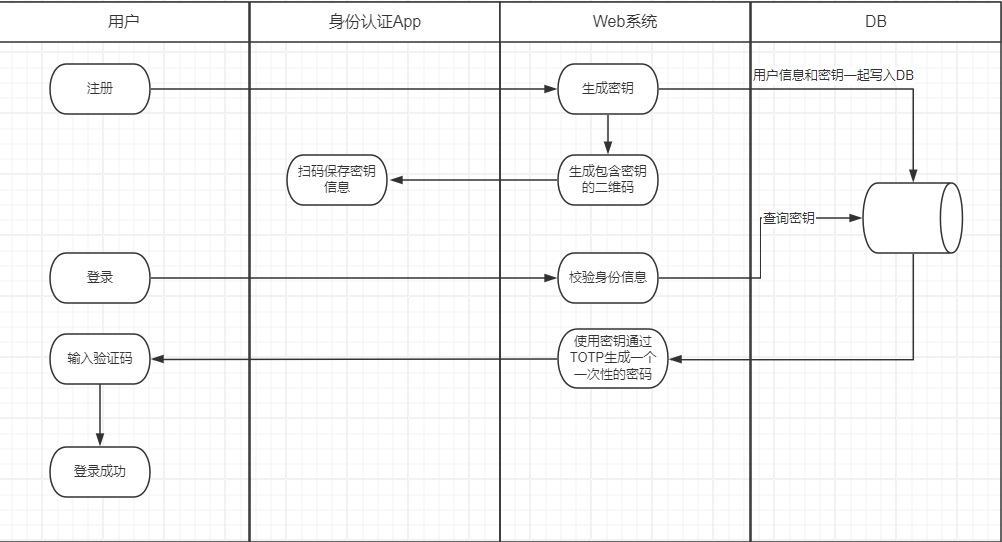
1、用户注册成功时,由后台系统生成随机的密钥(每个用户的密钥不同),注意这里的密钥并不是用于登录,而是之后用于生成一次性动态的密码。
2、将密钥保存到用户信息中,同时将含有密钥的信息发送给用户,可以通过扫描二维码的形式。
3、当用户登录时,第一步校验用户的账号密码是否正确,如果能够正确登录则获取数据库中用户的密钥,与当前时间生成一个一次性的密码。
4、身份认证APP也使用同样的密钥去尝试生成一个动态密码,由服务端来判断这两个密码是否一致,如果一致则表示登录成功,否则登录失败,触发其他的逻辑。
2、Java实现
下面是一个Java实现的版本
import org.apache.commons.codec.binary.Base32;
import org.apache.commons.codec.binary.Base64;

import javax.crypto.Mac;
import javax.crypto.spec.SecretKeySpec;
import java.security.InvalidKeyException;
import java.security.NoSuchAlgorithmException;
import java.security.SecureRandom;

/**
 * Java Server side class for Google Authenticator's TOTP generator
 * Thanks to Enrico's blog for the sample code:
 *
 * @see <a href="http://thegreyblog.blogspot.com/2011/12/google-authenticator-using-it-in-your.html">...</a>
 * @see http://code.google.com/p/google-authenticator
 * @see http://tools.ietf.org/id/draft-mraihi-totp-timebased-06.txt
 */
public class GoogleAuthenticator {


    // 生成的key长度( Generate secret key length)
    private static final int SECRET_SIZE = 10;

    private static final String SEED = "g8GjEvTbW5oVSV7avL47357438reyhreyuryetredLDVKs2m0QN7vxRs2im5MDaNCWGmcD2rvcZx";
    // Java实现随机数算法
    private static final String RANDOM_NUMBER_ALGORITHM = "SHA1PRNG";
    // 最多可偏移的时间
    private int window_size = 1; // default 3 - max 17

    /**
     * set the windows size. This is an integer value representing the number of
     * 30 second windows we allow The bigger the window, the more tolerant of
     * clock skew we are.
     *
     * @param s window size - must be >=1 and <=17. Other values are ignored
     */
    public void setWindowSize(int s) {
        if (s >= 1 && s <= 17)
            window_size = s;
    }

    /**
     * Generate a random secret key. This must be saved by the server and
     * associated with the users account to verify the code displayed by Google
     * Authenticator. The user must register this secret on their device.
     * 生成一个随机秘钥
     *
     * @return secret key
     */
    public String generateSecretKey() {
        SecureRandom sr;
        try {
            sr = SecureRandom.getInstance(RANDOM_NUMBER_ALGORITHM);
            sr.setSeed(Base64.decodeBase64(SEED));
            byte[] buffer = sr.generateSeed(SECRET_SIZE);
            Base32 codec = new Base32();
            byte[] bEncodedKey = codec.encode(buffer);
            return new String(bEncodedKey);
        } catch (NoSuchAlgorithmException e) {
            // should never occur... configuration error
            e.printStackTrace();
        }
        return null;
    }

    /**
     * 生成绑定二维码(字符串)
     *
     * @param account   账户信息(展示在Google Authenticator App中的)
     * @param secretKey 密钥
     * @param title     标题 (展示在Google Authenticator App中的)
     * @return
     */
    public String spawnScanQRString(String account, String secretKey, String title) {
        return "otpauth://totp/" + title + ":" + account + "?secret=" + secretKey + "&issuer=" + title;
    }


    /**
     * Return a URL that generates and displays a QR barcode. The user scans
     * this bar code with the Google Authenticator application on their
     * smartphone to register the auth code. They can also manually enter the
     * secret if desired
     *
     * @param user   user id (e.g. fflinstone)
     * @param host   host or system that the code is for (e.g. myapp.com)
     * @param secret the secret that was previously generated for this user
     * @return the URL for the QR code to scan
     */
    public String getQRBarcodeURL(String user, String host, String secret) {
        String format = "http://www.google.com/chart?chs=200x200&chld=M%%7C0&cht=qr&chl=otpauth://totp/%s@%s?secret=%s";
        return String.format(format, user, host, secret);
    }


    /**
     * 生成一个google身份验证器,识别的字符串,只需要把 该方法返回值生成二维码扫描 就可以了。
     *
     * @param user   账号
     * @param secret 密钥
     * @return
     */
    public String getQRBarcode(String user, String secret) {
        String format = "otpauth://totp/%s?secret=%s";
        return String.format(format, user, secret);
    }

    /**
     * Check the code entered by the user to see if it is valid 验证code是否合法
     *
     * @param secret The users secret.
     * @param code   The code displayed on the users device
     * @param t      The time in msec (System.currentTimeMillis() for example)
     * @return
     */
    public boolean checkCode(String secret, long code, long timeMsec) {
        Base32 codec = new Base32();
        byte[] decodedKey = codec.decode(secret);
        // convert unix msec time into a 30 second "window"
        // this is per the TOTP spec (see the RFC for details)
        long t = (timeMsec / 1000L) / 30L;
        // Window is used to check codes generated in the near past.
        // You can use this value to tune how far you're willing to go.
        for (int i = -window_size; i <= window_size; ++i) {
            long hash;
            try {
                hash = verifyCode(decodedKey, t + i);
            } catch (Exception e) {
                // Yes, this is bad form - but
                // the exceptions thrown would be rare and a static
                // configuration problem
                e.printStackTrace();
                throw new RuntimeException(e.getMessage());
                // return false;
            }
            if (hash == code) {
                return true;
            }
        }
        // The validation code is invalid.
        return false;
    }

    private int verifyCode(byte[] key, long t) throws NoSuchAlgorithmException, InvalidKeyException {
        byte[] data = new byte[8];
        long value = t;
        for (int i = 8; i-- > 0; value >>>= 8) {
            data[i] = (byte) value;
        }
        SecretKeySpec signKey = new SecretKeySpec(key, "HmacSHA1");
        Mac mac = Mac.getInstance("HmacSHA1");
        mac.init(signKey);
        byte[] hash = mac.doFinal(data);
        int offset = hash[20 - 1] & 0xF;
        // We're using a long because Java hasn't got unsigned int.
        long truncatedHash = 0;
        for (int i = 0; i < 4; ++i) {
            truncatedHash <<= 8;
            // We are dealing with signed bytes:
            // we just keep the first byte.
            truncatedHash |= (hash[offset + i] & 0xFF);
        }
        truncatedHash &= 0x7FFFFFFF;
        truncatedHash %= 1000000;
        return (int) truncatedHash;
    }
}
3、测试
public static void main(String[] args) {
    GoogleAuthenticator authenticator = new GoogleAuthenticator();
    //设置时间窗口
    authenticator.setWindowSize(3);
    //生成密钥
    String secretKey = authenticator.generateSecretKey();
    log.info("secretKey:{}",secretKey);
    //生成绑定的二维码
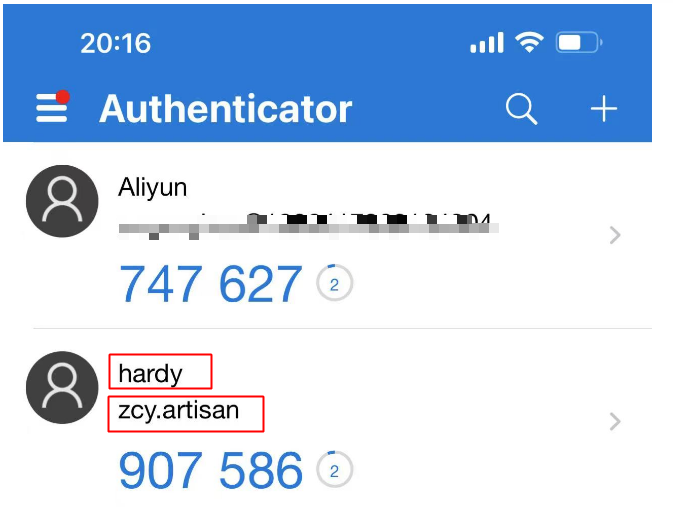
    String qrCode = authenticator.spawnScanQRString("zcy.artisan", secretKey, "hardy");
    log.info("qrCode:{}",qrCode);
}
我们使用刚才编写的工具类去绑定一个我们自己的双因子认证,将qrCode生成二维码并使用Authenticator App去绑定效果如下。

四、结束语
至此已经简单的介绍了双因子认证是的实现原理,希望对你有所帮助
本文来自互联网用户投稿,该文观点仅代表作者本人,不代表本站立场。本站仅提供信息存储空间服务,不拥有所有权,不承担相关法律责任。 如若内容造成侵权/违法违规/事实不符,请联系我的编程经验分享网邮箱:chenni525@qq.com进行投诉反馈,一经查实,立即删除!