python对常见的激活函数绘图操作(详细代码讲解)
写论文的时候需要做一些激活函数的图像,为此将常见的激活函数进行整理汇总了一下,方便后续的复习
激活函数的作用是为让模型处理非线性问题,故次激活函数都是非线性的
生活中,非线性问题占大多数,而模型的训练通常都是线性可分的函数,通过非线性激活函数可以使得模型刚好的处理非线性问题
一、导包
from matplotlib import pyplot as plt
import numpy as np
import mpl_toolkits.axisartist as axisartist
二、sigmoid
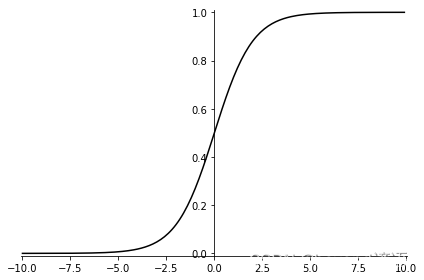
简而言之:通过sigmoid函数可以将函数值转换为0-1之间,从而变成了概率问题,实现不同类别的分类
详细的函数推到可参考博文:四、逻辑回归
大概讲解下代码:
函数 sigmoid(x) 为sigmoid的表达式
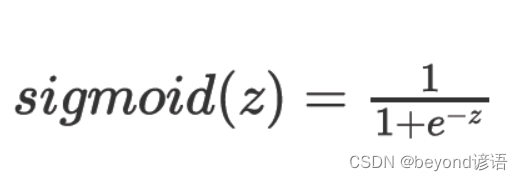
函数 plot_sigmoid() 根据函数表达式进行绘图
x = np.arange(-10, 10, 0.1)
X轴从 [-10,10) 中每隔0.1选取一个点,X轴最终为200个数据点
y = sigmoid(x)
把x这些点带入sigmoid函数中得到对应的y值
fig = plt.figure()
生成一个图框,这个图框目前还不能画图,需要在其子图(subplot)或者轴域(Axes)中作图
ax = fig.add_subplot(111)
第一个参数表示行数、第二个参数表示列数、第三个参数表示第几个子图
这里就是一行、一列、第一个子图
ax.spines['top'].set_color('none')
去掉顶部的边框线,这里的none表示啥也没,相当于去掉顶端边框
ax.spines['right'].set_color('none')
同样的道理,去掉右侧的边框
左侧:left、底部:bottom
ax.spines['left'].set_position(('data', 0))
这里的data表示通过 给定的值(这里是0) 来进行设置坐标轴的位置
这里的0可以理解为:平移y轴到x轴的什么位置,这里就是平移y轴到x轴的0刻度处
当然参数也可以设置为axes,表示按百分比进行偏移y轴,也就相当于按多少进行平分x轴;后一个参数为0.5,相当于平分x轴
ax.spines['left'].set_position(('axes', 0.5))和ax.spines['left'].set_position(('data', 0))是等价的关系
ax.plot(x, y, 'k-')
根据之前得到的x和y值进行绘制,前提x和y的个数是一致的,得一一对应才行
参数k-,表示颜色为black,使用 - 进行连接
也可以设置其他的,例如:红色,通过 + 这个符号进行连接,最后一个参数可以设置为r+,多动手试试就知道了
plt.xlim([-10.05, 10.05])
x轴的取值范围为 [-10.05,10.05]
plt.ylim([-0.01, 1.01])
y轴的取值范围为 [-0.01,1.01]
plt.tight_layout()
有时,轴标签和标题等会出现重叠、超过正常范围而被截断等情况发生,通过调用该函数即可进行解决
plt.savefig("sigmoid.png")
保存生成的图片,参数为字符串,传入要保存的具体路径
plt.show()
展示生成的图片
def sigmoid(x):
    return 1. / (1 + np.exp(-x))

def plot_sigmoid():
    x = np.arange(-10, 10, 0.1)
    y = sigmoid(x)
    fig = plt.figure()
    ax = fig.add_subplot(111)
    ax.spines['top'].set_color('none')
    ax.spines['right'].set_color('none')
    ax.spines['left'].set_position(('data', 0))
    ax.plot(x, y, 'k-')
    plt.xlim([-10.05, 10.05])
    plt.ylim([-0.01, 1.01])
    plt.tight_layout()
    # plt.savefig("sigmoid.png")
    plt.show()
if __name__ == "__main__":
    plot_sigmoid()
二、tanh
函数表达式:
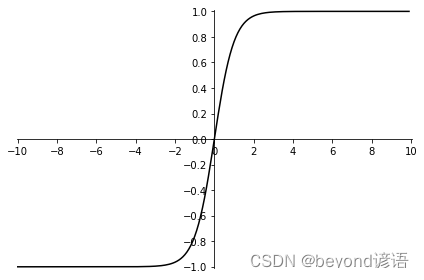
函数 tanh(x) 为tanh的表达式
函数 plot_tanh() 绘制tanh函数图像
函数操作都大差不差,根据上面sigmoid激活函数的实现进行类比即可
这里只讲解未出现的函数
ax.set_yticks([-1.0, -0.8, -0.6, -0.4, -0.2, 0, 0.2, 0.4, 0.6, 0.8, 1.0])
设置y轴显示刻度的范围,说白了就是显示y轴的刻度线都有哪几个点
ax.set_xticks([-10, -8, -6, -4, -2, 0, 2, 4, 6, 8, 10])
设置x轴显示刻度的范围
def tanh(x):
    return (np.exp(x) - np.exp(-x)) / (np.exp(x) + np.exp(-x))

def plot_tanh():
    x = np.arange(-10.0, 10.0, 0.1)
    y = tanh(x)
    fig = plt.figure()
    ax = fig.add_subplot(111)
    ax.spines['top'].set_color('none')
    ax.spines['right'].set_color('none')
    ax.spines['left'].set_position(('data', 0))
    ax.spines['bottom'].set_position(('data', 0))
    ax.plot(x, y, 'k-')
    plt.xlim([-10.05, 10.05])
    plt.ylim([-1.01, 1.01])
    ax.set_yticks([-1.0, -0.8, -0.6, -0.4, -0.2, 0, 0.2, 0.4, 0.6, 0.8, 1.0])
    ax.set_xticks([-10.0, -8.0, -6.0, -4.0, -2.0, 0.0, 2.0, 4.0, 6.0, 8.0, 10.0])
    plt.tight_layout()
    # plt.savefig("tanh.png")
    plt.show()
if __name__ == "__main__":
    plot_tanh()
三、relu
函数表达式:
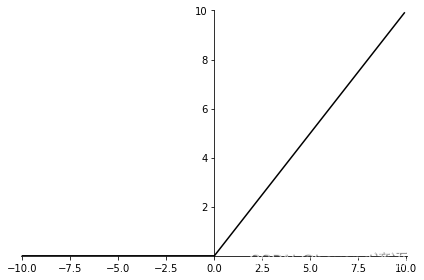
函数操作都大差不差,根据上面sigmoid激活函数的实现进行类比即可
def relu(x):
    return np.where(x <= 0, 0, x)

def plot_relu():
    x = np.arange(-10, 10, 0.1)
    y = relu(x)
    fig = plt.figure()
    ax = fig.add_subplot(111)
    ax.spines['top'].set_color('none')
    ax.spines['right'].set_color('none')
    ax.spines['left'].set_position(('data', 0))
    ax.plot(x, y, 'k-')
    plt.xlim([-10.05, 10.05])
    plt.ylim([0, 10.01])
    ax.set_yticks([2, 4, 6, 8, 10])
    plt.tight_layout()
    # plt.savefig("relu.png")
    plt.show()

if __name__ == "__main__":
    plot_relu()
四、elu
函数表达式:
这里α取值为1,当然具体情况具体分析
函数操作都大差不差,根据上面sigmoid激活函数的实现进行类比即可
def elu(x):
    return np.where(x < 0, 1*(np.exp(x)-1), x)

def plot_elu():
    x = np.arange(-10, 10, 0.1)
    y = elu(x)
    fig = plt.figure()
    ax = fig.add_subplot(111)
    ax.spines['top'].set_color('none')
    ax.spines['right'].set_color('none')
    ax.spines['left'].set_position(('data', 0))
    ax.spines['bottom'].set_position(('data', 0))
    ax.plot(x, y, 'k-')
    #plt.xticks([])
    ax.set_yticks([-2, 0, 2, 4, 6, 8, 10])
    plt.tight_layout()
    # plt.savefig("prelu.png")
    plt.show()

if __name__ == "__main__":
    plot_elu()

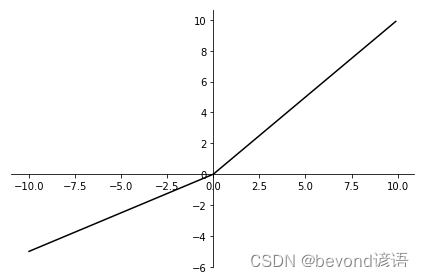
五、prelu
函数表达式:
这里的ai取值为0.5,当然具体情况具体分析
函数操作都大差不差,根据上面sigmoid激活函数的实现进行类比即可
def prelu(x):
    return np.where(x <= 0, 0.5 * x, x)

def plot_prelu():
    x = np.arange(-10, 10, 0.1)
    y = prelu(x)
    fig = plt.figure()
    ax = fig.add_subplot(111)
    ax.spines['top'].set_color('none')
    ax.spines['right'].set_color('none')
    ax.spines['left'].set_position(('data', 0))
    ax.spines['bottom'].set_position(('data', 0))
    ax.plot(x, y, 'k-')
    #plt.xticks([])
    ax.set_yticks([-6, -4, -2, 0, 2, 4, 6, 8, 10])
    plt.tight_layout()
    # plt.savefig("prelu.png")
    plt.show()

if __name__ == "__main__":
    plot_prelu()
本文来自互联网用户投稿,该文观点仅代表作者本人,不代表本站立场。本站仅提供信息存储空间服务,不拥有所有权,不承担相关法律责任。 如若内容造成侵权/违法违规/事实不符,请联系我的编程经验分享网邮箱:chenni525@qq.com进行投诉反馈,一经查实,立即删除!
- Python教程
- 深入理解 MySQL 中的 HAVING 关键字和聚合函数
- Qt之QChar编码(1)
- MyBatis入门基础篇
- 用Python脚本实现FFmpeg批量转换
- 助力城市部件[标石/电杆/光交箱/人井]精细化管理,基于YOLOv5全系列模型【n/s/m/l/x】开发构建生活场景下城市部件检测识别系统
- 设计 Pastebin.com
- 探索社区团购宝藏:使用Python抓取商品数据的简便指南
- NLP中的嵌入层
- [RK-Linux] RK3399支持M.2 NVMe SSD启动
- 首届”欧柯奇杯高交会“免费参与了,快来看看如何报名
- Spring学习 基于注解的IOC配置
- stm32项目(17)——基于stm32的温湿度检测protues仿真
- STM32入门教程-2023版【3-4】按键控制制LED
- linux高级管理——shell脚本应用(三)