Spring boot:3.X + Security OAuth2 自定义登录页面、登出后跳转到登录页
发布时间:2023年12月29日
本文描述了基于 Spring Oauth2 的 code 模式,实现登陆同时授权、自定义登录界面、登出页面的功能。
1.Maven依赖:
<parent>
    <groupId>org.springframework.boot</groupId>
    <artifactId>spring-boot-starter-parent</artifactId>
    <version>3.1.6</version>
    <relativePath/>
</parent>
<dependency> <groupId>org.springframework.boot</groupId> <artifactId>spring-boot-starter-oauth2-authorization-server</artifactId> </dependency> <dependency> <groupId>org.springframework.boot</groupId> <artifactId>spring-boot-starter-security</artifactId> </dependency> <dependency> <groupId>org.springframework.boot</groupId> <artifactId>spring-boot-starter-web</artifactId> </dependency> <dependency> <groupId>org.springframework.boot</groupId> <artifactId>spring-boot-configuration-processor</artifactId> <optional>true</optional> </dependency> <!-- thymeleaf 模板引擎--> <dependency> <groupId>org.springframework.boot</groupId> <artifactId>spring-boot-starter-thymeleaf</artifactId> </dependency>
?2.thymeleaf配置
在spring boot工程的application.yml配置文件中
?
spring:
  thymeleaf:
    prefix: classpath:/singleSign/
    suffix: .html
    cache: false
3.登陆界面HTML
登录页面需要符合thymeleaf格式,不符合格式的不支持,在resources 目录下新建singleSign目录,在此目录下新建login.html(文件名不能乱命名,要跟下面的Controller、WebSecurity 相对应) 文件如下:
<!DOCTYPE html>
<html xmlns="http://www.w3.org/1999/xhtml" xmlns:th="http://www.thymeleaf.org">
<head>
<meta charset="UTF-8">
<title>欢迎来到单点登录平台</title>
</head>
<style>
.login-container {
margin: 50px;
width: 100%;
}
.form-container {
margin: 0px auto;
width: 50%;
text-align: center;
box-shadow: 1px 1px 10px #888888;
height: 300px;
padding: 5px;
}
input {
margin-top: 10px;
width: 350px;
height: 30px;
border-radius: 3px;
border: 1px #E9686B solid;
padding-left: 2px;
}
.btn {
width: 350px;
height: 35px;
line-height: 35px;
cursor: pointer;
margin-top: 20px;
border-radius: 3px;
background-color: #E9686B;
color: white;
border: none;
font-size: 15px;
}
.title{
margin-top: 5px;
font-size: 18px;
color: #E9686B;
}
</style>
<body>
<div class="login-container">
<div class="form-container">
<p class="title">欢迎来到单点登录平台</p>
<form name="loginForm" method="post" th:action="${login}">
<input type="text" name="username" placeholder="用户名"/>
<br>
<input type="password" name="password" placeholder="密码"/>
<br>
<button type="submit" class="btn">登 录</button>
</form>
<p style="color: red" th:if="${param.error}">用户名或密码错误</p>
</div>
</div>
</body>
</html>4.登陆界面Controller
import org.springframework.beans.factory.annotation.Autowired;
import org.springframework.security.oauth2.provider.AuthorizationRequest;
import org.springframework.stereotype.Controller;
import org.springframework.ui.Model;
import org.springframework.web.bind.annotation.GetMapping;
?
@Controller
public class BaseMainController { ?

    @GetMapping("/login") // 设置登录页面的路由
    public String loginPage() {
        return "login"; // 返回视图名称,这里假设有一个名为"login"的模板文件(与login.html相对应)
    }
}
5.WebSecurity 配置
配置自定义登录、登出需要的参数
@Bean
    @Order(2)
    public SecurityFilterChain defaultSecurityFilterChain(HttpSecurity http)
            throws Exception {
        http
                .authorizeHttpRequests((authorize) -> authorize
                        .requestMatchers("/oauth/**","/login/**","/logout/**")
                        .permitAll()
                        .anyRequest().authenticated()
                )
                //自定义登录页
                .formLogin(formLogin->
                        formLogin.loginPage("/login") //登录页面
                                .loginProcessingUrl("/login").permitAll() //登录接口可以匿名访问
                                .defaultSuccessUrl("/our/page"))//登录成功访问的页面
                .csrf().disable()
                //自定义登出页
                .logout(logout->
                                logout.
                                        logoutUrl("/logout")
                                        .addLogoutHandler(new MyLogoutHandler())//登出后的跳转页
                                        .logoutSuccessUrl("/login")
                                        .permitAll()
                );
        return http.build();
    }
配置登出跳转LogoutHandler ,为防止要跳转的页面网址有问题,需要对网址进行base64Encode后,以参数(名称:redirect_uris)的形式传进来
import jakarta.servlet.http.HttpServletRequest;
import jakarta.servlet.http.HttpServletResponse;
import org.authorization.util.EncryptUtils;
import org.springframework.security.core.Authentication;
import org.springframework.security.web.authentication.logout.LogoutHandler;
import org.springframework.stereotype.Component;
import java.io.IOException;
@Component
public class MyLogoutHandler implements LogoutHandler {
@Override
public void logout(HttpServletRequest request, HttpServletResponse response, Authentication authentication) {
try {
String url = request.getParameter("redirect_uris");
response.sendRedirect(EncryptUtils.base64Decode(url));//实现自定义重定向
} catch (IOException e) {
e.printStackTrace();
}
}
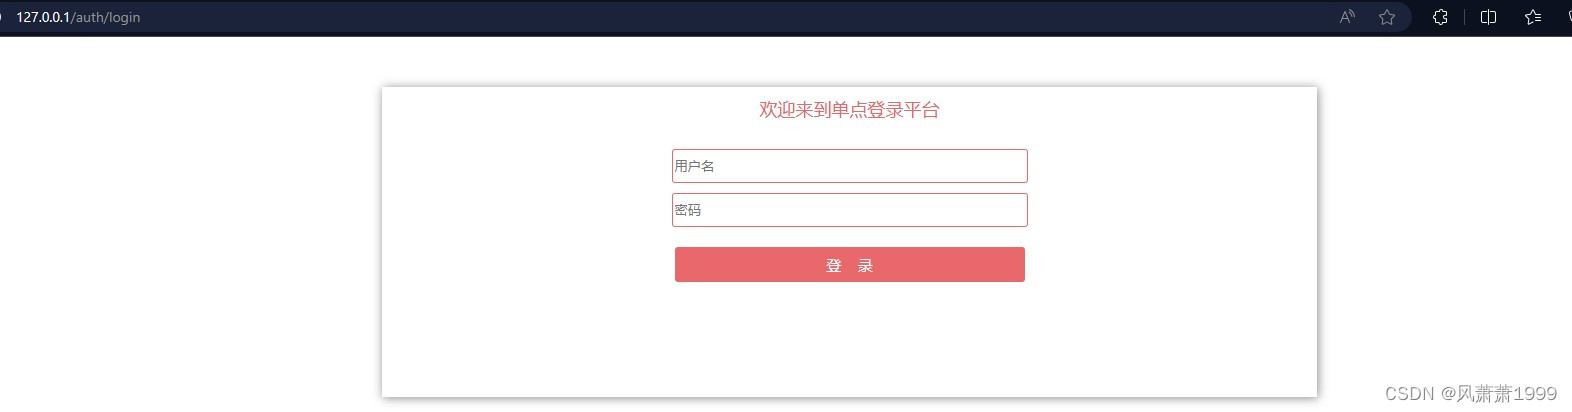
}6.自定义登录效果
访问登录URL:
http://127.0.0.1:80/auth/oauth2/authorize?client_id=XXXX&response_type=code&scope=openid&redirect_uri=https://www.baidu.com
7.自定义登出效果
对第6步中的登录URL进行base64Encode加密后,作为redirect_uris参数传入,访问:
http://127.0.0.1:80/auth/logout?redirect_uris=aHR0cDov....
后,系统会自动跳转到?第6步中的登录页。
文章来源:https://blog.csdn.net/u012998680/article/details/135295455
本文来自互联网用户投稿,该文观点仅代表作者本人,不代表本站立场。本站仅提供信息存储空间服务,不拥有所有权,不承担相关法律责任。 如若内容造成侵权/违法违规/事实不符,请联系我的编程经验分享网邮箱:chenni525@qq.com进行投诉反馈,一经查实,立即删除!
本文来自互联网用户投稿,该文观点仅代表作者本人,不代表本站立场。本站仅提供信息存储空间服务,不拥有所有权,不承担相关法律责任。 如若内容造成侵权/违法违规/事实不符,请联系我的编程经验分享网邮箱:chenni525@qq.com进行投诉反馈,一经查实,立即删除!
最新文章
- Python教程
- 深入理解 MySQL 中的 HAVING 关键字和聚合函数
- Qt之QChar编码(1)
- MyBatis入门基础篇
- 用Python脚本实现FFmpeg批量转换
- 学习【Mysql基础篇】这一篇就够了
- MyBatis–#与$的区别
- 信号知识总结
- 上海亚商投顾:三大指数红盘收官!沪指今年累计跌3.7%
- 今日聊聊寒假假期如何不颓废
- JAVA EXCEL 导出合并单元格
- 3.2.4 手写死锁检测组件
- 深度学习项目部署:解析 NVIDIA Docker 中的 CUDA 镜像版本:base 版本、 runtime 版本、devel 版本
- “性能压测揭密:关键指标分析!“
- SWUST OJ 15高精度加法