【SpringMVC】—— 如何配置使用SpringMVC(详细步骤)
发布时间:2024年01月15日
目录
引言
????????SpringMVC是一种基于Java实现MVC模型的轻量级Web框架,SpringMVC是表现层(web层)的框架,也是spring框架的一部分,用于表现层功能开发。
使用SpringMVC
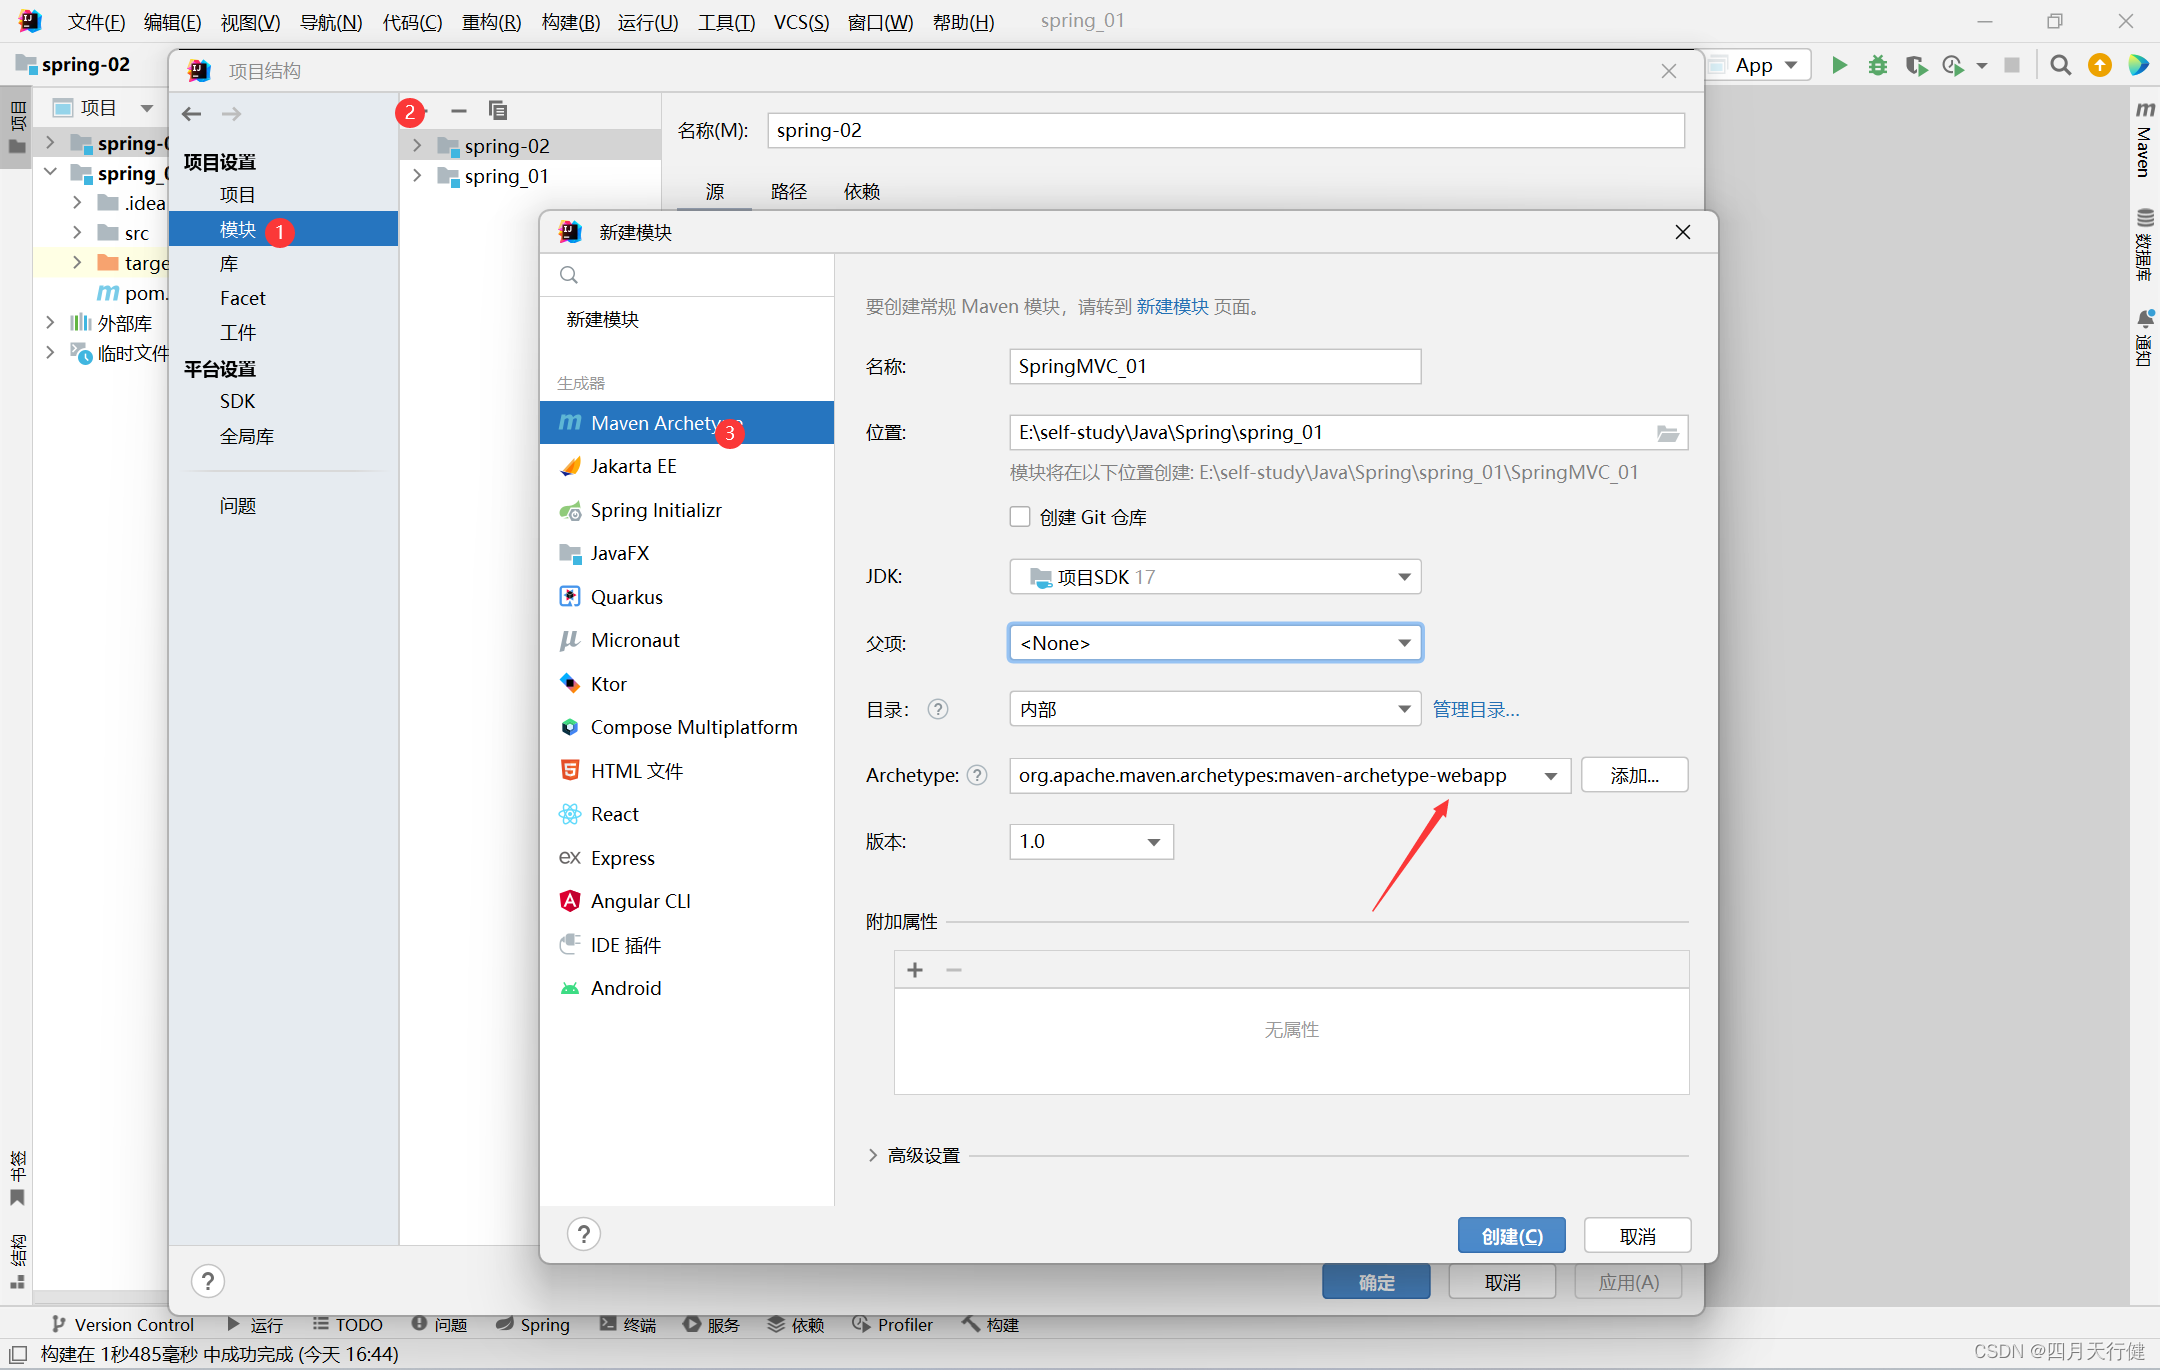
1、新建模块
如下

注意:有些人可能出现无src文件的情况,这是因为下载太慢!

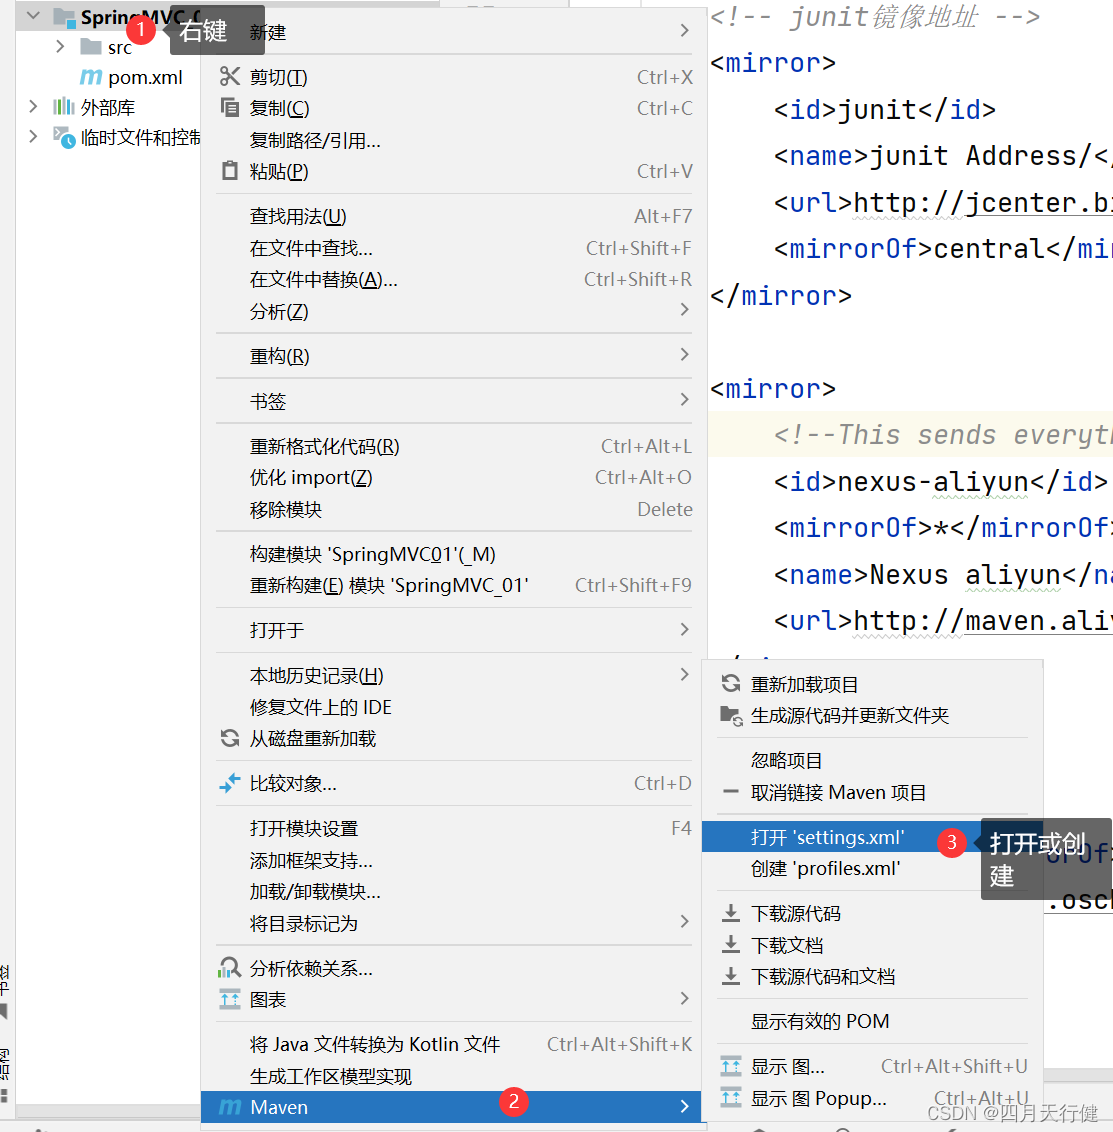
如何解决上述问题?引入国内镜像

setting.xml文件替换为以下内容:
<?xml version="1.0" encoding="UTF-8"?>
<settings xmlns="http://maven.apache.org/SETTINGS/1.0.0"
          xmlns:xsi="http://www.w3.org/2001/XMLSchema-instance"
          xsi:schemaLocation="http://maven.apache.org/SETTINGS/1.0.0 http://maven.apache.org/xsd/settings-1.0.0.xsd">
    <mirrors>

        <mirror>
            <id>alimaven</id>
            <name>aliyun maven</name>
            <url>http://maven.aliyun.com/nexus/content/groups/public/</url>
            <mirrorOf>central</mirrorOf>
        </mirror>

        <mirror>
            <id>uk</id>
            <mirrorOf>central</mirrorOf>
            <name>Human Readable Name for this Mirror.</name>
            <url>http://uk.maven.org/maven2/</url>
        </mirror>

        <mirror>
            <id>CN</id>
            <name>OSChina Central</name>
            <url>http://maven.oschina.net/content/groups/public/</url>
            <mirrorOf>central</mirrorOf>
        </mirror>

        <mirror>
            <id>nexus</id>
            <name>internal nexus repository</name>
            <url>http://repo.maven.apache.org/maven2</url>
            <mirrorOf>central</mirrorOf>
        </mirror>

        <!-- junit镜像地址 -->
        <mirror>
            <id>junit</id>
            <name>junit Address/</name>
            <url>http://jcenter.bintray.com/</url>
            <mirrorOf>central</mirrorOf>
        </mirror>

        <mirror>
            <!--This sends everything else to /public -->
            <id>nexus-aliyun</id>
            <mirrorOf>*</mirrorOf>
            <name>Nexus aliyun</name>
            <url>http://maven.aliyun.com/nexus/content/groups/public</url>
        </mirror>

        <mirror>
            <id>osc</id>
            <mirrorOf>*</mirrorOf>
            <url>http://maven.oschina.net/content/groups/public/</url>
        </mirror>

        <mirror>
            <id>repo2</id>
            <mirrorOf>central</mirrorOf>
            <name>Human Readable Name for this Mirror.</name>
            <url>http://repo2.maven.org/maven2/</url>
        </mirror>

        <mirror>
            <id>net-cn</id>
            <mirrorOf>central</mirrorOf>
            <name>Human Readable Name for this Mirror.</name>
            <url>http://maven.net.cn/content/groups/public/</url>
        </mirror>

        <mirror>
            <id>ui</id>
            <mirrorOf>central</mirrorOf>
            <name>Human Readable Name for this Mirror.</name>
            <url>http://uk.maven.org/maven2/</url>
        </mirror>

        <mirror>
            <id>ibiblio</id>
            <mirrorOf>central</mirrorOf>
            <name>Human Readable Name for this Mirror.</name>
            <url>http://mirrors.ibiblio.org/pub/mirrors/maven2/</url>
        </mirror>

        <mirror>
            <id>jboss-public-repository-group</id>
            <mirrorOf>central</mirrorOf>
            <name>JBoss Public Repository Group</name>
            <url>http://repository.jboss.org/nexus/content/groups/public</url>
        </mirror>

        <mirror>
            <id>JBossJBPM</id>
            <mirrorOf>central</mirrorOf>
            <name>JBossJBPM Repository</name>
            <url>https://repository.jboss.org/nexus/content/repositories/releases/</url>
        </mirror>

    </mirrors>
</settings>
2、导入坐标
在pom.xml文件中导入springmvc和servlet。
注意刷新maven
  <dependencies>
    <dependency>
      <groupId>javax.servlet</groupId>
      <artifactId>javax.servlet-api</artifactId>
      <version>3.1.0</version>
      <scope>provided</scope>
    </dependency>
    <dependency>
      <groupId>org.springframework</groupId>
      <artifactId>spring-webmvc</artifactId>
      <version>5.2.10.RELEASE</version>
    </dependency>
  </dependencies>
3、创建SpringMVC控制器类
用于处理请求。
@Controller设定SpringMVC的核心控制器bean,定义为bean
@RequestMapping设置当前控制器方法请求访问路径
@ResponseBody设置当前控制器方法,响应内容为当前返回值,返回给前端
@Controller
public class UserController {
    @RequestMapping("/save")
    @ResponseBody
    public String save(){
        System.out.println("user save ...");
        return "{'module':'springmvc'}";
    }
}
4、初始化SpringMVC环境
加载对应的bean
@Configuration
@ComponentScan("com.spring.controller")
public class SpringMvcConfig {
}
5、初始化Servlet容器,加载SpringMVC环境
public class ServletContainersInitConfig extends AbstractDispatcherServletInitializer {

    //加载springMVC容器配置
    protected WebApplicationContext createServletApplicationContext() {
        AnnotationConfigWebApplicationContext ctx = new AnnotationConfigWebApplicationContext();
        ctx.register(SpringMvcConfig.class);
        return ctx;
    }

    //设置哪写请求归属springMVC处理
    protected String[] getServletMappings() {
        return new String[]{"/"};
    }

    //加载spring容器配置
    protected WebApplicationContext createRootApplicationContext() {
        return null;
    }
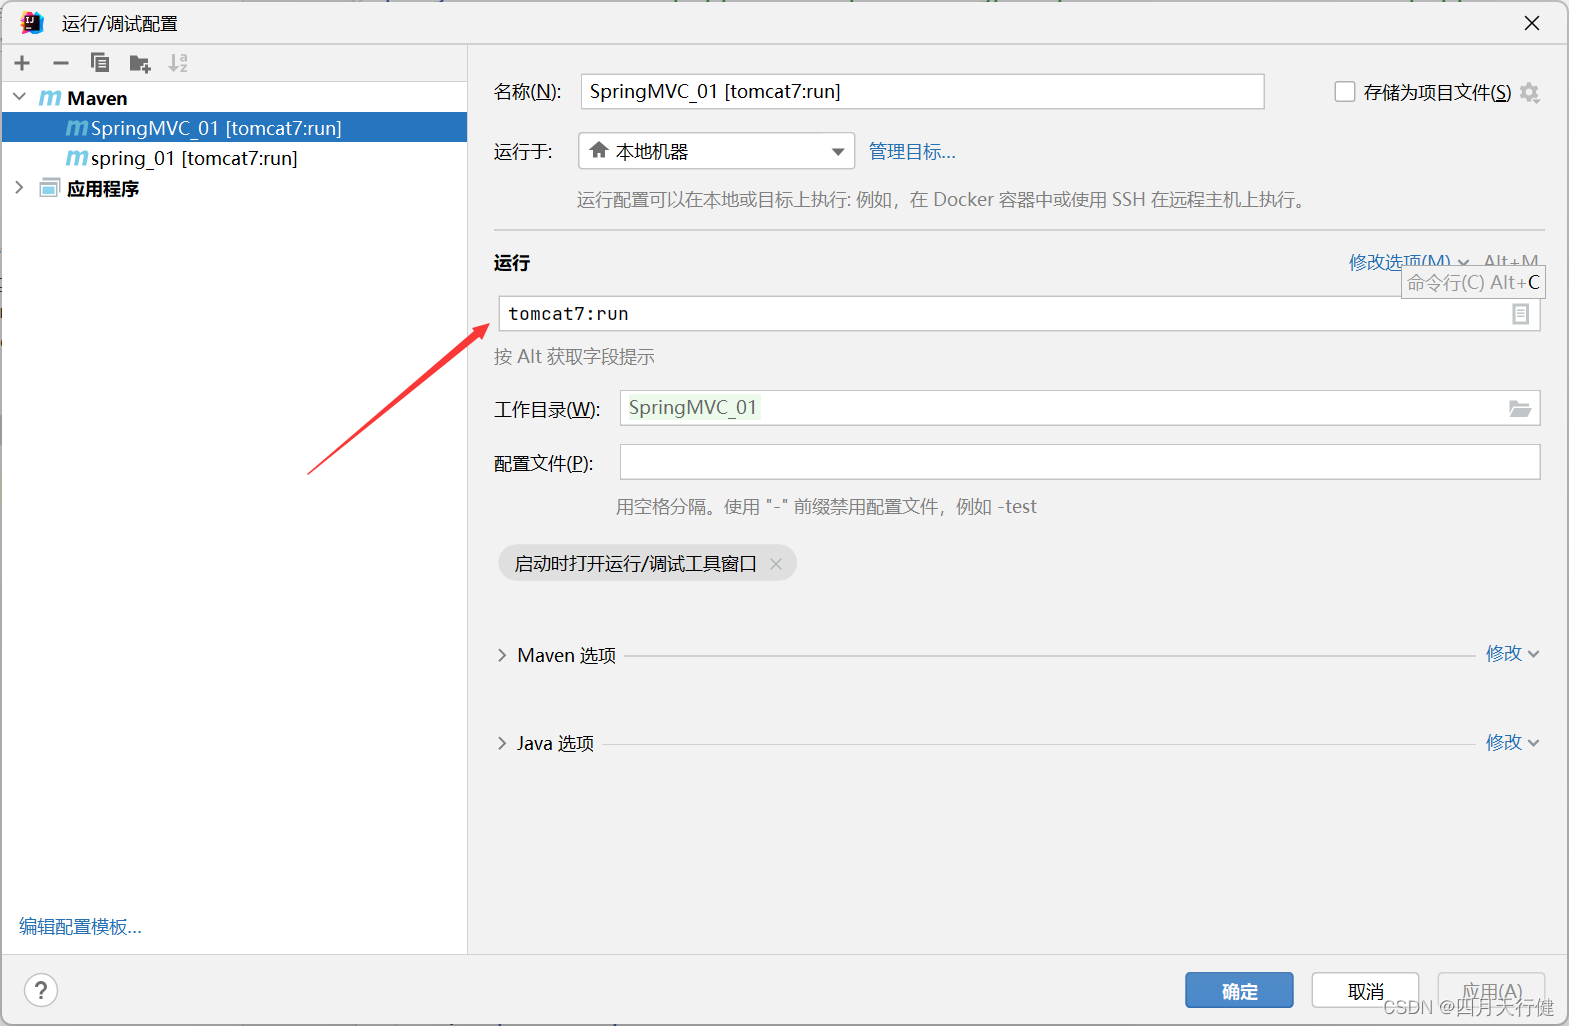
6、配置运行
pom.xml文件需要有以下内容:
配置tomcat,jdk版本为1.8
  <properties>
    <project.build.sourceEncoding>UTF-8</project.build.sourceEncoding>
    <maven.compiler.source>1.8</maven.compiler.source>
    <maven.compiler.target>1.8</maven.compiler.target>
  </properties>

  <dependencies>
    <dependency>
      <groupId>javax.servlet</groupId>
      <artifactId>javax.servlet-api</artifactId>
      <version>3.1.0</version>
      <scope>provided</scope>
    </dependency>
    <dependency>
      <groupId>org.springframework</groupId>
      <artifactId>spring-webmvc</artifactId>
      <version>5.2.10.RELEASE</version>
    </dependency>
  </dependencies>

  <build>
    <plugins>
      <plugin>
        <groupId>org.apache.tomcat.maven</groupId>
        <artifactId>tomcat7-maven-plugin</artifactId>
        <version>2.1</version>
        <configuration>
          <port>80</port>
          <path>/</path>
        </configuration>
      </plugin>
    </plugins>
  </build>
????????运行程序,浏览器输入http://localhost/save,打印出save()方法return内容即成功,后端控制台打印出save()方法输出内容。
文章来源:https://blog.csdn.net/Tir_zhang/article/details/135608479
本文来自互联网用户投稿,该文观点仅代表作者本人,不代表本站立场。本站仅提供信息存储空间服务,不拥有所有权,不承担相关法律责任。 如若内容造成侵权/违法违规/事实不符,请联系我的编程经验分享网邮箱:chenni525@qq.com进行投诉反馈,一经查实,立即删除!
本文来自互联网用户投稿,该文观点仅代表作者本人,不代表本站立场。本站仅提供信息存储空间服务,不拥有所有权,不承担相关法律责任。 如若内容造成侵权/违法违规/事实不符,请联系我的编程经验分享网邮箱:chenni525@qq.com进行投诉反馈,一经查实,立即删除!
最新文章
- Python教程
- 深入理解 MySQL 中的 HAVING 关键字和聚合函数
- Qt之QChar编码(1)
- MyBatis入门基础篇
- 用Python脚本实现FFmpeg批量转换
- 助力工业园区作业违规行为检测预警,基于YOLOv5【n/s/m/l/x】全系列参数模型开发构建工业园区场景下作业人员违规行为检测识别系统
- 第8章-第1节-Java中的泛型
- 特色功能解析:选择Zoho CRM的五大理由
- 【干货】Windows测试拉流工具及操作步骤大汇总
- java关键字【synchronized】
- linux中的系统安全
- C#有一张表 怎么获取某一列下面的含有数据的单元格datatable
- PTA 7-18 出租车计价
- 使用MySQL建立外键约束时,报错3780的问题分析,和解决办法
- 分类算法入门:决策树、朴素贝叶斯与最近邻算法