SpringBoot核心原理之事件和监听器(生命周期监听、事件触发、监听器、自定义事件发布和订阅)和配置类和Bean加载的时机
目录
1. 生命周期监听
场景:监听应用从创建到销毁的整个生命周期。这样可以在应用启动之前,或启动之后做一些操作
1.1 监听器-SpringApplicationRunListener
- springboot在spring-boot.jar中配置了默认的Listener,如下所示:
org.springframework.boot.SpringApplicationRunListener=\
org.springframework.boot.context.event.EventPublishingRunListener
用于事件发布。在生命周期的各个重要环节,都会将事件进行广播,如果我们对那个事件比较关系,可以继续监听
- 自定义SpringApplicationRunListener来监听事件
- 编写SpringApplicationRunListener实现类。可以自己实现一个有参构造器,接受两个参数
(SpringApplication application, String[] args) - 在META-INF/spring.factories中配置
org.springframework.boot.SpringApplicationRunListener=自己的Listener全类名
- 编写SpringApplicationRunListener实现类。可以自己实现一个有参构造器,接受两个参数
自定义示例如下:
MyAppListener.java
package com.hh.springboot3test.listener;

import org.springframework.boot.ConfigurableBootstrapContext;
import org.springframework.boot.SpringApplicationRunListener;
import org.springframework.context.ConfigurableApplicationContext;
import org.springframework.core.env.ConfigurableEnvironment;

import java.time.Duration;

public class MyAppListener implements SpringApplicationRunListener {
    @Override
    public void starting(ConfigurableBootstrapContext bootstrapContext) {
        System.out.println("=====starting=====正在启动======");
    }

    @Override
    public void environmentPrepared(ConfigurableBootstrapContext bootstrapContext, ConfigurableEnvironment environment) {
        System.out.println("=====environmentPrepared=====环境准备完成======");
    }

    @Override
    public void contextPrepared(ConfigurableApplicationContext context) {
        System.out.println("=====contextPrepared=====ioc容器准备完成======");
    }

    @Override
    public void contextLoaded(ConfigurableApplicationContext context) {
        System.out.println("=====contextLoaded=====ioc容器加载完成======");
    }

    @Override
    public void started(ConfigurableApplicationContext context, Duration timeTaken) {
        System.out.println("=====started=====启动完成======");
    }

    @Override
    public void ready(ConfigurableApplicationContext context, Duration timeTaken) {
        System.out.println("=====ready=====准备就绪======");
    }

    @Override
    public void failed(ConfigurableApplicationContext context, Throwable exception) {
        System.out.println("=====failed=====应用启动失败======");
    }
}
src\main\resources\META-INF\spring.factories
org.springframework.boot.SpringApplicationRunListener=com.hh.springboot3test.listener.MyAppListener
启动springBoot应用,打印如下:
E:\install_software\java\zulu17.42.19-ca-jdk17.0.7-win_x64\bin\java.exe -XX:TieredStopAtLevel=1 -Dspring.output.ansi.enabled=always -Dcom.sun.management.jmxremote -Dspring.jmx.enabled=true -Dspring.liveBeansView.mbeanDomain -Dspring.application.admin.enabled=true -javaagent:E:\install_software\IDEA\lib\idea_rt.jar=58974:E:\install_software\IDEA\bin -Dfile.encoding=UTF-8 -classpath D:\20230205备份\正使用文件\springBoot3Test\target\classes;E:\install_software\maven\apache-maven-3.8.6\repository\org\springframework\boot\spring-boot-starter-web\3.1.1\spring-boot-starter-web-3.1.1.jar;E:\install_software\maven\apache-maven-3.8.6\repository\org\springframework\boot\spring-boot-starter-json\3.1.1\spring-boot-starter-json-3.1.1.jar;E:\install_software\maven\apache-maven-3.8.6\repository\com\fasterxml\jackson\datatype\jackson-datatype-jdk8\2.15.2\jackson-datatype-jdk8-2.15.2.jar;E:\install_software\maven\apache-maven-3.8.6\repository\com\fasterxml\jackson\datatype\jackson-datatype-jsr310\2.15.2\jackson-datatype-jsr310-2.15.2.jar;E:\install_software\maven\apache-maven-3.8.6\repository\com\fasterxml\jackson\module\jackson-module-parameter-names\2.15.2\jackson-module-parameter-names-2.15.2.jar;E:\install_software\maven\apache-maven-3.8.6\repository\org\springframework\boot\spring-boot-starter-tomcat\3.1.1\spring-boot-starter-tomcat-3.1.1.jar;E:\install_software\maven\apache-maven-3.8.6\repository\org\apache\tomcat\embed\tomcat-embed-core\10.1.10\tomcat-embed-core-10.1.10.jar;E:\install_software\maven\apache-maven-3.8.6\repository\org\apache\tomcat\embed\tomcat-embed-el\10.1.10\tomcat-embed-el-10.1.10.jar;E:\install_software\maven\apache-maven-3.8.6\repository\org\apache\tomcat\embed\tomcat-embed-websocket\10.1.10\tomcat-embed-websocket-10.1.10.jar;E:\install_software\maven\apache-maven-3.8.6\repository\org\springframework\spring-web\6.0.10\spring-web-6.0.10.jar;E:\install_software\maven\apache-maven-3.8.6\repository\org\springframework\spring-beans\6.0.10\spring-beans-6.0.10.jar;E:\install_software\maven\apache-maven-3.8.6\repository\io\micrometer\micrometer-observation\1.11.1\micrometer-observation-1.11.1.jar;E:\install_software\maven\apache-maven-3.8.6\repository\io\micrometer\micrometer-commons\1.11.1\micrometer-commons-1.11.1.jar;E:\install_software\maven\apache-maven-3.8.6\repository\org\springframework\spring-webmvc\6.0.10\spring-webmvc-6.0.10.jar;E:\install_software\maven\apache-maven-3.8.6\repository\org\springframework\spring-aop\6.0.10\spring-aop-6.0.10.jar;E:\install_software\maven\apache-maven-3.8.6\repository\org\springframework\spring-context\6.0.10\spring-context-6.0.10.jar;E:\install_software\maven\apache-maven-3.8.6\repository\org\springframework\spring-expression\6.0.10\spring-expression-6.0.10.jar;E:\install_software\maven\apache-maven-3.8.6\repository\org\projectlombok\lombok\1.18.28\lombok-1.18.28.jar;E:\install_software\maven\apache-maven-3.8.6\repository\org\slf4j\slf4j-api\2.0.7\slf4j-api-2.0.7.jar;E:\install_software\maven\apache-maven-3.8.6\repository\org\springframework\spring-core\6.0.10\spring-core-6.0.10.jar;E:\install_software\maven\apache-maven-3.8.6\repository\org\springframework\spring-jcl\6.0.10\spring-jcl-6.0.10.jar;E:\install_software\maven\apache-maven-3.8.6\repository\org\springframework\boot\spring-boot-starter\3.1.1\spring-boot-starter-3.1.1.jar;E:\install_software\maven\apache-maven-3.8.6\repository\org\springframework\boot\spring-boot\3.1.1\spring-boot-3.1.1.jar;E:\install_software\maven\apache-maven-3.8.6\repository\org\springframework\boot\spring-boot-autoconfigure\3.1.1\spring-boot-autoconfigure-3.1.1.jar;E:\install_software\maven\apache-maven-3.8.6\repository\jakarta\annotation\jakarta.annotation-api\2.1.1\jakarta.annotation-api-2.1.1.jar;E:\install_software\maven\apache-maven-3.8.6\repository\org\yaml\snakeyaml\1.33\snakeyaml-1.33.jar;E:\install_software\maven\apache-maven-3.8.6\repository\org\springframework\boot\spring-boot-starter-log4j2\3.1.1\spring-boot-starter-log4j2-3.1.1.jar;E:\install_software\maven\apache-maven-3.8.6\repository\org\apache\logging\log4j\log4j-slf4j2-impl\2.20.0\log4j-slf4j2-impl-2.20.0.jar;E:\install_software\maven\apache-maven-3.8.6\repository\org\apache\logging\log4j\log4j-api\2.20.0\log4j-api-2.20.0.jar;E:\install_software\maven\apache-maven-3.8.6\repository\org\apache\logging\log4j\log4j-core\2.20.0\log4j-core-2.20.0.jar;E:\install_software\maven\apache-maven-3.8.6\repository\org\apache\logging\log4j\log4j-jul\2.20.0\log4j-jul-2.20.0.jar;E:\install_software\maven\apache-maven-3.8.6\repository\org\webjars\jquery\3.6.4\jquery-3.6.4.jar;E:\install_software\maven\apache-maven-3.8.6\repository\com\fasterxml\jackson\dataformat\jackson-dataformat-xml\2.15.2\jackson-dataformat-xml-2.15.2.jar;E:\install_software\maven\apache-maven-3.8.6\repository\com\fasterxml\jackson\core\jackson-core\2.15.2\jackson-core-2.15.2.jar;E:\install_software\maven\apache-maven-3.8.6\repository\com\fasterxml\jackson\core\jackson-annotations\2.15.2\jackson-annotations-2.15.2.jar;E:\install_software\maven\apache-maven-3.8.6\repository\com\fasterxml\jackson\core\jackson-databind\2.15.2\jackson-databind-2.15.2.jar;E:\install_software\maven\apache-maven-3.8.6\repository\org\codehaus\woodstox\stax2-api\4.2.1\stax2-api-4.2.1.jar;E:\install_software\maven\apache-maven-3.8.6\repository\com\fasterxml\woodstox\woodstox-core\6.5.1\woodstox-core-6.5.1.jar;E:\install_software\maven\apache-maven-3.8.6\repository\org\springframework\boot\spring-boot-starter-thymeleaf\3.1.1\spring-boot-starter-thymeleaf-3.1.1.jar;E:\install_software\maven\apache-maven-3.8.6\repository\org\thymeleaf\thymeleaf-spring6\3.1.1.RELEASE\thymeleaf-spring6-3.1.1.RELEASE.jar;E:\install_software\maven\apache-maven-3.8.6\repository\org\thymeleaf\thymeleaf\3.1.1.RELEASE\thymeleaf-3.1.1.RELEASE.jar;E:\install_software\maven\apache-maven-3.8.6\repository\org\attoparser\attoparser\2.0.6.RELEASE\attoparser-2.0.6.RELEASE.jar;E:\install_software\maven\apache-maven-3.8.6\repository\org\unbescape\unbescape\1.1.6.RELEASE\unbescape-1.1.6.RELEASE.jar com.hh.springboot3test.SpringBoot3TestApplication
=====starting=====正在启动======
=====environmentPrepared=====环境准备完成======

  .   ____          _            __ _ _
 /\\ / ___'_ __ _ _(_)_ __  __ _ \ \ \ \
( ( )\___ | '_ | '_| | '_ \/ _` | \ \ \ \
 \\/  ___)| |_)| | | | | || (_| |  ) ) ) )
  '  |____| .__|_| |_|_| |_\__, | / / / /
 =========|_|==============|___/=/_/_/_/
 :: Spring Boot ::                (v3.1.1)

=====contextPrepared=====ioc容器准备完成======
2023-07-24T18:19:05.215+08:00  INFO 22832 --- [           main] c.h.s.SpringBoot3TestApplication         : Starting SpringBoot3TestApplication using Java 17.0.7 with PID 22832 (D:\20230205备份\正使用文件\springBoot3Test\target\classes started by hehuan48495 in D:\20230205备份\正使用文件\springBoot3Test)
2023-07-24T18:19:05.220+08:00  INFO 22832 --- [           main] c.h.s.SpringBoot3TestApplication         : No active profile set, falling back to 1 default profile: "default"
=====contextLoaded=====ioc容器加载完成======
2023-07-24T18:19:05.805+08:00  INFO 22832 --- [           main] o.s.b.w.e.t.TomcatWebServer              : Tomcat initialized with port(s): 8080 (http)
2023-07-24T18:19:05.813+08:00  INFO 22832 --- [           main] o.a.c.c.StandardService                  : Starting service [Tomcat]
2023-07-24T18:19:05.813+08:00  INFO 22832 --- [           main] o.a.c.c.StandardEngine                   : Starting Servlet engine: [Apache Tomcat/10.1.10]
2023-07-24T18:19:05.876+08:00  INFO 22832 --- [           main] o.a.c.c.C.[.[.[/]                        : Initializing Spring embedded WebApplicationContext
2023-07-24T18:19:05.876+08:00  INFO 22832 --- [           main] w.s.c.ServletWebServerApplicationContext : Root WebApplicationContext: initialization completed in 631 ms
2023-07-24T18:19:06.141+08:00  INFO 22832 --- [           main] o.s.b.w.e.t.TomcatWebServer              : Tomcat started on port(s): 8080 (http) with context path ''
2023-07-24T18:19:06.147+08:00  INFO 22832 --- [           main] c.h.s.SpringBoot3TestApplication         : Started SpringBoot3TestApplication in 1.243 seconds (process running for 1.723)
=====started=====启动完成======
=====ready=====准备就绪======
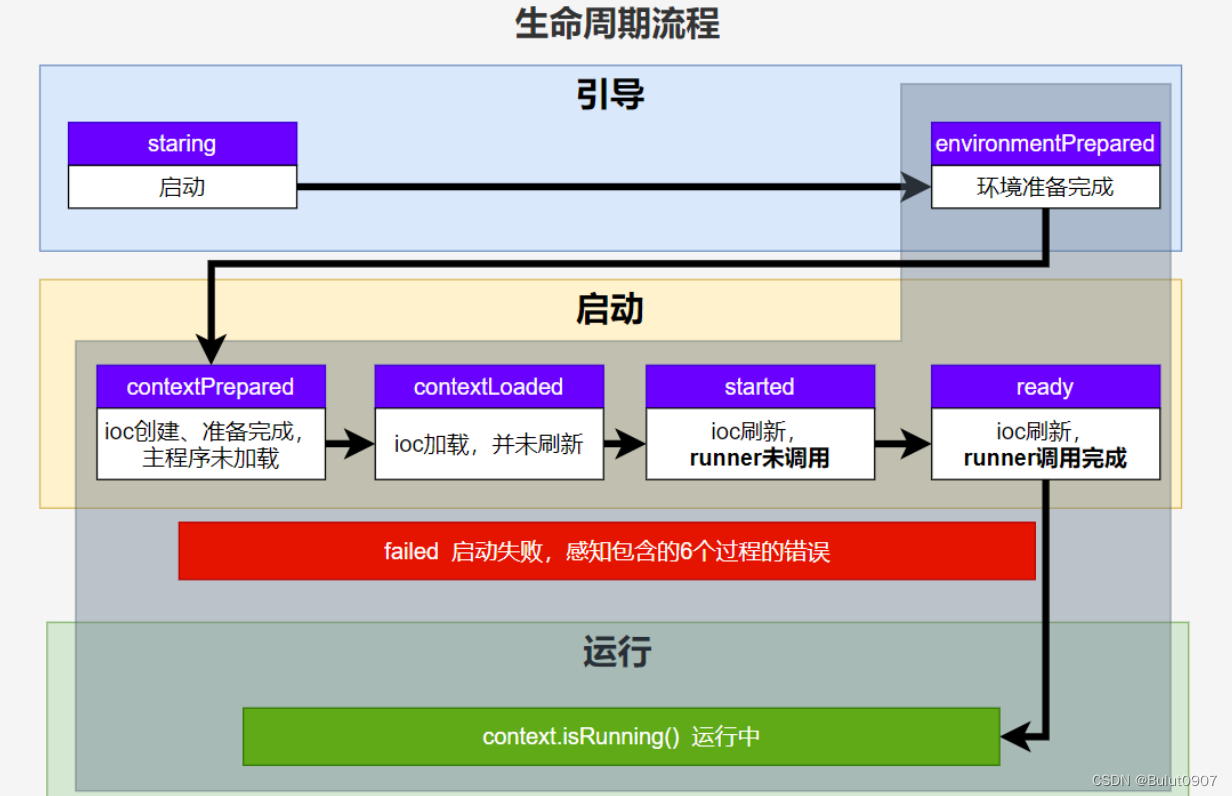
1.2 生命周期全流程

源码分析如下:
public class SpringApplication {
......省略部分......
	public ConfigurableApplicationContext run(String... args) {
		long startTime = System.nanoTime();
		// =====================================listeners.starting==============================
		// 1. 创建bootstrapContext
		DefaultBootstrapContext bootstrapContext = createBootstrapContext();
		ConfigurableApplicationContext context = null;
		configureHeadlessProperty();
		// 2. 获取run listeners。从spring.factories加载SpringApplicationRunListener类的所有监听器
		SpringApplicationRunListeners listeners = getRunListeners(args);
		// 3. 遍历调用所有listener的starting方法
		listeners.starting(bootstrapContext, this.mainApplicationClass);
		try {
			ApplicationArguments applicationArguments = new DefaultApplicationArguments(args);
			// =====================================listeners.environmentPrepared==============================
			// 准备环境。先将应用的各种参数绑定到环境变量,再在方法内部会【执行一次】listeners.environmentPrepared方法
			ConfigurableEnvironment environment = prepareEnvironment(listeners, bootstrapContext, applicationArguments);
			Banner printedBanner = printBanner(environment);
			// =====================================listeners.contextPrepared==============================
			// 1. 创建IOC容器
			context = createApplicationContext();
			context.setApplicationStartup(this.applicationStartup);
			// 2. 准备IOC容器。准备好后会【执行一次】listeners.contextPrepared,然后会执行bootstrapContext.close关闭引导上下文
			// =====================================listeners.contextLoaded==============================
			// 在prepareContext执行完前面的步骤后,先将核心的组件添加到IOC容器,然后再执行listeners.contextLoaded
			// 此时sources(主配置类)已加载,但是配置类中的Bean还未创建
			prepareContext(bootstrapContext, context, environment, listeners, applicationArguments, printedBanner);
			// =====================================listeners.started==============================
			// 1. 进行IOC容器经典的刷新十二大步。所有Bean进行创造
			refreshContext(context);
			afterRefresh(context, applicationArguments);
			Duration timeTakenToStartup = Duration.ofNanos(System.nanoTime() - startTime);
			if (this.logStartupInfo) {
				new StartupInfoLogger(this.mainApplicationClass).logStarted(getApplicationLog(), timeTakenToStartup);
			}
			// 2. 【执行一次】listeners.started
			listeners.started(context, timeTakenToStartup);
			// =====================================listeners.ready==============================
			// 1. 调用runner调用
			callRunners(context, applicationArguments);
		}
		catch (Throwable ex) {
			if (ex instanceof AbandonedRunException) {
				throw ex;
			}
			// =====================================listeners.failed==============================
			// 如果失败,在方法内部【第一次】调用listeners.failed
			handleRunFailure(context, ex, listeners);
			throw new IllegalStateException(ex);
		}
		try {
			if (context.isRunning()) {
				Duration timeTakenToReady = Duration.ofNanos(System.nanoTime() - startTime);
				// 2. 在run方法完毕前,执行listeners.ready
				listeners.ready(context, timeTakenToReady);
			}
		}
		catch (Throwable ex) {
			if (ex instanceof AbandonedRunException) {
				throw ex;
			}
			// =====================================listeners.failed==============================
			// 如果失败,在方法内部【第二次】调用listeners.failed
			handleRunFailure(context, ex, null);
			throw new IllegalStateException(ex);
		}
		return context;
	}
......省略部分......
}
2. 事件触发时机
2.1 各种回调监听器
- BootstrapRegistryInitializer: 感知引导初始化特定阶段
- 从META-INF/spring.factories加载
- 也可以使用
SpringApplication.addBootstrapRegistryInitializer();添加自定义的类 - 创建引导上下文bootstrapContext的时候触发
- 场景:项目启动的时候,进行密钥校对授权
	public SpringApplication(ResourceLoader resourceLoader, Class<?>... primarySources) {
		this.resourceLoader = resourceLoader;
		Assert.notNull(primarySources, "PrimarySources must not be null");
		this.primarySources = new LinkedHashSet<>(Arrays.asList(primarySources));
		this.webApplicationType = WebApplicationType.deduceFromClasspath();
		// 从spring.factories加载BootstrapRegistryInitializer
		this.bootstrapRegistryInitializers = new ArrayList<>(
				getSpringFactoriesInstances(BootstrapRegistryInitializer.class));
		// 从spring.factories加载ApplicationContextInitializer
		setInitializers((Collection) getSpringFactoriesInstances(ApplicationContextInitializer.class));
		// 从spring.factories加载ApplicationListener
		setListeners((Collection) getSpringFactoriesInstances(ApplicationListener.class));
		this.mainApplicationClass = deduceMainApplicationClass();
	}
- ApplicationContextInitializer: 感知ioc容器初始化特定阶段。加载方式如下:
- 从META-INF/spring.factories加载
- 使用
SpringApplication.addInitializers();添加自定义的类
- ApplicationListener: 感知全阶段生命周期 + 基于事件机制,感知事件。 一旦到了哪个阶段可以做别的事。类似于AOP的基本通知(前置、后置、返回、异常)。9大事件后面会讲。加载方式如下:
- @Bean或@EventListener(事件驱动)
- 使用
SpringApplication.addListeners(…)或SpringApplicationBuilder.listeners(…)添加自定义的类 - 从META-INF/spring.factories加载
- SpringApplicationRunListener: 感知全阶段生命周期 + 各种阶段都能自定义操作,功能更完善。类似于AOP的环绕通知
- 从META-INF/spring.factories加载
- ApplicationRunner: 感知应用就绪Ready特定阶段。应用卡死,就不会就绪。后面具体会讲
- 通过@Bean加载
- CommandLineRunner: 感知应用就绪Ready特定阶段。应用卡死,就不会就绪ApplicationListener
- 通过@Bean加载
2.2 九大事件触发流程
- 先自定义ApplicationListener感知各个事件
MyListener.java
package com.hh.springboot3test.listener;

import org.springframework.context.ApplicationEvent;
import org.springframework.context.ApplicationListener;


public class MyListener implements ApplicationListener<ApplicationEvent> {
    @Override
    public void onApplicationEvent(ApplicationEvent event) {
        System.out.println("=====事件====到达====" + event + "=====");
    }
}
src\main\resources\META-INF\spring.factories添加
org.springframework.context.ApplicationListener=com.hh.springboot3test.listener.MyListener
- 自定义ApplicationRunner和CommandLineRunner
RunnerConfig.java
package com.hh.springboot3test.config;

import org.springframework.boot.ApplicationRunner;
import org.springframework.boot.CommandLineRunner;
import org.springframework.context.annotation.Bean;
import org.springframework.context.annotation.Configuration;


@Configuration
public class RunnerConfig {

    @Bean
    public ApplicationRunner applicationRunner(){

        return args -> {
            System.out.println("===ApplicationRunner=====运行了=====");
        };
    }

    @Bean
    public CommandLineRunner commandLineRunner(){
        return args -> {
            System.out.println("===CommandLineRunner=====运行了=====");
        };
    }
}
启动springboot应用,打印如下:
=====事件====到达====org.springframework.boot.context.event.ApplicationStartingEvent[source=org.springframework.boot.SpringApplication@1787f2a0]=====
=====starting=====正在启动======
=====事件====到达====org.springframework.boot.context.event.ApplicationEnvironmentPreparedEvent[source=org.springframework.boot.SpringApplication@1787f2a0]=====
=====environmentPrepared=====环境准备完成======

  .   ____          _            __ _ _
 /\\ / ___'_ __ _ _(_)_ __  __ _ \ \ \ \
( ( )\___ | '_ | '_| | '_ \/ _` | \ \ \ \
 \\/  ___)| |_)| | | | | || (_| |  ) ) ) )
  '  |____| .__|_| |_|_| |_\__, | / / / /
 =========|_|==============|___/=/_/_/_/
 :: Spring Boot ::                (v3.1.1)

=====事件====到达====org.springframework.boot.context.event.ApplicationContextInitializedEvent[source=org.springframework.boot.SpringApplication@1787f2a0]=====
=====contextPrepared=====ioc容器准备完成======
2023-07-25T10:41:41.064+08:00  INFO 13056 --- [           main] c.h.s.SpringBoot3TestApplication         : Starting SpringBoot3TestApplication using Java 17.0.7 with PID 13056 (D:\20230205备份\正使用文件\springBoot3Test\target\classes started by hehuan48495 in D:\20230205备份\正使用文件\springBoot3Test)
2023-07-25T10:41:41.069+08:00  INFO 13056 --- [           main] c.h.s.SpringBoot3TestApplication         : No active profile set, falling back to 1 default profile: "default"
=====事件====到达====org.springframework.boot.context.event.ApplicationPreparedEvent[source=org.springframework.boot.SpringApplication@1787f2a0]=====
=====contextLoaded=====ioc容器加载完成======
2023-07-25T10:41:41.622+08:00  INFO 13056 --- [           main] o.s.b.w.e.t.TomcatWebServer              : Tomcat initialized with port(s): 8080 (http)
2023-07-25T10:41:41.631+08:00  INFO 13056 --- [           main] o.a.c.c.StandardService                  : Starting service [Tomcat]
2023-07-25T10:41:41.631+08:00  INFO 13056 --- [           main] o.a.c.c.StandardEngine                   : Starting Servlet engine: [Apache Tomcat/10.1.10]
2023-07-25T10:41:41.691+08:00  INFO 13056 --- [           main] o.a.c.c.C.[.[.[/]                        : Initializing Spring embedded WebApplicationContext
2023-07-25T10:41:41.691+08:00  INFO 13056 --- [           main] w.s.c.ServletWebServerApplicationContext : Root WebApplicationContext: initialization completed in 597 ms
2023-07-25T10:41:41.936+08:00  INFO 13056 --- [           main] o.s.b.w.e.t.TomcatWebServer              : Tomcat started on port(s): 8080 (http) with context path ''
=====事件====到达====org.springframework.boot.web.servlet.context.ServletWebServerInitializedEvent[source=org.springframework.boot.web.embedded.tomcat.TomcatWebServer@661d6bb6]=====
=====事件====到达====org.springframework.context.event.ContextRefreshedEvent[source=org.springframework.boot.web.servlet.context.AnnotationConfigServletWebServerApplicationContext@43ed0ff3, started on Tue Jul 25 10:41:41 CST 2023]=====
2023-07-25T10:41:41.942+08:00  INFO 13056 --- [           main] c.h.s.SpringBoot3TestApplication         : Started SpringBoot3TestApplication in 1.168 seconds (process running for 1.631)
=====事件====到达====org.springframework.boot.context.event.ApplicationStartedEvent[source=org.springframework.boot.SpringApplication@1787f2a0]=====
=====事件====到达====org.springframework.boot.availability.AvailabilityChangeEvent[source=org.springframework.boot.web.servlet.context.AnnotationConfigServletWebServerApplicationContext@43ed0ff3, started on Tue Jul 25 10:41:41 CST 2023]=====
=====started=====启动完成======
===ApplicationRunner=====运行了=====
===CommandLineRunner=====运行了=====
=====事件====到达====org.springframework.boot.context.event.ApplicationReadyEvent[source=org.springframework.boot.SpringApplication@1787f2a0]=====
=====事件====到达====org.springframework.boot.availability.AvailabilityChangeEvent[source=org.springframework.boot.web.servlet.context.AnnotationConfigServletWebServerApplicationContext@43ed0ff3, started on Tue Jul 25 10:41:41 CST 2023]=====
=====ready=====准备就绪======
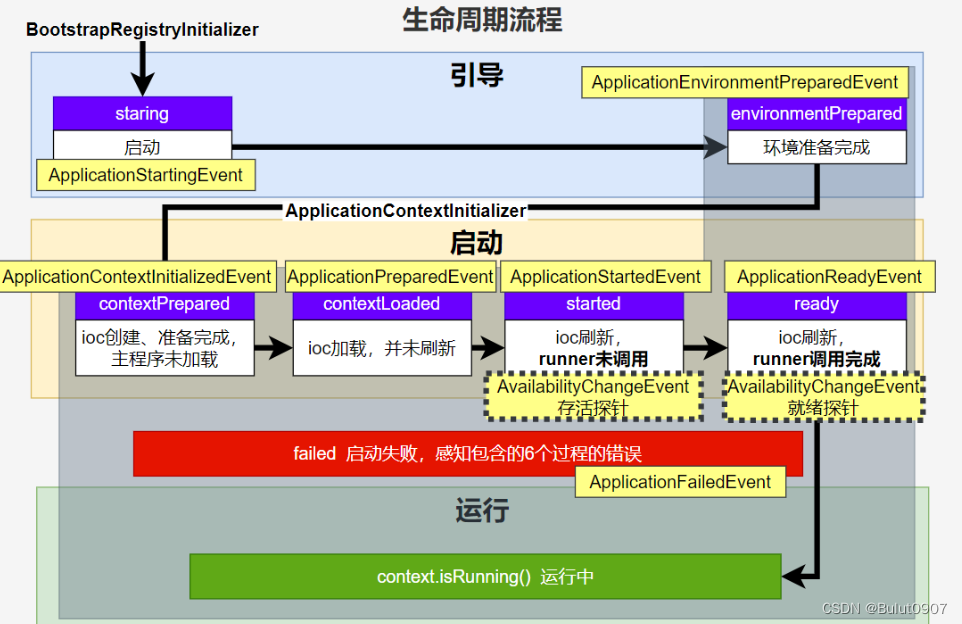
整体的流程如下图所示:

9大事件触发顺序总结:
- ApplicationStartingEvent:应用启动但未做任何事情, 除了注册listeners和initializers
- ApplicationEnvironmentPreparedEvent: Environment准备好,但context未创建.
- ApplicationContextInitializedEvent: ApplicationContext准备好,ApplicationContextInitializers调用,但是任何bean未加载
- ApplicationPreparedEvent: 容器刷新之前,bean定义信息加载
- ApplicationStartedEvent: 容器刷新完成, runner未调用
- AvailabilityChangeEvent: LivenessState.CORRECT应用存活探针,但还不能接收请求。用于K8S
- ApplicationReadyEvent: 所有runner被调用
- AvailabilityChangeEvent:ReadinessState.ACCEPTING_TRAFFIC应用就绪探针,可以接请求。用于K8S
- ApplicationFailedEvent :如果启动出错
2.3 最佳实战
- 如果项目启动前做事: BootstrapRegistryInitializer和ApplicationContextInitializer
- 如果想要在项目启动完成后做事:ApplicationRunner和CommandLineRunner
- 如果要干涉生命周期做事:SpringApplicationRunListener
- 如果想要用事件机制:ApplicationListener
2.4 SpringBoot应用运行的事件发布和订阅开发
应用运行中的事件发布和订阅,可以实现无数种。形成事件驱动模型
核心原理如下。符合设计模式的开闭原则:对新增开放,对修改关闭
- 事件发布者:实现ApplicationEventPublisherAware或ApplicationEventMulticaster,然后注入到IOC容器中
- 事件监听者:通过在组件中再添加@EventListener注解,或实现ApplicationListener,监听指定类型的ApplicationEvent

实战如下:
UserEntity.java:定义用户的信息
package com.hh.springboot3test.entity;


import lombok.AllArgsConstructor;
import lombok.Data;
import lombok.NoArgsConstructor;

@AllArgsConstructor
@NoArgsConstructor
@Data
public class UserEntity {

    private String uname;
    private String passwd;
}
LoginSuccessEvent.java:实现ApplicationEvent抽象类,定义一个事件类型
package com.hh.springboot3test.event;

import com.hh.springboot3test.entity.UserEntity;
import org.springframework.context.ApplicationEvent;


public class LoginSuccessEvent extends ApplicationEvent {

    /**
     * @param source: 登录成功的人
     */
    public LoginSuccessEvent(UserEntity source) {
        super(source);
    }
}
EventPublisher.java:实现了ApplicationEventPublisherAware,会自动完成两件事情。从而具有事件发布功能
- 方法setApplicationEventPublisher会被自动调用
- 会自动把底层发布事件的组件ApplicationEventPublisher注入进入参
package com.hh.springboot3test.event;

import org.springframework.context.ApplicationEvent;
import org.springframework.context.ApplicationEventPublisher;
import org.springframework.context.ApplicationEventPublisherAware;
import org.springframework.stereotype.Service;


@Service
public class EventPublisher implements ApplicationEventPublisherAware {

    ApplicationEventPublisher applicationEventPublisher;

    @Override
    public void setApplicationEventPublisher(ApplicationEventPublisher applicationEventPublisher) {
        this.applicationEventPublisher = applicationEventPublisher;
    }

    /**
     * 将事件广播出去。所有监听这个事件的监听器都可以收到
     */
    public void sendEvent(ApplicationEvent event) {
        applicationEventPublisher.publishEvent(event);
    }


}
LoginController.java:模拟用户登录,创建事件信息,再发送事件
package com.hh.springboot3test.controller;

import com.hh.springboot3test.entity.UserEntity;
import com.hh.springboot3test.event.EventPublisher;
import com.hh.springboot3test.event.LoginSuccessEvent;
import org.springframework.beans.factory.annotation.Autowired;
import org.springframework.web.bind.annotation.GetMapping;
import org.springframework.web.bind.annotation.RequestParam;
import org.springframework.web.bind.annotation.RestController;


@RestController
public class LoginController {

    @Autowired
    EventPublisher eventPublisher;

    @GetMapping("/login")
    public String login(@RequestParam("uname") String uname,
                        @RequestParam("passwd") String passwd) {
        // 业务处理登录
        System.out.println("=====业务处理登录完成======");

        // 如果是分布式服务,可以发布分布式事件
        LoginSuccessEvent event = new LoginSuccessEvent(new UserEntity(uname, passwd));
        eventPublisher.sendEvent(event);

        return uname + "登录成功";
    }
}
AccountService.java:订阅事件方式一:实现ApplicationListener接口,泛型为监听的事件类型。onApplicationEvent方法监听到新事件时自动调用
@Order注解用于方法和类上都可以,数字越小优先级越高。默认按类称排序
package com.hh.springboot3test.service;


import com.hh.springboot3test.entity.UserEntity;
import com.hh.springboot3test.event.LoginSuccessEvent;
import org.springframework.context.ApplicationListener;
import org.springframework.core.annotation.Order;
import org.springframework.stereotype.Service;


@Order(1)
@Service
public class AccountService implements ApplicationListener<LoginSuccessEvent> {

    // 模拟积分功能
    public void addAccountScore(String uname) {
        System.out.println(uname + "加了1分");
    }

    @Override
    public void onApplicationEvent(LoginSuccessEvent event) {
        System.out.println("=====AccountService======收到事件=====");

        UserEntity source = (UserEntity) event.getSource();
        addAccountScore(source.getUname());
    }
}
CouponService.java:订阅事件方式二:在自定义方法上使用@EventListener注解,参数为监听的事件类型。监听到新事件时方法自动调用
package com.hh.springboot3test.service;

import com.hh.springboot3test.entity.UserEntity;
import com.hh.springboot3test.event.LoginSuccessEvent;
import org.springframework.context.event.EventListener;
import org.springframework.core.annotation.Order;
import org.springframework.stereotype.Service;

@Service
public class CouponService {

    public void sendCoupon(String uname) {
        System.out.println(uname + "随机得到了一张优惠券");
    }

    @Async  // 需要在主程序上使用@EnableAsync开启异步功能
    @Order(2)
    @EventListener
    public void myEventMethod(LoginSuccessEvent event) {
        System.out.println("=====CouponService======收到事件=====");

        UserEntity source = (UserEntity) event.getSource();
        sendCoupon(source.getUname());
    }


}
访问http://localhost:8080/login?uname=jim&passwd=abc。页面显示如下:

控制台打印如下:
=====业务处理登录完成======
=====事件====到达====com.hh.springboot3test.event.LoginSuccessEvent[source=UserEntity(uname=jim, passwd=abc)]=====
=====AccountService======收到事件=====
jim加了1分
=====CouponService======收到事件=====
jim随机得到了一张优惠券
=====事件====到达====ServletRequestHandledEvent: url=[/login]; client=[0:0:0:0:0:0:0:1]; method=[GET]; servlet=[dispatcherServlet]; session=[null]; user=[null]; time=[32ms]; status=[OK]=====
可以看到,LoginController能发布事件,AccountService和CouponService能监听到事件
我们前面实现的MyListener,也能监听到LoginController发布的事件。同时能监听到ServletRequestHandledEvent
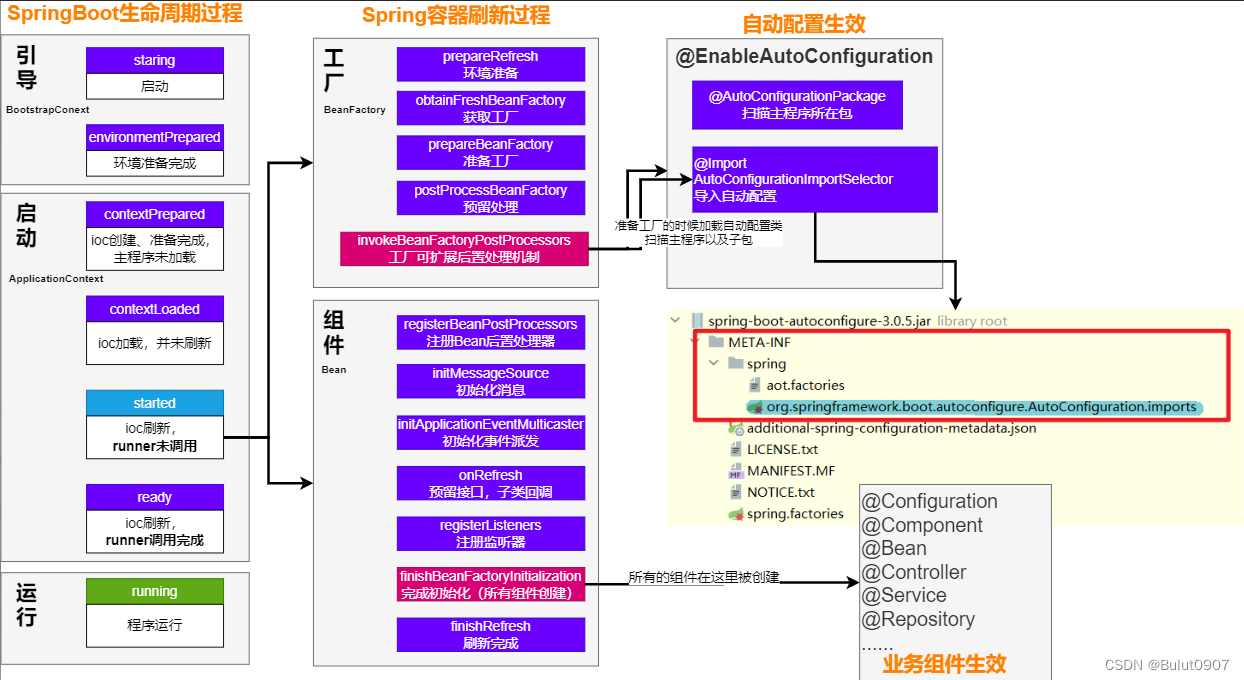
3. 配置类和Bean加载的时机
自动配置类、配置类、Bean加载的时机,可以看下图

本文来自互联网用户投稿,该文观点仅代表作者本人,不代表本站立场。本站仅提供信息存储空间服务,不拥有所有权,不承担相关法律责任。 如若内容造成侵权/违法违规/事实不符,请联系我的编程经验分享网邮箱:chenni525@qq.com进行投诉反馈,一经查实,立即删除!
- Python教程
- 深入理解 MySQL 中的 HAVING 关键字和聚合函数
- Qt之QChar编码(1)
- MyBatis入门基础篇
- 用Python脚本实现FFmpeg批量转换
- INT201 形式语言与自动机笔记(上)
- 什么是数据泄露?泄露如何发生?黑客是如何处理被盗数据的?
- 深度学习中的训练集、验证集、测试集作用有什么区别。
- java面试题-ArrayList的自动扩容过程
- 从入门到放弃之「ClickHouse」
- Python之字符编码汇总
- 如何高效使用静态S5:功能详解与最佳实践
- discuz论坛附件上传限制大小2MB
- 深圳神秘顾客(SMS)公司开展某连锁酒店神秘顾客调查
- 【JAVA】OPENGL+TIFF格式图片,不同阈值旋转效果