【AI】使用LoFTR进行图像匹配测试Demo
发布时间:2024年01月04日
LoFTR图像匹配的源码解析我们在上篇文章中已经写了,对于怎么试用一下,我这边再啰嗦一下。
0.环境搭建
详细的搭建教程请点击链接查看,这里只对需要特殊注意的地方做阐述
1.创建的Python环境采用python3.8的环境,因为文章发布较早,使用3.10版本测试的时候发现了依赖版本不兼容的问题
2.torch试用whl文件的安装方式比较稳妥,然后在源码requirements.txt中将torch的依赖注释掉,在安装完torch之后使用pip install -r requirements.txt进行安装依赖。
1.运行文件准备
1.下载预训练权重文件,由于我这边使用的是外景图片,所以下载了outdoor的模型文件。
官方提供了下载地址:https://drive.google.com/drive/folders/1DOcOPZb3-5cWxLqn256AhwUVjBPifhuf,需要一点魔法
2.图片文件随便两张带有重叠景象的图片,我这边随便用了两张
3.注意修改demo文件中的权重路径和图片路径
2.运行demo文件
这里我是在模型源码的demo文件夹下面进行的测试,如果在其他路径下需要注意引入路径问题。
import torch
import cv2
import numpy as np
import matplotlib.cm as cm

from src.utils.plotting import make_matching_figure
from src.loftr import LoFTR, default_cfg


if __name__ == '__main__':
    # 根据图片拍摄场景和下载的预训练模型进行选择 可选:indoor、outdoor
    image_type = 'outdoor'
	# 根据个人图片进行修改
    img0_pth = "images/12003890_f6c899bec0_o.jpg"
    img1_pth = "images/13866250_56e0509621_o.jpg"
    image_pair = [img0_pth, img1_pth]

    # The default config uses dual-softmax.
    # The outdoor and indoor models share the same config.
    # You can change the default values like thr and coarse_match_type.
    matcher = LoFTR(config=default_cfg)
    # load中修改预训练模型地址
    if image_type == 'indoor':
        matcher.load_state_dict(torch.load("indoor_ds.ckpt")['state_dict'])
    elif image_type == 'outdoor':
        matcher.load_state_dict(torch.load("outdoor_ds.ckpt")['state_dict'])
    else:
        raise ValueError("Wrong image_type is given.")
    matcher = matcher.eval().cuda()

    # Rerun this cell (and below) if a new image pair is uploaded.
    img0_raw = cv2.imread(image_pair[0], cv2.IMREAD_GRAYSCALE)
    img1_raw = cv2.imread(image_pair[1], cv2.IMREAD_GRAYSCALE)
    img0_raw = cv2.resize(img0_raw, (640, 480))
    img1_raw = cv2.resize(img1_raw, (640, 480))

    img0 = torch.from_numpy(img0_raw)[None][None].cuda() / 255.
    img1 = torch.from_numpy(img1_raw)[None][None].cuda() / 255.
    batch = {'image0': img0, 'image1': img1}

    # Inference with LoFTR and get prediction
    with torch.no_grad():
        matcher(batch)
        mkpts0 = batch['mkpts0_f'].cpu().numpy()
        mkpts1 = batch['mkpts1_f'].cpu().numpy()
        mconf = batch['mconf'].cpu().numpy()

    # Draw
    color = cm.jet(mconf, alpha=0.7)
    text = [
        'LoFTR',
        'Matches: {}'.format(len(mkpts0)),
    ]
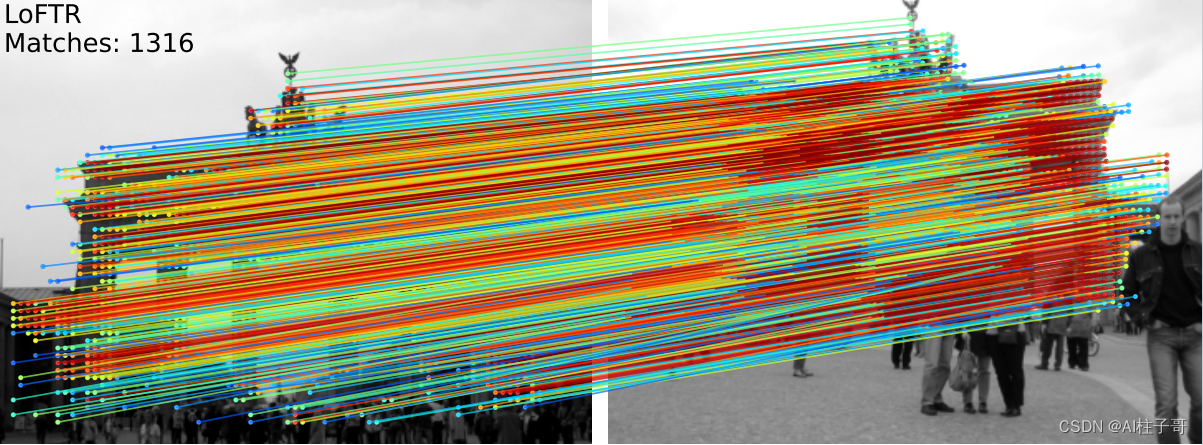
    fig = make_matching_figure(img0_raw, img1_raw, mkpts0, mkpts1, color, mkpts0, mkpts1, text)

    # A high-res PDF will also be downloaded automatically.
    make_matching_figure(img0_raw, img1_raw, mkpts0, mkpts1, color, mkpts0, mkpts1, text, path="LoFTR-colab-demo.pdf")
不论是在pycharm中运行,还是使用jupyter进行测试,都可以使用上述代码。
代码会将匹配的图片存在LoFTR-colab-demo.pdf文件中,这个文件地址可以自行修改。
模型结果展示:

文章来源:https://blog.csdn.net/zhoulizhu/article/details/135390917
本文来自互联网用户投稿,该文观点仅代表作者本人,不代表本站立场。本站仅提供信息存储空间服务,不拥有所有权,不承担相关法律责任。 如若内容造成侵权/违法违规/事实不符,请联系我的编程经验分享网邮箱:chenni525@qq.com进行投诉反馈,一经查实,立即删除!
本文来自互联网用户投稿,该文观点仅代表作者本人,不代表本站立场。本站仅提供信息存储空间服务,不拥有所有权,不承担相关法律责任。 如若内容造成侵权/违法违规/事实不符,请联系我的编程经验分享网邮箱:chenni525@qq.com进行投诉反馈,一经查实,立即删除!
最新文章
- Python教程
- 深入理解 MySQL 中的 HAVING 关键字和聚合函数
- Qt之QChar编码(1)
- MyBatis入门基础篇
- 用Python脚本实现FFmpeg批量转换
- 开源28181协议视频平台搭建流程
- 算法设计与分析实验2 :利用蛮力法、减治法和分治法解决排序问题
- Laravel 10.x 里如何使用 json 格式保存日志
- 【Docker安装Redis】Docker安装Redis,读取Redis配置文件,支持远程访问
- 初识——java(打开java的大门)
- 精通Discord营销:多账号注册与管理,高效打造矩阵
- java数据结构与算法刷题-----LeetCode524. 通过删除字母匹配到字典里最长单词
- 电子印章管理系统:腾讯电子签来袭
- 在手机上就能查看三维模型,这个软件太实用了!
- ssm超市管理系统(开题+源码)