Flutter中鼠标 onEnter onExit onHover 实现代码分析
生活会给你任何最有益的经历,以助你意识的演变。
转载请注明出处: 这里对最近用到的一些 Flutter 开源的东西进行总结积累,希望能帮助到大家。
背景
Android设备在使用的时候,大家日常使用的都是手指触摸滑动,点击进行操作,但是实际上,系统为我们提供了鼠标操作的能力。我们使用蓝牙鼠标连接到手机就会在界面上出现一个鼠标样式,然后我们可以使用鼠标进行操作,Flutter 也对系统原生的这个特性进行了支持,可以在Flutter中监听和处理响应的事件。
同样,IOS 也同样也可以使用鼠标进行连接,进行使用苹果设置指针样式
测试代码
这里自己编写了一个测试界面,我们可以使用监听鼠标进入和退出这个 View 的次数,同时当鼠标在 View 上移动的时候,我们监听 Hover 事件,并打印出对应的日志。

测试代码:下面的代码我们贴到我们的 flutter 工程的 main.dart 文件中,就可以运行的到上面的测试App。
import 'package:flutter/gestures.dart';
import 'package:flutter/material.dart';
/// Flutter code sample for [MouseRegion].
void main() {
runApp(MyApp());
}
class MyApp extends StatelessWidget {
Widget build(BuildContext context) {
return MaterialApp(
title: 'Nested MouseRegion Example',
home: Scaffold(
appBar: AppBar(
title: Text('Nested MouseRegion Example'),
),
body: Center(
child: ParentWidget(),
),
),
);
}
}
class ParentWidget extends StatefulWidget {
_ParentWidgetState createState() => _ParentWidgetState();
}
class _ParentWidgetState extends State<ParentWidget> {
int parentEnterCount = 0;
int parentExitCount = 0;
void handleParentEnter() {
setState(() {
parentEnterCount++;
});
}
void handleParentExit() {
setState(() {
parentExitCount++;
});
}
int childEnterCount = 0;
int childExitCount = 0;
void handleChildEnter() {
setState(() {
childEnterCount++;
});
}
void handleChildExit() {
setState(() {
childExitCount++;
});
}
void onParentHover(){
print("parent onHover");
}
void onChildHover(){
print("child onHover");
}
Widget build(BuildContext context) {
return MouseRegion(
cursor: SystemMouseCursors.click,
onEnter: (_) => handleParentEnter(),
onExit: (_) => handleParentExit(),
onHover: (_) => onParentHover(),
child: Container(
width: 200,
height: 200,
color: Colors.blue,
child: Stack(
children: [
Positioned(
top: 50,
left: 50,
child: MouseRegion(
onEnter: (_) => handleChildEnter(),
onExit: (_) => handleChildExit(),
onHover: (_) => onChildHover(),
child: Container(
width: 100,
height: 100,
color: Colors.red,
),
),
),
Positioned(
bottom: 0,
child: Container(
width: 200,
color: Colors.black54,
padding: EdgeInsets.all(16),
child: Column(
crossAxisAlignment: CrossAxisAlignment.start,
children: [
Text(
'Parent: Enter Count - $parentEnterCount, Exit Count - $parentExitCount',
style: TextStyle(color: Colors.white),
),
SizedBox(height: 8),
Text(
'Child: Enter Count - $childEnterCount, Exit Count - $childExitCount',
style: TextStyle(color: Colors.white),
),
],
),
),
),
],
),
),
);
}
}
这里我们用到了 Flutter 提供的 MouseRegion Widget 。
- onEnter property
Triggered when a mouse pointer has entered this widget - onExit property
Triggered when a mouse pointer has exited this widget when the widget is still mounted. - onHover property
Triggered when a pointer moves into a position within this widget without buttons pressed.
上面这几个方法对应的功能描述如上。
flutter 代码
onEnter & onExit
鼠标移入和移出是一个成对的监听事件,查看源码实现我们先断点查看流程:

在事件进行分发的时候,鼠标 Enter 和 Exit 的掉用都会在MouseTracker 中进行处理。因此onEnter 和 onExit 的实现我们也主要查看该模块的实现。
几个相关的概念需要理解
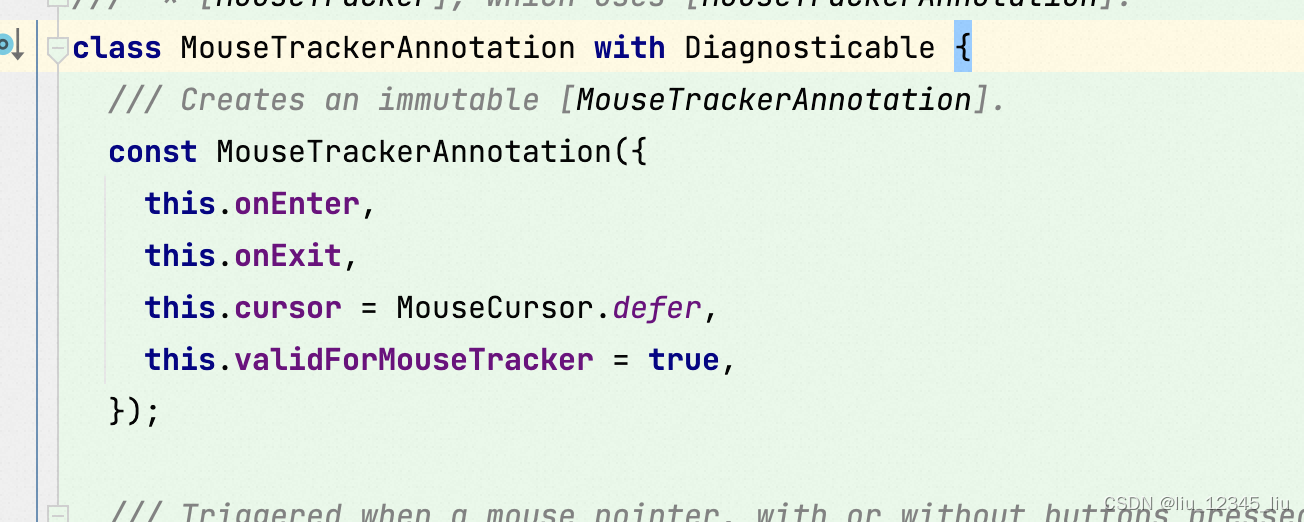
- MouseTrackerAnnotation :The annotation object used to annotate regions that are interested in mouse movements.
其实查看代码,这个类中会存储我们注册的回掉,也就意味着对应的对象在监听鼠标相关的事件,因此在回掉的时候我们也是通过这个对象完成。
- MouseState: Various states of a connected mouse device used by [MouseTracker].
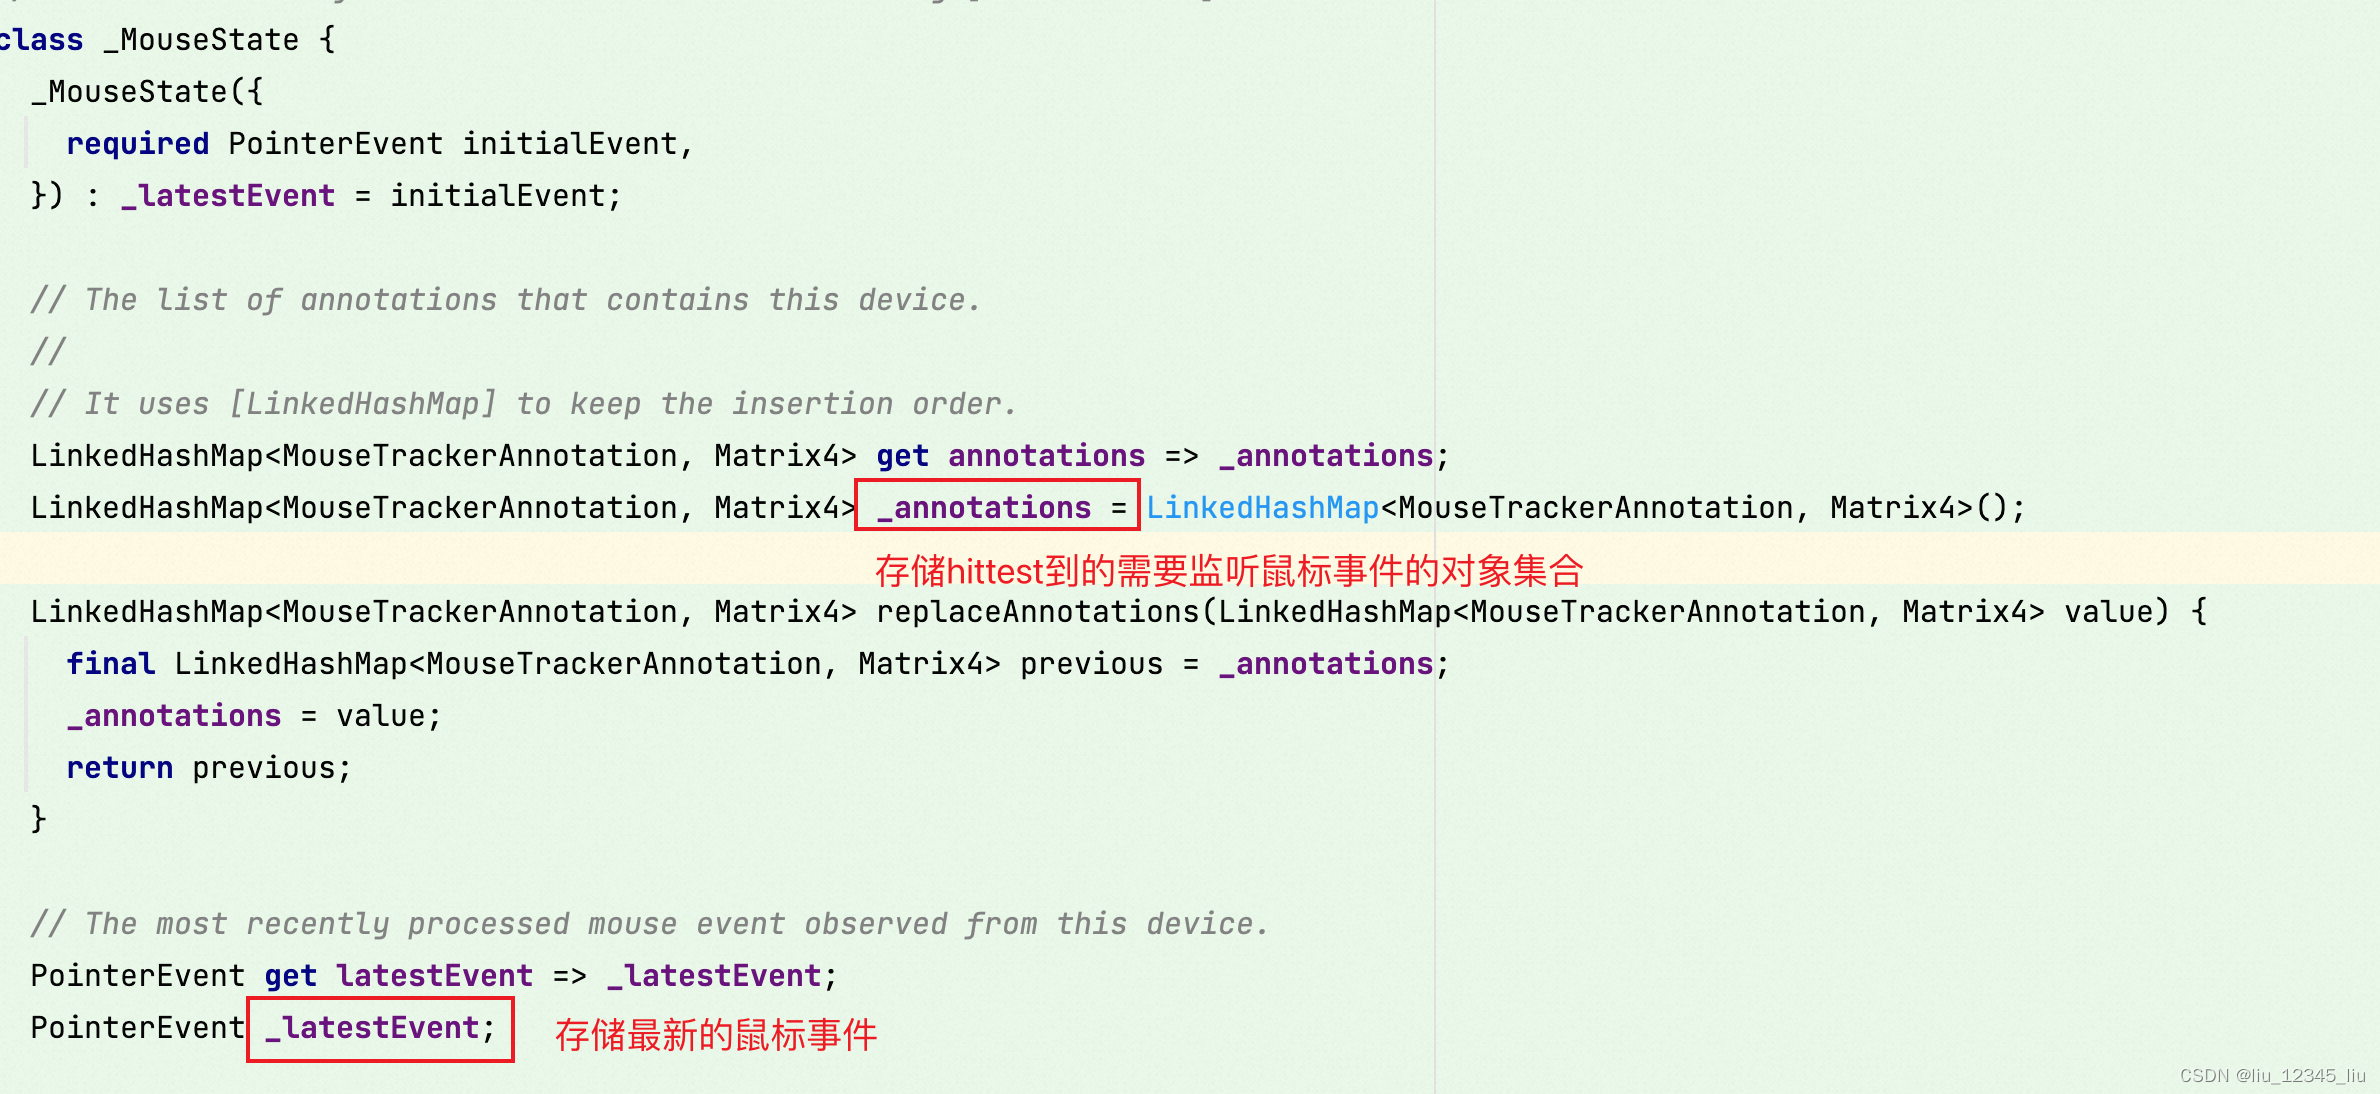
MouseState 中的数据会在派发的时候使用
hittest 指的是命中检测,即从当前的位置为标准检测鼠标的位置可以命中哪个View。
- MouseTrackerUpdateDetails :This class contains the information needed to handle the update that might change the state of a mouse device
查看代码,MouseTrackerUpdateDetails 中主要有
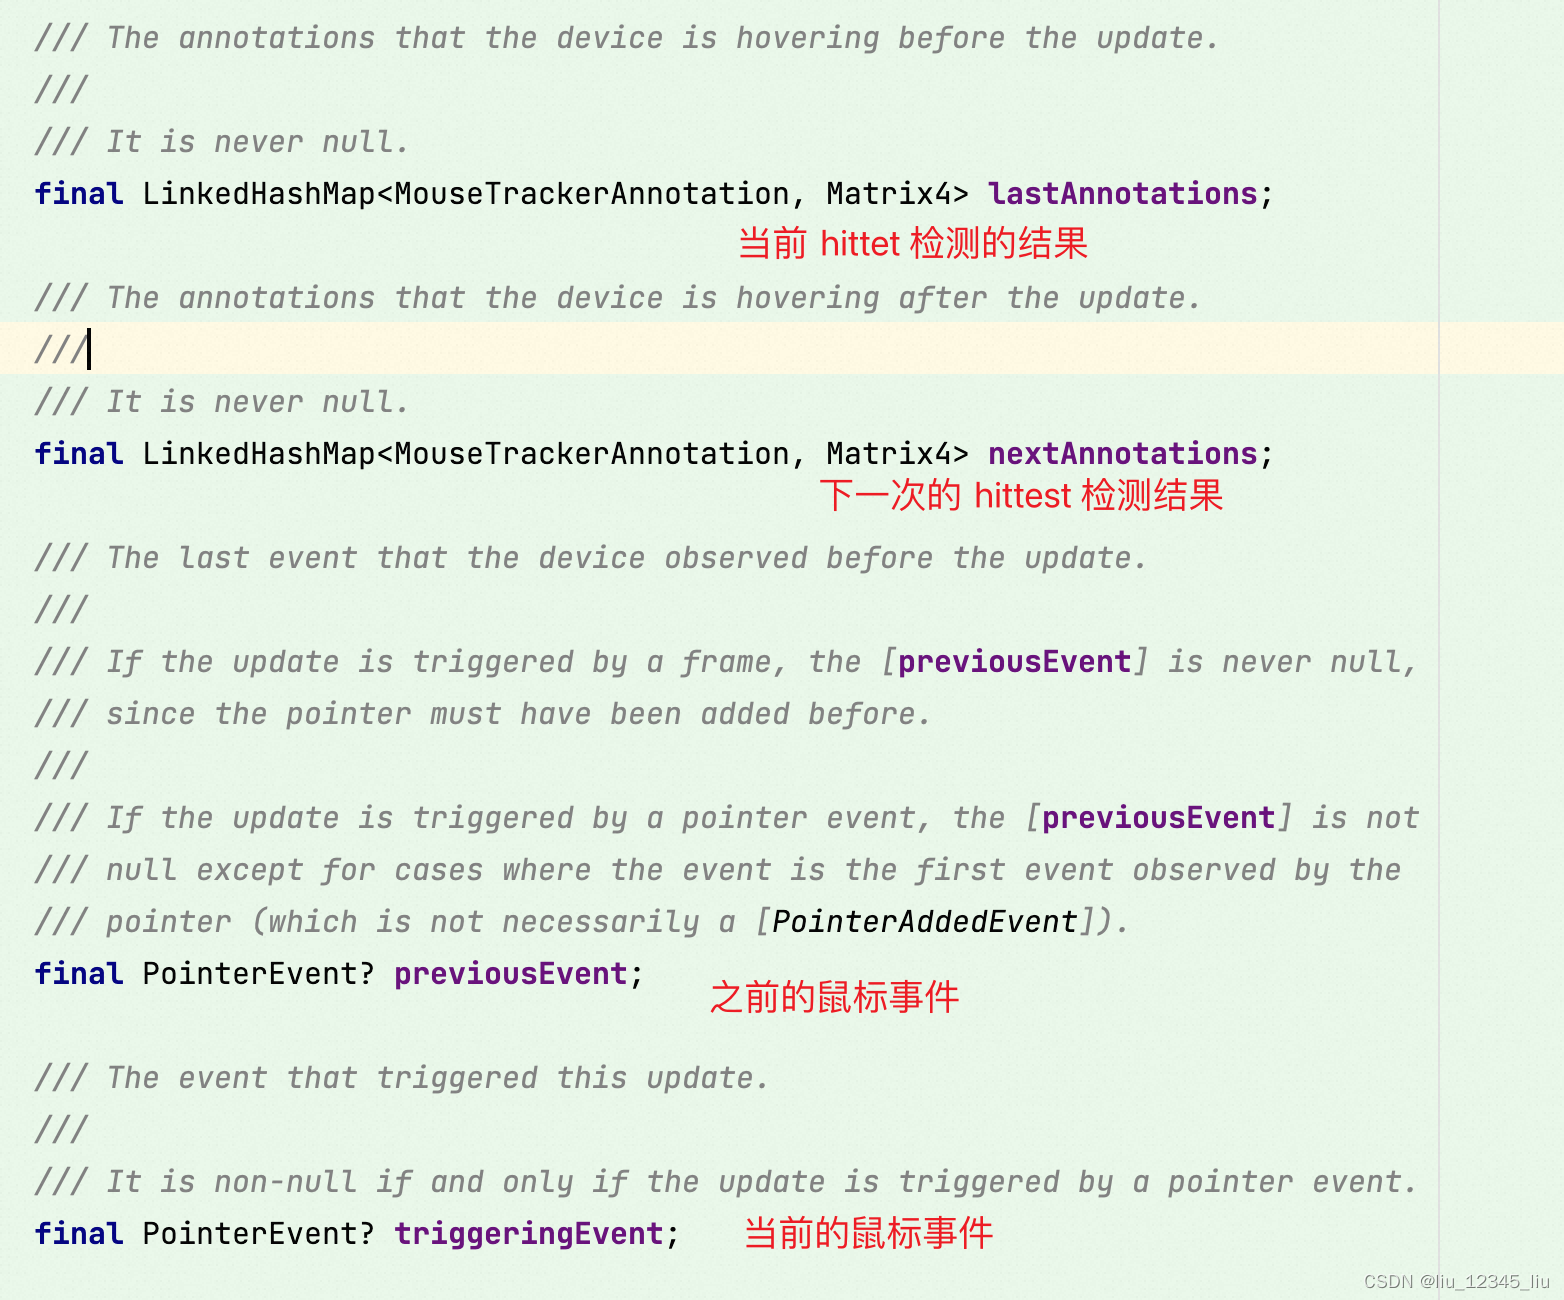
可以看到 MouseTrackerUpdateDetails 其实主要就是存储 Mouse 状态更新是所需要的信息。
代码流程:
拿到一个事件以后事件派发的流程如下:
mouse_tracker.dart
// 该方法会提供给 RendererBinding ,在事件派发的时候先掉用该方法作为处理的入口。如果是多设备参考updateAllDevices,方法,流程基本差不多
void updateWithEvent(...){
	...
	// 这里首先通过 hittest 拿到当前位置命中检测的结果。
	final HitTestResult result;
    if (event is PointerRemovedEvent) {
      result = HitTestResult();
    } else {
      final int viewId = event.viewId;
      result = hitTestResult ?? _hitTestInView(event.position, viewId);
    }
	...
		// 拿到鼠标对应的目标状态
	    final _MouseState targetState = _mouseStates[device] ?? existingState!;

		// 更新 MouseState 中存储的事件为最新的事件
        final PointerEvent lastEvent = targetState.replaceLatestEvent(event);

		// 这里将hittest 的结果转换为 Annotations 的集合
        final LinkedHashMap<MouseTrackerAnnotation, Matrix4> nextAnnotations = event is PointerRemovedEvent ?
            LinkedHashMap<MouseTrackerAnnotation, Matrix4>() :
            _hitTestInViewResultToAnnotations(result);
         // 这里替换 MouseState 中对应的状态
        final LinkedHashMap<MouseTrackerAnnotation, Matrix4> lastAnnotations = targetState.replaceAnnotations(nextAnnotations);

		// 这个会掉到 -> _handleDeviceUpdateMouseEvents
        _handleDeviceUpdate(_MouseTrackerUpdateDetails.byPointerEvent(
          lastAnnotations: lastAnnotations,
          nextAnnotations: nextAnnotations,
          previousEvent: lastEvent,
          triggeringEvent: event,
        ));
}


// 进行事件最后的派发处理
static void _handleDeviceUpdateMouseEvents(_MouseTrackerUpdateDetails details) {
	final PointerEvent latestEvent = details.latestEvent;

	// 当前对应的对象集合
    final LinkedHashMap<MouseTrackerAnnotation, Matrix4> lastAnnotations = details.lastAnnotations;
    // 下一次检测结果对应的对象集合
    final LinkedHashMap<MouseTrackerAnnotation, Matrix4> nextAnnotations = details.nextAnnotations;

	// 当前结果有这个对象,但是下一次检测结果中没有,就派发exit事件
	lastAnnotations.forEach((MouseTrackerAnnotation annotation, Matrix4 transform) {
      if (!nextAnnotations.containsKey(annotation)) {
        if (annotation.validForMouseTracker && annotation.onExit != null) {
          annotation.onExit!(baseExitEvent.transformed(lastAnnotations[annotation]));
        }
      }
    });
	// 上一次检测结果中没有这个对象,下一次检测结果中包含则派发 onEnter事件
	final List<MouseTrackerAnnotation> enteringAnnotations = nextAnnotations.keys.where(
      (MouseTrackerAnnotation annotation) => !lastAnnotations.containsKey(annotation),
    ).toList();
    final PointerEnterEvent baseEnterEvent = PointerEnterEvent.fromMouseEvent(latestEvent);
  // Order is important for mouse event callbacks. The
    // `_hitTestInViewResultToAnnotations` returns annotations in the visual order
	// 这里 需要 reversed 是因为 hittest 结果是视觉顺序,例如这样:child1->parent,但是进入的时候是先进入 parent 然后再进入到 child,所以要反向一下
    for (final MouseTrackerAnnotation annotation in enteringAnnotations.reversed) {
      if (annotation.validForMouseTracker && annotation.onEnter != null) {
        annotation.onEnter!(baseEnterEvent.transformed(nextAnnotations[annotation]));
      }
    }
}
最后,我们注册的onEnter 和onExit 函数就会被调用。
onHover
当鼠标在 View 上移动,并没有按下的时候,这个事件就会被调用:
hover 的分发相对简单一些,直接调用 dispatchEvent() 去将事件分发到 hittest 的结果: MouseRegion 对象上。
// GestureBinding::dispatchEvent
void dispatchEvent(PointerEvent event, HitTestResult? hitTestResult) {
...
for (final HitTestEntry entry in hitTestResult.path) {
try {
entry.target.handleEvent(event.transformed(entry.transform), entry);
...
}
}
// 在RenderMouseRegion 的handleEvent 中进行 hover 事件的处理
void handleEvent(PointerEvent event, HitTestEntry entry) {
assert(debugHandleEvent(event, entry));
if (onHover != null && event is PointerHoverEvent) {
return onHover!(event);
}
}
end
flutter 对 Mouse 状态监听的实现不算复杂,大家可以使用本文进行参考。
本文来自互联网用户投稿,该文观点仅代表作者本人,不代表本站立场。本站仅提供信息存储空间服务,不拥有所有权,不承担相关法律责任。 如若内容造成侵权/违法违规/事实不符,请联系我的编程经验分享网邮箱:chenni525@qq.com进行投诉反馈,一经查实,立即删除!
- Python教程
- 深入理解 MySQL 中的 HAVING 关键字和聚合函数
- Qt之QChar编码(1)
- MyBatis入门基础篇
- 用Python脚本实现FFmpeg批量转换
- 微信小程序从入门到进阶(二)
- display:grid
- 这才是Android开发学鸿蒙的正确打开方式
- 架构设计内容分享(八十):微服务的4大设计原则和19个解决方案
- 代码随想录算法训练营第49天|● 121. 买卖股票的最佳时机 ● 122.买卖股票的最佳时机II
- SAP一次查看多张凭证明细SQ03
- 【linux】线程概念
- 19.多页面情况下再看Activity生命周期
- 详解华为铁三角工作法完全解密.ppt
- 三、计算机理论-计算机网络-物理层,数据通信的理论基础,物理传输媒体、编码与传输技术及传输系统