AI聊天伴侣的语料采集大揭秘:OpenCV如何轻松识别聊天图片?
最近,负责元宇宙中AI聊天伴侣的语料数据采集,这些数据主要用于AI虚拟角色聊天的训练和测试。虽然语料获取有多种渠道,但由于部分数据涉及隐私,这里就不多说了(感兴趣的朋友可以私聊我)。今天,我将详细讲解如何利用OpenCV轻松识别真实的聊天图片。
在这个过程中,我主要涉及了一系列操作,包括OpenCV如何读取PDF多个分页图片、如何对图片进行水印过滤和异常文字剔除、如何识别聊天文本框和聊天角色、以及如何提取颜色等关键步骤。
通过OpenCV的强大功能,实现对聊天图片的智能识别和处理。这些技术操作不仅能构建了一个高质量的语料库,而且为AI虚拟角色的训练提供了可靠的基础。
导入第三方库:
import os
import json
import base64, re
from tqdm import tqdm
from tencentcloud.common import credential
from tencentcloud.common.profile.client_profile import ClientProfile
from tencentcloud.common.profile.http_profile import HttpProfile
from tencentcloud.common.exception.tencent_cloud_sdk_exception import TencentCloudSDKException
from tencentcloud.ocr.v20181119 import ocr_client, models
import fitz  # PyMuPDF
import numpy as np
腾讯云OCR服务识别图片所有文字
腾讯云OCR使用需要开通服务获取api密钥和id,可以白嫖使用api一千次,如何开通腾讯云使用腾讯云OCR服务,具体可以参考(这里选的是通用印刷识别 高精度版):文字识别 通用印刷体识别(高精度版)-服务端 API 文档-文档中心-腾讯云
图片: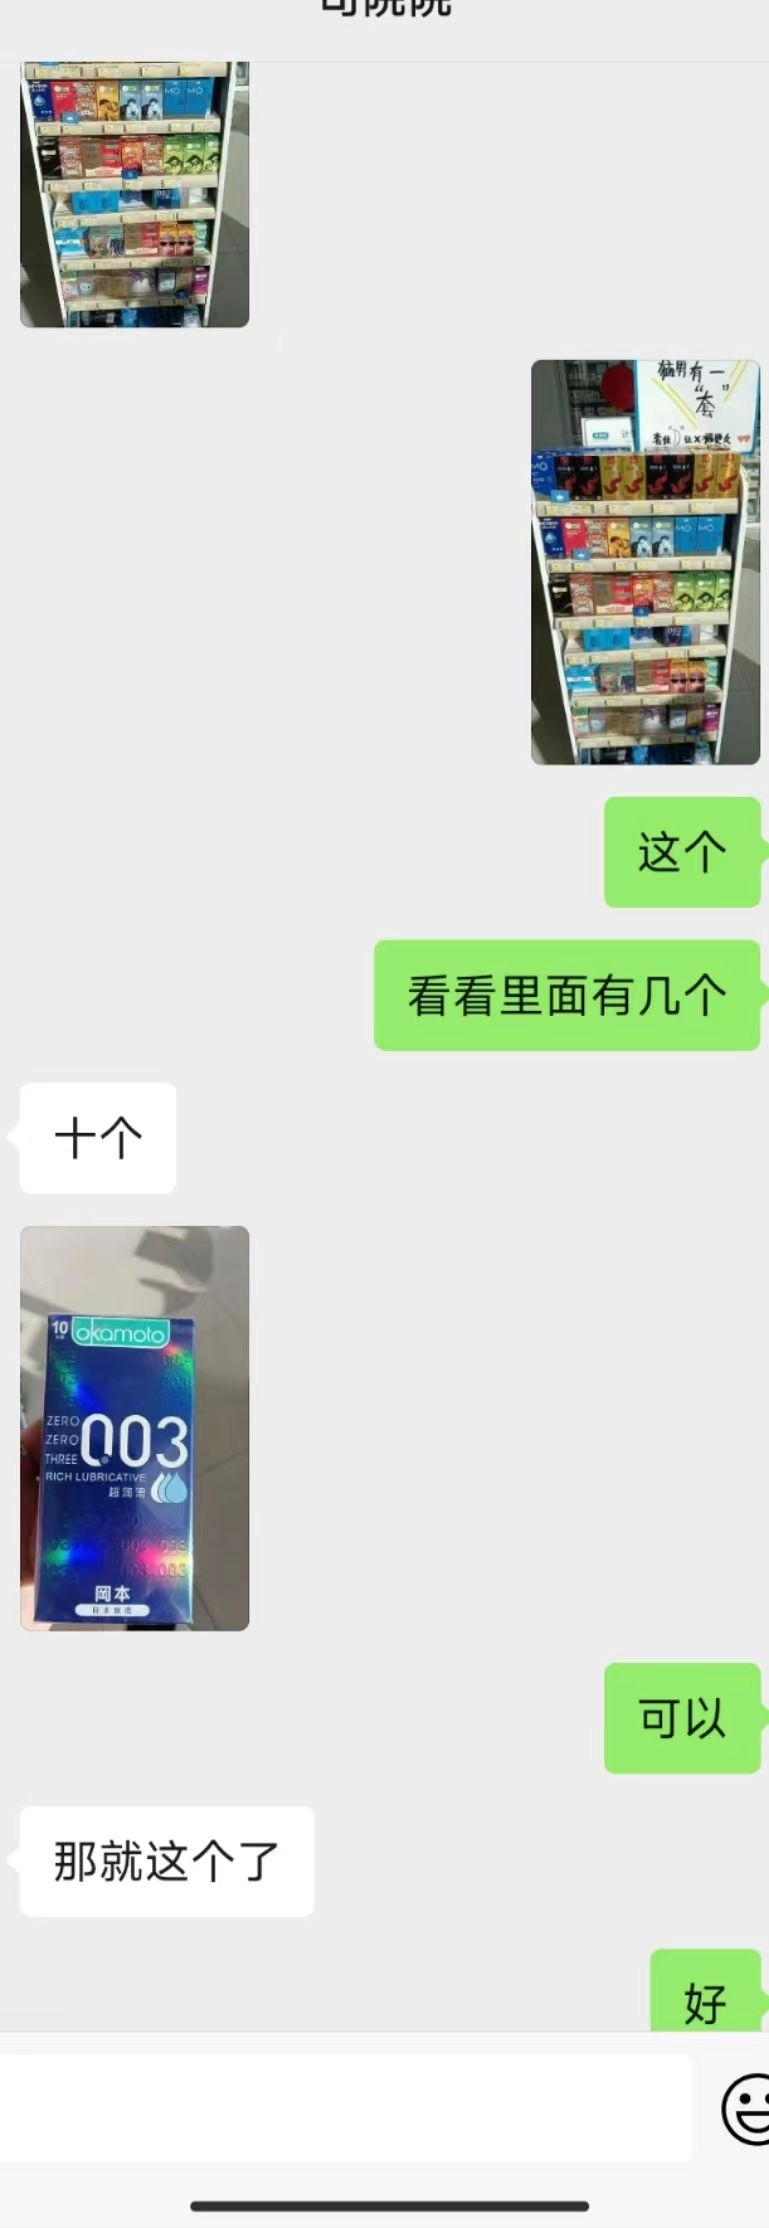
代码:
def make_api_call(base64_str, jsn_fpath, json_data):
        try:
            cred = credential.Credential(secret_id, secret_key)
            httpProfile = HttpProfile()
            httpProfile.endpoint = "ocr.tencentcloudapi.com"
            clientProfile = ClientProfile()
            clientProfile.httpProfile = httpProfile
            client = ocr_client.OcrClient(cred, "ap-guangzhou", clientProfile)
            req = models.GeneralAccurateOCRRequest()
            params = {
                'LanguageType': 'zh',
                'IsPdf': True,
                "PdfPageNumber": 5,
                'ImageBase64': f'data:image/jpeg;base64,{base64_str}',
                # 'EnableDetectText': True
            }
            req.from_json_string(json.dumps(params))
            resp = client.GeneralBasicOCR(req)
            res = json.loads(resp.to_json_string()).get('TextDetections')
            print("res lenght:",len(res))
            json_data['TextDetections'].append(res)
            # break
        except TencentCloudSDKException as err:
            print(err)

        print("len(json_data['TextDetections']):",len(json_data['TextDetections']))
        os.makedirs(os.path.dirname(os.path.realpath(jsn_fpath)), exist_ok=True)
        with open(jsn_fpath, 'w', encoding='UTF-8') as o_file:
            o_file.write(json.dumps(json_data, ensure_ascii=False))

if __name__ == '__main__':
    secret_id = "密钥id"
    secret_key = "密钥key 通过腾讯云账号获取"
    jpg_fpath = '图片路径.jpg'
    with open(jpg_fpath, 'rb') as i_file:
        base64_str = base64.b64encode(i_file.read()).decode()
    json_data = {"TextDetections":[]}
    jsn_fpath = '输出结果json文件.json'
    make_api_call(base64_str, jsn_fpath, json_data)
输出结果:
包含多个识别结果的列表,DetectedText:识别结果的文本;Polygon:文字所在的坐标,Confidence:字体大小。
{"TextDetections": [[{"DetectedText": "这个", "Confidence": 100, "Polygon": [{"X": 633, "Y": 824}, {"X": 724, "Y": 824}, {"X": 724, "Y": 872}, {"X": 633, "Y": 872}], "AdvancedInfo": "{\"Parag\":{\"ParagNo\":2}}", "ItemPolygon": {"X": 633, "Y": 824, "Width": 91, "Height": 48}, "Words": [], "WordCoordPoint": []}, {"DetectedText": "看看里面有几个", "Confidence": 100, "Polygon": [{"X": 403, "Y": 969}, {"X": 724, "Y": 969}, {"X": 724, "Y": 1017}, {"X": 403, "Y": 1017}], "AdvancedInfo": "{\"Parag\":{\"ParagNo\":3}}", "ItemPolygon": {"X": 403, "Y": 969, "Width": 321, "Height": 48}, "Words": [], "WordCoordPoint": []}, {"DetectedText": "十个", "Confidence": 100, "Polygon": [{"X": 52, "Y": 1108}, {"X": 140, "Y": 1108}, {"X": 140, "Y": 1159}, {"X": 52, "Y": 1159}], "AdvancedInfo": "{\"Parag\":{\"ParagNo\":1}}", "ItemPolygon": {"X": 52, "Y": 1108, "Width": 88, "Height": 51}, "Words": [], "WordCoordPoint": []}, {"DetectedText": "kamole", "Confidence": 89, "Polygon": [{"X": 87, "Y": 1322}, {"X": 162, "Y": 1322}, {"X": 162, "Y": 1341}, {"X": 87, "Y": 1341}], "AdvancedInfo": "{\"Parag\":{\"ParagNo\":4}}", "ItemPolygon": {"X": 87, "Y": 1322, "Width": 75, "Height": 19}, "Words": [], "WordCoordPoint": []}, {"DetectedText": "003", "Confidence": 100, "Polygon": [{"X": 41, "Y": 1408}, {"X": 186, "Y": 1408}, {"X": 186, "Y": 1467}, {"X": 41, "Y": 1467}], "AdvancedInfo": "{\"Parag\":{\"ParagNo\":4}}", "ItemPolygon": {"X": 41, "Y": 1408, "Width": 145, "Height": 59}, "Words": [], "WordCoordPoint": []}, {"DetectedText": "THBEEL", "Confidence": 100, "Polygon": [{"X": 41, "Y": 1448}, {"X": 97, "Y": 1448}, {"X": 97, "Y": 1480}, {"X": 41, "Y": 1480}], "AdvancedInfo": "{\"Parag\":{\"ParagNo\":4}}", "ItemPolygon": {"X": 41, "Y": 1448, "Width": 56, "Height": 32}, "Words": [], "WordCoordPoint": []}, {"DetectedText": "2", "Confidence": 100, "Polygon": [{"X": 95, "Y": 1585}, {"X": 119, "Y": 1585}, {"X": 119, "Y": 1596}, {"X": 95, "Y": 1596}], "AdvancedInfo": "{\"Parag\":{\"ParagNo\":5}}", "ItemPolygon": {"X": 95, "Y": 1585, "Width": 24, "Height": 11}, "Words": [], "WordCoordPoint": []}, {"DetectedText": "可以", "Confidence": 100, "Polygon": [{"X": 635, "Y": 1692}, {"X": 727, "Y": 1692}, {"X": 727, "Y": 1740}, {"X": 635, "Y": 1740}], "AdvancedInfo": "{\"Parag\":{\"ParagNo\":7}}", "ItemPolygon": {"X": 635, "Y": 1692, "Width": 92, "Height": 48}, "Words": [], "WordCoordPoint": []}, {"DetectedText": "那就这个了", "Confidence": 100, "Polygon": [{"X": 49, "Y": 1837}, {"X": 277, "Y": 1837}, {"X": 277, "Y": 1885}, {"X": 49, "Y": 1885}], "AdvancedInfo": "{\"Parag\":{\"ParagNo\":6}}", "ItemPolygon": {"X": 49, "Y": 1837, "Width": 228, "Height": 48}, "Words": [], "WordCoordPoint": []}, {"DetectedText": "好", "Confidence": 100, "Polygon": [{"X": 678, "Y": 1978}, {"X": 729, "Y": 1978}, {"X": 729, "Y": 2027}, {"X": 678, "Y": 2027}], "AdvancedInfo": "{\"Parag\":{\"ParagNo\":8}}", "ItemPolygon": {"X": 678, "Y": 1978, "Width": 51, "Height": 49}, "Words": [], "WordCoordPoint": []}]]}Opencv识别图片的文本轮廓
首先对图片进行二值化突出目标物体的轮廓,然后进行中值滤波除图像中的噪声,最后使用cannyPic进行边缘检测,最终返回所有轮廓坐标。(后续基于这些轮廓坐标可以确认文本所属的背景颜色,这样就能确定文本所属的角色)
def get_contours(image):
    srcPic = image
    # 将图像转换为灰度
    gray = cv2.cvtColor(srcPic, cv2.COLOR_BGR2GRAY)
    # 自适应阈值二值化
    binPic = cv2.adaptiveThreshold(gray, 255, cv2.ADAPTIVE_THRESH_MEAN_C, cv2.THRESH_BINARY, 11, 2)
    # 中值滤波
    median = cv2.medianBlur(binPic, 5)
    # 边缘检测
    cannyPic = cv2.Canny(median, 10, 200)
    # 找出轮廓
    contours, hierarchy = cv2.findContours(cannyPic, cv2.RETR_EXTERNAL, cv2.CHAIN_APPROX_SIMPLE)
    # 根据轮廓面积排序并筛选
    min_contour_area = 500
    contours = sorted(contours, key=cv2.contourArea, reverse=True)
    contours = [cnt for cnt in contours if cv2.contourArea(cnt) > min_contour_area]

    # 画出矩形框
    rectangles = []
    for i in range(min(26, len(contours))):
        x, y, w, h = cv2.boundingRect(contours[i])
        cv2.rectangle(srcPic, (x, y), (x + w, y + h), (0, 255, 0), 2)
        rectangles.append(((x, y), (x + w, y + h)))

    # 显示处理后的图像
    cv2.namedWindow(str("C"), cv2.WINDOW_NORMAL)
    cv2.resizeWindow(str("C"), 800, 1000)
    cv2.imshow('C', srcPic)
    cv2.waitKey(0)
    cv2.destroyAllWindows()
    return rectangles #返回轮廓坐标列表


if __name__ == "__main__":
    img = cv2.imread('77.jpg') #20 31 64
    img = get_contours(img)
? ? 输出结果:
初步识别到个别轮廓,到还没达到最好的效果,预想的目标是识别出所有聊天的文本框。
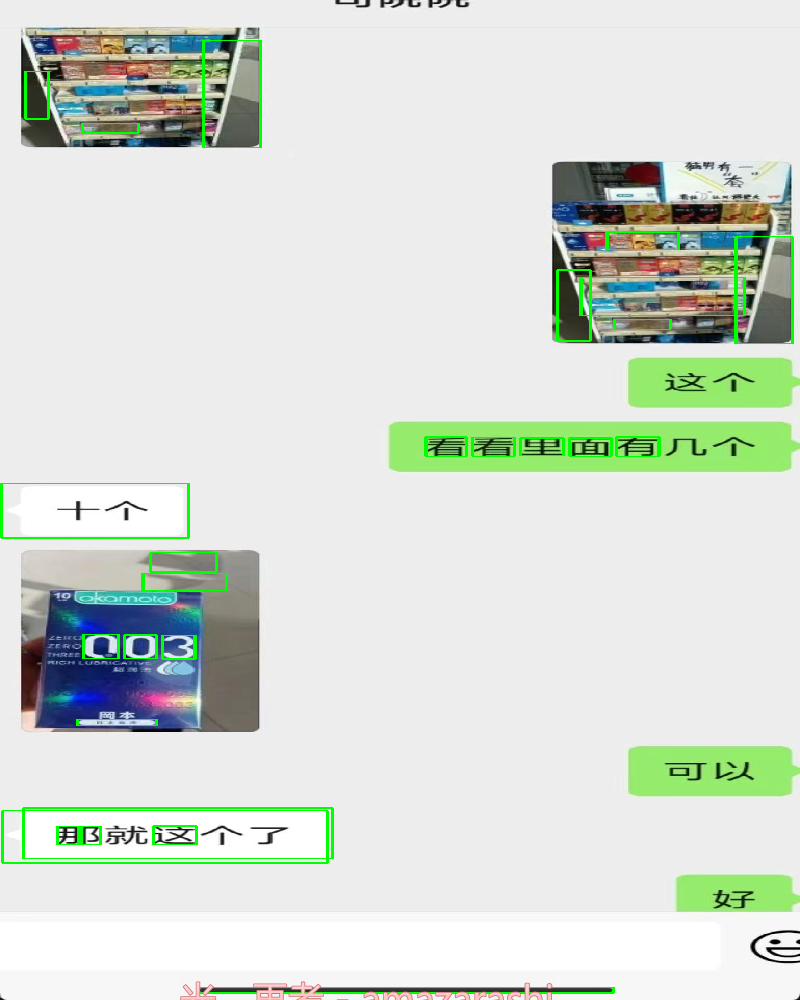
改进方案:
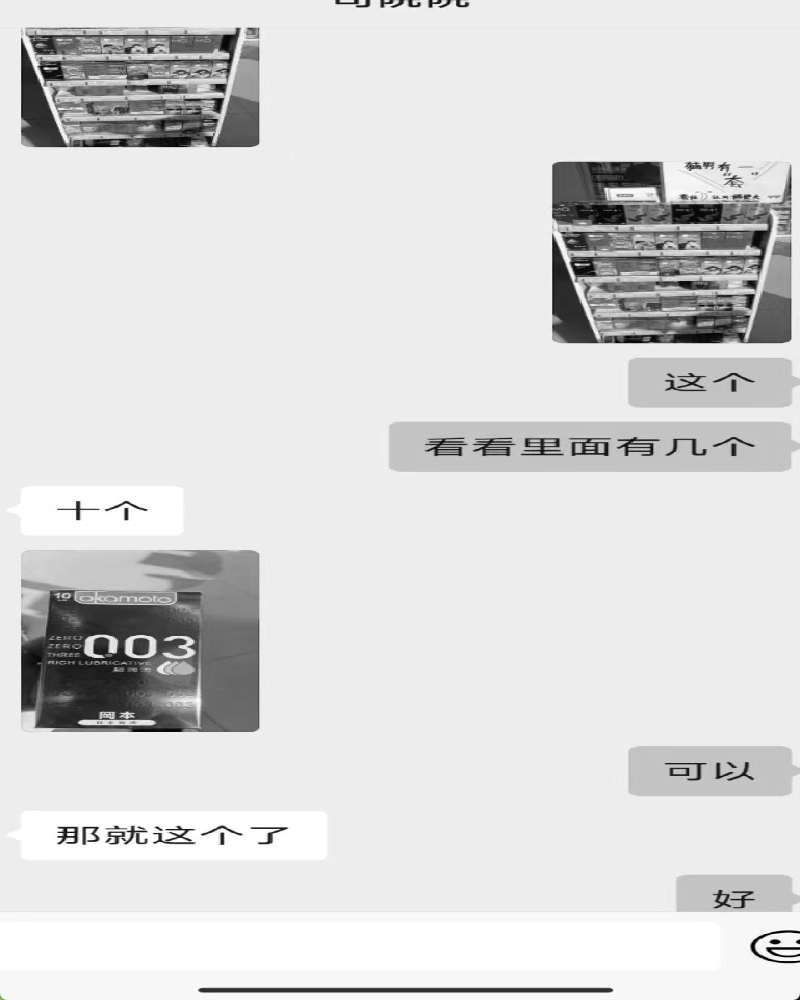
由于对图片进行二值化后,图片变成黑白像素,而聊天文本框和文字都是黑色像素的轮廓,所以将文字转换为成白色有利于减少的噪音。
代码:(get_contours方法里对图片二值化之前增加下面代码)
    # Apply thresholding to replace black pixels with white pixels
    hsv = cv2.cvtColor(srcPic, cv2.COLOR_BGR2HSV)
    # Define the lower and upper bounds for black color in HSV
    lower_black = np.array([0, 0, 0], dtype=np.uint8)
    upper_black = np.array([180, 255, 86], dtype=np.uint8)

    # Create a binary mask for black pixels
    black_mask = cv2.inRange(hsv, lower_black, upper_black)
    # Replace black pixels with white pixels
    srcPic[black_mask > 0] = [255, 255, 255]
文字没转换白色像素之前的效果:
文字转换成白色后二值化结果:

虽然通过把文字转换成白色像素,减少了噪音,但还远远不够识别出所有文本框的效果。
通过morphologyEx :将图像中的物体轮廓膨胀,增加物体的面积。膨胀操作通常用于连接两个相邻的物体或填充物体的空洞
    kernel = np.ones((6, 6), np.uint8)
    binPic = cv2.morphologyEx(binPic, cv2.MORPH_OPEN, kernel, iterations=3)
效果:
完整识别出所有文本框轮廓
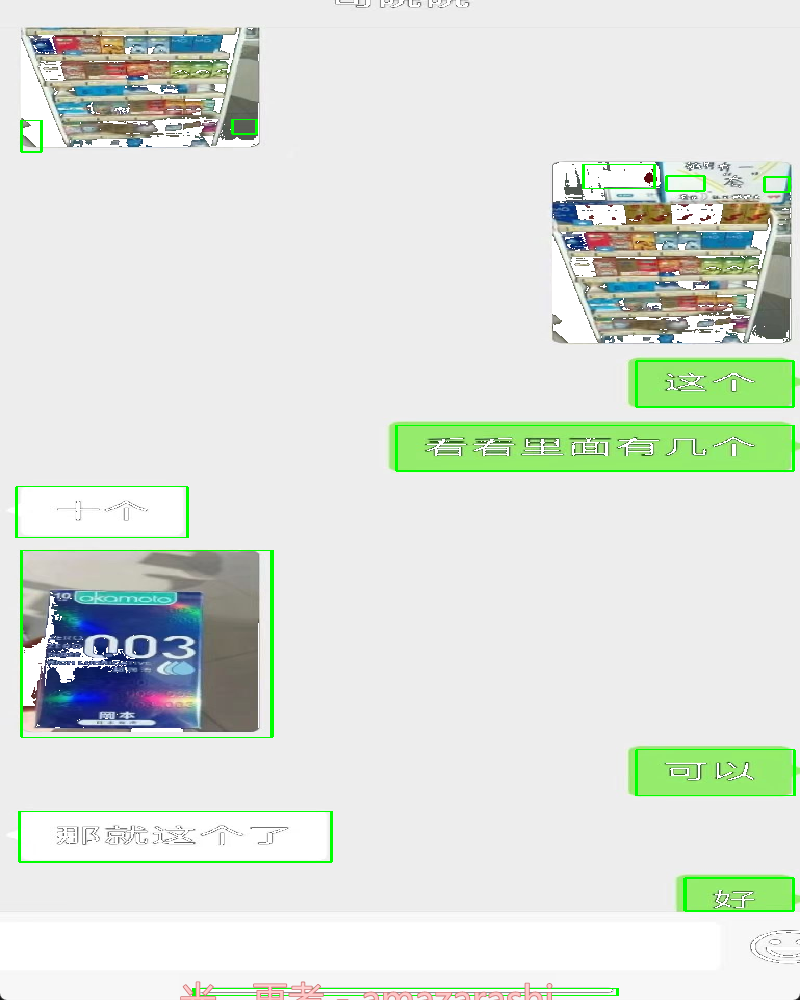
基于上述操作基本实现一个简单的聊天文本框识别,后续通过识别到的文字坐标确定它所属的文本框所在的背景颜色,就能确定文本所属的角色。
下面进一步讲解如何识别包含水印和异常文字的图片中的文本框所在位置。
原始图片:
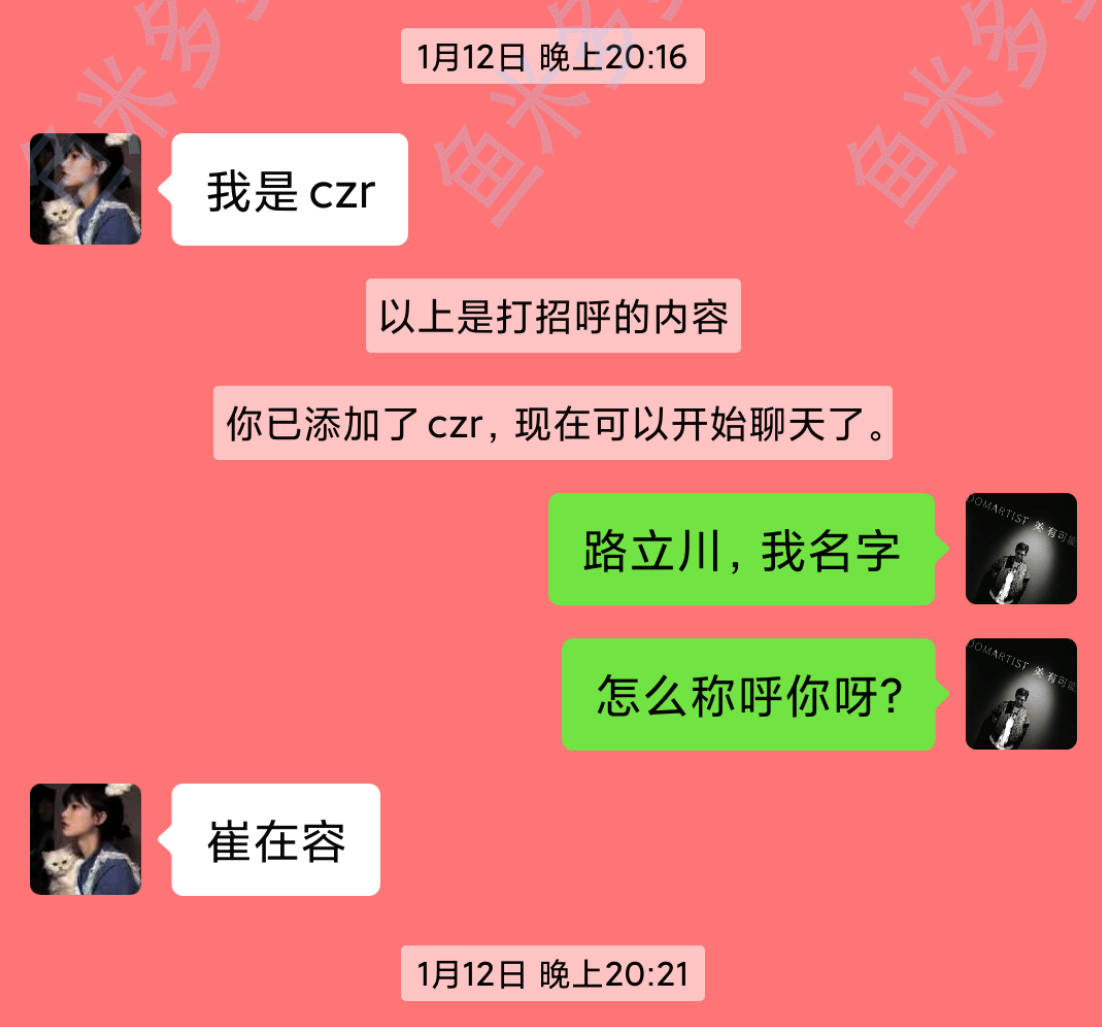
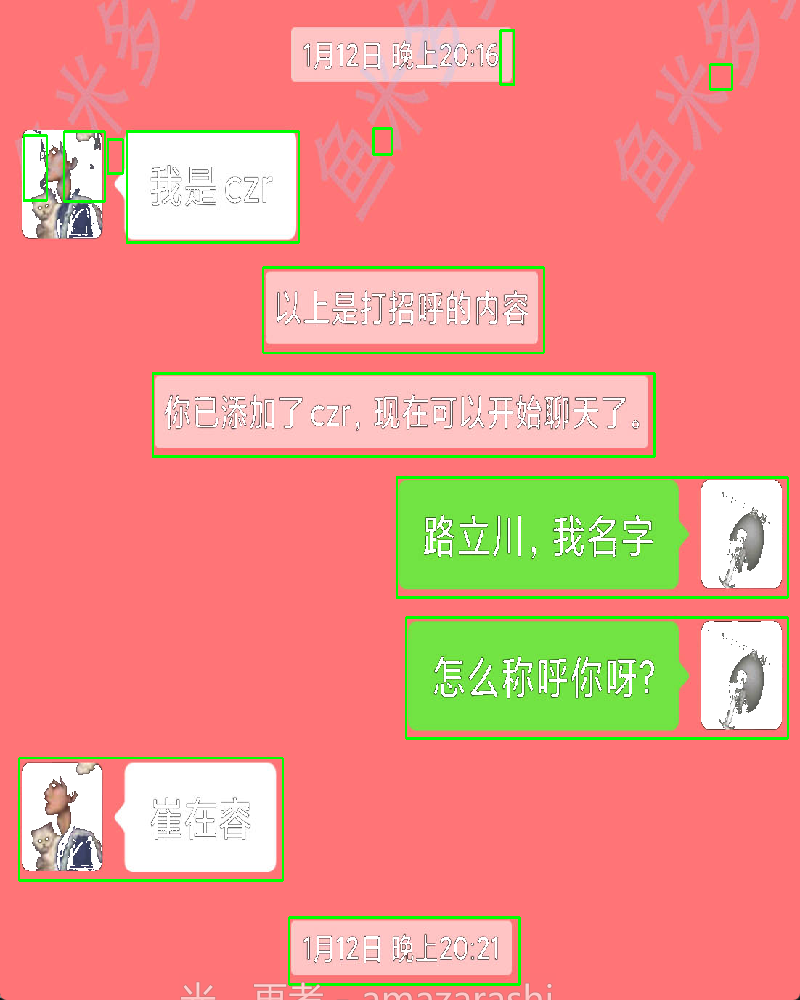
识别结果:
通过之前的代码识别,识别结果水印基本已经剔除掉,但文本框包含了头像部分,头像并不是我们想要的部分,会影响后续坐标定位背景颜色。
通过显示中值滤波的图片发现,很明显白色头像和文本框被识别成一体了,median如下图:
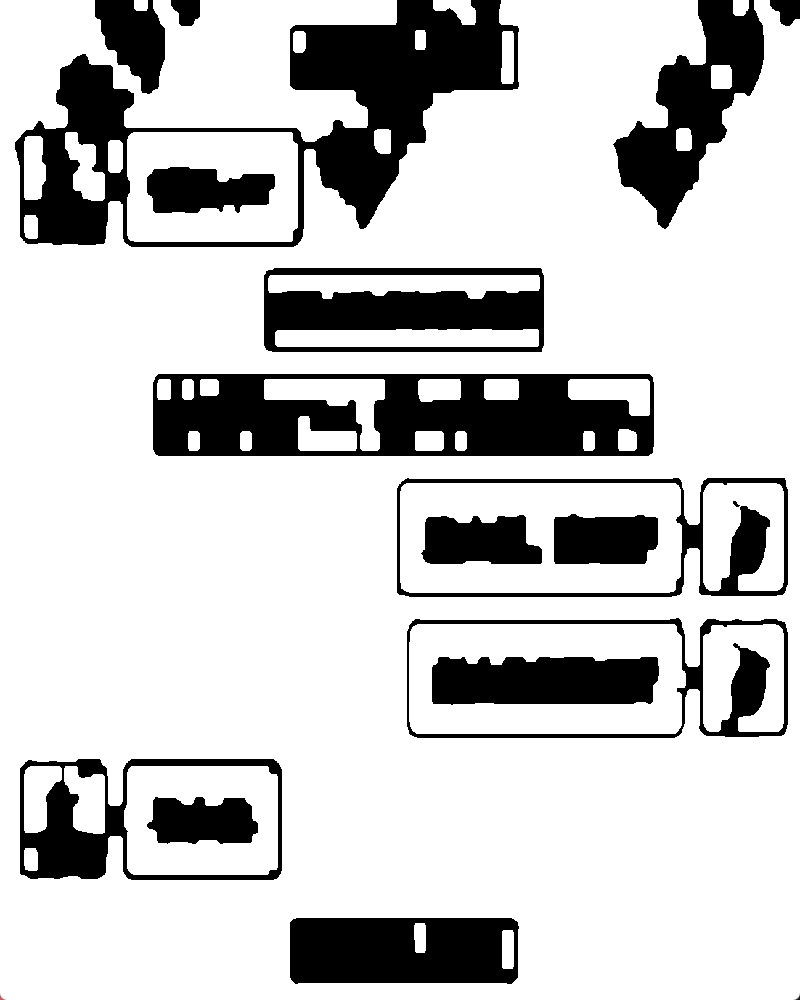
解决方法:
通过在图片右侧画一条虚线,然后通过横线腐蚀来分离文本和头像(这个方法是我在处理文本框和边界融为一体后不能被识别成功时候想到的)
代码:
   #get_contours方法里添加下面代码
    border_size = 12
    pattern = np.array([0, 255] * (border_size // 2), dtype=np.uint8)
    # Apply the dashed line pattern to the right side of the image
    binPic[:, -border_size:] = pattern[:binPic.shape[0]]
    binPic = dilate_line(binPic, 'horizontal', 120, 900) #vertical
def dilate_line(binary, type='vertical', x_scale=10, y_scale=5):
'''
获取竖线/横线腐蚀后的二值图
'''
rows_z, cols_z = binary.shape
if type == 'horizontal':
size = (cols_z // x_scale, 1)
else:
size = (1, rows_z // y_scale)
kernel = cv2.getStructuringElement(cv2.MORPH_RECT, size)
eroded = cv2.erode(binary, kernel, iterations=1) # 腐蚀
dilated = cv2.dilate(eroded, kernel, iterations=1) # 膨胀
return dilated改进后的结果:

完整代码:
import numpy as np
import cv2
def dilate_line(binary, type='vertical', x_scale=10, y_scale=5):
    '''
    获取竖线/横线腐蚀后的二值图
    '''
    rows_z, cols_z = binary.shape
    if type == 'horizontal':
        size = (cols_z // x_scale, 1)
    else:
        size = (1, rows_z // y_scale)
    kernel = cv2.getStructuringElement(cv2.MORPH_RECT, size)
    eroded = cv2.erode(binary, kernel, iterations=1)  # 腐蚀
    dilated = cv2.dilate(eroded, kernel, iterations=1)  # 膨胀
    return dilated
def get_contours(image):
srcPic = image # 读取图像
hsv = cv2.cvtColor(srcPic, cv2.COLOR_BGR2HSV) # 将图像转换为HSV颜色空间
# 定义在HSV颜色空间中表示黑色的范围
lower_black = np.array([0, 0, 0], dtype=np.uint8)
upper_black = np.array([180, 255, 86], dtype=np.uint8)
# 创建二值掩模,将黑色替换为白色
black_mask = cv2.inRange(hsv, lower_black, upper_black)
srcPic[black_mask > 0] = [255, 255, 255]
# 将图像转换为灰度
gray = cv2.cvtColor(srcPic, cv2.COLOR_BGR2GRAY)
# 自适应阈值二值化
binPic = cv2.adaptiveThreshold(gray, 255, cv2.ADAPTIVE_THRESH_MEAN_C, cv2.THRESH_BINARY, 11, 2)
# 开运算,去除噪音
kernel = np.ones((6, 6), np.uint8)
binPic = cv2.morphologyEx(binPic, cv2.MORPH_OPEN, kernel, iterations=3)
# 应用虚线模式到图像右侧
border_size = 12
pattern = np.array([0, 255] * (border_size // 2), dtype=np.uint8)
binPic[:, -border_size:] = pattern[:binPic.shape[0]]
# 水平膨胀操作
binPic = dilate_line(binPic, 'horizontal', 120, 900)
# 中值滤波
median = cv2.medianBlur(binPic, 5)
# 边缘检测
cannyPic = cv2.Canny(median, 10, 200)
# 找出轮廓
contours, hierarchy = cv2.findContours(cannyPic, cv2.RETR_EXTERNAL, cv2.CHAIN_APPROX_SIMPLE)
# 根据轮廓面积排序并筛选
min_contour_area = 500
contours = sorted(contours, key=cv2.contourArea, reverse=True)
contours = [cnt for cnt in contours if cv2.contourArea(cnt) > min_contour_area]
# 画出矩形框
rectangles = []
for i in range(min(26, len(contours))):
x, y, w, h = cv2.boundingRect(contours[i])
cv2.rectangle(srcPic, (x, y), (x + w, y + h), (0, 255, 0), 2)
rectangles.append(((x, y), (x + w, y + h)))
# 显示处理后的图像
cv2.namedWindow(str("C"), cv2.WINDOW_NORMAL)
cv2.resizeWindow(str("C"), 800, 1000)
cv2.imshow('C', srcPic)
cv2.waitKey(0)
cv2.destroyAllWindows()
print(rectangles)
return rectangles
if __name__ == "__main__":
img = cv2.imread('123.jpg') #20 31 64
img = get_contours(img)
# img_separate = get_color(img) #设置get_color 返回roi后,判断轮廓所在的颜色区域
代码中通过对面积进行排序后,使用for i in range(min(26, len(contours))) 只返回了前26最大面积的轮廓
输出结果(前26个轮廓坐标,这里没有26轮廓这么多):
[((210, 383), (901, 468)), ((550, 495), (939, 609)), ((563, 640), (945, 754)), ((26, 778), (389, 904)), ((362, 274), (749, 362)), ((174, 135), (411, 249)), ((398, 942), (715, 1011)), ((968, 495), (1080, 607)), ((968, 640), (1080, 752)), ((88, 135), (144, 206)), ((32, 139), (64, 205)), ((689, 31), (708, 86)), ((978, 66), (1008, 91)), ((148, 143), (169, 178)), ((514, 131), (539, 158))]
由于之前使用OCR识别文字已经返回了文字所在的坐标,通过这个坐标我们可以确定文本所在的轮廓。
下面定义几个主要方法,包含识别文本是否在文本框里,识别文本的背景颜色、计算坐标等。
judge_side 用于根据图像中边界框的位置和颜色信息来判断文本所在的位置是在左侧、右侧还是无法判断。以下是对代码的逐步解释:
def judge_side(img, bbox, rectangles, detectedtext):
    """Judge the left/right side based on the occurrence of white/green pixels."""

    x_min, x_max, y_min, y_max = get_bbox_bounds(bbox)  # 获取边界框的最小和最大坐标值
    side = None

    # 遍历矩形区域列表
    for rect in rectangles:
        # 判断边界框是否在矩形区域内(考虑了一定的容错范围)
        if (
            rect[0][0] - 50 <= x_min <= rect[1][0] + 50 and
            rect[0][1] - 50 <= y_min <= rect[1][1] + 50 and
            rect[0][0] - 50 <= x_max <= rect[1][0] + 50 and
            rect[0][1] - 50 <= y_max <= rect[1][1] + 50
        ):
            side = rect  # 如果在矩形区域内,则将该矩形区域赋值给 side

    # 如果 side 存在或者检测到的文本长度大于等于3
    if side or (detectedtext and len(detectedtext) >= 3):
        # 调用 get_color 方法,获取图像区域的颜色
        side = get_color(img[x_min - 60:x_max + 60, y_min - 60:y_max + 60])

    return side  # 返回判断结果

def get_bbox_bounds(bbox):
    x_min = min([x['X'] for x in bbox])
    x_max = max([x['X'] for x in bbox])
    y_min = min([x['Y'] for x in bbox])
    y_max = max([x['Y'] for x in bbox])
    return x_min, x_max, y_min, y_max
get_color?该函数接受一个图像 img 作为输入,然后根据颜色的平均值(色相、饱和度、亮度)来判断图像的颜色,并返回相应的结果。
def get_color(img):
    if img.shape[0] == 0 or img.shape[1] == 0:
        return "UNK"  # 如果图像高度或宽度为0,返回未知颜色

    # 颜色提取
    hsv = cv2.cvtColor(img, cv2.COLOR_BGR2HSV)  # 将图像颜色空间转换为HSV,便于颜色分离
    average_hue = np.median(hsv[:,:,0])  # 色相的中位数
    average_saturation = np.median(hsv[:,:,1])  # 饱和度的中位数
    average_value = np.median(hsv[:,:,2])   # 亮度的中位数
    print('RBG--hsv:', average_hue, average_saturation, average_value)

    # 定义颜色范围
    green_min = [35, 43, 46]
    green_max = [77, 255, 255]
    back_min = [0, 0, 40]
    back_max = [180, 43, 220]
    white_min = [0, 0, 239]
    white_max = [180, 30, 255]

    # 根据颜色范围判断颜色
    if (
        average_hue >= green_min[0] and average_hue <= green_max[0] and
        average_saturation >= green_min[1] and average_saturation <= green_max[1] and
        average_value >= green_min[2] and average_value <= green_max[2]
    ):
        print("color is green")
        return 'RIGHT'
    elif (
        average_hue >= white_min[0] and average_hue <= white_max[0] and
        average_saturation >= white_min[1] and average_saturation <= white_max[1] and
        average_value >= white_min[2] and average_value <= white_max[2]
    ):
        print("color is white")
        return "LEFT"
    elif (
        average_hue >= back_min[0] and average_hue <= back_max[0] and
        average_saturation >= back_min[1] and average_saturation <= back_max[1] and
        average_value >= back_min[2] and average_value <= back_max[2]
    ):
        print("color is gray")
        return "LEFT"
    else:
        print("not white and green", average_hue, average_saturation, average_value)
        return "UNK"  # 如果不在上述颜色范围内,返回未知颜色
这个函数通过计算颜色的中位数来判断图像的整体颜色,然后根据预定义的颜色范围,判断图像是绿色、白色、灰色还是未知颜色,并返回相应的标签。函数中的颜色范围是通过调试和实验得到的,可以根据实际情况进行调整。
主代码入口:
with open(jsn_fpath, 'r', encoding='UTF-8') as i_file:
    jsn_data = json.load(i_file)
with open(pdf_path, 'rb') as i_file:
    pix = i_file.read()
conv_list = []
regex = re.compile(r'[0-9]+:[0-9]+$|中国移动|输入聊天')
print(len(jsn_data['TextDetections']), '-------------------')
for hits in jsn_data['TextDetections']:
    pix = next(gen)
    pix = np.frombuffer(pix, np.uint8)
    img = cv2.imdecode(pix, cv2.IMREAD_COLOR)
    rectangles  = get_contours(img)
    for hit in hits:
        y_list = [y for y in hit.get('Polygon')]  #获取句子y轴坐标
        text = hit["DetectedText"]
        #根据y轴坐标,使用极差计算句子高度:如果句子水平方向,高度在一个字的高度左右,如果是水印则会异常高
        ptp = np.ptp(np.array([i.get('Y') for i in y_list]))
        #过滤异常高度、异常字体大小和时间文本
        if hit['Confidence'] <= CONF_THRES or ptp > ptp_max or ptp <= ptp_min or re.search(regex, text):
            print("pass -----")
            continue
        print("text:",text)
        side = judge_side(img, hit['Polygon'], rectangles,hit["DetectedText"])
        if side == 'UNK' or not side:
            # print("side:", hit["DetectedText"])
            continue
        else:
            conv_list.append(f'{side}: {text}')
这段代码通过循环遍历腾讯云OCR返回的每一条文本信息。在处理每一条文本信息时,会进行一系列的过滤操作,包括置信度、文本框高度、异常文本等。最终,将符合条件的文本按照其位置('左'、'右')以及文本内容添加到 conv_list 列表中。这个列表最终用于存储经过筛选后的文本信息,供后续处理和分析。
上述代码完成了基本的聊天图片的文本识别步骤,但要实现自动化识别大量聊天图片还需进一步完善。比如这里使用了jpg图片进行识别,如果使用多个分页的pdf又如何识别呢。
下面将完整自动化识别大量聊天图片的脚本写好了,欢迎感兴趣的小伙伴收看我的专栏博客:
完整代码:
对于更多ai语料,欢迎感兴趣的朋友私聊我。
本文来自互联网用户投稿,该文观点仅代表作者本人,不代表本站立场。本站仅提供信息存储空间服务,不拥有所有权,不承担相关法律责任。 如若内容造成侵权/违法违规/事实不符,请联系我的编程经验分享网邮箱:chenni525@qq.com进行投诉反馈,一经查实,立即删除!