【AIGC】Diffusers:扩散模型的开发手册说明2
前言
扩散器被设计成一个用户友好且灵活的工具箱,用于构建适合您用例的扩散系统。工具箱的核心是模型和调度程序。然而?DiffusionPipeline 为方便起见将这些组件捆绑在一起,但您也可以解包管道并分别使用模型和调度程序来创建新的扩散系统。
解构 Stable Diffusion 流水线
?稳定扩散是一种文本到图像的潜在扩散模型。它被称为潜在扩散模型,因为它使用图像的低维表示而不是实际的像素空间,这使得它更节省内存。编码器将图像压缩为较小的表示形式,解码器将压缩的表示形式转换回图像。对于文本到图像模型,需要一个分词器和一个编码器来生成文本嵌入。从上一个的说明中,您已经知道需要一个 UNet 模型和一个调度程序。
Stable Diffusion 模型有三个独立的预训练模型
VAE
VAE包含两个部分,一个encoder和一个decoder.encoder将图像转换到低维潜在空间,作为U-Net的输入。decoder,相反的将潜在空间表示转换回图像。
在潜在扩散训练时,encoder通常用于获取前向扩散过程的潜在图像表示,该过程在每一步获得越来越多的噪声。在推理时,由逆向扩散过程生成的潜在降噪空间会被decoder转换为图像。在推理阶段,我们只需要VAE decoder.
U-Net
?U-Net 有一个编码器部分和一个解码器部分,两者都由 ResNet 模块组成。编码器将图像表示压缩为较低分辨率的图像表示,解码器将较低分辨率的图像表示解码回原始的高分辨率图像表示,该图像表示应该噪声较小。更具体地说,U-Net 输出预测噪声残差,可用于计算预测的去噪图像表示。
为了防止U-Net在下采样时丢失重要信息,通常在编码器的下采样ResNet和解码器的上采样ResNet之间添加捷径连接。此外,稳定的扩散 U-Net 能够通过交叉注意力层在文本嵌入上调节其输出。交叉注意力层被添加到U-Net的编码器和解码器部分,通常在ResNet模块之间。
CLIP(Text Encoder)
文本编码器负责将输入提示(例如“骑马的宇航员”)转换为U-Net可以理解的嵌入空间。它通常是一个简单的基于 transformer 的编码器,它将一系列输入标记映射到一系列潜在的文本嵌入。
受 Imagen 的启发,Stable Diffusion 不会在训练期间训练文本编码器,而只是使用 CLIP 已经训练好的文本编码器 CLIPTextModel。
推理过程中的稳定扩散
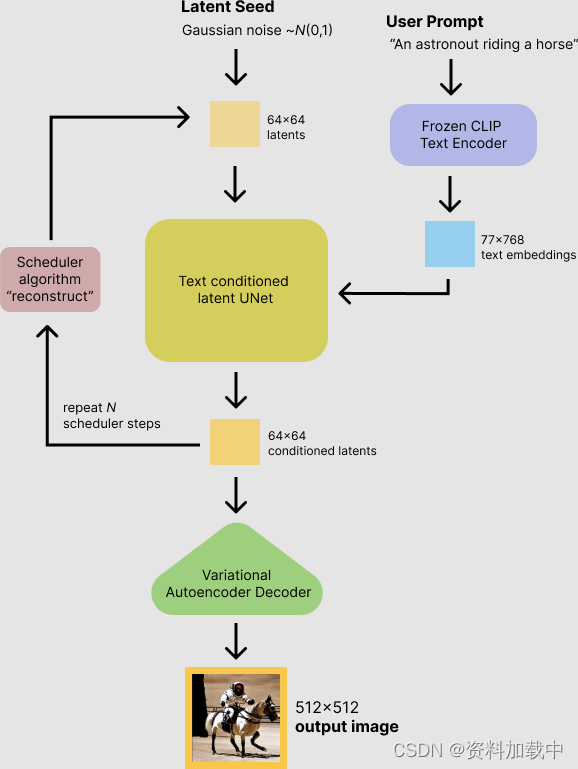
稳定扩散模型将潜在种子和文本提示作为输入。然后,潜伏种子用于生成大小?64×6464×64?的随机潜在图像表示,其中文本提示通过 CLIP 的文本编码器转换为大小?77×76877×768?的文本嵌入。?
接下来,U-Net 迭代地对随机的潜在图像表示进行降噪,同时以文本嵌入为条件。U-Net 的输出是噪声残差,用于通过调度器算法计算去噪的潜在图像表示。许多不同的调度器算法可用于此计算,每种算法都有其优点和缺点。对于稳定扩散,我们建议使用以下方法之一:
?它们从先前的噪声表示和预测的噪声残差中计算预测的去噪图像表示。
预训练模型包括设置完整扩散管道所需的所有组件。它们存储在以下文件夹中:
text_encoder?:Stable Diffusion 使用 CLIP,但其他扩散模型可能使用其他编码器,例如?BERT?.?
tokenizer?。它必须与模型使用的?text_encoder?模型匹配。
scheduler?:用于在训练期间逐步向图像添加噪点的调度算法。?
unet?:用于生成输入的潜在表示的模型。?
vae?:自动编码器模块,我们将使用它来将潜在表示解码为真实图像。?
我们可以通过引用保存组件的文件夹来加载组件,使用?subfolder?参数?from_pretrained?.
from transformers import CLIPTextModel, CLIPTokenizer
from diffusers import AutoencoderKL, UNet2DConditionModel, PNDMScheduler

# 1. Load the autoencoder model which will be used to decode the latents into image space.
vae = AutoencoderKL.from_pretrained("CompVis/stable-diffusion-v1-4", subfolder="vae")

# 2. Load the tokenizer and text encoder to tokenize and encode the text.
tokenizer = CLIPTokenizer.from_pretrained("openai/clip-vit-large-patch14")
text_encoder = CLIPTextModel.from_pretrained("openai/clip-vit-large-patch14")

# 3. The UNet model for generating the latents.
unet = UNet2DConditionModel.from_pretrained("CompVis/stable-diffusion-v1-4", subfolder="unet")
现在,我们不再加载预定义的调度程序,而是加载带有一些拟合参数的 K-LMS 调度程序。?
from diffusers import LMSDiscreteScheduler

scheduler = LMSDiscreteScheduler(beta_start=0.00085, beta_end=0.012, beta_schedule="scaled_linear", num_train_timesteps=1000)
?接下来,让我们将模型移动到 GPU。
torch_device = "cuda"
vae.to(torch_device)
text_encoder.to(torch_device)
unet.to(torch_device)
?现在,我们定义将用于生成图像的参数。
?请注意,?
guidance_scale?该定义类似于 Imagen 论文中公式 (2) 的引导权重?w?。?guidance_scale == 1?对应于不执行无分类器指导。在这里,我们将其设置为 7.5,就像之前所做的那样。
与前面的示例相比,我们设置为?num_inference_steps?100 以获得更清晰的图像。?
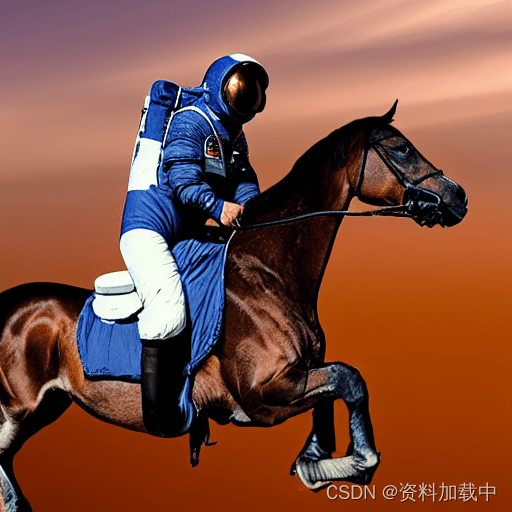
prompt = ["a photograph of an astronaut riding a horse"]

height = 512                        # default height of Stable Diffusion
width = 512                         # default width of Stable Diffusion

num_inference_steps = 100           # Number of denoising steps

guidance_scale = 7.5                # Scale for classifier-free guidance

generator = torch.manual_seed(0)    # Seed generator to create the inital latent noise

batch_size = len(prompt)
?首先,我们通过提示词得到?text_embeddings。这些嵌入将用于调节 UNet 模型,并引导图像生成类似于输入提示的内容。
text_input = tokenizer(prompt, padding="max_length", max_length=tokenizer.model_max_length, truncation=True, return_tensors="pt")

text_embeddings = text_encoder(text_input.input_ids.to(torch_device))[0]
?我们还将获得无分类器指南的无条件文本嵌入,这些嵌入只是填充标记(空文本)的嵌入。它们需要具有与条件?text_embeddings?(?batch_size?和?seq_length?) 相同的形状
max_length = text_input.input_ids.shape[-1]
uncond_input = tokenizer(
    [""] * batch_size, padding="max_length", max_length=max_length, return_tensors="pt"
)
uncond_embeddings = text_encoder(uncond_input.input_ids.to(torch_device))[0]
?对于无分类器的指导,我们需要进行两次前向传递:一次使用条件输入 (?text_embeddings?),另一次使用无条件嵌入 (?uncond_embeddings?)。在实践中,我们可以将两者连接成一个批次,以避免进行两次前向传递。
text_embeddings = torch.cat([uncond_embeddings, text_embeddings])
?接下来,我们生成初始随机噪声。
latents = torch.randn(
    (batch_size, unet.in_channels, height // 8, width // 8),
    generator=generator,
)
latents = latents.to(torch_device)如果我们在这个阶段检查它们?latents?,我们会看到它们的形状?torch.Size([1, 4, 64, 64])?比我们想要生成的图像小得多。该模型稍后会将这种潜在表示(纯噪声)转换为?512 × 512?图像。
接下来,我们使用我们选择?num_inference_steps?的 .这将计算?sigmas?在去噪过程中使用的确切时间步长值。?
scheduler.set_timesteps(num_inference_steps)
K-LMS 调度器需要将?latents?乘以它?sigma?的值。让我们在这里执行此操作:
latents = latents * scheduler.init_noise_sigma
?我们已准备好编写去噪循环。
from tqdm.auto import tqdm

scheduler.set_timesteps(num_inference_steps)

for t in tqdm(scheduler.timesteps):
    # expand the latents if we are doing classifier-free guidance to avoid doing two forward passes.
    latent_model_input = torch.cat([latents] * 2)

    latent_model_input = scheduler.scale_model_input(latent_model_input, timestep=t)

    # predict the noise residual
    with torch.no_grad():
        noise_pred = unet(latent_model_input, t, encoder_hidden_states=text_embeddings).sample

    # perform guidance
    noise_pred_uncond, noise_pred_text = noise_pred.chunk(2)
    noise_pred = noise_pred_uncond + guidance_scale * (noise_pred_text - noise_pred_uncond)

    # compute the previous noisy sample x_t -> x_t-1
    latents = scheduler.step(noise_pred, t, latents).prev_sample
我们现在使用 将?vae?生成的?latents?解码回图像。?
# scale and decode the image latents with vae
latents = 1 / 0.18215 * latents
with torch.no_grad():
    image = vae.decode(latents).sample
最后,让我们将图像转换为 PIL,以便我们可以显示或保存它。
image = (image / 2 + 0.5).clamp(0, 1)
image = image.detach().cpu().permute(0, 2, 3, 1).numpy()
images = (image * 255).round().astype("uint8")
pil_images = [Image.fromarray(image) for image in images]
pil_images[0]
?结果
参考链接
https://huggingface.co/docs/diffusers/main/en/using-diffusers/write_own_pipeline
本文来自互联网用户投稿,该文观点仅代表作者本人,不代表本站立场。本站仅提供信息存储空间服务,不拥有所有权,不承担相关法律责任。 如若内容造成侵权/违法违规/事实不符,请联系我的编程经验分享网邮箱:chenni525@qq.com进行投诉反馈,一经查实,立即删除!
- Python教程
- 深入理解 MySQL 中的 HAVING 关键字和聚合函数
- Qt之QChar编码(1)
- MyBatis入门基础篇
- 用Python脚本实现FFmpeg批量转换
- 2024年美国大学生数学建模思路 - 案例:FPTree-频繁模式树算法
- Ubuntu中连接不上网络的问题解决方法
- C#使用Stopwatch实现执行耗时及性能监测
- Python如何实现数据驱动的接口自动化测试
- 如何使用批量重命名技巧:将文件名称中文翻译成英文
- 数据链路层解读
- 代码随想录 739. 每日温度
- python selenium 爬虫教程
- SSL弱加密算法的漏洞研究
- 【cesium-3】cesium建筑体添加和使用