【Android】 ConstraintLayout实操
发布时间:2024年01月09日
由于最近比较悠闲,重新学习了constraintlayout,看着官网学的,官网网站如下:https://developer.android.com/training/constraint-layout?hl=zh-cn#alignment
其实之前也小小的学过一波constraintlayout,不过因为用线性布局跟相对布局习惯了,加上使用constraintlayout的时候不熟练,控件经常没有出现在预想的位置,后面就没用了。
这里只记录在官网学习的时候遇到的阻碍,官网有的就不写了。
引导线\屏障位置
第一个阻碍是引导线位置,找了一会才找到,右击-Add helpers- guideline就是引导线,barrier就是屏障。

?或者是点击左上角的工具栏

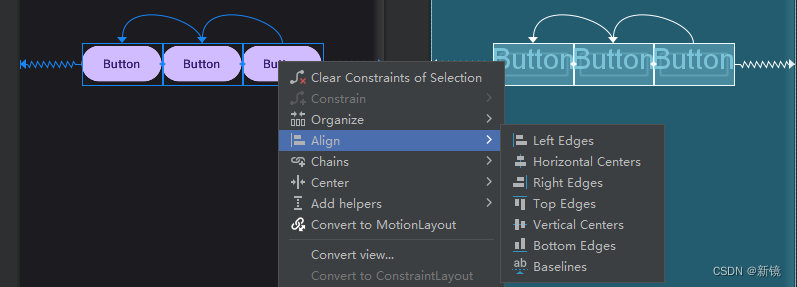
使用链控制线性组
同时选择三个button,右击-chains-create Horizontal chain(我想要它们水平对齐)

创建链之后再右击就会长这样了

就有了样式选择,结合官网就知道每个样式对应什么样子了,下面就是官网的截图

例如我选择了 packed效果就会如下图。

如果我想让它们顶端对齐呢,需要右击-Align-Top Edges,完美。?
 动画
动画
使用?ConstraintSet?和?TransitionManager?为尺寸和位置元素的变化添加动画效果。
?需要两个布局文件,一个是动画开始前的,一个是动画之后的。
布局1:activity_constraint1.xml
<?xml version="1.0" encoding="utf-8"?>
<androidx.constraintlayout.widget.ConstraintLayout xmlns:android="http://schemas.android.com/apk/res/android"
    xmlns:app="http://schemas.android.com/apk/res-auto"
    android:id="@+id/constraint"
    android:layout_width="match_parent"
    android:layout_height="match_parent">

    <Button
        android:id="@+id/button2"
        android:layout_width="0dp"
        android:layout_height="wrap_content"
        android:text="Button"
        app:layout_constraintEnd_toEndOf="parent"
        app:layout_constraintStart_toStartOf="parent"
        app:layout_constraintTop_toTopOf="parent" />
</androidx.constraintlayout.widget.ConstraintLayout>
?布局2:activity_constraint2.xml
<?xml version="1.0" encoding="utf-8"?>
<androidx.constraintlayout.widget.ConstraintLayout xmlns:android="http://schemas.android.com/apk/res/android"
    xmlns:app="http://schemas.android.com/apk/res-auto"
    android:layout_width="match_parent"
    android:layout_height="match_parent">

    <Button
        android:id="@+id/button2"
        android:layout_width="0dp"
        android:layout_height="wrap_content"
        android:text="Button"
        app:layout_constraintEnd_toEndOf="parent"
        app:layout_constraintStart_toStartOf="parent"
        app:layout_constraintBottom_toBottomOf="parent" />
</androidx.constraintlayout.widget.ConstraintLayout>
Activity代码:
public class ConstraintActivity extends AppCompatActivity {
    private Button button;

    @Override
    protected void onCreate(Bundle savedInstanceState) {
        super.onCreate(savedInstanceState);
        setContentView(R.layout.activity_constraint1); //设置一开始的布局
        button = findViewById(R.id.button2);
        button.setOnClickListener(new View.OnClickListener() {
            @Override
            public void onClick(View view) {
                animate();
            }
        });
    }

    public void animate(){
        ConstraintLayout constraintLayout = findViewById(R.id.constraint); //获取父布局
        ConstraintSet constraintSet = new ConstraintSet(); // ConstraintSet用于存储布局所有的约束
        constraintSet.load(this,R.layout.activity_constraint2); //加载第二个布局文件的ConstraintSet
        TransitionManager.beginDelayedTransition(constraintLayout);
        constraintSet.applyTo(constraintLayout); //布局参数过度到第二个布局文件的ConstraintSet
    }
}
不过至少从它需要两个重复率这么高的布局看,我觉得这种动画不咋地。
文章来源:https://blog.csdn.net/lxjlxj2333/article/details/135292825
本文来自互联网用户投稿,该文观点仅代表作者本人,不代表本站立场。本站仅提供信息存储空间服务,不拥有所有权,不承担相关法律责任。 如若内容造成侵权/违法违规/事实不符,请联系我的编程经验分享网邮箱:chenni525@qq.com进行投诉反馈,一经查实,立即删除!
本文来自互联网用户投稿,该文观点仅代表作者本人,不代表本站立场。本站仅提供信息存储空间服务,不拥有所有权,不承担相关法律责任。 如若内容造成侵权/违法违规/事实不符,请联系我的编程经验分享网邮箱:chenni525@qq.com进行投诉反馈,一经查实,立即删除!
最新文章
- Python教程
- 深入理解 MySQL 中的 HAVING 关键字和聚合函数
- Qt之QChar编码(1)
- MyBatis入门基础篇
- 用Python脚本实现FFmpeg批量转换
- base64编码与图片之间相互转换
- processon使用及流程图和泳道图的绘画(登录界面流程图,门诊流程图绘制门诊泳道图,住院泳道图,OA会议泳道图),Axure自定义元件
- LeetCode刷题--- 组合总和
- 第二章 Linux 文件管理
- html页面练习——公司发展流程图
- nginx+rsyslog+kafka+clickhouse+grafana 实现nginx 网关监控
- JavaScript 继承的方式和优缺点
- 基于ssm百货中心供应链管理系统+jsp论文
- 2024鸿蒙学习路线指南
- C++从零开始的打怪升级之路(day12)