基础篇_数据持久化(实战-我的B站,MySQL数据库)
文章目录
一. 实战-我的B站
1. 功能演示
从这节课开始,我们来做一个实战练习,我的 B 站。我们从播放视频页面开始做,做了适当简化,说明一点,这个页面的所有图标,动画等都是自己做的,虽然丑了点,但不会侵权。先来看看页面效果:
- 左侧可以播放视频,并包含了视频的信息
- 右侧是视频选集,一个视频可以包含多集,点击后可以切换到第一集、第二集等等
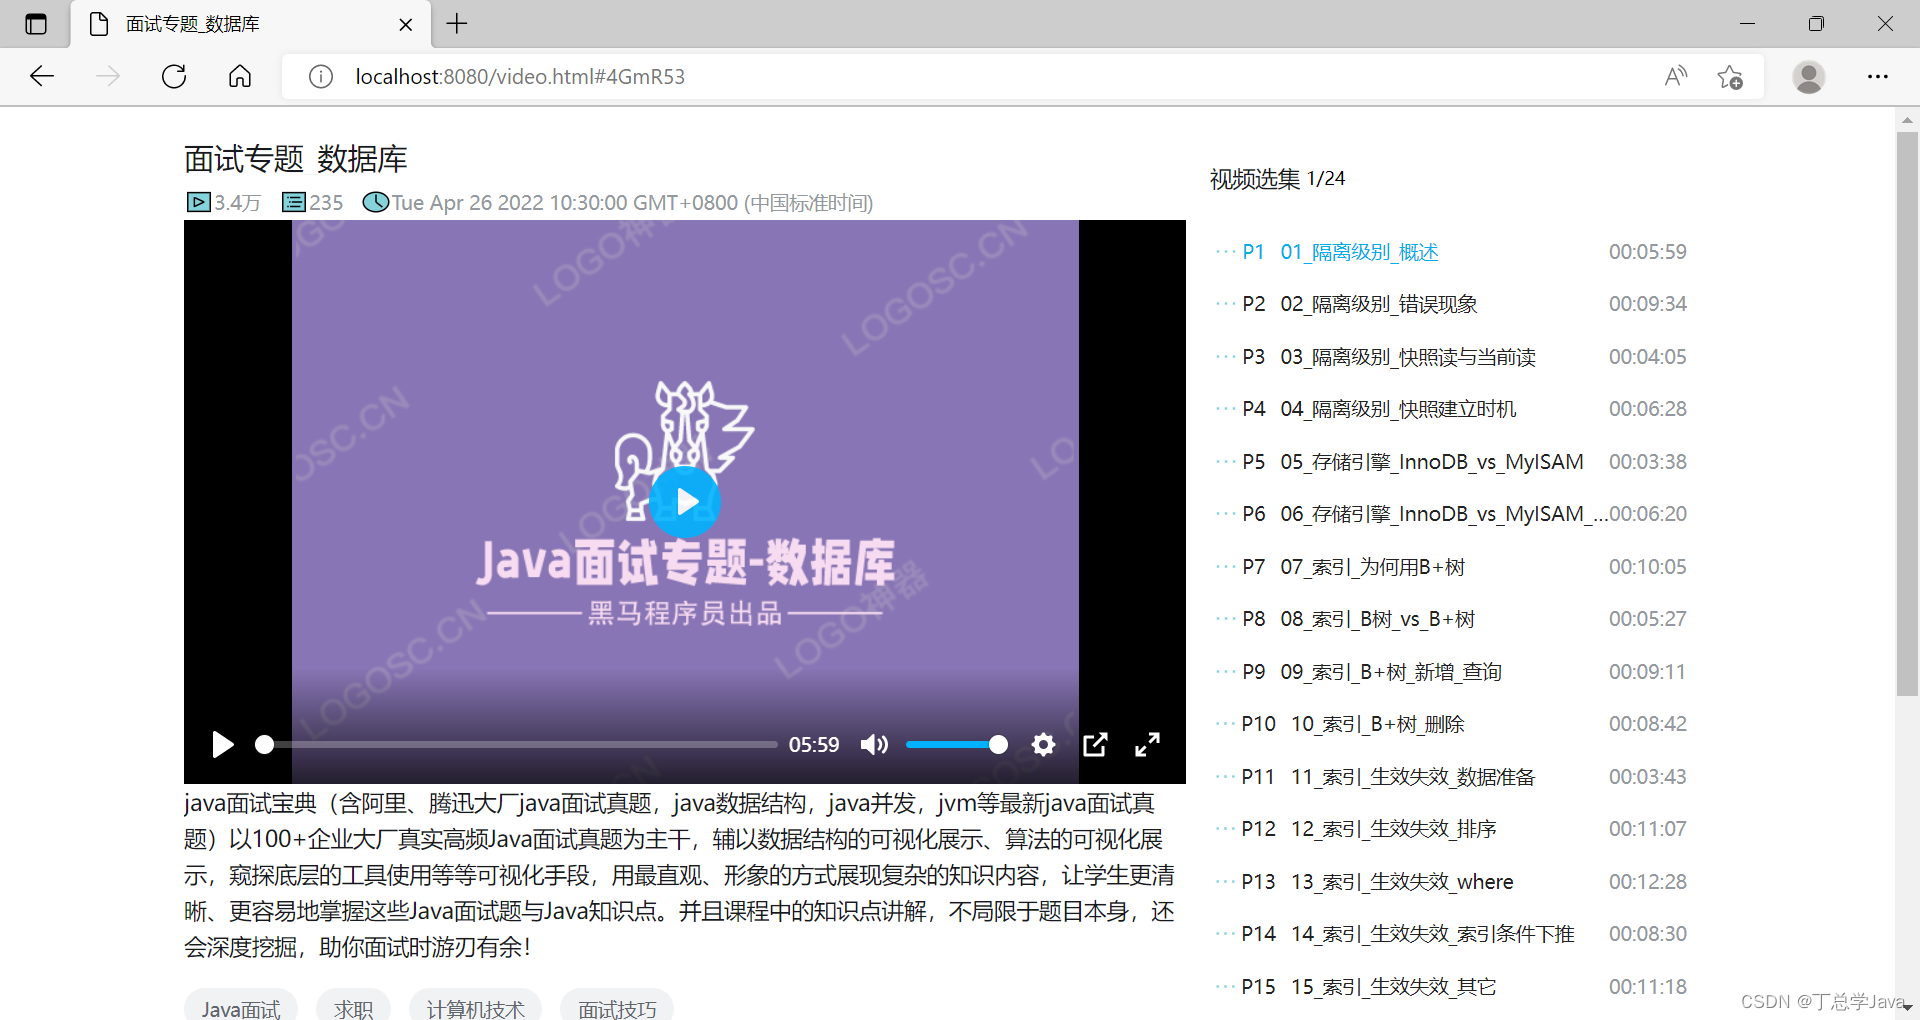
整个程序分成前端页面部分和后端 java 代码两部分。页面部分你就当是前端妹妹给你做好了,我们是后端 java 程序员,需要用面向对象的思想和 Spring Boot 与前端对接。从哪儿开始呢?
2. 设计数据类
之前讲过任何程序都分成数据和逻辑两部分,我们之前也讲了数据和逻辑的分离,数据部分对应 Java Bean,逻辑部分对应 Service,我们的代码开发,就可以从设计 Java Bean 和 Service 类开始。
先从 Java Bean 开始分析,通过这个页面,查看它的组成就可以看出来,将来 Java Bean 的组成,我们这个页面,主要展现的是视频信息,有哪些视频信息呢?
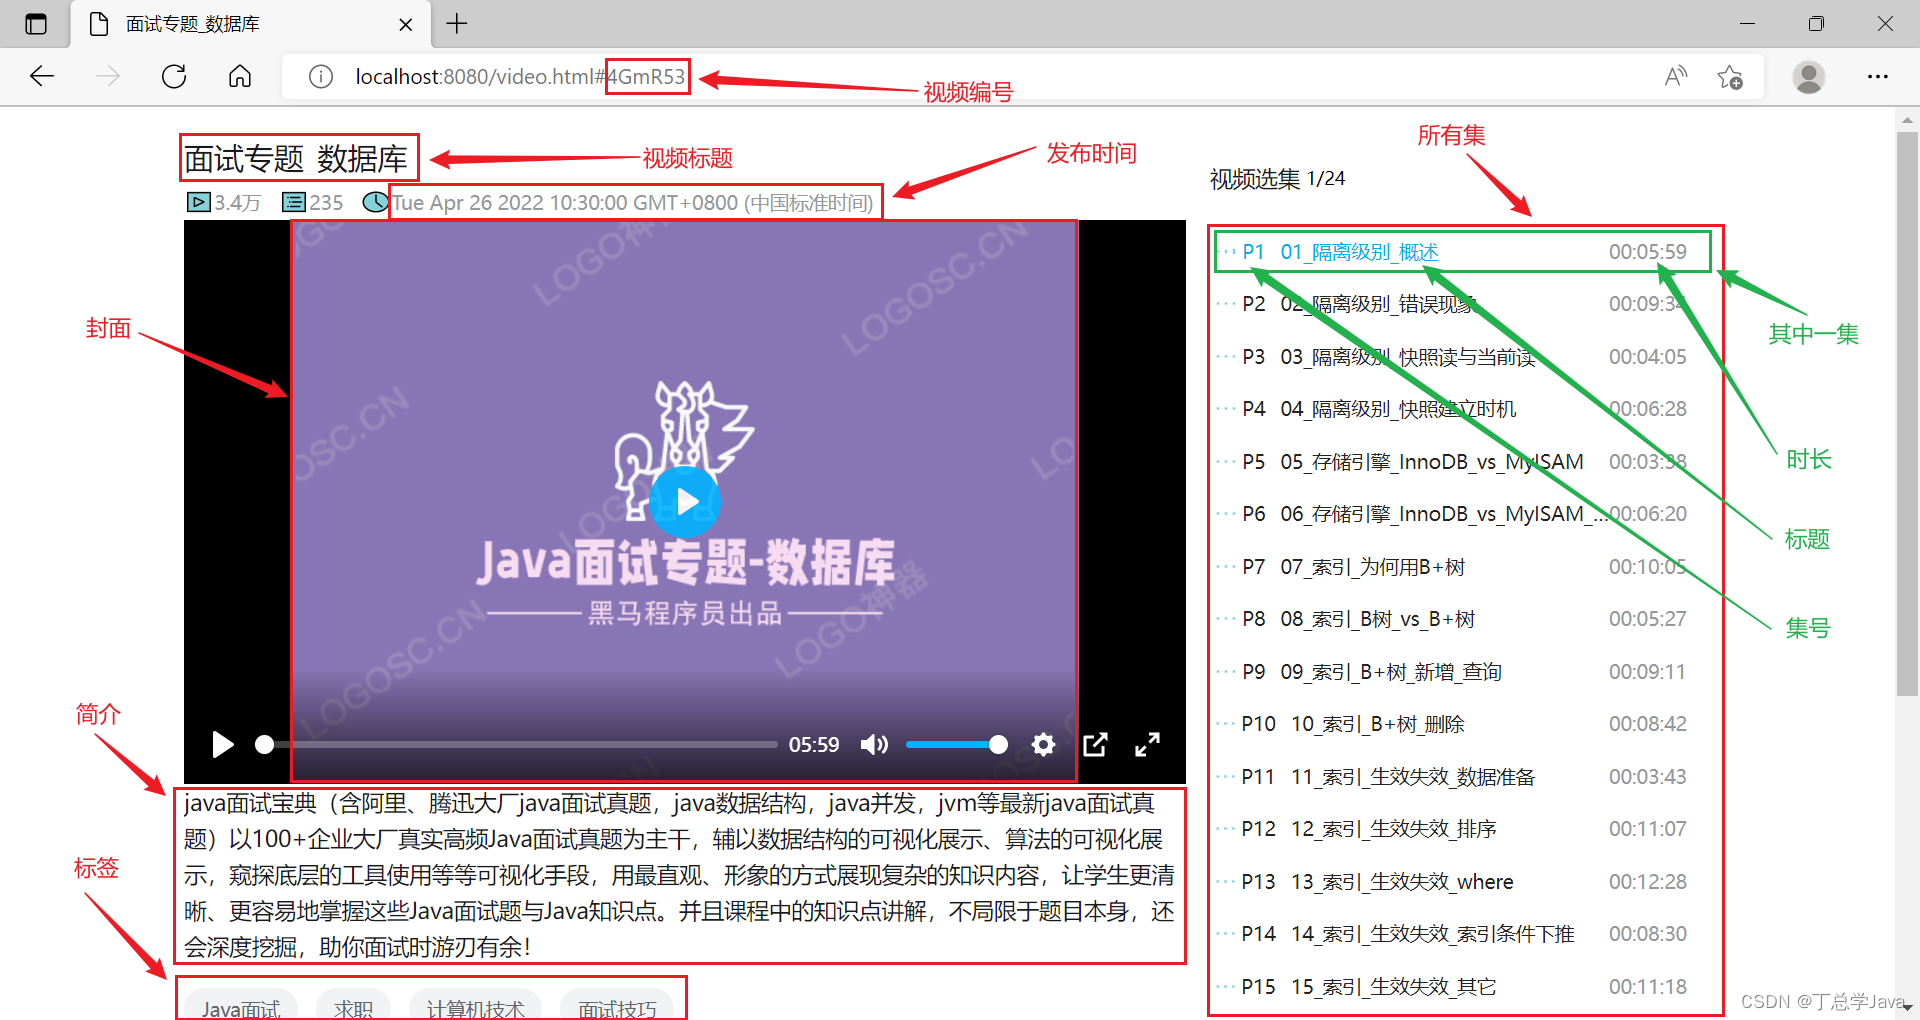
开始抽象,每一集抽象为 Play 类,整个视频抽象为 Video 类
public class Play {
    private String id;
    private String title;
    private String url;
    LocalTime duration;
    // ...
}
- 其中 url 对应视频实际名称,截图中没有体现
public class Video {

    private List<Play> playList;

    private String bv;
    private String type; // 类型: 自制、转载
    private String category; // 分区: 生活、游戏、娱乐、知识、影视、音乐、动画、时尚、美食、汽车、运动、科技、动物圈、舞蹈、国创、鬼畜、纪录片、番剧、电视剧、电影
    private String title; // 总标题, 最多 80 字
    private String cover; // 封面
    private String introduction; // 简介, 最多 250 字
    private LocalDateTime publishTime; // 发布时间

    private List<String> tagList; // 最多 10 个

    // ...
}
- 其中 type 和 category 页面展示暂时没有用上
- bv 号生成有一定规则,目前暂时用字符串 1,2,3 … 来表示
- 必须有对应的 get 方法
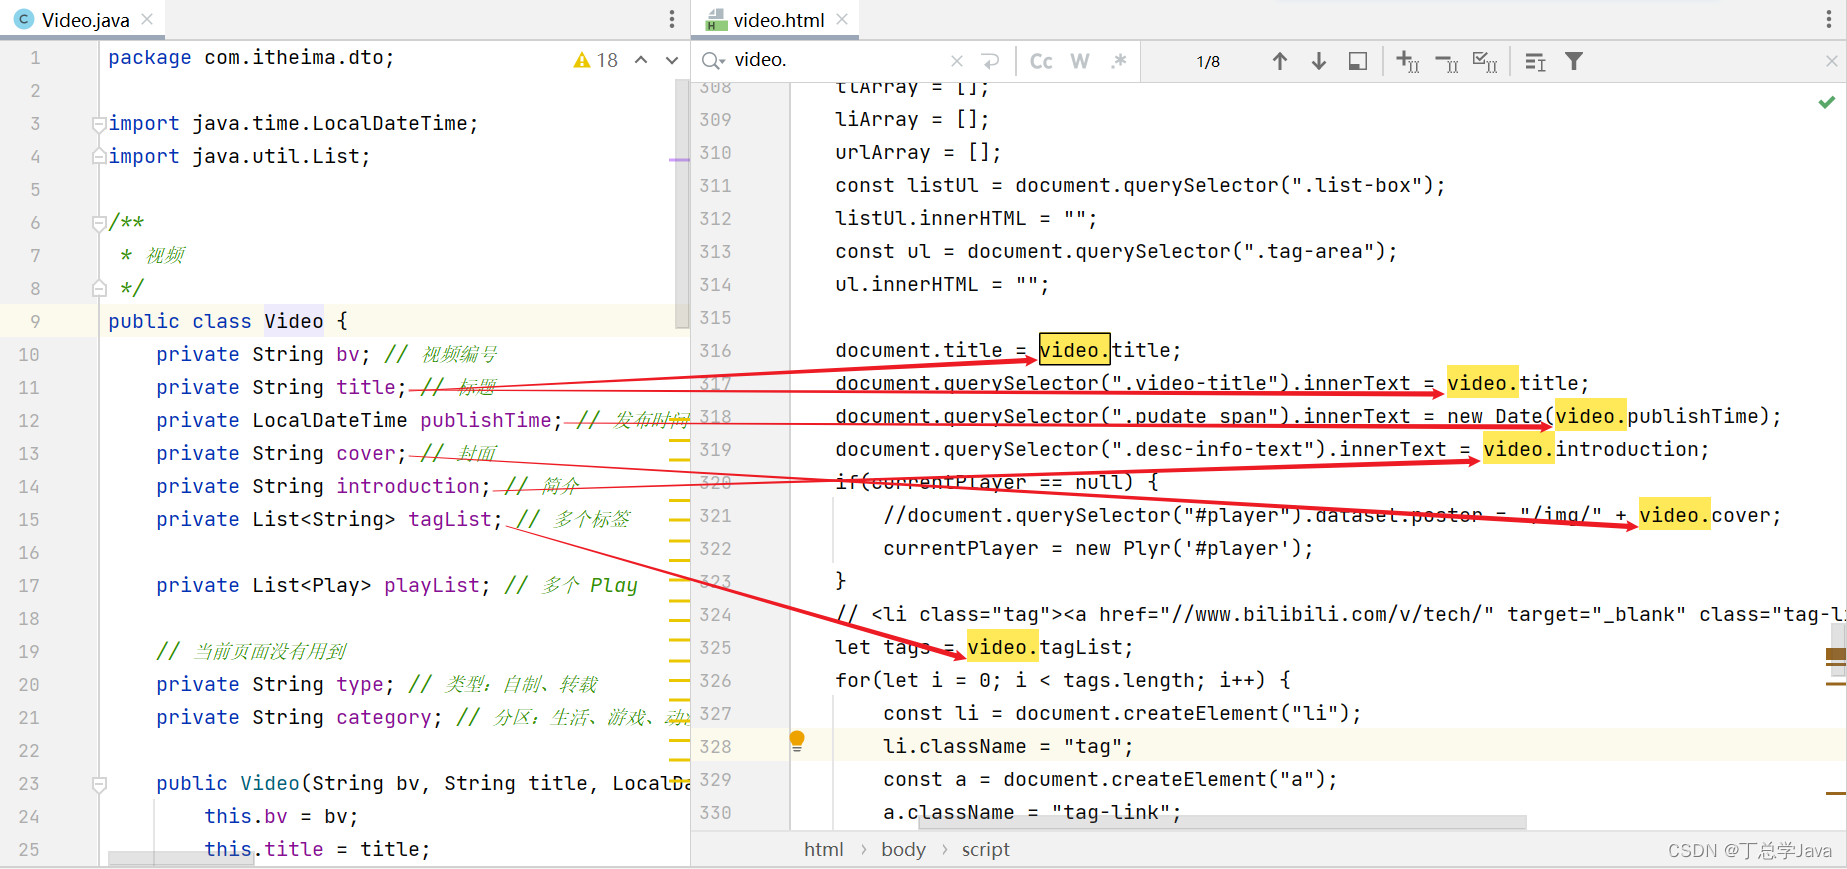
有同学问,Video 和 Play 中这些属性名能不能改成其它的,答案是,可以改,但你这边改了,前端页面也得跟着改。因为前端页面中使用对象时,属性名与后端 JavaBean 代码的属性名是一一对应的
数据展示
前端约定
- 输入
http://localhost:8080/video/1显示 1 号视频 - 输入
http://localhost:8080/video/2显示 2 号视频
页面上需要的是 Video 对象,我们先返回固定的 Video 对象试试
@Controller
public class VideoController {

    @RequestMapping("/video/1")
    @ResponseBody
    public Video t1() {
        List<Play> plays = List.of(
                new Play("P1", "二分查找-演示", LocalTime.parse("00:05:46"), "1_1.mp4"),
                new Play("P2", "二分查找-实现", LocalTime.parse("00:06:47"), "1_2.mp4")
        );
        return new Video("1", "面试专题-基础篇", LocalDateTime.now(), "1.png", "祝你面试游刃有余!",
                List.of("面试", "Java", "计算机技术"), plays, "自制", "科技->计算机技术");
    }

    @RequestMapping("/video/2")
    @ResponseBody
    public Video t2() {
        List<Play> plays = List.of(
                new Play("P1", "Java中的线程状态", LocalTime.parse("00:09:45"), "2_1.mp4"),
                new Play("P2", "代码演示1", LocalTime.parse("00:07:05"), "2_2.mp4"),
                new Play("P3", "代码演示2", LocalTime.parse("00:05:01"), "2_3.mp4")
        );
        return new Video("2", "面试专题-并发篇", LocalDateTime.now(), "2.png", "祝你面试游刃有余!",
                List.of("面试", "Java", "计算机技术"), plays, "自制", "科技->计算机技术");
    }
}
路径参数
还有一个未解决的问题,就是前端页面中不同的 URL 路径对应不同的视频
http://localhost:8080/video/1显示 1 号视频http://localhost:8080/video/2显示 2 号视频- …
后端 Java 代码每个 URL 路径都用了一个方法来返回视频,但是不可能无限增加方法,得找一个办法把多个路径映射到一个方法,这就是接下来要介绍的路径参数
- 首先,改动
@RequestMapping("/video/{bv}")这里 bv 就是一个路径参数,前端 URL 是 /video/1,bv 值就是1,前端 URL 是 /video/2,bv 值就是 2 - 其次,需要在代码中获取实际的 bv 值,给方法加一个参数,参数名也叫 bv,参数前加 @PathVariable 表示该参数从路径中获取
- 如果不加 @PathVariable,参数实际是从 ? 后获取
@Controller
public class VideoController {

    // 路径参数

    // 1. @RequestMapping("/video/{bv}")
    // 2. @PathVariable String bv, @PathVariable 表示该方法参数要从路径中获取

    @RequestMapping("/video/{bv}") // 1, 2, 3...
    @ResponseBody
    public Video t(@PathVariable String bv) {
        if(bv.equals("1")) {
            List<Play> plays = List.of(
                    new Play("P1", "二分查找-演示", LocalTime.parse("00:05:46"), "1_1.mp4"),
                    new Play("P2", "二分查找-实现", LocalTime.parse("00:06:47"), "1_2.mp4")
            );
            return new Video("1", "面试专题-基础篇", LocalDateTime.now(), "1.png", "祝你面试游刃有余!",
                    List.of("面试", "Java", "计算机技术"), plays, "自制", "科技->计算机技术");
        }
        if (bv.equals("2")) {
            List<Play> plays = List.of(
                    new Play("P1", "Java中的线程状态", LocalTime.parse("00:09:45"), "2_1.mp4"),
                    new Play("P2", "代码演示1", LocalTime.parse("00:07:05"), "2_2.mp4"),
                    new Play("P3", "代码演示2", LocalTime.parse("00:05:01"), "2_3.mp4")
            );
            return new Video("2", "面试专题-并发篇", LocalDateTime.now(), "2.png", "祝你面试游刃有余!",
                    List.of("面试", "Java", "计算机技术"), plays, "自制", "科技->计算机技术");
        }
        return null;
    }
3. 设计 Service 类
现有代码的缺点是
- 把数据写死在了 java 代码当中,如果将来想对数据,新增、修改、删除、代码也得跟着变动。解决方法是,把数据存储在独立的文件当中,不与 java 代码混在一起。
- 我们现在写的这种根据视频编号,返回视频对象的代码属于数据的查询、数据的增、删、改、查属于业务逻辑的范畴,应该把这部分代码转移到业务逻辑类中
这些视频内容不应当固定在代码里,而是存于 p.csv 文件中,读取方式如下
try {
    List<String> data = Files.readAllLines(Path.of("data", "p.csv"));
    // ...
} catch (IOException e) {
    throw new RuntimeException(e);
}
- 这里 readAllLines() 方法的作用就是读取文件的所有行
- Path.of 用来告知要读取的目录和文件名
- readAllLines() 方法执行时,可能出现 IOException,例如文件不存在
- IOException 是编译异常,处理没必要,不处理又会有语法上连锁反应,这里有一个小技巧
- 就是把编译异常转换成 RuntimeException 重新抛出,避免了连锁反应
设计 Service 如下:
@Service
public class VideoService1 {

    // 查询方法,根据视频编号,查询 Video 对象
    public Video find(String bv) { // bv 参数代表视频编号 1
        try {
            List<String> data = Files.readAllLines(Path.of("data", "p.csv")); // 1 ~ 7

            // String line 就是读到的文件中的每一行数据
            for (String line : data) {
                String[] s = line.split(",");
                if(s[0].equals(bv)) { // 找到了
                    String[] tags = s[7].split("_");
                    // playList 暂时用空集合
                    return new Video(s[0], s[3], LocalDateTime.parse(s[6]), s[4], s[5], List.of(tags), List.of(), s[1], s[2]);
                }
            }
            // 没有找到
            return null;
        } catch (IOException e) {
            // RuntimeException 运行时异常, 把编译时异常转换为运行时异常
            throw new RuntimeException(e);
        }
    }
}
补充 playList
@Service
public class VideoService1 {

    // 查询方法,根据视频编号,查询 Video 对象
    public Video find(String bv) { // bv 参数代表视频编号 1
        try {
            List<String> data = Files.readAllLines(Path.of("data", "p.csv")); // 1 ~ 7

            // String line 就是读到的文件中的每一行数据
            for (String line : data) {
                String[] s = line.split(",");
                if(s[0].equals(bv)) { // 找到了
                    String[] tags = s[7].split("_");
                    return new Video(s[0], s[3], LocalDateTime.parse(s[6]), s[4], s[5],
                                     List.of(tags), getPlayList(bv), s[1], s[2]);
                }
            }
            // 没有找到
            return null;
        } catch (IOException e) {
            // RuntimeException 运行时异常, 把编译时异常转换为运行时异常
            throw new RuntimeException(e);
        }
    }

    // 读取选集文件 v_1.csv
    private List<Play> getPlayList(String bv) {
        try {
            List<String> vdata = Files.readAllLines(Path.of("data", "v_" + bv + ".csv"));
            List<Play> list = new ArrayList<>();
            for (String vline : vdata) {
                String[] ss = vline.split(",");
                list.add(new Play(ss[0], ss[1], LocalTime.parse(ss[3]), ss[2]));
            }
            return list;
        } catch (IOException e) {
            throw new RuntimeException(e);
        }
    }
}
静态资源映射
像图片、视频这样的文件,它们内容都不会轻易变动,所以有个叫法称为静态资源,另外由于它们占用的空间较大,不太适合与其它程序代码打包在一起。但如果它们不在这个位置,我还想通过 url 访问这些文件该怎么找到它们呢,前面我们说过,这些文件放在 static 目录下,就能通过 url 找到,static 就是这些文件的起点,比如
在浏览器中输入一个 url 地址:
- http://localhost:8080/play/1_1.mp4 找的是 static 为起点 play 目录下的 1_1.mp4 这个文件
- http://localhost:8080/play/0a7ea914523dcf380d8bdbff506f19b4.mp4 怎样能找到服务器 d:\aaa 目录下的同名文件呢
这就需要让一个 url 地址与服务器的一个磁盘目录相关联,具体做法是
@SpringBootApplication // 支持 SpringBoot 功能的应用程序
public class Module5App implements WebMvcConfigurer {
    public static void main(String[] args) {
        SpringApplication.run(Module5App.class, args); // 运行 SpringBoot 程序
    }

    // 作用:把 url 路径和 磁盘路径做一个映射
    // http://localhost:8080/play/xxx => static/play
    // http://localhost:8080/play/xxx => d:/aaa
    @Override
    public void addResourceHandlers(ResourceHandlerRegistry registry) {
        //       url 路径                                    磁盘路径
        registry.addResourceHandler("/play/**").addResourceLocations("file:d:\\aaa\\");
    }
}
读取文件的时机
每次查询都应当读取一次视频文件吗?
- 如果视频文件固定的话,没必要次次读取
- 给 Service 添加初始化方法
准备一个 Map<String, Video>
- key 使用 bv 号
- value 是 Video 对象
@Service
public class VideoService1 {

    @PostConstruct // 这是一个初始化方法,在对象创建之后,只会调用一次
    public void init() { // 初始化
        try {
            List<String> data = Files.readAllLines(Path.of("data", "p.csv")); // 1 ~ 7
            for (String line : data) {
                String[] s = line.split(",");
                String[] tags = s[7].split("_");
                Video video = new Video(s[0], s[3], LocalDateTime.parse(s[6]),
                                        s[4], s[5], List.of(tags), getPlayList(s[0]), s[1], s[2]);
                map.put(s[0], video);
            }
        } catch (IOException e) {
            throw new RuntimeException(e);
        }
    }

    // List, Map
    /*
        1 -> Video 1
        2 -> Video 2
        ...
     */
    Map<String, Video> map = new HashMap<>();

    // 调用多次
    // 查询方法,根据视频编号,查询 Video 对象
    public Video find(String bv) {
        return map.get(bv);
    }

    // 读取选集文件 v_1.csv
    private List<Play> getPlayList(String bv) {
        try {
            List<String> vdata = Files.readAllLines(Path.of("data", "v_" + bv + ".csv"));
            List<Play> list = new ArrayList<>();
            for (String vline : vdata) {
                String[] ss = vline.split(",");
                list.add(new Play(ss[0], ss[1], LocalTime.parse(ss[3]), ss[2]));
            }
            return list;
        } catch (IOException e) {
            throw new RuntimeException(e);
        }
    }
}
Stream API 改进
完整代码
@Service
public class VideoService2 {

    // 将一行字符串变成 Video 对象
    Video string2Video(String string) {
        String[] s = string.split(",");
        String[] tags = s[7].split("_");
        return new Video(s[0], s[3], LocalDateTime.parse(s[6]), s[4], s[5], List.of(tags),
                getPlayList(s[0]), s[1], s[2]);
    }

    // 读取 playList
    List<Play> getPlayList(String bv) {
        try (Stream<String> data = Files.lines(Path.of("data", "v_" + bv + ".csv"))) {
            return data.map(this::string2Play).collect(Collectors.toList());
        } catch (IOException e) {
            throw new RuntimeException(e);
        }
    }

    // 将一行字符串变成 Play 对象
    Play string2Play(String string) {
        String[] ss = string.split(",");
        return new Play(ss[0], ss[1], LocalTime.parse(ss[3]), ss[2]);
    }

    // Video 对象中哪部分作为 map 的 key
    String key(Video video) {
        return video.getBv();
    }

    // Video 对象中哪部分作为 map 的 value
    Video value(Video video) {
        return video;
    }

    @PostConstruct
    public void init() {
        try (Stream<String> data = Files.lines(Path.of("data", "p.csv"))) {
            map = data.map(this::string2Video).collect(Collectors.toMap(this::key, this::value));
        } catch (IOException e) {
            throw new RuntimeException(e);
        }
    }

    Map<String, Video> map = new HashMap<>();

    public Video find(String bv) {
        return map.get(bv);
    }
}
Stream API 有两套方法
- 第一套:化整为零,把聚焦点集中在每个元素上
- .map() 方法需要参数个数为一,返回值为一的方法
- this::string2Play 称之为方法引用,它符合 map() 方法所需,把字符串转为 Play 对象
- this::string2Video 也是类似的,它符合 map() 方法所需,把字符串转为 Video 对象
- 第二套:化零为整,把元素通过收集器,收集为需要的 List 或是 Map 等
- collect 作用是将元素手机为 List 或 Map
- Collectors.toList() 是将多个元素收集为 List
- Collectors.toMap() 是将多个元素收集为 Map,需要指明如何从元素(Video)获取 key 和 value
二. MySQL 数据库
1. 数据库必要性
读取 csv 文件的数据,虽然看着也不难,但要新增、修改、删除,就比较麻烦了,而且即便是查询,我们现在这种一次性地把文件的所有行都读取,也只适合数据量较小的情况下,可以想象,如果数据量非常庞大,不说别的,这种做法很容易撑爆内存。
因此我们需要一个更专业的,能够对文件数据进行增删改查的软件,这就是数据库。数据库有很多种,这里介绍其中最为流行的数据库:MySQL
MySQL 相对于普通文件,对数据处理的特点如下
- 通过 C/S 模式,支持多个客户端同时访问数据库服务器
- 对数据的增删改查操作被抽象为了 SQL 语言,隐藏底层复杂性
- 对数据的完整性、并发性、安全性都有很好的处理
- 并发性,普通文件虽然支持两个人同时读取,但如果两个人都要修改呢,处理不当就会造成混乱,而数据库能够保证多个人的修改操作能够有序进行
-
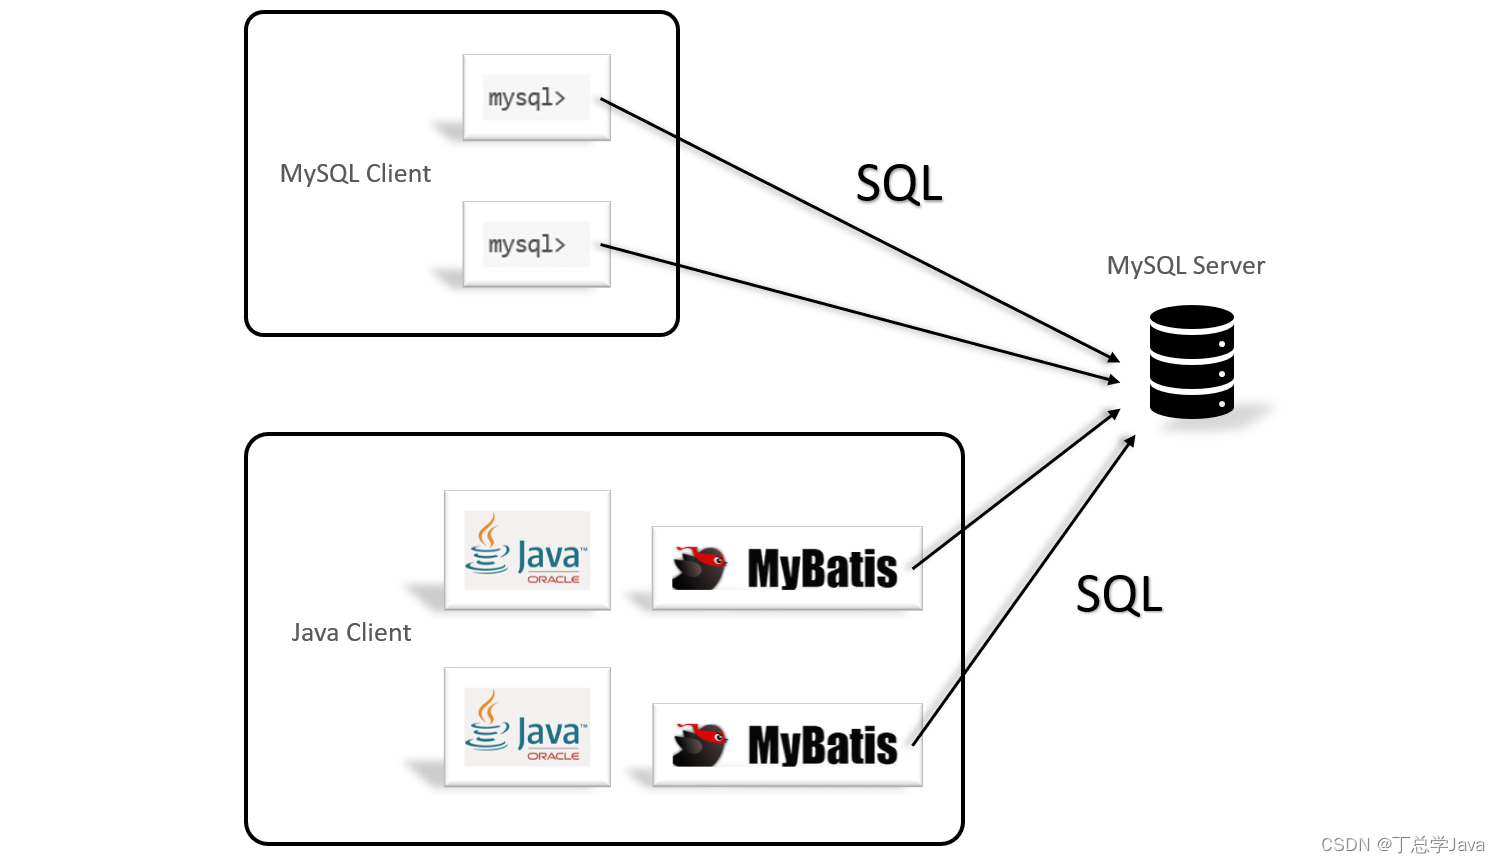
我们常说的 MySQL,其实主要是指 MySQL Server,将来要操作数据,需要通过 MySQL Client 客户端连接至数据库服务器,真正干活的是 Server,客户端负责发送命令,客户端可以有多个,发送的命令称为 SQL 语句,SQL 语句就能对数据进行增删改查
-
Java 代码当然也可以充当客户端,同样由 Java 代码执行 SQL 语句,对数据进行操作。但 SQL 语句查询到的数据,并不能自动封装为 Java Bean 对象,因此我们要借助一些框架来完成数据与 Java Bean 对象之间的转换操作,这就是后面要学习的 MyBatis 框架,它可以更方便实现数据和 Java Bean 对象之间的转换。
-
因此,我们接下来的学习顺序是 MySQL 服务器的安装使用、SQL 语句的语法,以及 MyBatis 框架
2. MySQL 安装
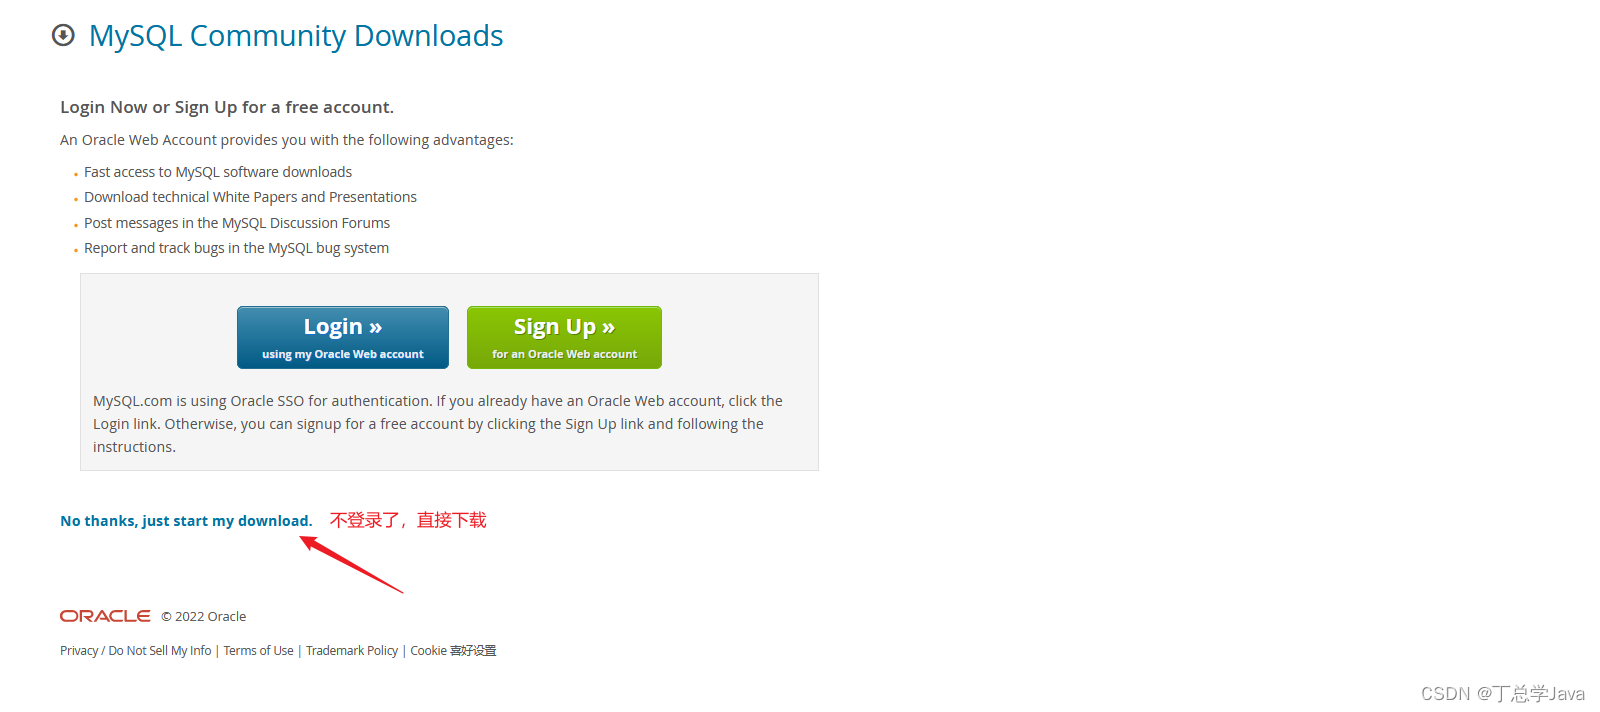
下载压缩包
首先到 oracle 官网
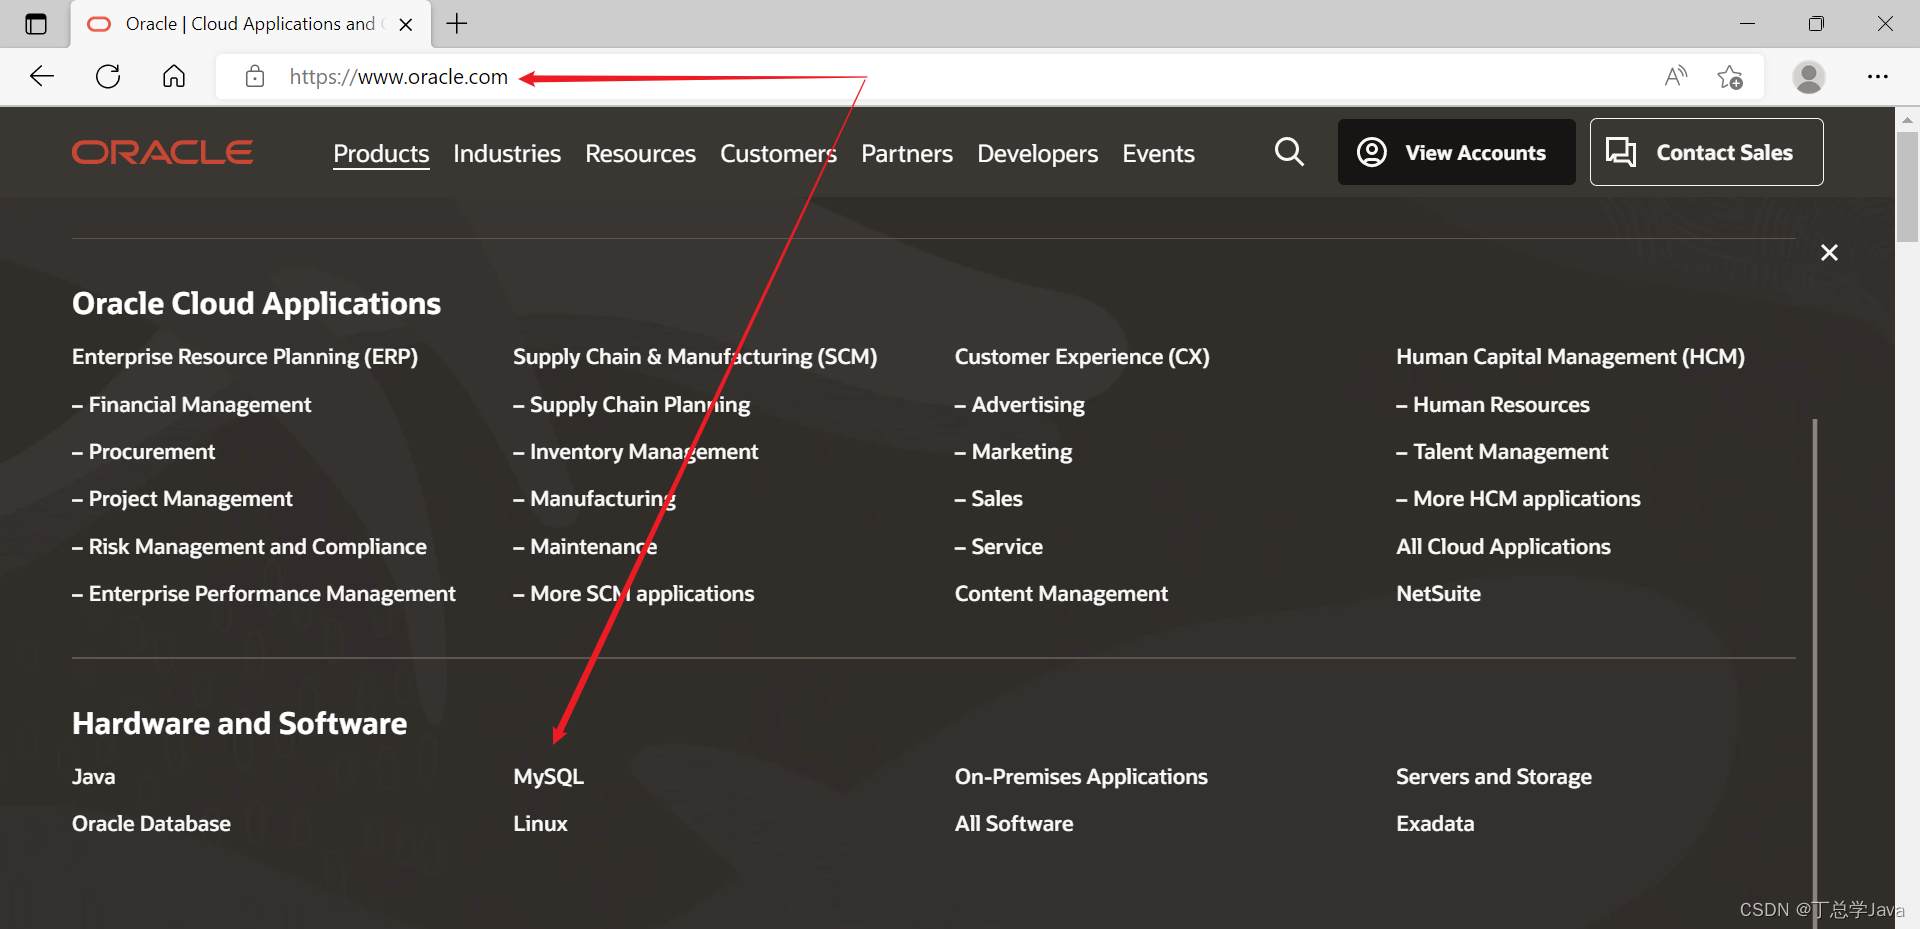
进入 MySQL 下载页面
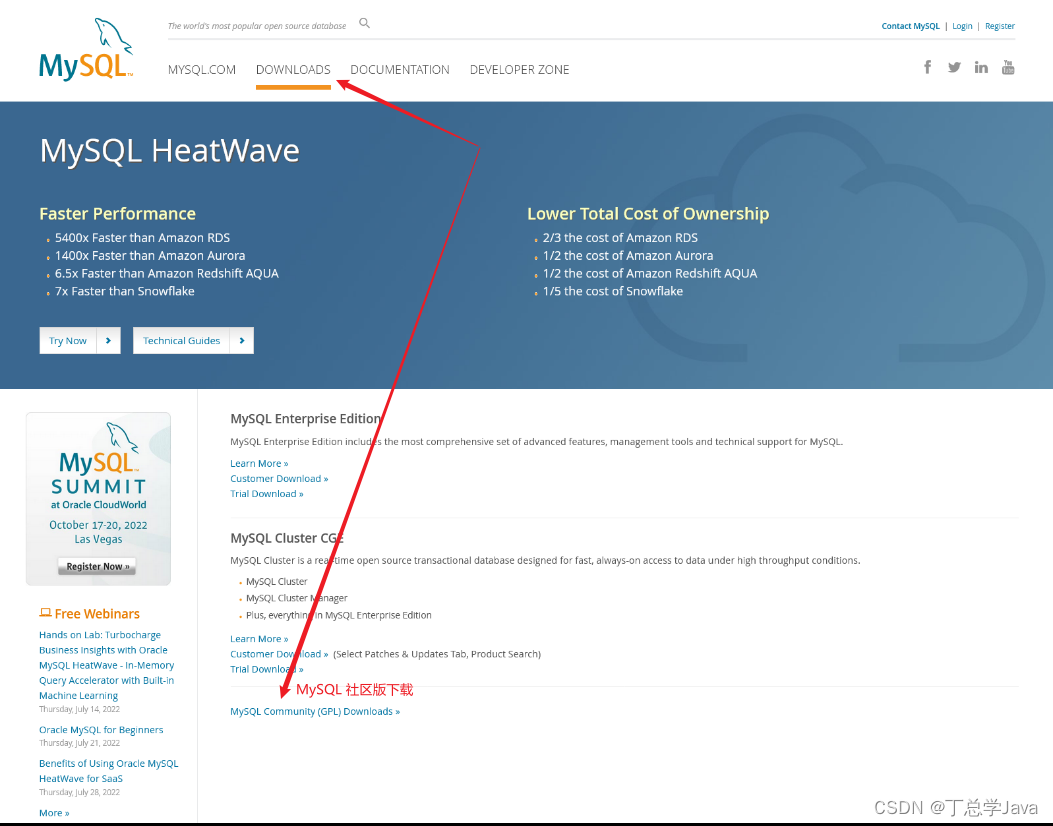
选择软件
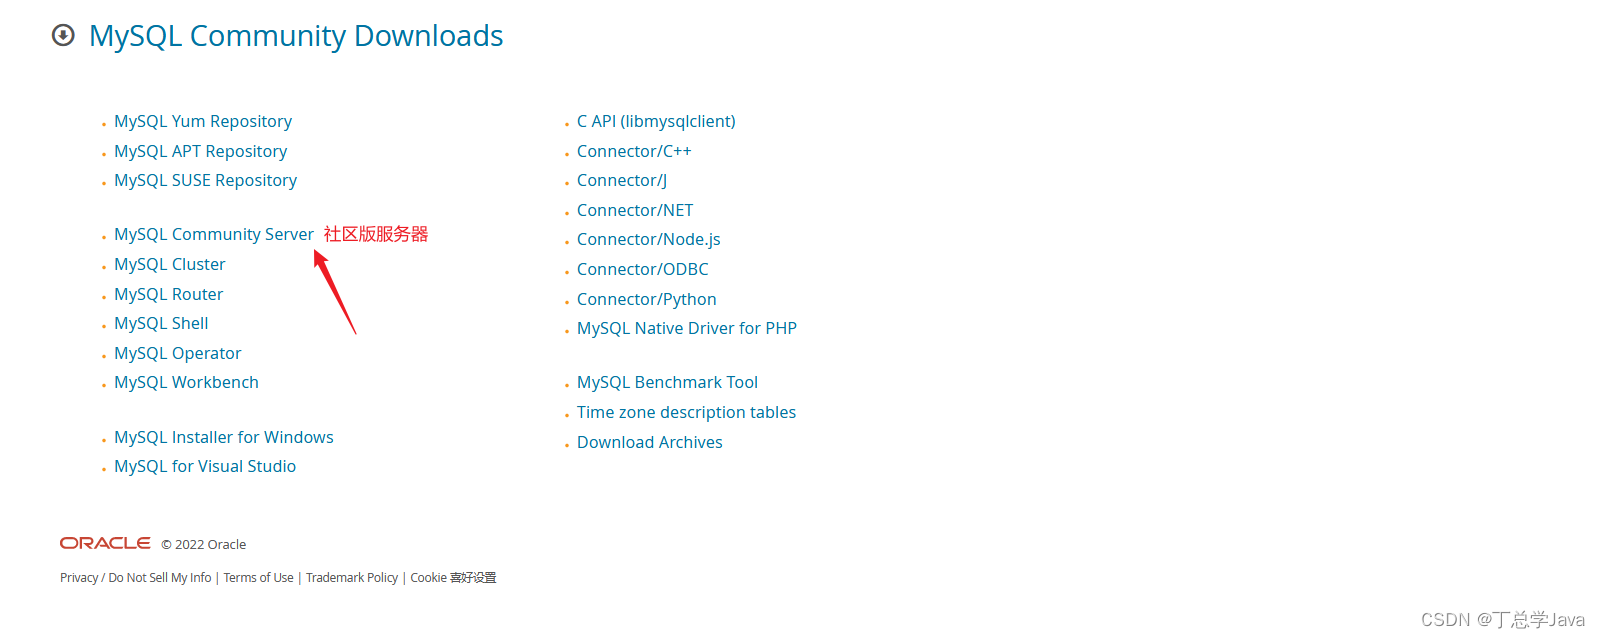
选择平台
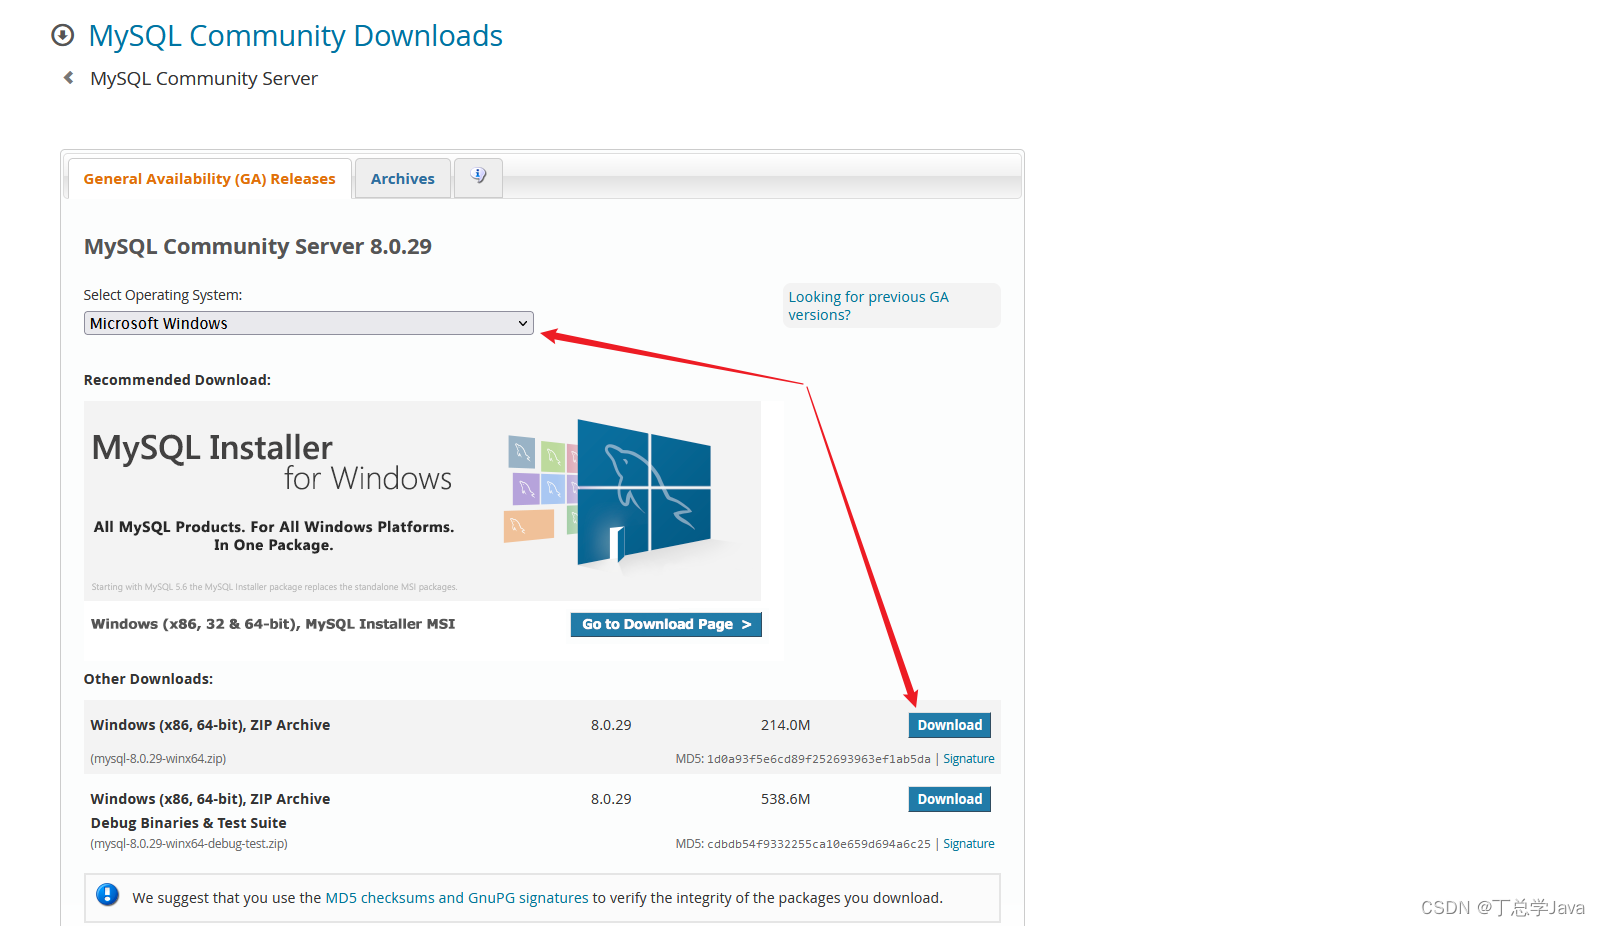
下载
初始化数据库
解压缩,配置 PATH 环境变量,添加 MySQL解压目录\bin 到环境变量
注意
- 如果用 cmd,那么改完环境变量,只要打开新的 cmd 窗口,就可以立刻生效
- 如果用 Fluent Terminal,改完之后,需要注销当前用户才能生效
初始化需要执行
mysqld --initialize
会生成初始数据库,在 MySQL解压目录\data 目录下,这时候需要查看一个名为 *.err 的文件,内部含有临时密码,把它记录下来,如图

运行服务器
以命令行窗口方式运行服务器
mysqld --console
这种方式好处是
- 窗口打开,服务器运行
- 窗口关闭,服务器停止
还有一种方式是把 MySQL 安装为系统服务(要以管理员权限启动 cmd)
mysqld --install
net start mysql
这样每次开机就会自动启动 MySQL 服务程序
运行客户端
打开一个新窗口,运行客户端,登录至服务器
mysql -uroot -p
Enter password: 临时密码
- -u 之后跟的是用户名,root 是 MySQL 的管理员用户
- -p 表示接下来要输入密码,密码就是在前面步骤里让你记录的临时密码
- 首先做的一件事应该是把临时密码改掉
alter user 'root'@'localhost' identified by 'root';
- 作用就是将本地 root 用户的密码改为 root,当然改成别的密码也行,改成 root 只是为了好记
- 改完后输入 quit 退出,重新登录测试是否修改正确
3. 初步使用
mysql 分成库和表,库用来包含表,表用来存储数据,这里的表就和我们常见的二维表格类似
查看库
show databases;
创建库
create database 库名;
切换库
use 库名;
查看表
show tables;
创建表,语法
create table 表名 (
	字段名1 类型 [约束],
    字段名2 类型 [约束],
    ...
);
例
create table student(
	id int primary key,
    name varchar(10)
);
插入数据,语法 insert into 表名(字段1, 字段2 ...) values (值1, 值2 ...)
insert into student(id, name) values (1, '张三');
insert into student(id, name) values (2, '李四');
insert into student(id, name) values (3, '王五');
查询数据,语法 select 字段1, 字段2 ... from 表 where 条件
select id,name from student;
按编号查询数据
select id,name from student where id = 1;
修改数据,语法 update 表 set 字段1=值1, 字段2=值2 where 条件
update student set name='张小三' where id = 1;
删除数据,语法 delete from 表 where 条件
delete from student where id = 3;
4. datagrip
可以用 JetBrain 出品的 datagrip,以可视化的方式管理库,表
用它的意义在于界面看起来更友好一些,前面讲的 insert、delete、update、select 还是需要熟练掌握
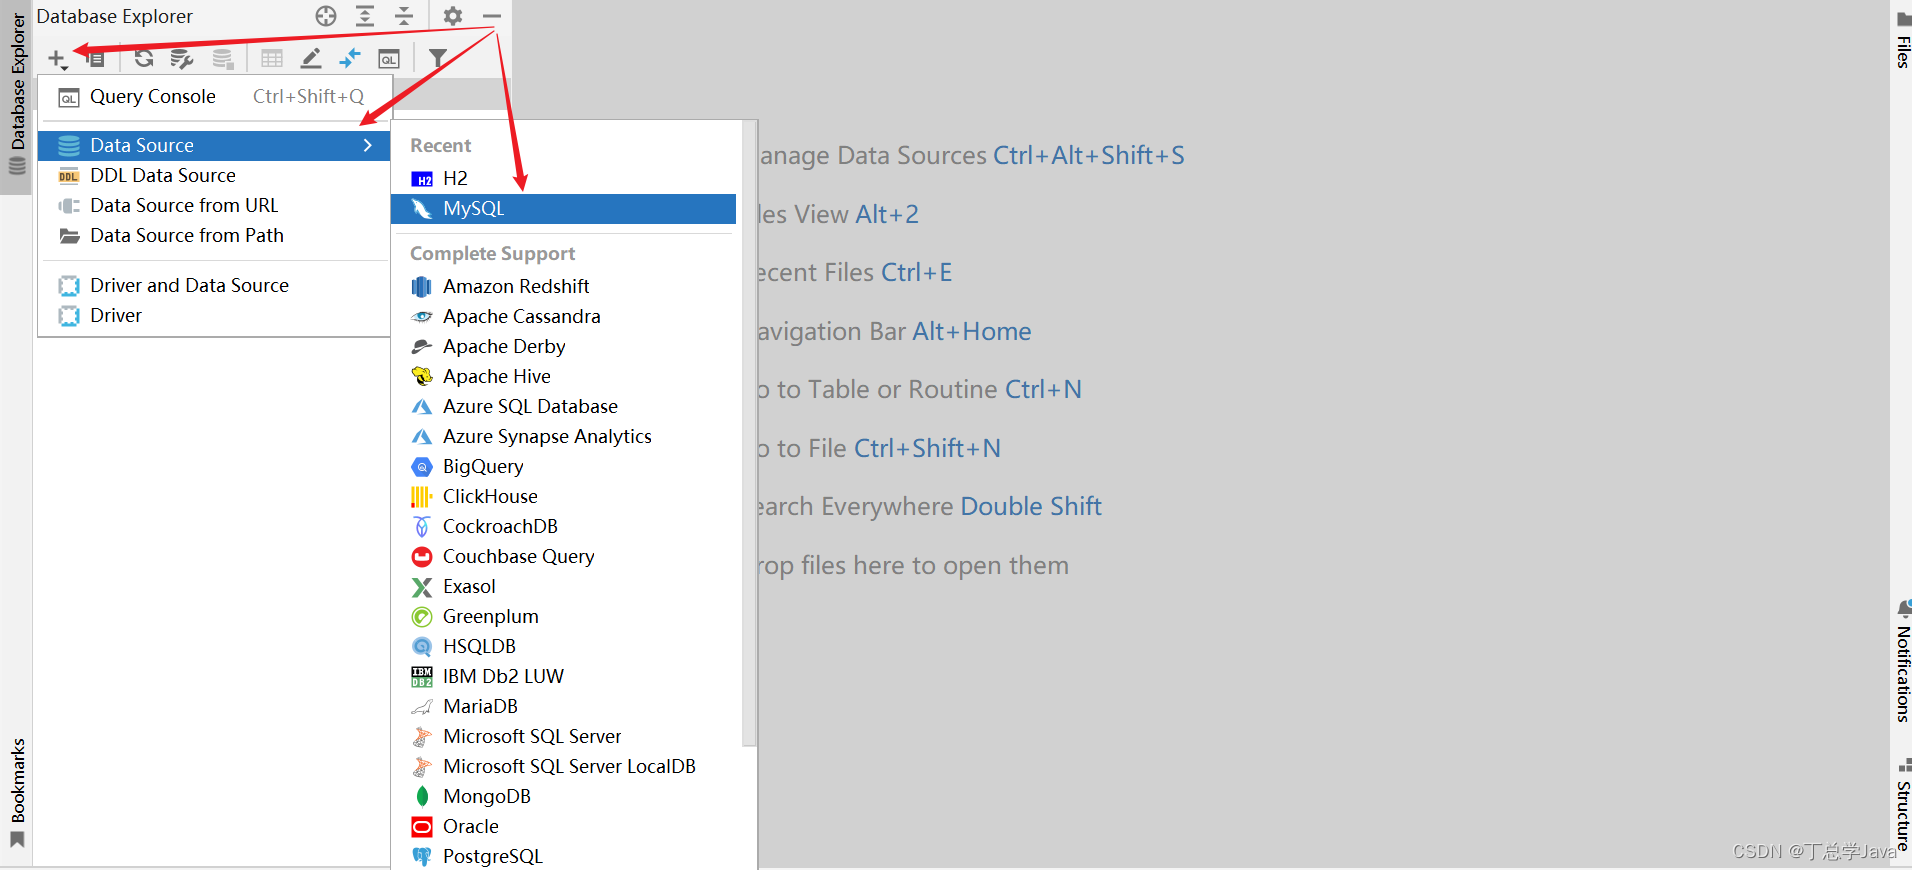
添加数据源
选择数据库的类型
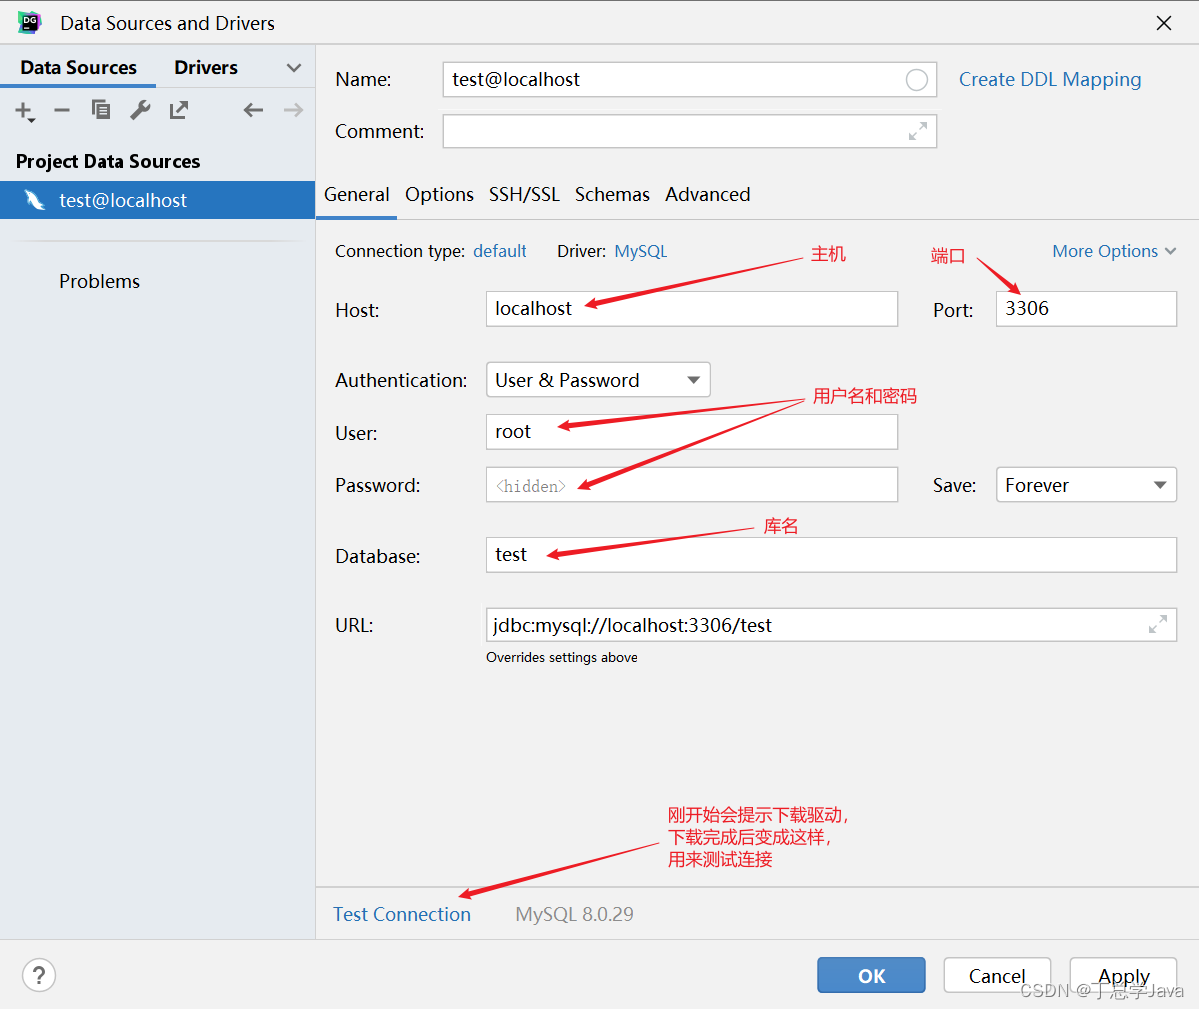
配置界面
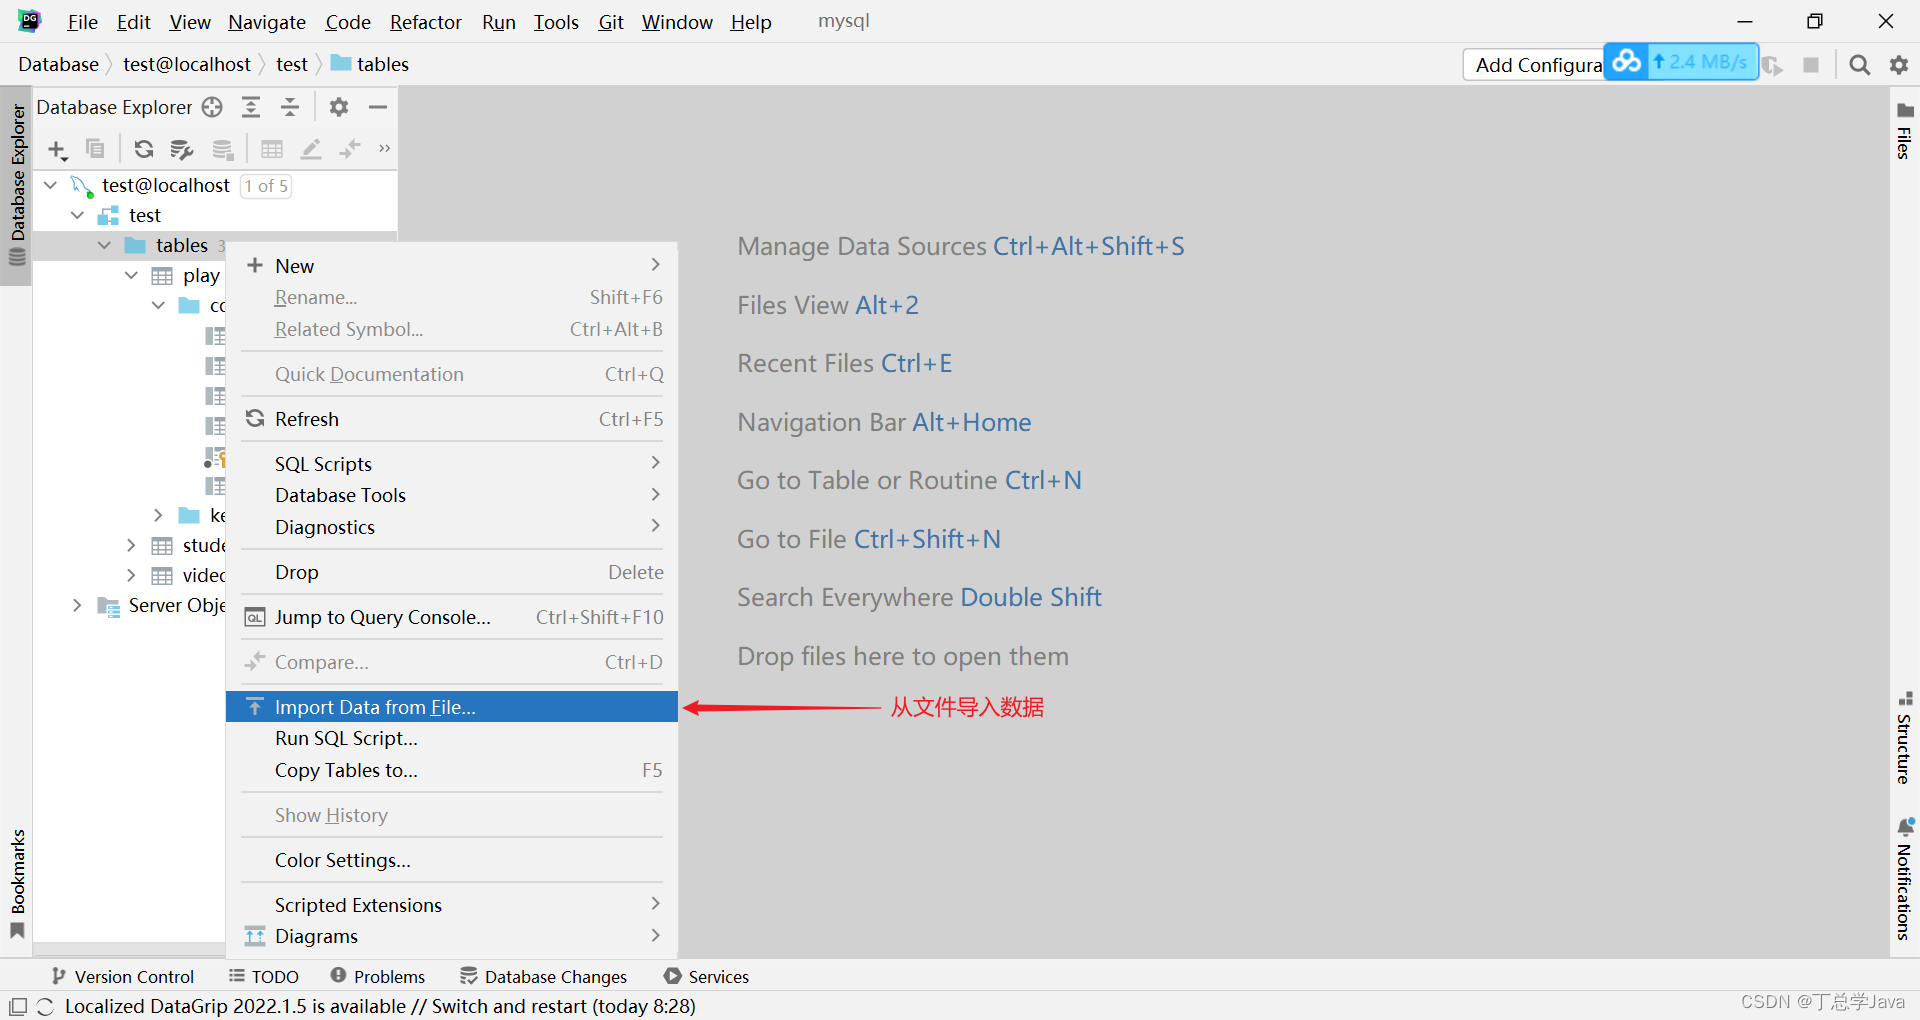
导入数据
用 datagrip 导入数据
将文件的列与数据库表的列对应起来
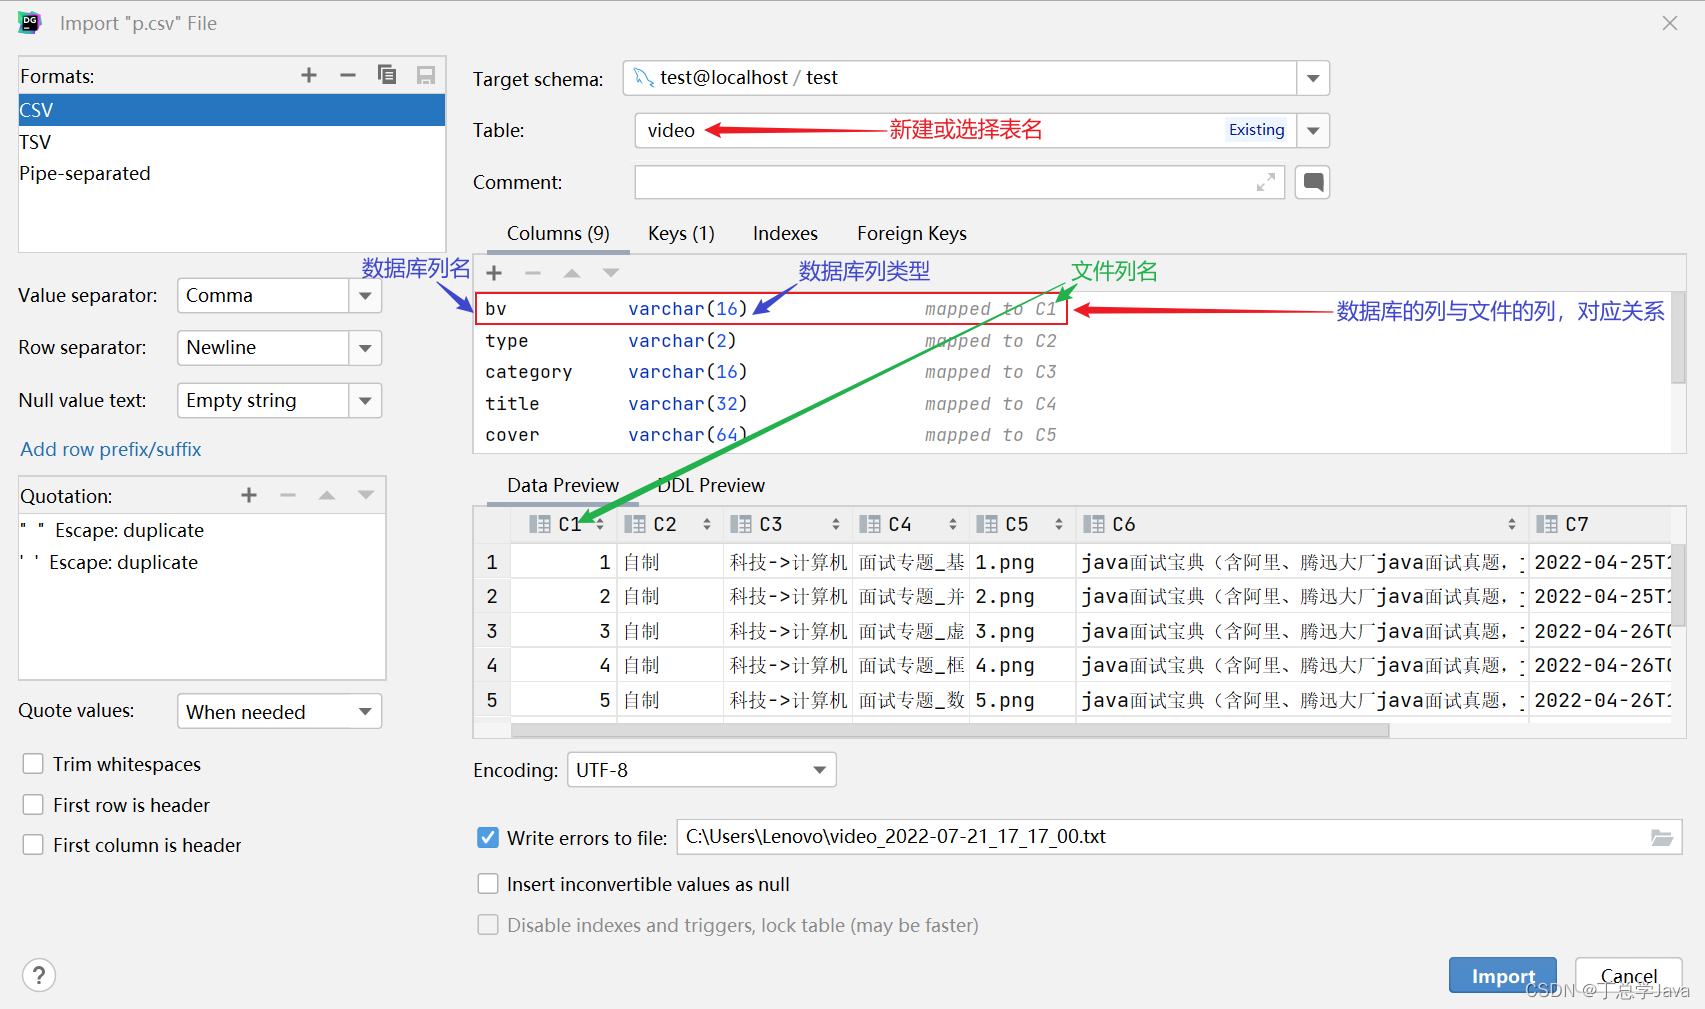
用 mysql 工具导入数据
导入数据,服务器和客户端运行时都要添加 --local_infile=1 参数
1.txt
1,张三
2,李四
4,王五
用下面的语句
load data local infile '1.txt' replace into table student fields terminated by ',' lines terminated by '\r\n';
5. MyBatis 入门
准备工作
pom.xml 中加入依赖
<?xml version="1.0" encoding="UTF-8"?>
<project xmlns="http://maven.apache.org/POM/4.0.0" xmlns:xsi="http://www.w3.org/2001/XMLSchema-instance"
         xsi:schemaLocation="http://maven.apache.org/POM/4.0.0 https://maven.apache.org/xsd/maven-4.0.0.xsd">

    ...

    <dependencies>

        ...

        <dependency>
            <groupId>org.mybatis.spring.boot</groupId>
            <artifactId>mybatis-spring-boot-starter</artifactId>
            <version>2.2.2</version>
        </dependency>

        <dependency>
            <groupId>mysql</groupId>
            <artifactId>mysql-connector-java</artifactId>
            <scope>runtime</scope>
        </dependency>
    </dependencies>

    ...

</project>
application.properties 中配置数据库连接信息
spring.datasource.url=jdbc:mysql://localhost:3306/test
spring.datasource.username=root
spring.datasource.password=root
Java Bean
Java Bean 用来存数据
public class Student {

    private int id;
    private String name;

    public Student() {
    }

    public Student(int id, String name) {
        this.id = id;
        this.name = name;
    }

    public int getId() {
        return id;
    }

    public void setId(int id) {
        this.id = id;
    }

    public String getName() {
        return name;
    }

    public void setName(String name) {
        this.name = name;
    }
}
Mapper 接口
Mapper 接口用来增删改查
@Mapper // 这是一个专用于增删改查的接口
// 实现类(mybatis 和 spring), 可以通过 @Autowired 依赖注入获取实现类对象
public interface StudentMapper {

    @Select("""
            select id, name
            from student
            """)
    List<Student> findAll();

    // 根据编号查询学生
    @Select("""
            select id, name
            from student
            where id=#{id}
            """)
    Student findById(int id); // id=1,2,3...

    // 新增学生
    /*@Insert("""
            insert into student(id, name)
            values (#{id}, #{name})
            """)
    void insert(@Param("id") int i, @Param("name") String n);*/

    @Insert("""
            insert into student(id, name)
            values (#{id}, #{name})
            """)
    void insert(Student stu);

    // 修改学生
    @Update("""
            update student set name=#{name}
            where id=#{id}
            """)
    void update(Student stu);

    @Delete("delete from student where id=#{id}")
    void delete(int id);
}
注意事项
- Mapper 方法如果只有一个参数,那么它可以不加特殊说明,就与 SQL 语句中 #{} 相对应
- Mapper 方法如果有多个参数,要使用 @Param 注解将方法参数与 SQL 语句中 #{} 相对应
- Mapper 方法如果用 Java Bean 作为参数,那么 Java Bean 的字段名与 SQL 语句中 #{} 相对应
- 字段是私有的,本质上用的的字段对应的 public 的 get 方法获取值,然后给 #{} 赋值
- 同一个 Mapper 接口中,方法不能重名
单元测试
// 单元测试
@SpringBootTest
public class TestStudentMapper {

    @Autowired
    StudentMapper studentMapper;

    @Test // 测试查询所有
    public void test1() {
        System.out.println(1);
        List<Student> all = studentMapper.findAll();
        for (Student stu : all) {
            System.out.println(stu.getId() + " " + stu.getName());
        }
    }

    @Test // 测试根据id查询
    public void test2() {
        System.out.println(2);
        Student stu = studentMapper.findById(4);
        System.out.println(stu);
//        System.out.println(stu.getId() + " " + stu.getName());
    }

    @Test
    public void test3() {
//        studentMapper.insert(5, "钱七");
        Student stu = new Student(6, "周八");
        studentMapper.insert(stu);
    }

    @Test
    public void test4() {
        Student stu = new Student(1, "张小三");
        studentMapper.update(stu);
    }

    @Test
    public void test5() {
        studentMapper.delete(5);
    }

}
注意事项
- @SpringBootTest 用来把单元测试类与 SpringBoot 整合,有了它,才能用 Spring 的依赖注入等功能
- @Test 标注的方法是单元测试方法,可以作为独立的运行入口,要求
- 最好是 public
- 无返回值
- 方法名任意
- 无参
- 单元测试的好处是每个方法都可以作为独立的测试入口,互不干扰
6. 查询视频
Mapper 接口
@Mapper
public interface VideoMapper {

    // 根据 bv 号查询视频
    @Select("""
            select bv,
                   type,
                   category,
                   title,
                   cover,
                   introduction,
                   publish_time,
                   tags
            from video
            where bv=#{bv}
            """)
    Video findByBv(String bv);
    /*
        数据库习惯 underscore 下划线分隔多个单词 如 :publish_time
        Java 习惯 驼峰命名法 camel case 如 :publishTime

        Java面试_求职_计算机技术_面试技巧 字符串
                                     List
     */
}
要在查询时执行【下划线-驼峰命名转换】,需要在 application.properties 中加入配置
#...

mybatis.configuration.map-underscore-to-camel-case=true
@Mapper
public interface PlayMapper {

    // 查询某个视频的选集
    @Select("""
            select id, title, duration, url
            from play
            where bv=#{bv}
            """)
    List<Play> findByBv(String bv);
}
Java Bean
Java Bean 需要添加 tags 字段,以便与数据库的 tags 列相对应,原本的 getTagList 方法用来把字符串转换为 List<String>
public class Video {
    // ...

    private String tags;

    public String getTags() {
        return tags;
    }

    public void setTags(String tags) {
        this.tags = tags;
    }

    public List<String> getTagList() {
        String tags = this.tags; // Java面试_求职_计算机技术_面试技巧
        if (tags == null) {
            return List.of();
        }
        String[] s = tags.split("_");
        return List.of(s);
    }

}
Service
/**
 * 从数据库中获取视频数据
 */
@Service
public class VideoService2 {

    @Autowired
    private VideoMapper videoMapper;

    @Autowired
    private PlayMapper playMapper;

    // 根据 bv 号查询视频
    public Video find(String bv) {
        Video video = videoMapper.findByBv(bv);
        if (video == null) {
            return null;
        }

        List<Play> playList = playMapper.findByBv(bv);
        video.setPlayList(playList);
        return video;
    }
}
Controller
@Controller
public class VideoController {

    @RequestMapping("/video/{bv}")
    @ResponseBody
    public Video t(@PathVariable String bv) {
        return videoService2.find(bv);
    }

    @Autowired
    private VideoService2 videoService2;
}
7. 发布视频
原始发布功能预览


我的 B 站发布功能预览
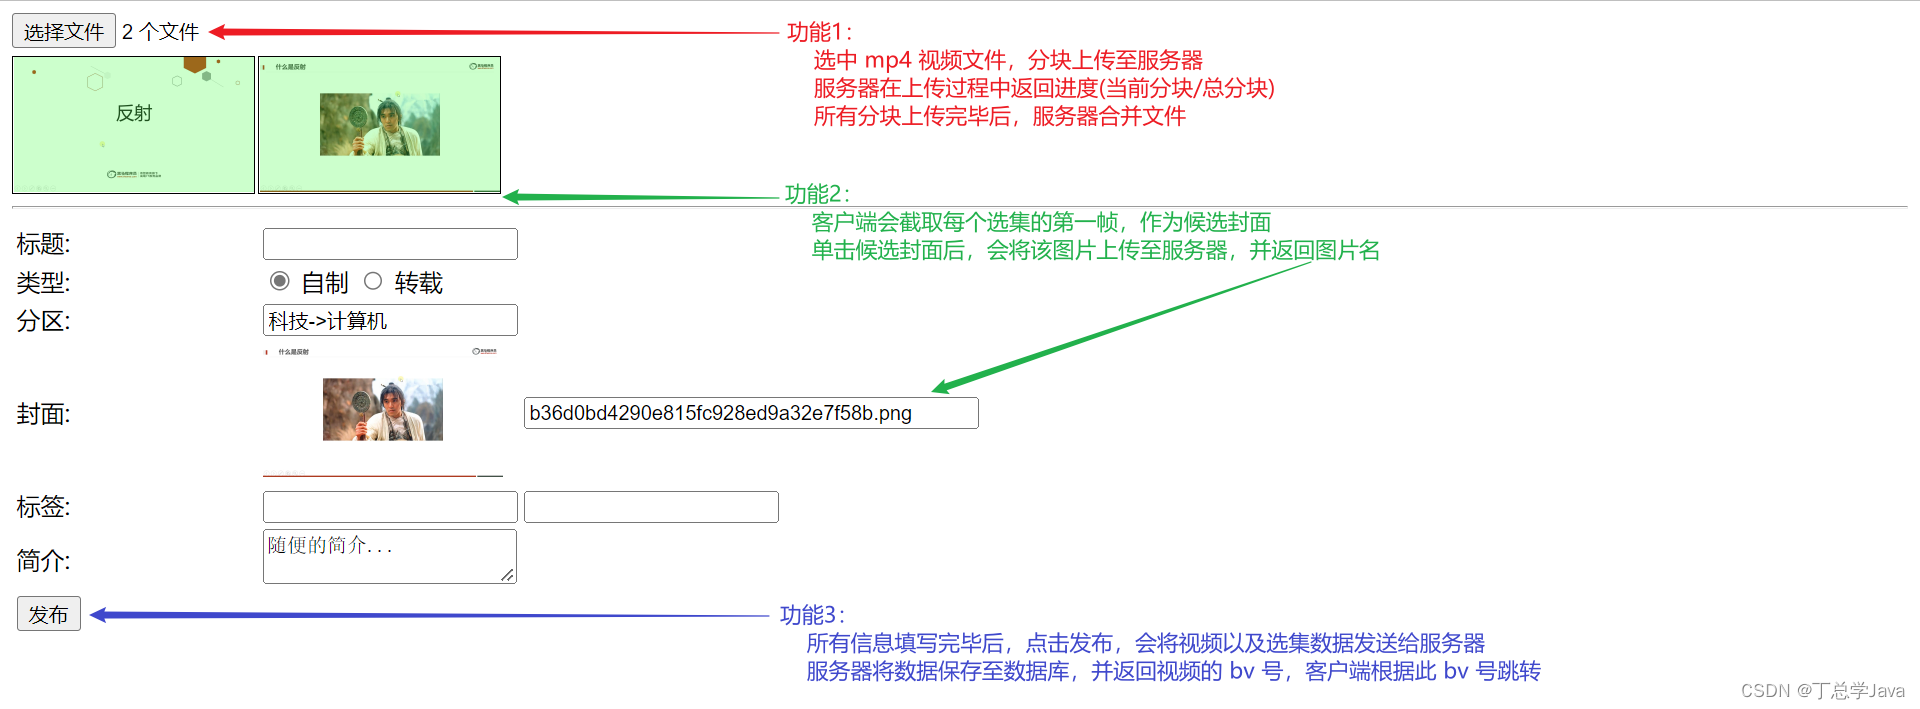
功能1:
- 选中 mp4 视频文件,分块上传至服务器
- 服务器在上传过程中返回进度(当前分块/总分块%)
- 所有分块上传完毕后,服务器合并当前文件
功能2:
- 客户端会截取每个选集的第一帧,作为候选封面
- 单击候选封面后,会将该图片上传至服务器,并返回图片名
功能3:
- 所有信息填写完毕后,点击发布,会将视频以及选集数据发送给服务器
- 服务器将数据保存至数据库,并返回视频的 bv 号,客户端根据此 bv 号跳转
上传分块
请求:/upload 路径
请求数据:
- i 第几块,从1开始
- chunks 总块数
- data 分块数据
- url 视频文件名
响应数据:
- 要一个 map,key 是 url 视频文件名,value 是上传进度,以百分比表示
代码
@Controller
public class UploadController {

    @Value("${video-path}")
    private String videoPath;

    @RequestMapping("/upload")
    @ResponseBody
    // MultipartFile 专用于上传二进制数据的类型
    public Map<String, String> upload(int i, int chunks, MultipartFile data, String url)
        throws IOException {
        data.transferTo(Path.of(videoPath, url + ".part" + i));
        return Map.of(url, (i * 100.0 / chunks) + "%");
    }

    // ...
}
-
@Value(“${video-path}”) 表示它标注的字段的值来自于 application.properties 配置文件
# ... video-path=d:\\aaa\\ -
data.transferTo 作用是将上传的临时文件 MultipartFile 另存为一个新的文件
-
计算百分比时,要先乘 100.0 这个 double 值,把整个运算提升为小数运算,否则整数除法算不出带小数的百分比值
-
spring 上传单个文件的最大值上限为 1MB,要调整的话在 application.properties 中配置
# ...

spring.servlet.multipart.max-file-size=8MB
合并分块
请求:/finish
请求数据:
- chunks 总块数
- url 视频文件名
响应数据:无
代码
@Controller
public class UploadController {

    @RequestMapping("/finish")
    @ResponseBody
    public void finish(int chunks, String url) throws IOException {
        try (FileOutputStream os = new FileOutputStream(videoPath + url)) {
            // 写入内容
            for (int i = 1; i <= chunks; i++) { // 1,2,3
                Path part = Path.of(videoPath, url + ".part" + i);
                Files.copy(part, os);
                part.toFile().delete(); // 删除 part 文件
            }
        }
    }

    // ...
}
- FileOutputStream 文件输出流,它的作用是创建新文件,并写入内容,它会占用外部资源,用完需要 close
- try-with-resource 语法能够帮我们添加 finally 语句块,并调用资源的 close 方法
- Files.copy 接收两个参数
- 参数一是代表原始文件的 Path 对象
- 参数二就是代表了目标文件的文件输出流对象
上传封面
请求:/uploadCover
请求数据:
- data 封面图片数据
- cover 图片名
响应数据:
- 要一个 map,key 固定为 cover,值是图片名
代码
@Controller
public class UploadController {

    @Value("${img-path}")
    private String imgPath;

    @RequestMapping("/uploadCover")
    @ResponseBody
    public Map<String, String> uploadCover(MultipartFile data, String cover) throws IOException {
        data.transferTo(Path.of(imgPath, cover));
        return Map.of("cover", cover);
    }

    // ...
}
-
@Value(“${img-path}”) 表示它标注的字段的值来自于 application.properties 配置文件
img-path=d:\\img\\
发布视频
请求:/publish
请求数据:json
{
    "title":"反射",
    "type":"自制",
    "category":"科技->计算机",
    "cover":"封面图片名.png",
    "tags":"面试_java_反射",
    "introduction":"简介...",
    "playList": [
        {"id":"P1","title":"标题1","url":"视频文件名.mp4","duration":"03:30"},
        {"id":"P2","title":"标题2","url":"视频文件名.mp4","duration":"03:30"},
        {"id":"P3","title":"标题3","url":"视频文件名.mp4","duration":"04:49"},
        {"id":"P4","title":"标题4","url":"视频文件名.mp4","duration":"08:19"}
    ]
}
响应数据:
- 要一个 map,key 固定为 bv,值是视频 bv 号
代码
@Mapper
public interface VideoMapper {

    // ...

    @Insert("""
            insert into video(type, category, title, cover,
                              introduction, publish_time, tags)
            VALUES (#{type}, #{category}, #{title}, #{cover},
                    #{introduction}, #{publishTime}, #{tags})
            """)
    void insert(Video video);

    // 获取最近生成的自增主键值
    @Select("select last_insert_id()")
    int lastInsertId();

    // 更新 bv 号
    @Update("update video set bv=#{bv} where id=#{id}")
    void updateBv(@Param("bv") String bv, @Param("id") int id);
}
PlayMapper
@Mapper
public interface PlayMapper {

    // ...

    @Insert("""
            insert into play(id,title,duration,url,bv)
            values (#{p.id},#{p.title},#{p.duration},#{p.url},#{bv})
            """)
    void insert(@Param("p") Play play, @Param("bv") String bv);
}
VideoService2
@Service
public class VideoService2 {

    @Autowired
    private VideoMapper videoMapper;

    @Autowired
    private PlayMapper playMapper;

    // 发布视频
    public String publish(Video video) {
        video.setPublishTime(LocalDateTime.now()); // 设置发布事件
        // 1. 向 video 表插入视频
        videoMapper.insert(video);
        // 2. 生成 bv 号
        int id = videoMapper.lastInsertId();
        String bv = Bv.get(id);
        // 3. 更新 bv 号
        videoMapper.updateBv(bv, id);
        // 4. 向 play 表插入所有视频选集
        for (Play play : video.getPlayList()) {
            playMapper.insert(play, bv);
        }
        return bv;
    }

    // ...
}
- 其中 bv 号使用工具方法 Bv.get(id) 提供,并不是重点
VideoController
@Controller
public class VideoController {

    // ...

    @Autowired
    private VideoService2 videoService2;

    @RequestMapping("/publish")
    @ResponseBody
    public Map<String,String> publish(@RequestBody Video video) {
        String bv = videoService2.publish(video);
        return Map.of("bv", bv);
    }
}
本文来自互联网用户投稿,该文观点仅代表作者本人,不代表本站立场。本站仅提供信息存储空间服务,不拥有所有权,不承担相关法律责任。 如若内容造成侵权/违法违规/事实不符,请联系我的编程经验分享网邮箱:chenni525@qq.com进行投诉反馈,一经查实,立即删除!