kitex快速入门
简介
kitex是字节跳动开源的一款基于 Go语言的rpc框架。
安装与使用
kitex具有一键生成的功能,能够一键生成rpc架构,使开发者只关注于逻辑的开发即可。自动生成的源码只需要简单的配置就可使用,十分方便。
安装就不在多赘述了,详情请见官网kitex的下载与安装
安装完毕使用kitex -module xxx -service xxx xxx.thrift命令自动生成源码。
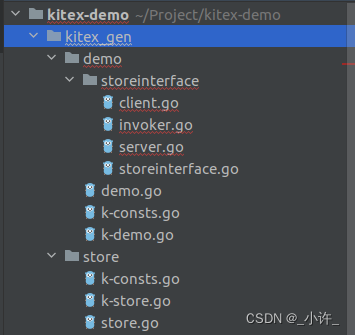
kitex命令自动生成rpc源码,如下图,其中kitex_gen,script,build,handler,kitex.yaml,main.go是自动生成的,后续会介绍各个目录或文件的作用。

其中核心部分是kitex_gen

| -- kitex_gen
|  	| -- demo
|	    |-- storeInterface
|		    |-- client.go
|			|-- invoker.go
|   		|-- server.go
|		    |-- storeinterface.go
|	    |-- demo.go
|       |-- k-consts.go
|       |-- k-demo.go
|   |-- store
|       |-- demo.go
|       |-- k-consts.go
|       |-- k-demo.go
| -- script
|    |-- bootstrap.sh
| -- build.sh
| -- handler.go
| -- kitex_info.yaml
| -- main.go
kitex_gen表示是kitex生成的rpc服务源码
demo是以thrift文件的namespace命名的,也就是服务名称
storeInterface是以thrift的service命名的,会把大写改为小写,其下的各个文件都是构建rpc服务的核心代码了,server构建服务端,client构建客户端,kitex将方法重构后拆分了出来,在thrift工具构建的源码中是都在一起的。
demo.go等和storeInterface平级的文件都是公用参数,入thrift定义的公用参数,错误封装参数等
k-consts.go, k-note.go, note.go,它们是rpc底层的传输实现,包含了根据thrift实现的rpc传输信息的包装、传输和验证.
该文件会随定义的多个thrift文件而生成多个,并和thrift文件同名包含文件夹名,除了k-consts.go
script的bootstrap.sh文件是在Kitex项目中用于帮助用户快速生成项目的基础结构,包括下载fabric-sample源码、拉取二进制文件以及拉取docker镜像等操作。这些步骤是自动化的,可以节省您手动配置这些环境的时间。当您在终端中运行这个脚本时,它将自动执行这些操作,为您设置好一个基本的开发环境。
build.sh是项目打包脚本
handler.go是rpc接口的实现方法,用于将go线程共享给rpc服务,实现远程接口调用。
kitex_info.yaml是项目的配置文件
main.go是rpc服务端的启动程序,有kitex直接生成,默认端口8888。
之后就是最重要的步骤了:1. 接口的实现类;2. 客户端程序。
接口实现类与客户端程序
续写rpc接口实现类方法体
自动生成的接口方法都是默认的,没有实际的方法体,需要重写,而handler.go就是接口的实现类,使用过thrift就了解,需要使用thrift工具生成核心rpc源码,再有开发继承接口重写方法,并使用源码的程序创建服务端与客户端接口。而在kitex中这些步骤都有kitex实现了,甚至接口的实现类都是生成了,只需要写方法体即可。handler.go默认生成如下:
package main

import (
	"context"
	"errors"
	store "kitexdemo/kitex_gen/store"
)

// StoreInterfaceImpl implements the last service interface defined in the IDL.
type StoreInterfaceImpl struct{}

// AddStore implements the StoreInterfaceImpl interface.
func (s *StoreInterfaceImpl) AddStore(ctx context.Context, req *store.AddStoreReq) (resp int32, err error) {
	// TODO: Your code here...
	return
}

// Delete implements the StoreInterfaceImpl interface.
func (s *StoreInterfaceImpl) Delete(ctx context.Context, req *store.DeleteReq) (resp int32, err error) {
	// TODO: Your code here...
	return
}

// Update implements the StoreInterfaceImpl interface.
func (s *StoreInterfaceImpl) Update(ctx context.Context, req *store.UpdateReq) (resp int32, err error) {
	// TODO: Your code here...
	return
}

// GetStore implements the StoreInterfaceImpl interface.
func (s *StoreInterfaceImpl) GetStore(ctx context.Context, id int32, uuid string) (resp []*store.GetStoreReq, err error) {
	// TODO: Your code here...
	return
}
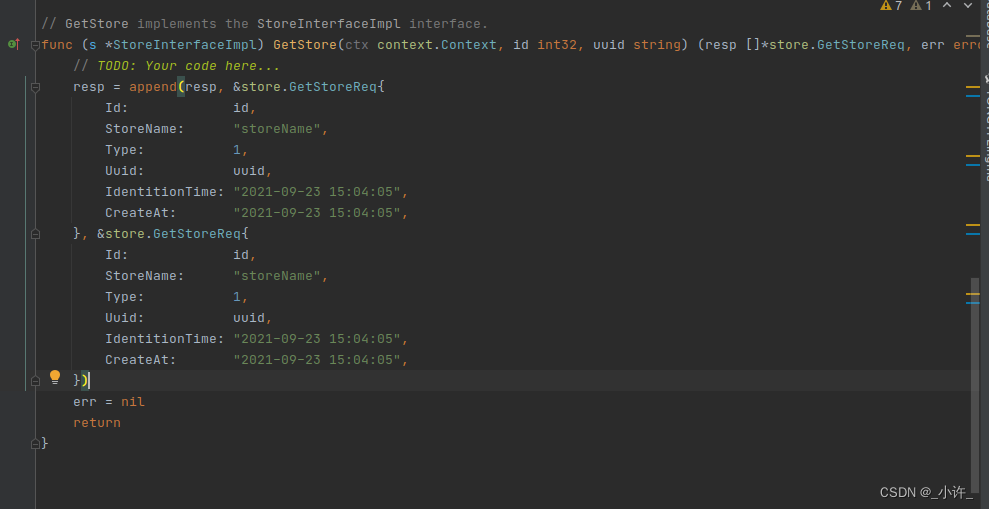
在TODO: Your code here...处编写业务实现的功能即可。例如小编在这里实现GetStore方法,如下

编写客户端程序
客户端自动生成了,直接启动即可。那么如何编写客户端实现通讯呢?
仿照服务端启动程序写即可,服务端主程序代码如下:
package main

import (
	demo "kitexdemo/kitex_gen/demo/storeinterface"
	"log"
)

func main() {
	svr := demo.NewServer(new(StoreInterfaceImpl))

	err := svr.Run()

	if err != nil {
		log.Println(err.Error())
	}
}
demo.NewServer()方法是生成源码kitex_gen的server.go方法,用于生成一个服务端,kitex隐藏了细节;那么该文件下同理还有一个client.go则是生成客户端的方法:
package main

import (
	"context"
	"fmt"
	"github.com/cloudwego/kitex/client"
	"kitexdemo/kitex_gen/demo/storeinterface"
)

func main() {
	newClient := storeinterface.MustNewClient("demo", client.WithHostPorts("127.0.0.1:8888"))
	store, err := newClient.GetStore(context.Background(), 1, "123")
	if err != nil {
		panic(err)
	}
	for _, s := range store {
		fmt.Printf("%#v", s)
	}
}
启动服务端:

启动客户端端:

成功连接并获取到服务端返回的结构体数据。
MustNewClient方法用于创建一个新的客户端实例,该方法的参数解析如下:
- addr(string):服务端的地址,格式为host:port。例如:“localhost:8080”。
- opts([]kitex.ClientOption):可选的配置参数,用于自定义客户端的行为。例如:超时时间、重试策略等。
- timeout(time.Duration):请求超时时间,默认为5秒。
- retryStrategy(kitex.RetryStrategy):重试策略,默认为指数退避策略。
- logger(log.Logger):日志记录器,用于记录客户端的日志信息。
- callerName(string):调用者名称,用于在日志中标识调用者。
- metadata(map[string]string):元数据,用于在请求和响应中传递额外的信息。
生成的实例为rpc接口用于远程调用方法。
跨语言性
rpc通讯和http协议一样都是跨语言的,只要地址端口和接口名一样就可以调用。
本文来自互联网用户投稿,该文观点仅代表作者本人,不代表本站立场。本站仅提供信息存储空间服务,不拥有所有权,不承担相关法律责任。 如若内容造成侵权/违法违规/事实不符,请联系我的编程经验分享网邮箱:chenni525@qq.com进行投诉反馈,一经查实,立即删除!