Linux驱动开发(1)-最简单的字符设备驱动开发例子
1.简介
字符设备驱动:按照字节流进行读写操作的设备,例如点灯、按键、IIC、SPI、LCD。
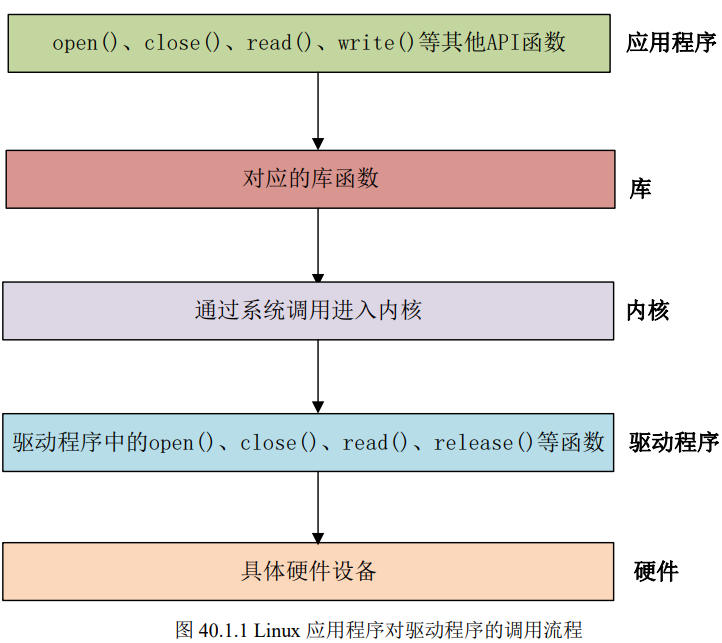
Linux系统中一切皆文件,驱动加载成功,就会在/dev目录生成文件,对文件操作,则可实现对硬件操作。应用程序运行在用户空间,驱动运行在内核空间,用户空间不能直接对内核操作,因此借助系统调用实现。

2.字符设备驱动开发
2.1 内核驱动操作函数集合
include/linux/fs.h 中 file_operations 结构体
struct file_operations {
	struct module *owner;
	loff_t (*llseek) (struct file *, loff_t, int);
	ssize_t (*read) (struct file *, char __user *, size_t, loff_t *);
	ssize_t (*write) (struct file *, const char __user *, size_t, loff_t *);
	ssize_t (*read_iter) (struct kiocb *, struct iov_iter *);
	ssize_t (*write_iter) (struct kiocb *, struct iov_iter *);
	int (*iterate) (struct file *, struct dir_context *);
	unsigned int (*poll) (struct file *, struct poll_table_struct *);
	long (*unlocked_ioctl) (struct file *, unsigned int, unsigned long);
	long (*compat_ioctl) (struct file *, unsigned int, unsigned long);
	int (*mmap) (struct file *, struct vm_area_struct *);
	int (*mremap)(struct file *, struct vm_area_struct *);
	int (*open) (struct inode *, struct file *);
	int (*flush) (struct file *, fl_owner_t id);
	int (*release) (struct inode *, struct file *);
	int (*fsync) (struct file *, loff_t, loff_t, int datasync);
	int (*aio_fsync) (struct kiocb *, int datasync);
	int (*fasync) (int, struct file *, int);
	int (*lock) (struct file *, int, struct file_lock *);
	ssize_t (*sendpage) (struct file *, struct page *, int, size_t, loff_t *, int);
	unsigned long (*get_unmapped_area)(struct file *, unsigned long, unsigned long, unsigned long, unsigned long);
	int (*check_flags)(int);
	int (*flock) (struct file *, int, struct file_lock *);
	ssize_t (*splice_write)(struct pipe_inode_info *, struct file *, loff_t *, size_t, unsigned int);
	ssize_t (*splice_read)(struct file *, loff_t *, struct pipe_inode_info *, size_t, unsigned int);
	int (*setlease)(struct file *, long, struct file_lock **, void **);
	long (*fallocate)(struct file *file, int mode, loff_t offset,
					  loff_t len);
	void (*show_fdinfo)(struct seq_file *m, struct file *f);
	#ifndef CONFIG_MMU
	unsigned (*mmap_capabilities)(struct file *);
	#endif
};
owner:该结构体的模块的指针,一般为THIS_MODULE
llseek:修改文件读写位置
read:读取设备文件
write:写入设备文件
poll:查询设备是否可以进行非阻塞读写
unlocked_ioctl:对应ioctl,控制设备
campat_ioctl: 64 位系统上, 32 位的应用程序调用将会使用此函数。在 32 位的系统上运行 32 位的应用程序调用的是 unlocked_ioctl
mmap:设备内存映射到用户空间,一般用于帧缓冲设备,这样应用程序可以直接操纵内核空间,避免数据在用户空间和内核空间来回复制
open:打开设备文件
release:关闭设备文件,对应close函数
fasync:刷新待处理数据
aio_fsync:异步刷新待处理和数据
2.2 驱动开发步骤
1)模块加载和卸载
module_init(xxx_init); ///模块加载函数
module_exit(xxx_exit); ///模块卸载函数
2)字符设备注册与注销
static inline int register_chrdev(unsigned int major, const char *name,
const struct file_operations *fops)

static inline void unregister_chrdev(unsigned int major, const char *name)
major:模块的主设备号
主设备号由32个bit组成,高12个bit为主设备号,低20个为次设备号。
设备号可以静态分配或动态分配,静态分配则代表自己去指定,可以使用cat /proc/devices查看系统中已使用的设备号,也可以通过上面函数的方式由系统动态分配,推荐是动态分配,静态指定容易造成冲突
fops:file_operations文件操作集合结构体指针
name:设备名
3)实现字符设备操作函数
static struct file_operations user_fops = {
    .owner = THIS_MODULE,
    .open = user_open,
    .release = user_close,
    .read = user_read,
    .write = user_write
};
4)LICENSE、作者信息
MODULE_LICENSE("GPL");
MODULE_AUTHOR("xuzhangxin");
2.3 实战
2.3.1 vscode工程配置
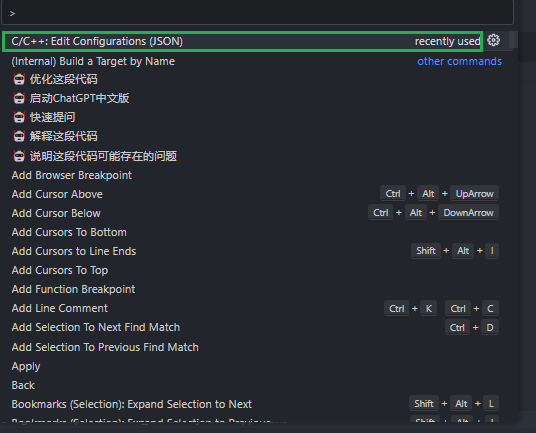
ctrl+shift+p,添加一个Cpp工程配置文件,其中设置包含头文件的目录,便于查找函数声明

会自动创建好.vscode,其中有一个c_cpp_properties.json,添加linux kernel源码的头文件路径
{
	"configurations": [
		{
			"name": "Linux",
			"includePath": [
				"${workspaceFolder}/**",
				"/home/xzx/share/project_ipc/study_linux_project/linux_bsp/linux-imx-4.1.15-2.1.0-g3dc0a4b-v2.7/include",
				"/home/xzx/share/project_ipc/study_linux_project/linux_bsp/linux-imx-4.1.15-2.1.0-g3dc0a4b-v2.7/arch/arm/include",
				"/home/xzx/share/project_ipc/study_linux_project/linux_bsp/linux-imx-4.1.15-2.1.0-g3dc0a4b-v2.7/arch/arm/include/generated/"
			],
			"defines": [],
			"compilerPath": "/usr/bin/gcc",
			"cStandard": "c11",
			"cppStandard": "gnu++14",
			"intelliSenseMode": "linux-gcc-x64"
		}
	],
	"version": 4
}
2.3.2 全部源码
2.3.2.1 驱动部分
1)驱动源码
#include <linux/types.h>
#include <linux/kernel.h>
#include <linux/delay.h>
#include <linux/ide.h>
#include <linux/init.h>
#include <linux/module.h>
#include <linux/uaccess.h>

#define USER_MAJOR 201
#define USER_NAME "user_chrdev"


char pri_buf[1024] = {0};

static int user_open(struct inode *node, struct file *file)
{
	printk("user driver open");
}

static int user_close(struct inode *node, struct file *file)
{
	printk("user driver close");
}

static ssize_t user_read (struct file *file, char __user *data, size_t cnt, loff_t *off)
{
	printk("user driver read");

	int ret = 0;
	ret = copy_to_user(data, pri_buf, cnt);
	if (ret < 0)
	{
		printk("user driver read failed:%d", ret);
		return ret;
	}

	printk("user driver read sucess, ret:%d", ret);
	return ret;
}
static ssize_t user_write(struct file *file, const char __user *data, size_t cnt, loff_t *off)
{
	printk("user driver write");

	int ret = 0;
	ret = copy_from_user(pri_buf, data, cnt);
	if (ret < 0)
	{
		printk("user driver write failed:%d", ret);
		return ret;
	}

	printk("user driver write sucess, ret:%d", ret);
	return ret;
}


static struct file_operations user_fops = {
	.owner = THIS_MODULE,
	.open = user_open,
	.release = user_close,
	.read = user_read,
	.write = user_write
	};

static int __init user_init(void)
{
	/// 注册驱动
	int ret = register_chrdev(USER_MAJOR, USER_NAME, &user_fops);
	if (ret < 0)
	{
		printk("user driver registration failed");
	}
	printk("user driver init");

	return 0;
}

static int __exit user_exit(void)
{
	/// 注销驱动
	unregister_chrdev(USER_MAJOR, USER_NAME);
	printk("user driver exit");
}


module_init(user_init);
module_exit(user_exit);

MODULE_LICENSE("GPL");
MODULE_AUTHOR("xuzhangxin");
2)驱动编译Makefile
这里要根据自己的路径等更改
KERNELDIR := /home/xzx/share/project_ipc/study_linux_project/linux_bsp/linux-imx-4.1.15-2.1.0-g3dc0a4b-v2.7
CURRENT_PATH := $(shell pwd)
    obj-m := user_chrdev.o

build: kernel_modules
kernel_modules:
    $(MAKE) -C $(KERNELDIR) M=$(CURRENT_PATH) modules
clean:
    $(MAKE) -C $(KERNELDIR) M=$(CURRENT_PATH) clean
3)加载驱动
编译生成user_chrdev_ko,随后拷贝到板子上,使用tftp、nfs等都可以。
使用insmod user_chrdev_ko加载驱动,
同时使用lsmod或者cat /proc/devices能看到驱动是否加载成功。
4)创建设备节点文件
mknod /dev/user_chrdev c 201 0
创建/dev/user_chrdev节点,c代表节点为字符设备,201为主设备号,0为次设备号
至此,驱动部分就准备完毕了,开始用应用代码去测试驱动啦!
5)卸载驱动
在不用的时候可以用rmmod卸载驱动,当然不是现在哈
2.3.2.2 应用测试部分
1)源码
#include "stdio.h"
#include "unistd.h"
#include "sys/types.h"
#include "sys/stat.h"
#include "fcntl.h"
#include "stdlib.h"
#include "string.h"


int main(int argc, char **argv)
{
    char w_buf[1024] = {0};
    char r_buf[1024] = {0};

    int fd = open("/dev/user_chrdev", O_RDWR);
    if (fd < 0)
    {
        return -1;
    }
    printf("open success\n");

    snprintf(w_buf, sizof(w_buf) / sizeof(w_buf[10]), "hello world");

    write(fd, w_buf, 10);
    read(fd, r_buf, 10);

    printf("r_buf :%s", r_buf);

    close(fd);


    return 0;
}
2)验证
gcc 编译后拷贝到板子上运行,查看有没有驱动内添加的打印即可
3. 源码地址
哈喽~我是Embedded-Xin,沪漂嵌入式开发工程师一枚,立志成为嵌入式全栈开发工程师,成为优秀博客创作者,共同学习进步。
以上代码全部放在我私人的github地址,其中有许多自己辛苦敲的例程源码,供大家参考、批评指正,有兴趣还可以直接提patch修改我的仓库~:
https://github.com/Xuzhangxin/study_linux_project.git
觉得不错的话可以点个收藏和star~
本文来自互联网用户投稿,该文观点仅代表作者本人,不代表本站立场。本站仅提供信息存储空间服务,不拥有所有权,不承担相关法律责任。 如若内容造成侵权/违法违规/事实不符,请联系我的编程经验分享网邮箱:chenni525@qq.com进行投诉反馈,一经查实,立即删除!
- Python教程
- 深入理解 MySQL 中的 HAVING 关键字和聚合函数
- Qt之QChar编码(1)
- MyBatis入门基础篇
- 用Python脚本实现FFmpeg批量转换
- 细说JavaScript事件处理(JavaScript事件处理详解)
- 【温故而知新】HTML表格table/列表ul
- 【教3妹学编程-算法题】统计出现过一次的公共字符串
- Spring5深入浅出篇:Spring与工厂设计模式简介
- 激光雷达行业梳理1-概述、市场、技术路线
- 龙迅LT6211B,HDMI1.4转LVDS,应用于AR/VR市场
- 【linux 多线程并发】多任务调度器,调度策略时间片轮转,先进先出,多种实时任务的策略,内核级最高优先级调度策略
- ShardingSphere-JDBC初探
- RocketMQ与SpringBoot实际项目中使用
- 使用宝塔面板部署后端项目到服务器