HAL——I2C
发布时间:2024年01月02日
学习目标
- 掌握I2C配置方式
- 掌握I2C读写操作
学习内容
需求
开发板中的PCF8563的RTC时钟设置和读取。
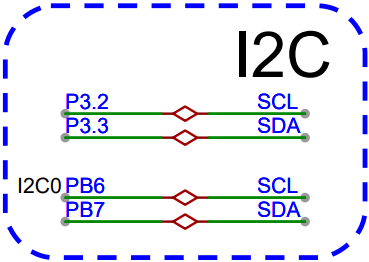

I2C功能配置
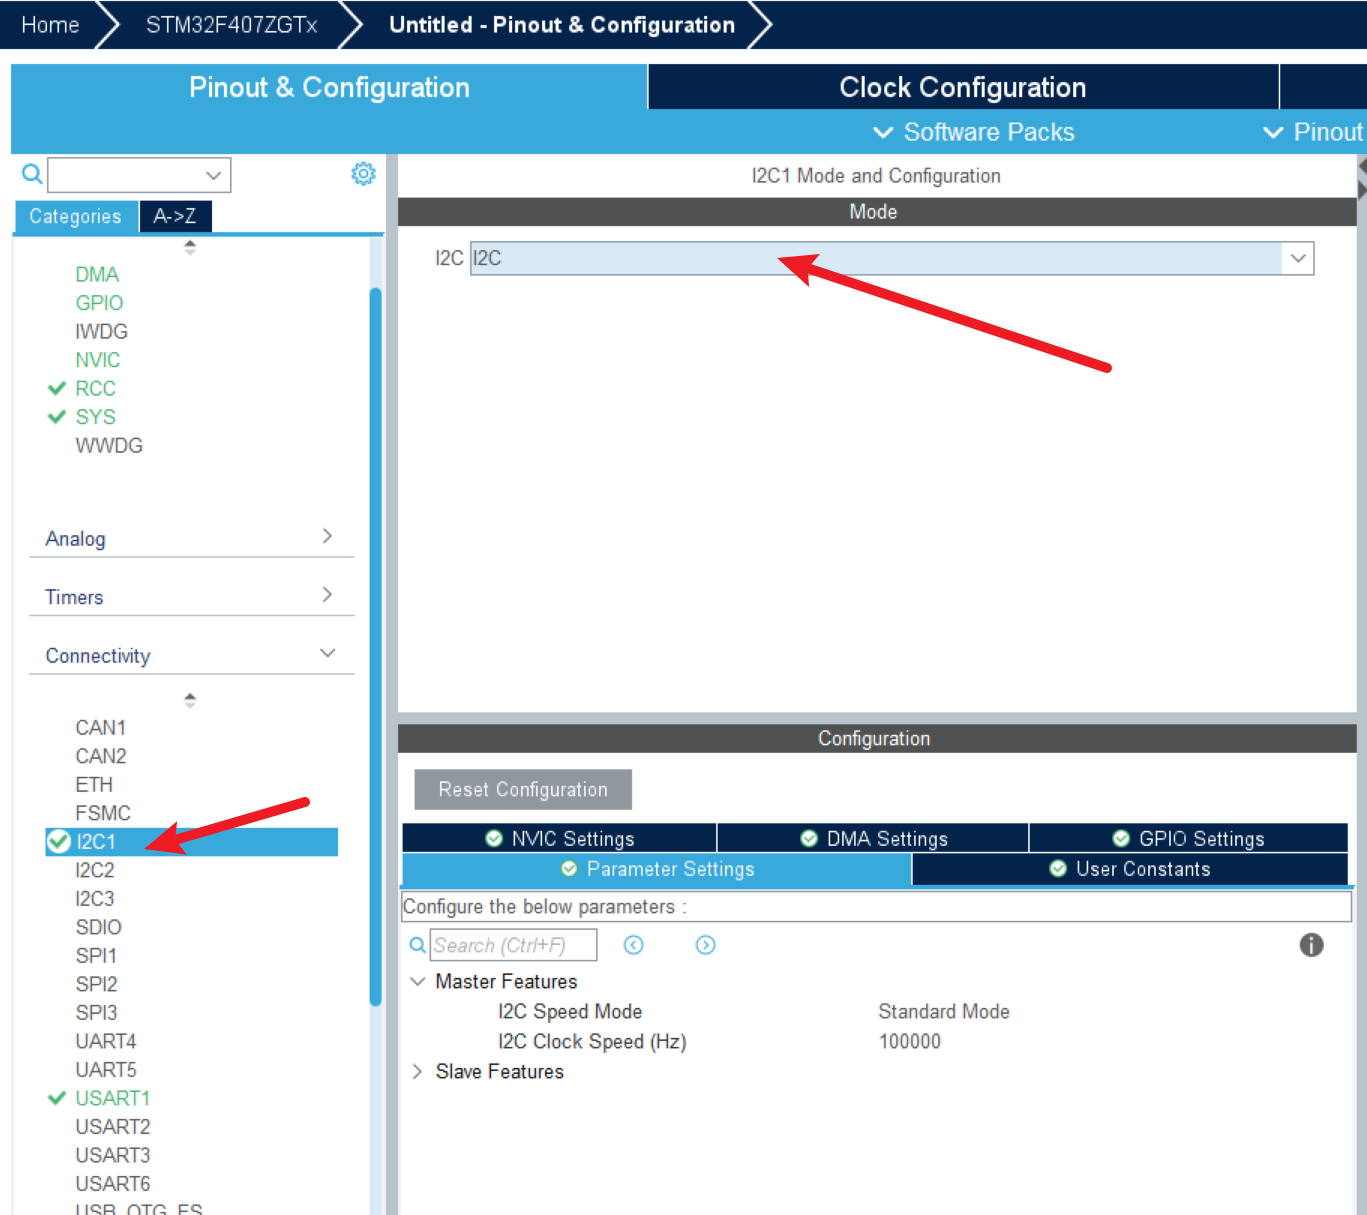
选择对应的I2C,打开。

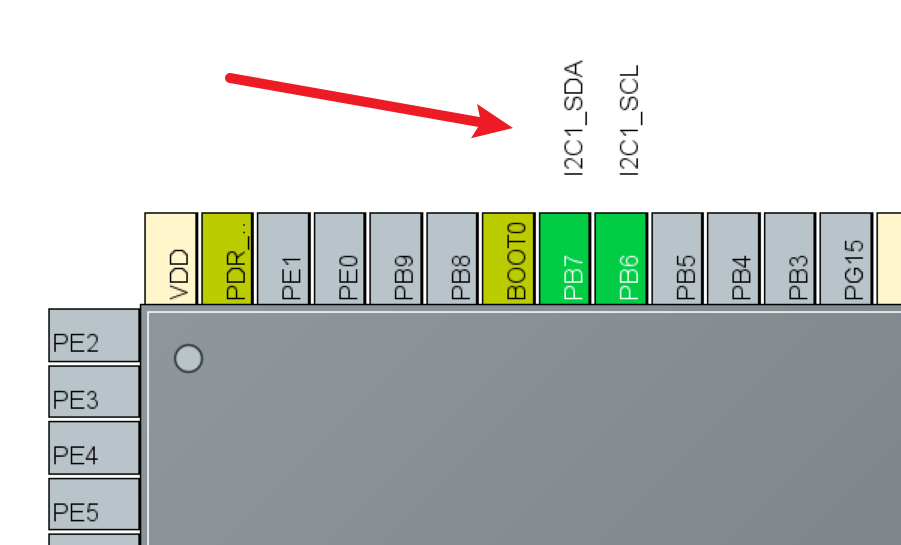
配置完成后可以查询引脚是否符合要求。
I2C编码
移植PCF8563驱动
pcf8563.h
#ifndef __PCF8563_H__
#define __PCF8563_H__

#include "stm32f4xx.h"
#include "i2c.h"

#ifndef u8
#define u8 uint8_t
#endif

#ifndef u16
#define u16 uint16_t
#endif

// 如果定义了该宏,Alarm的相关函数才会被编译并启用,被注释掉就是禁用
//#define PCF8563_ALARM_ENABLE
// 如果定义了该宏,Timer的相关函数才会被编译并启用,被注释掉就是禁用
//#define PCF8563_TIMER_ENABLE

// 设备地址
#define		PCF8563_ADDR  0x51
// 存储地址:时间的存储地址开始位置
#define		PCF8563_REG_TD   0x02

// 控制寄存器2
#define		PCF8563_REG_CS2   0x01

// I2C写操作
#define 	I2C_WRITE(a, r, p, n)		I2C1_write(a, r, p, n)
// I2C读操作
#define 	I2C_READ(a, r, p, n)		I2C1_read(a, r, p, n)


// 秒、分、时、星期、日、月、年、世纪
// year = 2023, month = 2, day = 28, week = 4;
// hour = 23, minute = 59, second = 52;
typedef struct {

    u16 year;
    u8 month;
    u8 day;
    u8 week;
    u8 hour;
    u8 minute;
    u8 second;

} Clock_t;

// 警报、闹铃Alarm结构体
typedef struct {
    u8 minute;
    u8 hour;
    u8 day;
    u8 weekday;
} Alarm_t;

typedef enum {

	HZ4096 = 0,
	HZ64	 = 1,
	HZ1	 	 = 2,
	HZ1_60 = 3,
}TimerFreq;


void PCF8563_init();

void PCF8563_set_clock(Clock_t c);

void PCF8563_get_clock(Clock_t *c);

void PCF8563_set_alarm(Alarm_t alarm);
void PCF8563_enable_alarm();
void PCF8563_disable_alarm();
void PCF8563_alarm_clear_flag();

void PCF8563_set_timer(TimerFreq freq ,u8 countdown);
void PCF8563_enable_timer();
void PCF8563_disable_timer();
void PCF8563_timer_clear_flag();

#ifdef PCF8563_ALARM_ENABLE
extern void PCF8563_on_alarm();
#endif

#ifdef PCF8563_TIMER_ENABLE
extern void PCF8563_on_timer();
#endif

#endif
pcf8563.c
#include "PCF8563.h"
#include <stdio.h>

#define NUMBER_TD	7

void PCF8563_init() {

}

void PCF8563_set_clock(Clock_t c) {

    u8 p[NUMBER_TD];				// 用于存储时间字节数组
    u8 Cent; // 世纪:0代表本世纪20, 1代表下个世纪,年99->00时交替

    // 将数值转成一个字节表达 (BCD)

    // 秒:VL 1 1 1 - 0 0 0 0
    p[0] = ((c.second / 10) << 4) + (c.second % 10);

    // 分: X 1 1 1 - 0 0 0 0
    p[1] = ((c.minute / 10) << 4) + (c.minute % 10);

    // 时: X X 1 1 - 0 0 0 0
    p[2] = ((c.hour / 10) << 4) + (c.hour % 10);

    // 天: X X 1 1 - 0 0 0 0
    p[3] = ((c.day / 10) << 4) + (c.day % 10);

    // 周: X X X X - X 0 0 0
    p[4] = c.week;

    // 世纪 20xx , 21xx
    Cent = (c.year >= 2100 ? 1 : 0);
    // 月: C X X 1 - 0 0 0 0
    p[5] = (Cent << 7) + ((c.month / 10) << 4) + (c.month % 10);

    // 年: 1 1 1 1 - 0 0 0 0   2023, 2036
    p[6] = ((c.year % 100 / 10) << 4) + (c.year % 10);

    // 设置数据Write
    I2C_WRITE(PCF8563_ADDR, PCF8563_REG_TD, p, NUMBER_TD);
}

void PCF8563_get_clock(Clock_t *c) {

    u8 Cent; // 世纪:0代表本世纪20, 1代表下个世纪,年99->00时交替
    u8 p[NUMBER_TD];				// 用于存储时间字节数组
    // 循环读取Read: 秒、分、时、星期、日、月、年、世纪
    I2C_READ(PCF8563_ADDR, PCF8563_REG_TD, p, NUMBER_TD);

//			for(i = 0; i < NUMBER; i++){
//				printf("%d-> %d \n", (int)i, (int)p[i]);
//			}
//			printf("----------------\n");
    // 秒:VL 1 1 1 - 0 0 0 0 转成十进制
    c->second = ((p[0] >> 4) & 0x07) * 10 + (p[0] & 0x0F);

    // 分: X 1 1 1 - 0 0 0 0 转成十进制
    c->minute = ((p[1] >> 4) & 0x07) * 10 + (p[1] & 0x0F);

    // 时: X X 1 1 - 0 0 0 0 转成十进制
    c->hour	 = ((p[2] >> 4) & 0x03) * 10 + (p[2] & 0x0F);

    // 天: X X 1 1 - 0 0 0 0 转成十进制
    c->day 	 = ((p[3] >> 4) & 0x03) * 10 + (p[3] & 0x0F);

    // 周: X X X X - X 0 0 0 转成十进制
    c->week 	 = p[4] & 0x07;

    // 世纪
    // 月: C X X 1 - 0 0 0 0
    c->month	 = ((p[5] >> 4) & 0x01) * 10 + (p[5] & 0x0F);
    Cent 		 = p[5] >> 7;		// 0->20xx年 1->21xx年

    // 年: 1 1 1 1 - 0 0 0 0   1969, 2023
    c->year   = ((p[6] >> 4) & 0x0F) * 10 + (p[6] & 0x0F);
    c->year	+= Cent == 0 ? 2000 : 2100;
}


void PCF8563_set_alarm(Alarm_t alarm){
		// 想将某个类型关闭掉,传一个负数
		// 或者多传1个字段,低4位,根据01决定是否启动对应类型 0000 0011

    u8 a[4];
//		a = 0;	// 分钟
//		I2C_WRITE(PCF8563_ADDR, 0x09, &a, 1);
//
//		a = 0;	// 小时
//		I2C_WRITE(PCF8563_ADDR, 0x0A, &a, 1);

    // 分 M	1 1 1 - 0 0 0 0			enable->0, diabled->0x80
    a[0] = ((alarm.minute / 10) << 4) + (alarm.minute % 10) + 0;

    // 时 H	x 1 1 - 0 0 0 0			enable->0, diabled->0x80
    a[1] = ((alarm.hour / 10) << 4) + (alarm.hour % 10) + 0;

    // 天 D	x 1 1 - 0 0 0 0			enable->0, diabled->0x80
    a[2] = ((alarm.day / 10) << 4) + (alarm.day % 10) + 0;

    // 周 W x x x - x 0 0 0			enable->0, diabled->0x80
    a[3] = alarm.weekday + 0;

    I2C_WRITE(PCF8563_ADDR, 0x09, a, 4);
}

void PCF8563_enable_alarm(){
    u8 cs2 = 0; // 控制状态寄存器2
		// 配置 cs2 寄存器以启用Alarm -------------------------------------------------
    I2C_READ(PCF8563_ADDR, 0x01, &cs2, 1);
		// printf("cs2: %d \n", (int)cs2);
    // 清除Alarm标记,AF设置为0,下一次闹钟到点时,才能触发
    cs2 &= ~0x08;
    // 开启Alarm中断, AIE为1,启用Alarm闹钟
    cs2 |= 0x02;
    I2C_WRITE(PCF8563_ADDR, 0x01, &cs2, 1);
}
void PCF8563_disable_alarm(){
    u8 cs2 = 0; // 控制状态寄存器2
		// 配置 cs2 寄存器以启用Alarm -------------------------------------------------
    I2C_READ(PCF8563_ADDR, 0x01, &cs2, 1);
		// printf("cs2: %d \n", (int)cs2);
    // 清除Alarm标记,AF设置为0,下一次闹钟到点时,才能触发
    cs2 &= ~0x08;
    // 开启Alarm中断, AIE为0,禁用Alarm闹钟
    cs2 &= ~0x02;
    I2C_WRITE(PCF8563_ADDR, 0x01, &cs2, 1);
}
void PCF8563_alarm_clear_flag(){

    u8 cs2 = 0; // 控制状态寄存器2
    // 01H寄存器中AF位,会在Alarm触发时,被置为1.
    // 必须手动置为0,下一个Alarm才能触发。

    // 配置 cs2 寄存器
    I2C_READ(PCF8563_ADDR, 0x01, &cs2, 1);
//		printf("cs2: %d \n", (int)cs2);
    // 清除Alarm标记,AF设置为0,下一次闹钟到点时,才能触发
    cs2 &= ~0x08;
    I2C_WRITE(PCF8563_ADDR, 0x01, &cs2, 1);
}

void PCF8563_set_timer(TimerFreq freq ,u8 countdown){
		u8 p = 0;
		// 设置Timer运行频率、启用timer source clock
		p = 0x80 + freq; // 64Hz
		I2C_WRITE(PCF8563_ADDR, 0x0E, &p, 1);

		// 设置Timer计数值(每个周期)
		p = countdown;
		I2C_WRITE(PCF8563_ADDR, 0x0F, &p, 1);

}

void PCF8563_enable_timer(){
    u8 cs2 = 0; // 控制状态寄存器2
		// 通过cs2启用Timer
		I2C_READ(PCF8563_ADDR, 0x01, &cs2, 1);
		// 开启Timer中断:	 TIE
		cs2 |=  0x01;
		// 清除Timer flag; TF
		cs2 &= ~0x04;
		I2C_WRITE(PCF8563_ADDR, 0x01, &cs2, 1);
}

void PCF8563_disable_timer(){
    u8 cs2 = 0; // 控制状态寄存器2
		// 通过cs2启用Timer
		I2C_READ(PCF8563_ADDR, 0x01, &cs2, 1);
		// 开启Timer中断:	 TIE
		cs2 &= ~0x01;
		// 清除Timer flag; TF
		cs2 &= ~0x04;
		I2C_WRITE(PCF8563_ADDR, 0x01, &cs2, 1);
}

void PCF8563_timer_clear_flag(){
    u8 cs2 = 0; // 控制状态寄存器2
		// 通过cs2启用Timer
		I2C_READ(PCF8563_ADDR, 0x01, &cs2, 1);
		// 清除Timer flag; TF
		cs2 &= ~0x04;
		I2C_WRITE(PCF8563_ADDR, 0x01, &cs2, 1);
}


// 当中断触发时,此函数会执行(Alarm、Timer)
void ext_int3_call() {
		u8 cs2;
		I2C_READ(PCF8563_ADDR, PCF8563_REG_CS2, &cs2, 1);
//		printf("cs2: %d \n", (int) cs2);


#ifdef PCF8563_TIMER_ENABLE
		// Alarm Flag && AIE
		if((cs2 & 0x08) && (cs2 & 0x02)){
				// 清除Alarm标记,避免下次无法触发
				PCF8563_alarm_clear_flag();
				// 事件触发
				PCF8563_on_alarm();
		}
#endif

#ifdef PCF8563_TIMER_ENABLE
		// Timer Flag && TIE
		if((cs2 & 0x04) && (cs2 & 0x01)){
				// 清除Timer标记,避免下次无法触发
				PCF8563_timer_clear_flag();
				// 事件触发
				PCF8563_on_timer();
		}
#endif
}
只需要实现 i2c_write和i2c_read,驱动就可以正常运行。
main函数
/* USER CODE BEGIN WHILE */
// pcf8563初始化
PCF8563_init();

Clock_t c;
c.year = 2023;
c.month = 3;
c.day = 10;
c.week = 2;
c.hour = 23;
c.minute = 59;
c.second = 55;
PCF8563_set_clock(c);

while (1)
{
    PCF8563_get_clock(&c);
    printf("%d-%d-%d %d %d:%d:%d\r\n", c.year, c.month, c.day, c.week, c.hour, c.minute,c.second);
    HAL_Delay(1000);
    /* USER CODE END WHILE */

    /* USER CODE BEGIN 3 */
}
/* USER CODE END 3 */
I2C读写实现
添加头定义
i2c.h中添加头定义
/* USER CODE BEGIN Prototypes */
void I2C1_write(uint8_t addr, uint8_t reg, uint8_t* data, uint32_t len);
void I2C1_read(uint8_t addr, uint8_t reg, uint8_t* data, uint32_t len);

/* USER CODE END Prototypes */
添加c实现
/* USER CODE BEGIN 1 */
#include "string.h"
void I2C1_write(uint8_t addr, uint8_t reg, uint8_t* data, uint32_t len) {
uint8_t write_addr = addr << 1;
// uint8_t buff[len + 1];
// buff[0] = reg;
// memcpy(&buff[1], data, len);
// HAL_I2C_Master_Transmit(&hi2c1, addr << 1, buff, len + 1, HAL_MAX_DELAY);
return HAL_I2C_Mem_Write(&hi2c1, write_addr, reg, I2C_MEMADD_SIZE_8BIT, data, len, HAL_MAX_DELAY);
}
void I2C1_read(uint8_t addr, uint8_t reg, uint8_t* data, uint32_t len) {
uint8_t write_addr = addr << 1;
uint8_t read_addr = (addr << 1) | 1; // 0xA3
// HAL_I2C_Master_Transmit(&hi2c1, addr << 1, ®, 1, HAL_MAX_DELAY);
// HAL_I2C_Master_Receive(&hi2c1, (addr << 1) | 0x01, data, len, HAL_MAX_DELAY);
return HAL_I2C_Mem_Read(&hi2c1, read_addr, reg, I2C_MEMADD_SIZE_8BIT, data, len, HAL_MAX_DELAY);
}
/* USER CODE END 1 */
- HAL库的设备地址,要的是具体的读写地址。
- HAL库中的写操作中的数据,包含了寄存器地址。
- HAL库中读操作,需要先写再读。
练习题
- 使用HAL库读写PCF8563芯片
文章来源:https://blog.csdn.net/bug_love/article/details/135350480
本文来自互联网用户投稿,该文观点仅代表作者本人,不代表本站立场。本站仅提供信息存储空间服务,不拥有所有权,不承担相关法律责任。 如若内容造成侵权/违法违规/事实不符,请联系我的编程经验分享网邮箱:chenni525@qq.com进行投诉反馈,一经查实,立即删除!
本文来自互联网用户投稿,该文观点仅代表作者本人,不代表本站立场。本站仅提供信息存储空间服务,不拥有所有权,不承担相关法律责任。 如若内容造成侵权/违法违规/事实不符,请联系我的编程经验分享网邮箱:chenni525@qq.com进行投诉反馈,一经查实,立即删除!