ubuntu 18.04网络问题
发布时间:2024年01月10日
准备工作
安装好系统之后,检查gcc和make是否已经安装
$ which gcc
/usr/bin/gcc
$ which make
/usr/bin/make
如果未安装,则安装gcc和make
$ apt install gcc
$ apt install make
安装openssh-server
$ apt install openssh-server
安装网络工具和防火墙
$ apt install net-tools
$ apt install ufw
开通端口
$ ufw allow 22
一、有线网卡不可用
准备设置静态IP时,发现没有有线网卡,无法正常插网线进行联网。
执行ipconfig 查看网卡配置是否有ethxx或者enxx,也没有,则说明有线网卡的驱动需要更新。
前往Intel官网下载驱动 , 选择3.8.4版本下载, 然后将下载的软件e1000e-3.8.4.tar.gz通过U盘拷贝到服务器。
解压e1000e-3.8.4.tar.gz安装包文件
$ tar -zxvf e1000e-3.8.4.tar.gz
或者
$ gunzip e1000e-3.8.4.tar.gz
$ tar xvf e1000e-3.8.4.ta
编译有线网卡驱动
$ cd e1000e-3.8.4/src
$ sudo make
*** disabled for this build.
make[1]: Entering directory '/usr/src/linux-headers-4.15.0-142-generic'
  Building modules, stage 2.
  MODPOST 1 modules
make[1]: Leaving directory '/usr/src/linux-headers-4.15.0-142-generic'
安装有线网卡驱动
$ sudo make install
*** The target kernel has CONFIG_MODULE_SIG_ALL enabled, but
*** the signing key cannot be found. Module signing has been
make[1]: Leaving directory '/usr/src/linux-headers-4.15.0-142-generic'
Running depmod...
启用有线网卡启动,如果没有报错,正常情况下可以看到有线网卡已经正常可用了。
$ sudo modprobe e1000e
如果遇到modprobe: ERROR: could not insert ‘e1000e’: Required key not available,这是因为从内核4.4.0-20 开始启用EFI_SECURE_BOOT_SIG_ENFORCE编译选项,如果启用UEFI Secure Boot,将禁止加载未签名的第三方驱动。
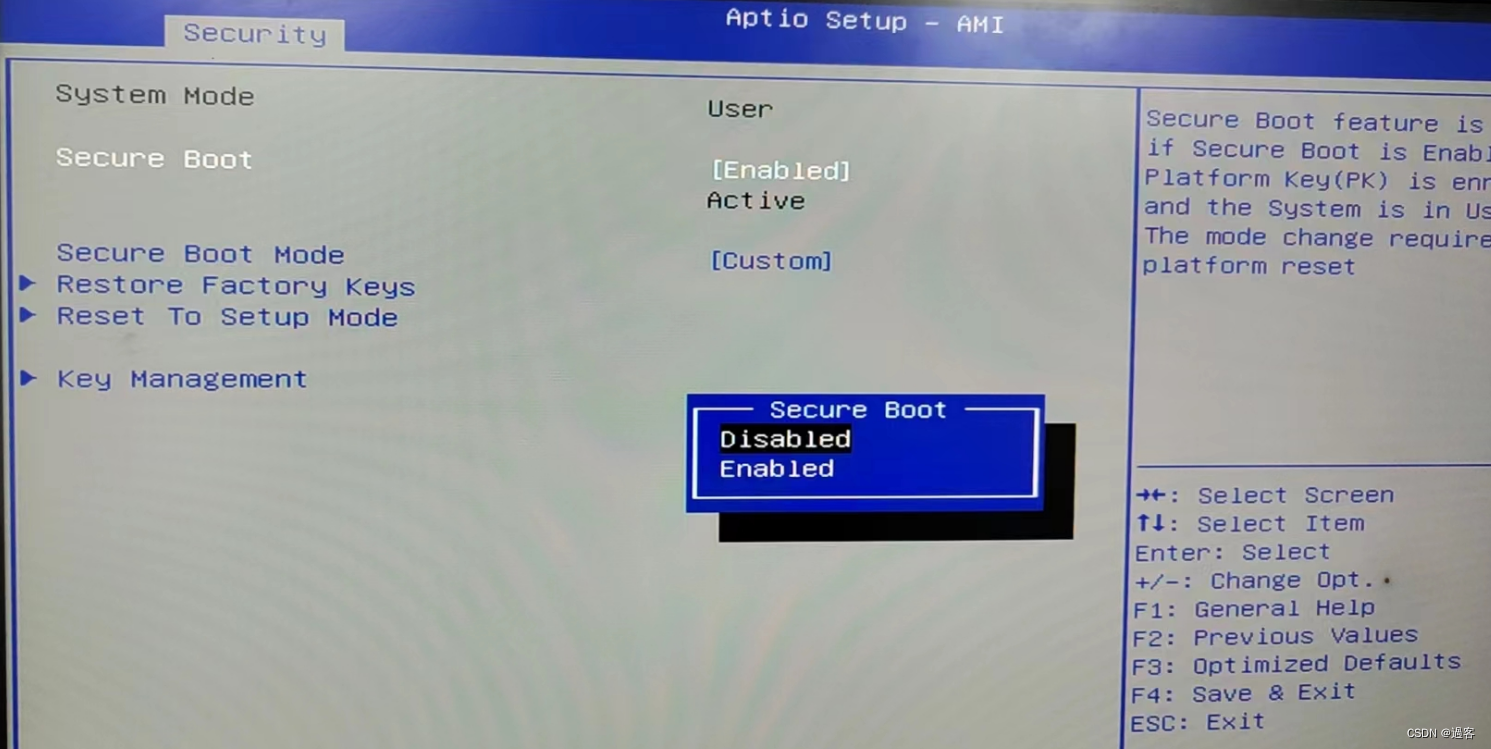
重启电脑,按ESC进Blos-->secuity-->secure boot-->enabled,重新进入系统,以太网正常连接。
二、无法访问外网
服务器上部署了docker镜像后,调用接口提示无法访问外网,去服务器上查看,确实无法ping通百度。
$ ping www.baidu.com
ping: www.baidu.com: 未知的名称或服务
修改并应用网口信息,并重启网络
$ vim  /etc/network/interfaces
$ cat  /etc/network/interfaces
# interfaces(5) file used by ifup(8) and ifdown(8)
auto lo
iface lo inet loopback

auto eno1
iface eno1 inet static
address 192.168.248.142
gateway 192.168.248.254
netmask 255.255.255.0
dns-nameserver 192.168.42.161
dns-nameserver 8.8.8.8

$ netplan apply
$ systemctl restart networking
再次ping百度还是不同
$ ping www.baidu.com
ping: www.baidu.com: 未知的名称或服务
查看域名解析配置文件,发现里面的nameserver和我们的dns配置不一致。
$ cat /etc/resolv.conf
# This file is managed by man:systemd-resolved(8). Do not edit.
#
# This is a dynamic resolv.conf file for connecting local clients to the
# internal DNS stub resolver of systemd-resolved. This file lists all
# configured search domains.
#
# Run "systemd-resolve --status" to see details about the uplink DNS servers
# currently in use.
#
# Third party programs must not access this file directly, but only through the
# symlink at /etc/resolv.conf. To manage man:resolv.conf(5) in a different way,
# replace this symlink by a static file or a different symlink.
#
# See man:systemd-resolved.service(8) for details about the supported modes of
# operation for /etc/resolv.conf.
nameserver 127.0.0.53
options edns0
修改域名解析配置文件如下,保存并退出
$ vim /etc/resolv.conf
nameserver 192.168.42.161
options eno1
再次ping百度,成功。
$ ping www.baidu.com
PING www.a.shifen.com (183.2.172.42) 56(84) bytes of data.
64 bytes from 183.2.172.42 (183.2.172.42): icmp_seq=1 ttl=51 time=7.02 ms
64 bytes from 183.2.172.42 (183.2.172.42): icmp_seq=2 ttl=51 time=7.06 ms
^C
--- www.a.shifen.com ping statistics ---
9 packets transmitted, 9 received, 0% packet loss, time 9079ms
rtt min/avg/max/mdev = 6.393/7.012/8.473/0.798 ms
如果你的docker镜像启动的时候network_mode选择的是host,则还需要重启一次容器,否则程序还是不能访问到外网。
文章来源:https://blog.csdn.net/panyongjie2577/article/details/135509487
本文来自互联网用户投稿,该文观点仅代表作者本人,不代表本站立场。本站仅提供信息存储空间服务,不拥有所有权,不承担相关法律责任。 如若内容造成侵权/违法违规/事实不符,请联系我的编程经验分享网邮箱:chenni525@qq.com进行投诉反馈,一经查实,立即删除!
本文来自互联网用户投稿,该文观点仅代表作者本人,不代表本站立场。本站仅提供信息存储空间服务,不拥有所有权,不承担相关法律责任。 如若内容造成侵权/违法违规/事实不符,请联系我的编程经验分享网邮箱:chenni525@qq.com进行投诉反馈,一经查实,立即删除!
最新文章
- Python教程
- 深入理解 MySQL 中的 HAVING 关键字和聚合函数
- Qt之QChar编码(1)
- MyBatis入门基础篇
- 用Python脚本实现FFmpeg批量转换
- C++11 异常
- [云原生] Go 定时器
- 计算机体系结构动态调度(计分板及Tomasulo)学习记录
- 计算机毕业设计 SpringBoot的中小型制造企业质量管理系统 Javaweb项目 Java实战项目 前后端分离 文档报告 代码讲解 安装调试
- 关于时区处理策略
- 智慧校园统一身份认证平台建设
- Vue入门四(组件介绍与定义|组件之间的通信)
- c# _表示未使用的变量引用
- 认识OCR,从文字检测到文字识别,从任务定义到下游任务,从形态学方法到深度学习
- 如何进行USB丢弃攻击?