Pytest 测试框架与Allure 测试报告——Allure2测试报告-L1
发布时间:2024年01月20日
目录:
- allure2安装
- Allure2介绍
- Allure2报告展示
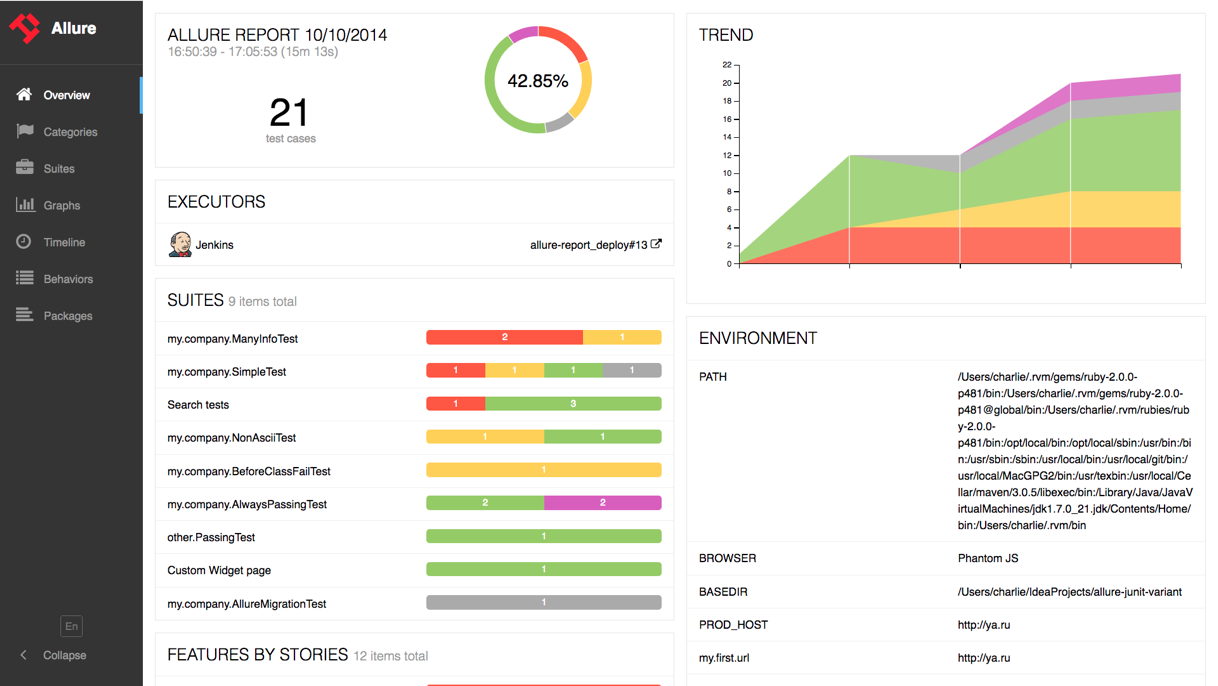
- Allure2报告展示-首页概览
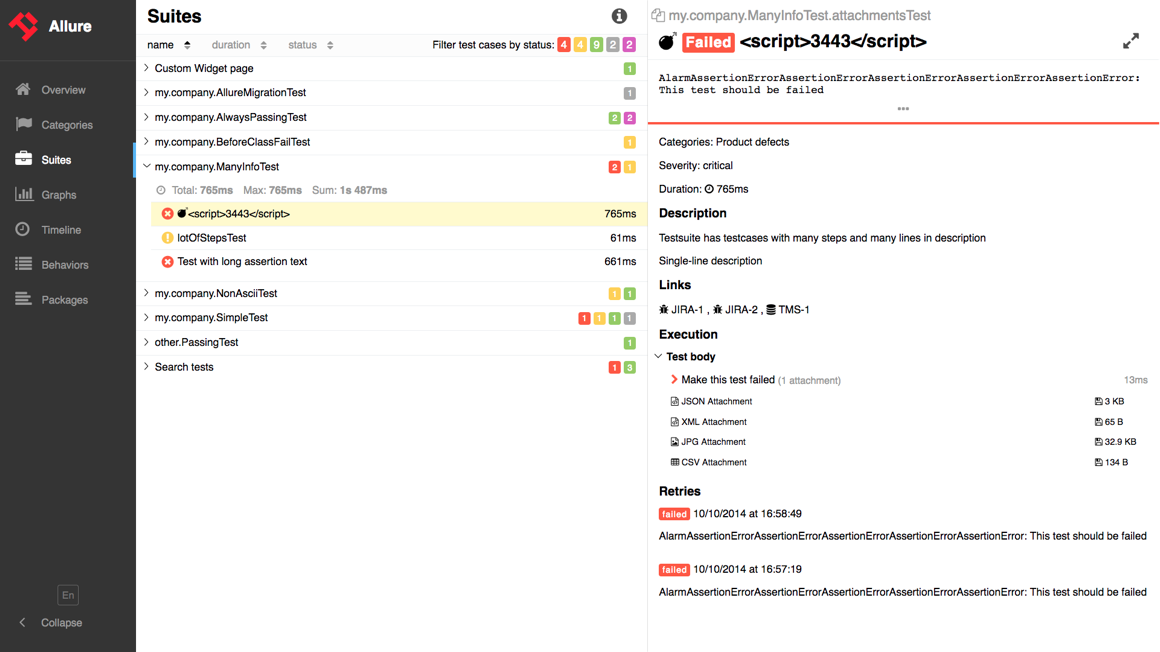
- Allure2报告展示-用例详情页
- Allure2安装
- Allure2下载与安装
- Allure环境验证
- 插件安装-Python
- 插件安装-Java
- 验证插件安装-Java
- allure2运行方式
- 生成测试报告流程
- 使用Allure2运行方式-Python
- 使用Allure2运行方式-Java
- 问题
- 代码示例:
1.allure2安装
Allure2 介绍
- Allure 是由 Java 语?开发的?个轻量级,灵活的测试报告?具。
- Allure 多平台的 Report 框架。
- Allure ?持多语?,包括 python、JaveScript、PHP、Ruby 等。
- 可以为开发/测试/管理等人员提供详尽的的测试报告,包括测试类别、测试步骤、日志、图片、视频等。
- 可以为管理层提供高水准的统计报告。
- 可以集成到 Jenkins 生成在线的趋势汇总报告。
Allure2 报告展示
github 地址:https://github.com/allure-framework/allure2
Allure2 报告展示 - 首页概览
Allure2 报告展示 - 用例详情页?
Allure2 安装
- 安装 Java,需要配置环境变量。
- 安装 Allure ,需要配置环境变量。
- 安装插件
- Python:
pip install allure-pytest。 - Java:Maven插件安装。
- Python:
Allure2 下载与安装
Allure 环境验证
- 执行命令验证环境
# 环境验证
allure --version
插件安装-Python
- 安装 Python 插件?
allure-pytest- 执行命令:
pip install allure
- 执行命令:
# linux/mac
> pip list |grep allure
allure-pytest         x.xx.x

# windows
> pip list |findstr allure
allure-pytest         x.xx.x
?插件安装-Java
<groupId>指定了插件的groupId。<artifactId>指定了插件的artifactId。<version>指定了插件的版本号。
    <properties>
        <maven.compiler.encoding>UTF-8</maven.compiler.encoding>
        <maven.compiler.version>3.10.1</maven.compiler.version>
        <maven-surefire-plugin.version>3.0.0-M9</maven-surefire-plugin.version>
        <!-- 使用 Java 17 语言特性 ( -source 11 )  -->
        <java.version>17</java.version>
        <!-- 对应junit Jupiter的版本号;放在这里就不需要在每个依赖里面写版本号,导致对应版本号会冲突 -->
        <junit.jupiter.version>5.9.2</junit.jupiter.version>
        <!-- log日志 -->
        <slf4j.version>2.0.6</slf4j.version>
        <logback.version>1.4.5</logback.version>
        <!-- yaml对应解析 -->
        <jackson.version>2.14.2</jackson.version>
        <!-- hamcrest断言 -->
        <hamcrest.version>2.2</hamcrest.version>
        <!-- allure报告 -->
        <allure.version>2.21.0</allure.version>
        <allure.maven.version>2.12.0</allure.maven.version>
        <aspectj.version>1.9.19</aspectj.version>
        <allure.cmd.download.url>
            https://repo.maven.apache.org/maven2/io/qameta/allure/allure-commandline
        </allure.cmd.download.url>
    </properties>
    <!--    物料清单 (BOM)-->
    <dependencyManagement>
        <dependencies>
            <!--当使用 Gradle 或 Maven 引用多个 JUnit 工件时,此物料清单 POM 可用于简化依赖项管理。不再需要在添加依赖时设置版本-->
            <dependency>
                <groupId>org.junit</groupId>
                <artifactId>junit-bom</artifactId>
                <version>${junit.jupiter.version}</version>
                <type>pom</type>
                <scope>import</scope>
            </dependency>
        </dependencies>
    </dependencyManagement>
    <dependencies>
        <!-- junit5 -->
        <!-- 创建 Junit5 测试用例的 API-->
        <dependency>
            <groupId>org.junit.jupiter</groupId>
            <artifactId>junit-jupiter</artifactId>
            <!--对应添加的依赖的作用范围-->
            <scope>test</scope>
        </dependency>
        <!-- 兼容 JUnit4 版本的测试用例-->
        <dependency>
            <groupId>org.junit.vintage</groupId>
            <artifactId>junit-vintage-engine</artifactId>
            <scope>test</scope>
        </dependency>
        <!--suite套件依赖 -->
        <dependency>
            <groupId>org.junit.platform</groupId>
            <artifactId>junit-platform-suite</artifactId>
            <scope>test</scope>
        </dependency>

        <!-- log日志 -->
        <dependency>
            <groupId>org.slf4j</groupId>
            <artifactId>slf4j-api</artifactId>
            <version>${slf4j.version}</version>
            <scope>compile</scope>
        </dependency>
        <dependency>
            <groupId>ch.qos.logback</groupId>
            <artifactId>logback-classic</artifactId>
            <version>${logback.version}</version>
            <scope>compile</scope>
        </dependency>

        <!--        allure报告-->
        <dependency>
            <groupId>io.qameta.allure</groupId>
            <artifactId>allure-junit5</artifactId>
            <version>${allure.version}</version>
        </dependency>

        <!-- https://mvnrepository.com/artifact/org.aspectj/aspectjweaver -->
        <dependency>
            <groupId>org.aspectj</groupId>
            <artifactId>aspectjweaver</artifactId>
            <version>${aspectj.version}</version>
        </dependency>

        <!--        yaml文件解析-->
        <dependency>
            <groupId>com.fasterxml.jackson.core</groupId>
            <artifactId>jackson-databind</artifactId>
            <version>${jackson.version}</version>
        </dependency>
        <dependency>
            <groupId>com.fasterxml.jackson.dataformat</groupId>
            <artifactId>jackson-dataformat-yaml</artifactId>
            <version>${jackson.version}</version>
        </dependency>

    </dependencies>

    <build>
        <plugins>
            <plugin>
                <groupId>org.apache.maven.plugins</groupId>
                <artifactId>maven-compiler-plugin</artifactId>
                <version>${maven.compiler.version}</version>
                <configuration>
                    <source>${java.version}</source>
                    <target>${java.version}</target>
                    <!-- 设置编码为 UTF-8 -->
                    <encoding>${maven.compiler.encoding}</encoding>
                </configuration>
            </plugin>

            <plugin>
                <groupId>org.apache.maven.plugins</groupId>
                <artifactId>maven-surefire-plugin</artifactId>
                <version>${maven-surefire-plugin.version}</version>
                <configuration>
                     <argLine>
                       -javaagent:"${settings.localRepository}/org/aspectj/aspectjweaver/${aspectj.version}/aspectjweaver-${aspectj.version}.jar"
                     </argLine>
                    <includes>
                        <!--  <include>**/*Test</include>-->
                        <!--  <include>**/Test*</include>-->
                    </includes>
                    <systemProperties>
                        <property>
                            <name>allure.results.directory</name>
                            <value>${project.build.directory}/allure-results</value>
                        </property>
                    </systemProperties>
                </configuration>
                <dependencies>
                    <dependency>
                        <groupId>org.junit.jupiter</groupId>
                        <artifactId>junit-jupiter-engine</artifactId>
                        <version>${junit.jupiter.version}</version>
                    </dependency>
                    <dependency>
                        <groupId>org.junit.vintage</groupId>
                        <artifactId>junit-vintage-engine</artifactId>
                        <version>${junit.jupiter.version}</version>
                    </dependency>
                </dependencies>
            </plugin>
            <plugin>
                <groupId>io.qameta.allure</groupId>
                <artifactId>allure-maven</artifactId>
                <version>${allure.maven.version}</version>
                <configuration>
                    <reportVersion>${allure.version}</reportVersion>
                    <allureDownloadUrl>${allure.cmd.download.url}/${allure.version}/allure-commandline-${allure.version}.zip</allureDownloadUrl>
                </configuration>
            </plugin>
        </plugins>
    </build>
</project>
验证插件安装-Java
mvn clean test
mvn allure:report

# allure报告打开网站
mvn allure:serve
2.allure2运行方式
生成测试报告流程

使用 Allure2 运行方式-Python?
- 使用?
--alluredir?参数生成测试报告。
# 在测试执行期间收集结果
pytest [测试用例/模块/包] --alluredir=./result/  (—alluredir这个选项 用于指定存储测试结果的路径)

# 生成在线的测试报告
allure serve ./result
使用 Allure2 运行方式-Java
- 使用?
allure:report?参数生成测试报告。
# 在测试执行期间收集结果
# mvn命令行使用 maven插件安装
mvn clean test allure:report

# 生成在线的测试报告
# mvn 直接找target/allure-results目录
mvn allure:serve
问题
-
运行mvn命令对应没有在target下面生成allure-results目录,怎么解决?
-
解决方案:
- 在src/test/resources路径下配置allure配置文件
allure.properties,指名allure报告生成路径。
allure.results.directory=target/allure-resultsa - 在src/test/resources路径下配置allure配置文件
- ?运行mvn命令一直卡在下载中,如下图:
 ?
?
- 解决方案:
- 在项目下创建
.allure文件夹。 - 下载allure解压到.allure文件夹下。
- 在项目下创建
 ?
?
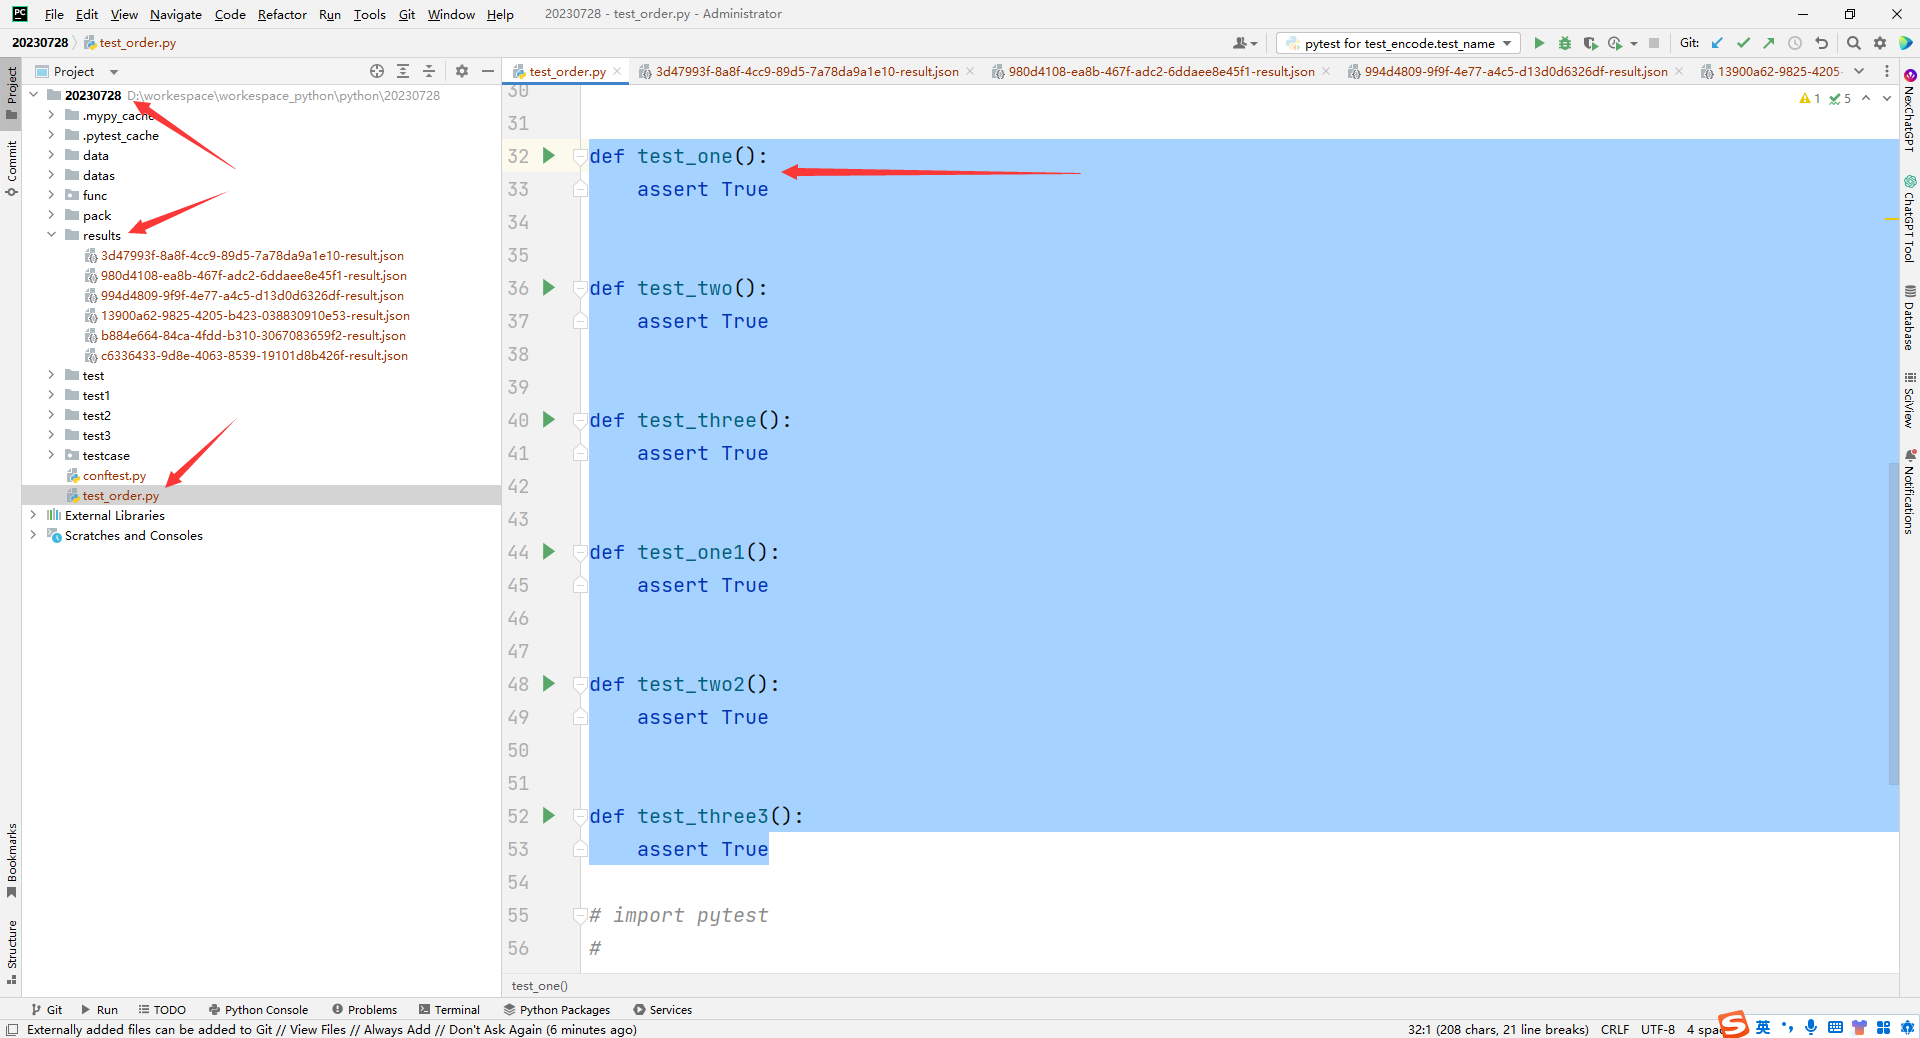
代码示例:
test_order.py
def test_one():
    assert True


def test_two():
    assert True


def test_three():
    assert True


def test_one1():
    assert True


def test_two2():
    assert True


def test_three3():
    assert True
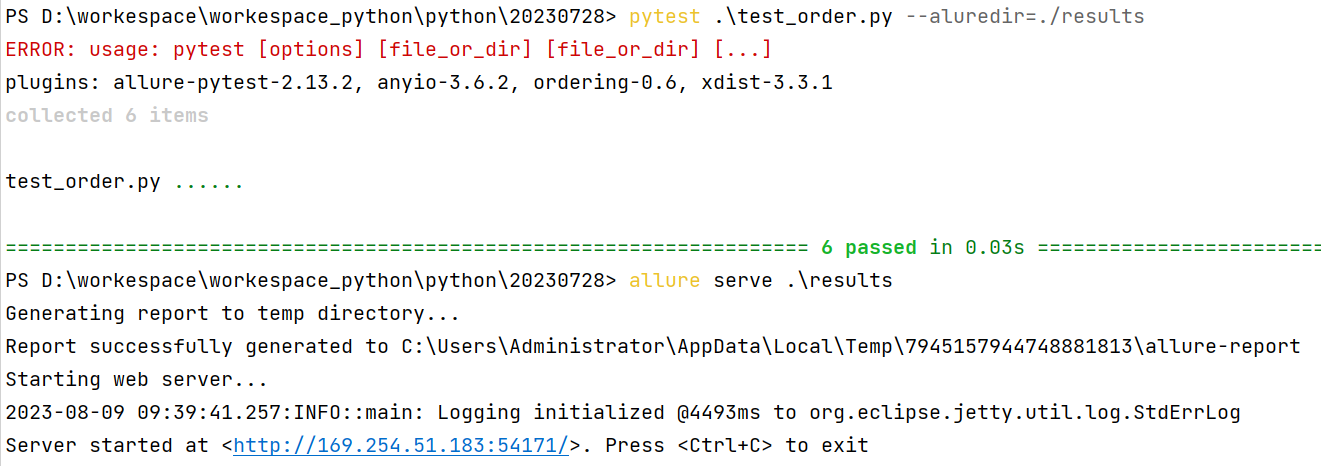
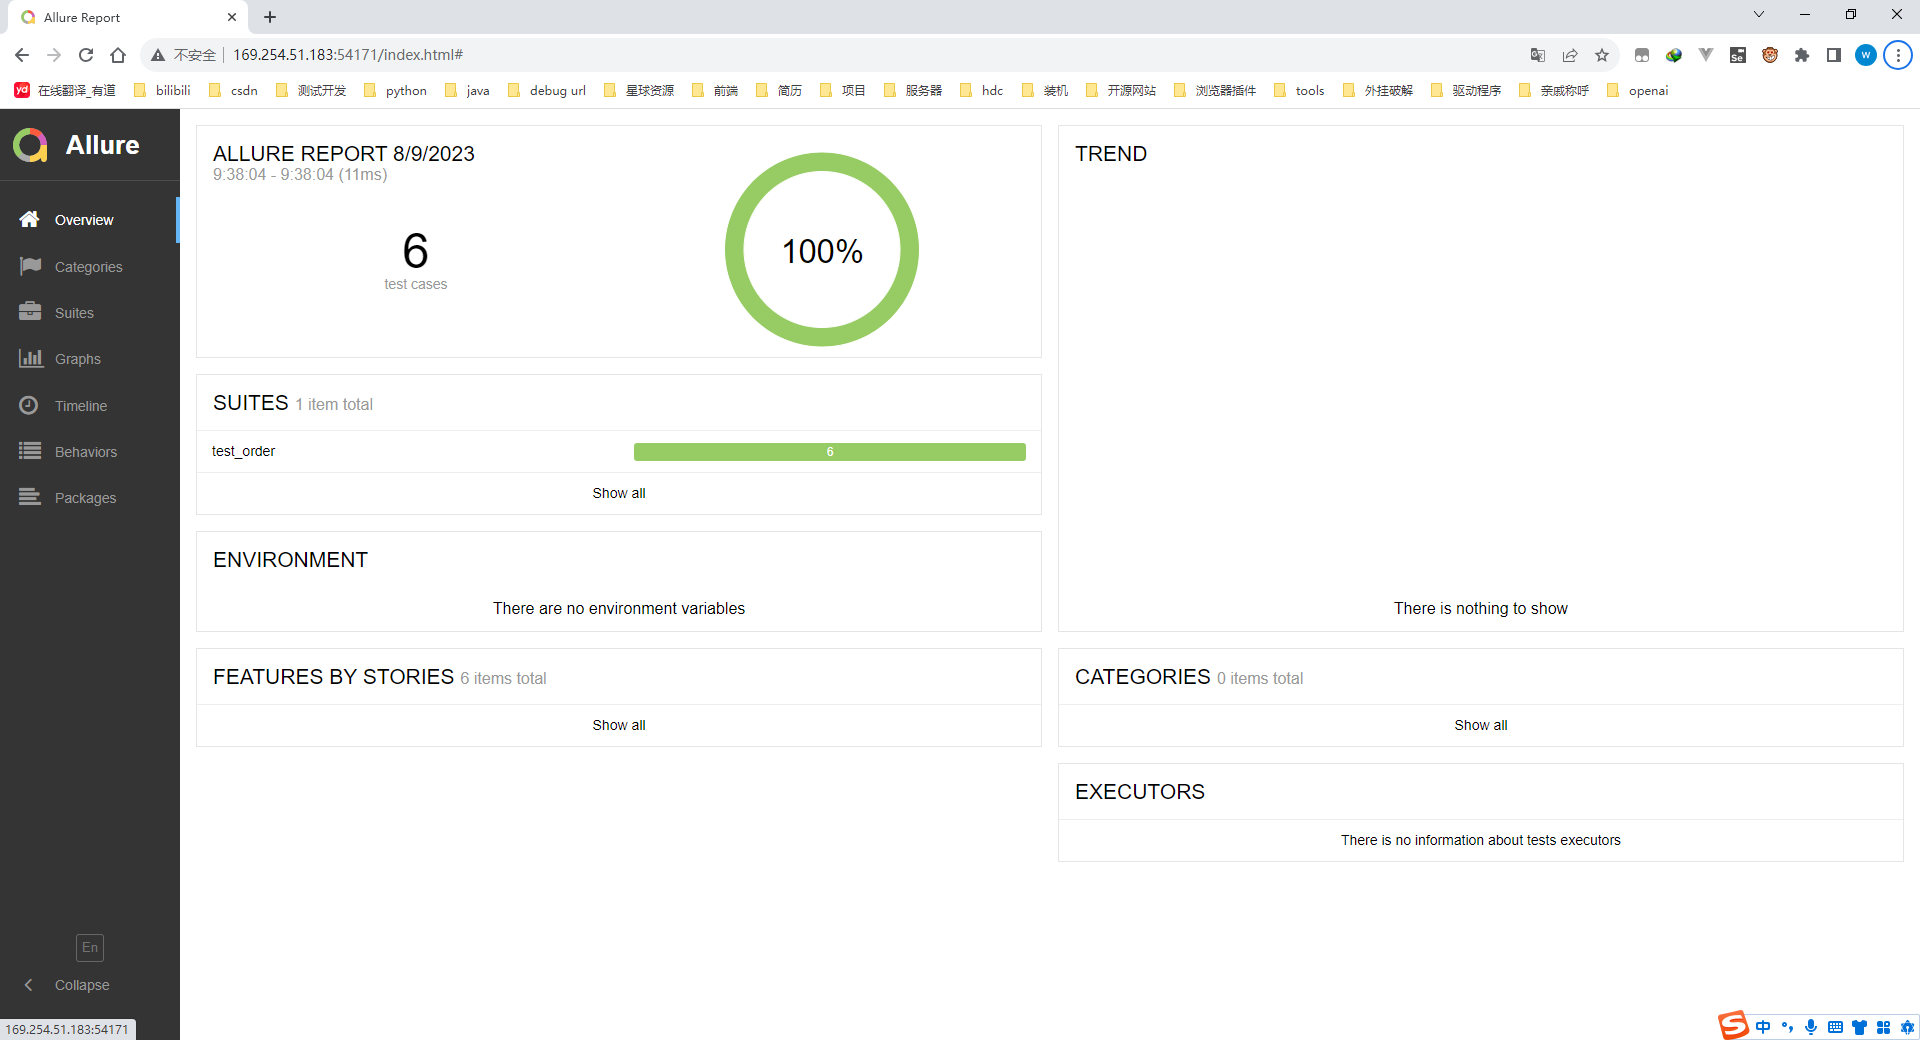
?在终端运行:
pytest .\test_order.py --alluredir=./results
allure serve .\results 运行结果:
 ?
?
 ?
?
文章来源:https://blog.csdn.net/qq_56444564/article/details/135712864
本文来自互联网用户投稿,该文观点仅代表作者本人,不代表本站立场。本站仅提供信息存储空间服务,不拥有所有权,不承担相关法律责任。 如若内容造成侵权/违法违规/事实不符,请联系我的编程经验分享网邮箱:chenni525@qq.com进行投诉反馈,一经查实,立即删除!
本文来自互联网用户投稿,该文观点仅代表作者本人,不代表本站立场。本站仅提供信息存储空间服务,不拥有所有权,不承担相关法律责任。 如若内容造成侵权/违法违规/事实不符,请联系我的编程经验分享网邮箱:chenni525@qq.com进行投诉反馈,一经查实,立即删除!
最新文章
- Python教程
- 深入理解 MySQL 中的 HAVING 关键字和聚合函数
- Qt之QChar编码(1)
- MyBatis入门基础篇
- 用Python脚本实现FFmpeg批量转换
- Elastic Stack AIOps Labs 8.12:日志率分析的正式发布
- 大数据时代必备技能:Flink实时处理框架,学习网站助你一臂之力!
- 如何解决浏览器提示“SSL协议未开启”?
- vue2 diff算法:双端指针法
- ABAP 报表中如何给报表的输入参数增添 F4 Value Help
- 6.微前端设计
- Spring Boot与微服务测试:JUnit和Mockito的单元和集成测试实践
- 菱形以及各种组合图形讲解(*#@¥$&)
- STM32G4x FLASH 读写(修改HAL库驱动)
- Matlab矩阵嵌套