KAGGLE · GETTING STARTED CODE COMPETITION 图像风格迁移 示例代码阅读
本博文阅读的代码来自于I’m Something of a Painter Myself | Kaggle倾情推荐:
Monet CycleGAN Tutorial | Kaggle
数据集说明
I’m Something of a Painter Myself | Kaggle
Files
- monet_jpg?- 300 Monet paintings sized 256x256 in JPEG format
- monet_tfrec?- 300 Monet paintings sized 256x256 in TFRecord format
- photo_jpg?- 7028 photos sized 256x256 in JPEG format
- photo_tfrec?- 7028 photos sized 256x256 in TFRecord format
简单介绍一下,就是有两种类型的数据提供使用,一个是JPEG格式,一个是TFRecord,训练集的size是300,测试集的size是7028。并且每张图片的大小都是256×256。

代码阅读
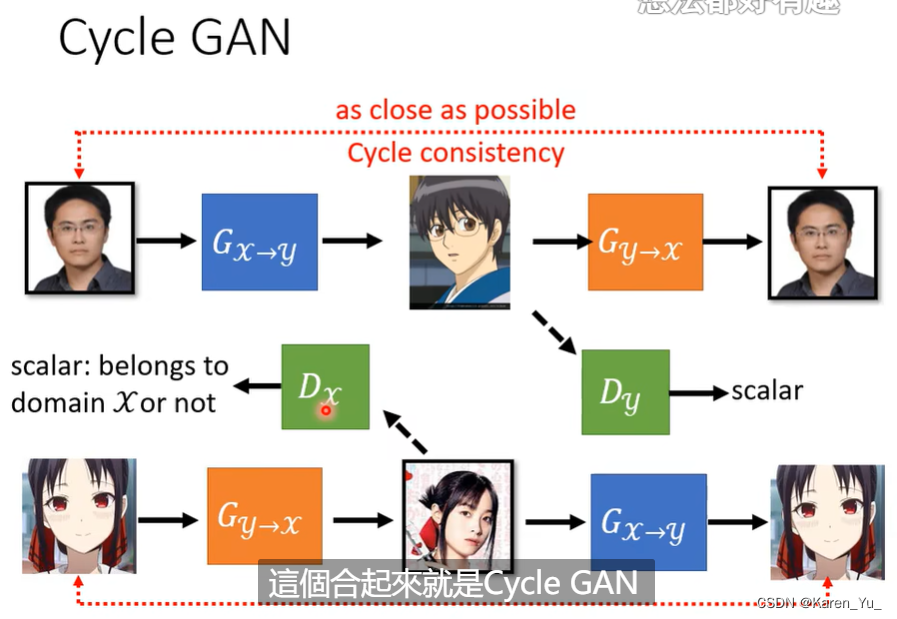
首先是一些说明,这个代码使用的是TensorFlow,所以也就大概看看,后面会搬家到PyTorch写写看。使用的是CycleGAN,这个很合理,因为这里是无监督学习,不过GAN的种类有超多哎,也许会有更好的GAN可以选择呢?anyway,CycleGAN也是很经典的方法啦。
先放一张PPT:

加载数据
MONET_FILENAMES = tf.io.gfile.glob(str(GCS_PATH + '/monet_tfrec/*.tfrec'))
print('Monet TFRecord Files:', len(MONET_FILENAMES))

PHOTO_FILENAMES = tf.io.gfile.glob(str(GCS_PATH + '/photo_tfrec/*.tfrec'))
print('Photo TFRecord Files:', len(PHOTO_FILENAMES))
tf.io.gfile.glob(str(GCS_PATH + '/monet_tfrec/*.tfrec'))tf.io.gfile.glob(pattern): Returns a list of files that match the given pattern(s).
查找匹配pattern的文件并以列表的形式返回,pattern可以是一个具体的文件名,也可以是包含通配符的正则表达式。
参考链接:
tf.io.gfile.glob ?|? TensorFlow v2.15.0.post1 (google.cn)
TensorFlow函数教程:tf.io.gfile.glob_w3cschool
Tensorflow 2.0 gfile 文件操作 - 知乎 (zhihu.com)
tf.io.gfile.glob 遍历文件-CSDN博客
TensorFlow函数:tf.io.gfile.glob_tf.io.gfile.remove函数参数-CSDN博客
def decode_image(image):
    image = tf.image.decode_jpeg(image, channels=3)
    image = (tf.cast(image, tf.float32) / 127.5) - 1
    image = tf.reshape(image, [*IMAGE_SIZE, 3])
    return image
tf.image.decode_jpeg(image, channels=3)
将JPEG编码的图像解码为unit8的Tensor,channels取3表示返回的是RGB图像,channels取1表示返回的是灰度图像,channels取0表示使用JPEG编码图像中的通道数量。
参考链接:
加载和预处理图像 ?|? TensorFlow Core (google.cn)
TensorFlow函数:tf.image.decode_jpeg_w3cschool
tf.image.decode_jpeg函数与tf.image.encode_jpeg函数用法-CSDN博客
tf.cast(image, tf.float32)将前面得到的Tensor数据类型从unit8改到float32
参考链接:
Tensorflow中 tf.cast()的用法_tensorflow.cast-CSDN博客
tensorflow——tf.cast()详解_tensorflow的cast-CSDN博客
tf.cast - TensorFlow Python - W3cubDocs
tf.reshape(image, [*IMAGE_SIZE, 3])对image(也就是前面处理的Tensor)进行维度的调整。比如:

参考链接:
tf.reshape函数用法&理解-CSDN博客
【tensorflow】tf.reshape函数说明:重塑张量_tensorflow reshape 变大-CSDN博客
TensorFlow:使用tf.reshape函数重塑张量_w3cschool
tf.reshape(x, [-1, 28, 28, 1])_reshape((-1, 28, 28, 1)-CSDN博客
Python的reshape的用法:reshape(1,-1)-CSDN博客
def read_tfrecord(example):
    tfrecord_format = {
        "image_name": tf.io.FixedLenFeature([], tf.string),
        "image": tf.io.FixedLenFeature([], tf.string),
        "target": tf.io.FixedLenFeature([], tf.string)
    }
    example = tf.io.parse_single_example(example, tfrecord_format)
    image = decode_image(example['image'])
    return image
tf.io.FixedLenFeature([], tf.string)解析每个输入样本的每一列数据
参考链接:
TFRecord 中 FixedLenFeature、VarLenFeature、FixedLenSequenceFeature 说明_tf.fixedlenfeature-CSDN博客
Tensorflow2.0之TFRecord文件的写入与读取_tensorflow2 使用tfrecord-CSDN博客
TensorFlow函数教程:tf.io.FixedLenFeature_w3cschool
tf.io.parse_single_example(example, tfrecord_format)输入一个Tensor,输出一个dict
使用tf.parse_single_example() 按照schema解析dataset中每个样本;
schema的意义在于指定每个样本的每一列数据应该用哪一种特征解析函数去解析。
参考链接:
tensorflow2.0 环境下的tfrecord读写及tf.io.parse_example和tf.io.parse_single_example的区别-CSDN博客
TensorFlow2.0 TFrecord数据集的写入、读取和训练示例详解_tensorflow将图片数据写入tfrecord-CSDN博客
TensorFlow函数教程:tf.io.parse_single_example_w3cschool
Tensorflow之TFRecord的原理和使用心得 - 知乎 (zhihu.com)
def load_dataset(filenames, labeled=True, ordered=False):
    dataset = tf.data.TFRecordDataset(filenames)
    dataset = dataset.map(read_tfrecord, num_parallel_calls=AUTOTUNE)
return datasettf.data.TFRecordDataset(filenames)该数据集以字节形式从文件中加载 TFRecord,与写入时完全相同。?TFRecordDataset?本身不进行任何解析或解码。可以通过在?TFRecordDataset?之后应用?Dataset.map?转换来完成解析和解码。
参考链接:
tensorfow学习(一) ——tf.data.TFRecordDataset的使用-CSDN博客
TensorFlow2.0 TFrecord数据集的写入、读取和训练示例详解_tensorflow将图片数据写入tfrecord-CSDN博客
tensorflow入门:tfrecord 和tf.data.TFRecordDataset-CSDN博客
TFRecord + Dataset 进行数据的写入和读取 - 知乎 (zhihu.com)TensorFlow - tf.data.TFRecordDataset (runebook.dev)
创建generator
为了创建我们的generator,首先定义downsample和upsample方法。downsample,顾名思义,通过步幅减少图像的2D维度。upsample与downsample相反,增加图像的尺寸。Conv2DTranspose基本上与Conv2D层相反。
initializer = tf.random_normal_initializer(0., 0.02)生成一组符合标准正态分布的Tensor的初始化器,类似的也可以初始化成别的形式(按照逻辑来说可能normal distribution并不是一个最好的选择,but anyway,既然GAN都能train起来,我更愿意相信……这玩意儿就是炼丹)
参考链接:
tensorflow和pytorch中的参数初始化调用方法-CSDN博客
tf.random_normal_initializer:TensorFlow初始化器_w3cschool
Tensorflow API——tf.random_normal_initializer_python中tf.random_normal_initializer什么意思-CSDN博客
gamma_init = keras.initializers.RandomNormal(mean=0.0, stddev=0.02)初始化定义了设置 Keras 各层权重随机初始值的方法。
按照正态分布生成随机张量的初始化器。
参数
- mean: 一个 Python 标量或者一个标量张量。要生成的随机值的平均数。
- stddev: 一个 Python 标量或者一个标量张量。要生成的随机值的标准差。
- seed: 一个 Python 整数。用于设置随机数种子。
参考链接:
初始化 Initializers - Keras 中文文档 (kldivergence.github.io)
Layer weight initializers (keras.io)
Keras教学(6):Keras的初始化Initializers,看这一篇就够了_bias_initializer": {"module": "keras.initializers"-CSDN博客
result = keras.Sequential()
result.add(layers.Conv2DTranspose(filters, size, strides=2,
                                  padding='same',
                                  kernel_initializer=initializer,
                                  use_bias=False))
将图像恢复到原来的尺寸(上采样)->实现图像从小分辨率到大分辨率映射的操作。(有很多上采样的方法,反卷积只是其中的一种方法)
参考链接:
深度卷积生成对抗网络 ?|? TensorFlow Core (google.cn)
Conv2DTranspose layer (keras.io)
反卷积操作Conv2DTranspose-CSDN博客
有了upsampling和downsampling方法之后就可以创建generator了。在这里采用了skip的方法,提到这样是为了缓解梯度消失(一些resnet开始在脑海里旋转)
layers.Concatenate()([x, skip])Concatenates a list of inputs.
It takes as input a list of tensors, all of the same shape except for the concatenation axis, and returns a single tensor that is the concatenation of all inputs.
简要来说就是把两个Tensor拼起来(所以也不算resnet死灰复燃×)按照axis取值的不同决定拼接的方式。如果没有指定axis的值,default=-1,就是从倒数第一个维度进行拼接。
创建discriminator
discriminator接收输入图像并将其分类为真实或虚假(生成)。鉴别器不是输出单个节点,而是输出一个较小的2D图像,其中像素值较高表示真实分类,像素值较低表示虚假分类。
with strategy.scope():
    monet_generator = Generator() # transforms photos to Monet-esque paintings
    photo_generator = Generator() # transforms Monet paintings to be more like photos

    monet_discriminator = Discriminator() # differentiates real Monet paintings and generated Monet paintings
    photo_discriminator = Discriminator() # differentiates real photos and generated photos
从最开始的cycleGAN的图片可以看出,对于generator和discriminator,是双向的,所以两个方向都需要定义。
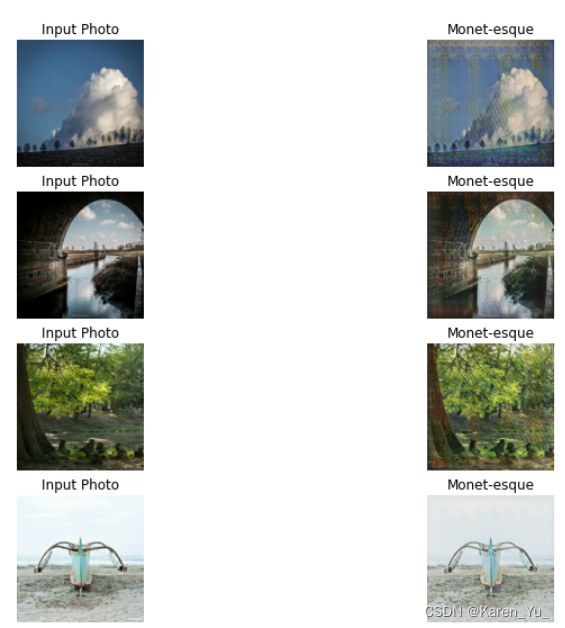
因为此刻generator尚未训练,所以自然生成出来的图片只能说是皇帝的新图×

创建CycleGAN
在训练步骤中,模型将照片转换为莫奈的画作,然后再转换回照片。原始照片和经过两次变换的照片之间的区别是循环一致性损失。我们希望原始照片和经过两次变换的照片彼此相似。
简要来说,为了好理解,就是auto-encoder

具体请参考文章开头处的链接
定义损失函数
with strategy.scope():
    def discriminator_loss(real, generated):
        real_loss = tf.keras.losses.BinaryCrossentropy(from_logits=True, reduction=tf.keras.losses.Reduction.NONE)(tf.ones_like(real), real)

        generated_loss = tf.keras.losses.BinaryCrossentropy(from_logits=True, reduction=tf.keras.losses.Reduction.NONE)(tf.zeros_like(generated), generated)

        total_disc_loss = real_loss + generated_loss

        return total_disc_loss * 0.5
将真实图像比作1的矩阵,将假图像比作0的矩阵。完美的discriminator将为真实图像输出所有的1,为假图像输出所有的0。discriminator损耗输出实际损耗和生成损耗的平均值。
tf.keras.losses.BinaryCrossentropy(from_logits=True, reduction=tf.keras.losses.Reduction.NONE)(tf.ones_like(real), real)计算真实标签和预测标签之间的交叉熵损失。将这种交叉熵损失用于二值(0或1)分类应用程序。
参考链接:
Probabilistic losses (keras.io)
TF2.0—tf.keras.losses.BinaryCrossentropy-CSDN博客
tf.keras.losses.BinaryCrossentropy函数-CSDN博客

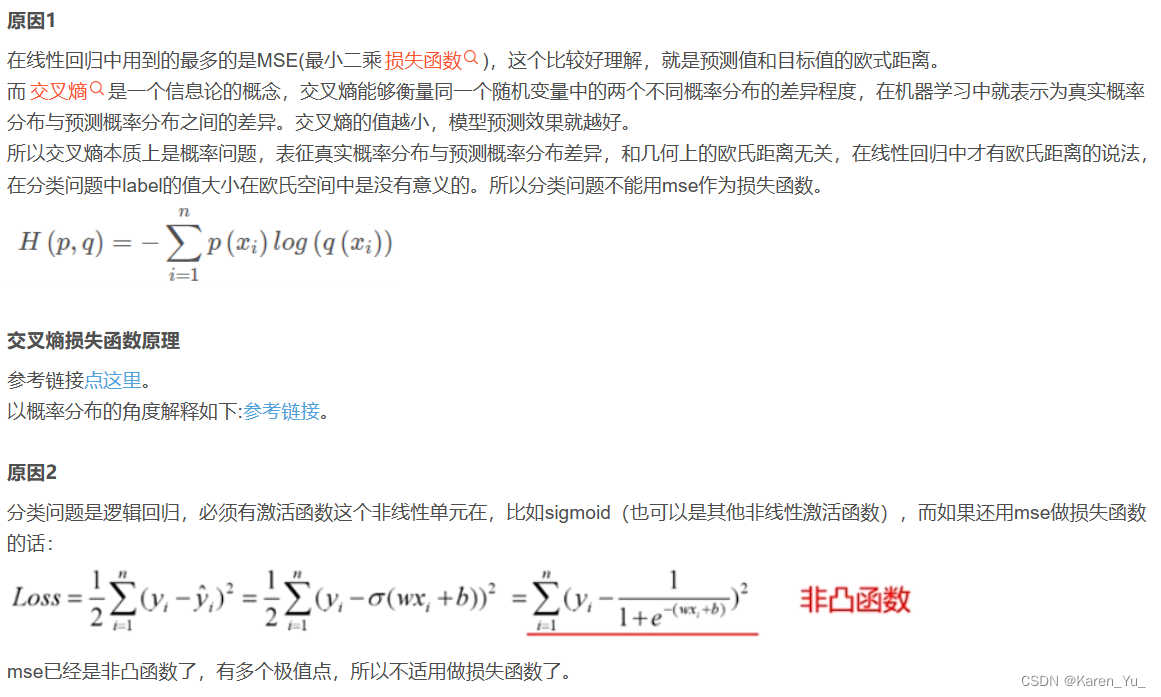
这里延伸一下:
为什么分类要用交叉熵而不用MSE
比较直觉的解释可以是,假设我们有100个类别,假设类别1被分类成类别2,这与类别1被分成类别100其实是一样的,都是分错了,但是MSE就会觉得分成类别100错的更离谱,这是显然不合理的。
非直觉的理由(不好算)
- MSE作为分类的损失函数会有梯度消失的问题。
- MSE是非凸的,存在很多局部极小值点。

请参考链接:
分类为什么用CE而不是MSE - 知乎 (zhihu.com)
为什么分类问题不能使用mse损失函数_为什么分类不用mse-CSDN博客
训练和可视化

——————————————————————————
后续就是会用PyTorch自己写写,看情况放不放链接吧
本文来自互联网用户投稿,该文观点仅代表作者本人,不代表本站立场。本站仅提供信息存储空间服务,不拥有所有权,不承担相关法律责任。 如若内容造成侵权/违法违规/事实不符,请联系我的编程经验分享网邮箱:chenni525@qq.com进行投诉反馈,一经查实,立即删除!
- Python教程
- 深入理解 MySQL 中的 HAVING 关键字和聚合函数
- Qt之QChar编码(1)
- MyBatis入门基础篇
- 用Python脚本实现FFmpeg批量转换
- Python实现JS逆向解密采集网站数据
- R语言【cli】——ansi_hide_cursor():隐藏或显示终端的光标
- 父元素不设置高度,子元素有高度:父元素没有被子元素撑开
- 社交商业革命:Facebook Shops的崛起
- 【C++】智能指针
- Vue3中的混入(mixins)
- 代理IP连接不上?网速过慢?自检与应对方法来了
- JPEG文件内嵌HTML代码(JavaScript型图片马)
- 5 个让日常编码更简单的 Python 库
- AWS 专题学习 P7 (FSx、SQS、SNS)