Gateway+Springsecurity+OAuth2.0+JWT 实现分布式统一认证授权!
发布时间:2024年01月23日
目录
?
在SpringSecurity+OAuth2.0 搭建认证中心和资源服务中心-CSDN博客???????
基础上整合网关和JWT实现分布式统一认证授权。

?
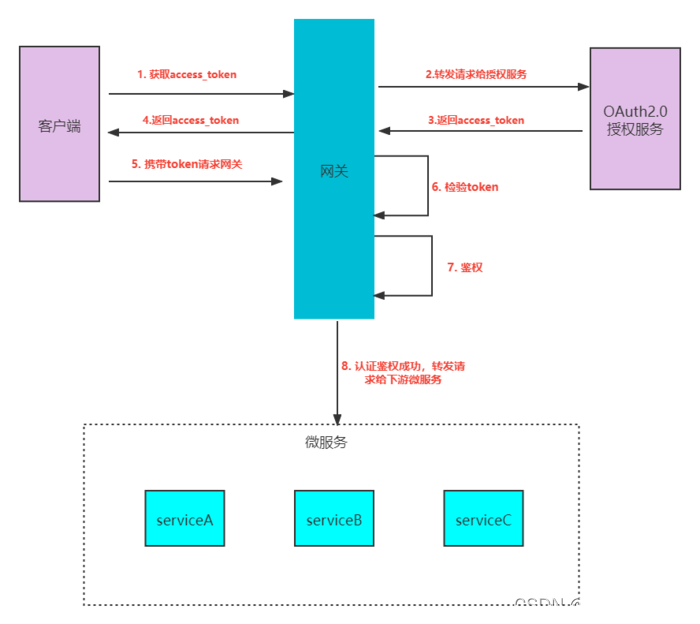
大致流程如下:
1、客户端发出请求给网关获取令牌
2、网关收到请求,直接转发给授权服务
3、授权服务验证用户名、密码等一系列身份,通过则颁发令牌给客户端
4、客户端携带令牌请求资源,请求直接到了网关层
5、网关对令牌进行校验(验签、过期时间校验....)、鉴权(对当前令牌携带的权限)和访问资源所需的权限进行比对,如果权限有交集则通过校验,直接转发给微服务
6、微服务进行逻辑处理
1. OAuth2.0授权服务
导入依赖
<dependencies>
        <dependency>
            <groupId>org.springframework.boot</groupId>
            <artifactId>spring-boot-starter-web</artifactId>
        </dependency>
        <dependency>
            <groupId>org.springframework.cloud</groupId>
            <artifactId>spring-cloud-starter-security</artifactId>
            <version>2.2.5.RELEASE</version>
        </dependency>
        <dependency>
            <groupId>org.springframework.cloud</groupId>
            <artifactId>spring-cloud-starter-oauth2</artifactId>
            <version>2.2.5.RELEASE</version>
        </dependency>
        <dependency>
            <groupId>mysql</groupId>
            <artifactId>mysql-connector-java</artifactId>
            <version>8.0.28</version>
        </dependency>
        <dependency>
            <groupId>com.baomidou</groupId>
            <artifactId>mybatis-plus-boot-starter</artifactId>
            <version>3.3.2</version>
        </dependency>
        <dependency>
            <groupId>org.springframework.security</groupId>
            <artifactId>spring-security-oauth2-resource-server</artifactId>
        </dependency>
        <dependency>
            <groupId>org.projectlombok</groupId>
            <artifactId>lombok</artifactId>
            <version>1.18.30</version>
        </dependency>
        <dependency>
            <groupId>org.springframework.boot</groupId>
            <artifactId>spring-boot-starter-test</artifactId>
        </dependency>
        <dependency>
            <groupId>com.alibaba.cloud</groupId>
            <artifactId>spring-cloud-starter-alibaba-nacos-discovery</artifactId>
        </dependency>
    </dependencies>
application.yaml
server:
  port: 8080
spring:
  application:
    name: oauth2-cloud-auth-server
  cloud:
    nacos:
      ## 注册中心配置
      discovery:
        # nacos的服务地址,nacos-server中IP地址:端口号
        server-addr: 127.0.0.1:8848
  datasource:
    driver-class-name: com.mysql.cj.jdbc.Driver
    url: jdbc:mysql://localhost:3306/rbac?useUnicode=true&characterEncoding=UTF-8&serverTimezone=UTC
    username: root
    password: 123456
?这里展示部分代码
AccessTokenConfig类
/**
 * 令牌的配置
 */
@Configuration
public class AccessTokenConfig {
    /**
     * JWT的秘钥
     * TODO 实际项目中需要统一配置到配置文件中,资源服务也需要用到
     */
    private final static String SIGN_KEY="jwt";

    /**
     * 令牌的存储策略
     */
    @Bean
    public TokenStore tokenStore() {
        //使用JwtTokenStore生成JWT令牌
        return new JwtTokenStore(jwtAccessTokenConverter());
    }

    /**
     * JwtAccessTokenConverter
     * TokenEnhancer的子类,在JWT编码的令牌值和OAuth身份验证信息之间进行转换。
     * TODO:后期可以使用非对称加密
     */
    @Bean
    public JwtAccessTokenConverter jwtAccessTokenConverter(){
        JwtAccessTokenConverter converter = new JwtAccessTokenConverter();
        // 设置秘钥
        converter.setSigningKey(SIGN_KEY);
        return converter;
    }

    @Bean
    PasswordEncoder passwordEncoder() {
        return new BCryptPasswordEncoder();
    }
}
MyAuthorizationConfig类
@Configuration
@EnableAuthorizationServer
public class MyAuthorizationConfig extends AuthorizationServerConfigurerAdapter {

   @Autowired
   private TokenStore tokenStore;
    /**
     * 客户端存储策略,这里使用内存方式,后续可以存储在数据库
     */
    @Autowired
    private ClientDetailsService clientDetailsService;

    /**
     * Security的认证管理器,密码模式需要用到
     */
    @Autowired
    private AuthenticationManager authenticationManager;

    @Autowired
    private JwtAccessTokenConverter jwtAccessTokenConverter;

    /**
     * 配置令牌访问的安全约束
     */
    @Override
    public void configure(AuthorizationServerSecurityConfigurer security) throws Exception {
        security
                //开启/oauth/token_key验证端口权限访问
                .tokenKeyAccess("permitAll()")
                //开启/oauth/check_token验证端口认证权限访问
                .checkTokenAccess("permitAll()")
                //表示支持 client_id 和 client_secret 做登录认证
                .allowFormAuthenticationForClients();
    }
    //配置客户端
    @Override
    public void configure(ClientDetailsServiceConfigurer clients) throws Exception {
        //内存模式
        clients.inMemory()
                //客户端id
                .withClient("test")
                //客户端秘钥
                .secret(new BCryptPasswordEncoder().encode("123456"))
                //资源id,唯一,比如订单服务作为一个资源,可以设置多个
                .resourceIds("order")
                //授权模式,总共四种,1. authorization_code(授权码模式)、password(密码模式)、client_credentials(客户端模式)、implicit(简化模式)
                //refresh_token并不是授权模式,
                .authorizedGrantTypes("authorization_code","password","client_credentials","implicit","refresh_token")
                //允许的授权范围,客户端的权限,这里的all只是一种标识,可以自定义,为了后续的资源服务进行权限控制
                .scopes("all")
                //false 则跳转到授权页面
                .autoApprove(false)
                //授权码模式的回调地址
                .redirectUris("http://www.baidu.com"); //可以and继续添加客户端
    }


    @Bean
    public AuthorizationServerTokenServices tokenServices() {
        DefaultTokenServices services = new DefaultTokenServices();
        //客户端端配置策略
        services.setClientDetailsService(clientDetailsService);
        //支持令牌的刷新
        services.setSupportRefreshToken(true);
        //令牌服务
        services.setTokenStore(tokenStore);
        //access_token的过期时间
        services.setAccessTokenValiditySeconds(60 * 60 * 2);
        //refresh_token的过期时间
        services.setRefreshTokenValiditySeconds(60 * 60 * 24 * 3);

        //设置令牌增强,使用jwt
        services.setTokenEnhancer(jwtAccessTokenConverter);
        return services;
    }
    /**
     * 授权码模式的service,使用授权码模式authorization_code必须注入
     */
    @Bean
    public AuthorizationCodeServices authorizationCodeServices() {
        //授权码存在内存中
        return new InMemoryAuthorizationCodeServices();
    }

    /**
     * 配置令牌访问的端点
     */
    @Override
    public void configure(AuthorizationServerEndpointsConfigurer endpoints) throws Exception {
        endpoints
                //授权码模式所需要的authorizationCodeServices
                .authorizationCodeServices(authorizationCodeServices())
                //密码模式所需要的authenticationManager
                .authenticationManager(authenticationManager)
                //令牌管理服务,无论哪种模式都需要
                .tokenServices(tokenServices())
                //只允许POST提交访问令牌,uri:/oauth/token
                .allowedTokenEndpointRequestMethods(HttpMethod.POST);
    }
}
SecurityConfig类
/**
 * spring security的安全配置
 */
@Configuration
@EnableWebSecurity
public class SecurityConfig extends WebSecurityConfigurerAdapter {

    /**
     * 加密算法
     */

    @Autowired
    JwtTokenUserDetailsService userDetailsService;

    @Override
    protected void configure(HttpSecurity http) throws Exception {
        //todo 允许表单登录
        http.authorizeRequests()
                .anyRequest().authenticated()
                .and()
                .formLogin()
                .loginProcessingUrl("/login")
                .permitAll()
                .and()
                .csrf()
                .disable();
    }

    @Override
    protected void configure(AuthenticationManagerBuilder auth) throws Exception {
       //从数据库中查询用户信息
        auth.userDetailsService(userDetailsService);
    }


    /**
     * AuthenticationManager对象在OAuth2认证服务中要使用,提前放入IOC容器中
     * Oauth的密码模式需要
     */
    @Override
    @Bean
    public AuthenticationManager authenticationManagerBean() throws Exception {
        return super.authenticationManagerBean();
    }
}
2. 资源服务
导入依赖
  <dependency>
            <groupId>org.springframework.boot</groupId>
            <artifactId>spring-boot-starter-web</artifactId>
        </dependency>
        <dependency>
        <groupId>cn.hutool</groupId>
        <artifactId>hutool-all</artifactId>
       </dependency>
        <dependency>
            <groupId>com.alibaba</groupId>
            <artifactId>fastjson</artifactId>
            <version>1.2.78</version>
        </dependency>
        <dependency>
            <groupId>org.projectlombok</groupId>
            <artifactId>lombok</artifactId>
            <version>1.18.30</version>
        </dependency>
        <dependency>
            <groupId>com.alibaba.cloud</groupId>
            <artifactId>spring-cloud-starter-alibaba-nacos-discovery</artifactId>
        </dependency>
application.yaml
server:
  port: 8081
spring:
  application:
    name: oauth2-cloud-service
  cloud:
    nacos:
      ## 注册中心配置
      discovery:
        # nacos的服务地址,nacos-server中IP地址:端口号
        server-addr: 127.0.0.1:8848
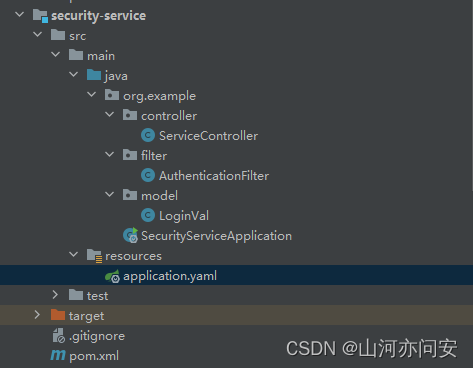
?AuthenticationFilter类
@Component
public class AuthenticationFilter extends OncePerRequestFilter {
    /**
     * 具体方法主要分为两步
     * 1. 解密网关传递的信息
     * 2. 将解密之后的信息封装放入到request中
     */
    @Override
    protected void doFilterInternal(HttpServletRequest request, HttpServletResponse response, FilterChain filterChain) throws ServletException, IOException {
        //获取请求头中的用户信息
        String token = request.getHeader("token");
        if (token!=null){
            //解密
            String json = Base64.decodeStr(token);
            JSONObject jsonObject = JSON.parseObject(json);
            //获取用户身份信息、权限信息
            String principal = jsonObject.getString("user_name");
            JSONArray tempJsonArray = jsonObject.getJSONArray("authorities");
            //权限
            String[] authorities =  tempJsonArray.toArray(new String[0]);
            //放入LoginVal
            LoginVal loginVal = new LoginVal();

            loginVal.setUsername(principal);
            loginVal.setAuthorities(authorities);

            //放入request的attribute中
            request.setAttribute("login_message",loginVal);
        }
        filterChain.doFilter(request,response);
    }
}
ServiceController类
@RestController
public class ServiceController {

    @RequestMapping("/test")
    public LoginVal test(HttpServletRequest httpServletRequest){
       return  (LoginVal)httpServletRequest.getAttribute("login_message");
    }
}
3. Gateway网关
导入依赖
 <dependencies>
        <dependency>
            <groupId>org.springframework.cloud</groupId>
            <artifactId>spring-cloud-starter-gateway</artifactId>
        </dependency>
        <dependency>
            <groupId>org.springframework.cloud</groupId>
            <artifactId>spring-cloud-starter-security</artifactId>
            <version>2.2.5.RELEASE</version>
        </dependency>
        <dependency>
            <groupId>org.springframework.cloud</groupId>
            <artifactId>spring-cloud-starter-oauth2</artifactId>
            <version>2.2.5.RELEASE</version>
        </dependency>
        <dependency>
            <groupId>org.springframework.security</groupId>
            <artifactId>spring-security-oauth2-resource-server</artifactId>
        </dependency>
        <dependency>
            <groupId>com.alibaba.cloud</groupId>
            <artifactId>spring-cloud-starter-alibaba-nacos-discovery</artifactId>
        </dependency>
        <dependency>
            <groupId>org.projectlombok</groupId>
            <artifactId>lombok</artifactId>
        </dependency>
        <dependency>
            <groupId>cn.hutool</groupId>
            <artifactId>hutool-all</artifactId>
        </dependency>
        <dependency>
            <groupId>com.alibaba</groupId>
            <artifactId>fastjson</artifactId>
            <version>1.2.78</version>
        </dependency>
        <dependency>
            <groupId>org.springframework.cloud</groupId>
            <artifactId>spring-cloud-starter-loadbalancer</artifactId>
        </dependency>
    </dependencies>
application.yaml
server:
  port: 7000
spring:
  main:
    allow-bean-definition-overriding: true
  application:
    name: oauth2-cloud-gateway
  cloud:
    nacos:
      ## 注册中心配置
      discovery:
        # nacos的服务地址,nacos-server中IP地址:端口号
        server-addr: 127.0.0.1:8848
    gateway:
      ## 路由
      routes:
        ## id只要唯一即可,名称任意
        - id: oauth2-cloud-auth-server
          uri: lb://oauth2-cloud-auth-server
          predicates:
            ## Path Route Predicate Factory断言
            - Path=/oauth/**
        - id: oauth2-cloud-order
          uri: lb://oauth2-cloud-service
          predicates:
            ## Path Route Predicate Factory断言
            - Path=/test/**

oauth2:
  cloud:
    sys:
      parameter:
        ignoreUrls:
          - /oauth/token
          - /oauth/authorize
?AccessTokenConfig类
/**
 * 令牌的配置
 */
@Configuration
public class AccessTokenConfig {
    private final static String SIGN_KEY="jwt";

    /**
     * 令牌的存储策略
     */
    @Bean
    public TokenStore tokenStore() {
        //使用JwtTokenStore生成JWT令牌
        return new JwtTokenStore(jwtAccessTokenConverter());
    }

    /**
     * JwtAccessTokenConverter
     * TokenEnhancer的子类,在JWT编码的令牌值和OAuth身份验证信息之间进行转换。
     * TODO:后期可以使用非对称加密
     */
    @Bean
    public JwtAccessTokenConverter jwtAccessTokenConverter(){
        JwtAccessTokenConverter converter = new JwtAccessTokenConverter();
        // 设置秘钥
        converter.setSigningKey(SIGN_KEY);
        return converter;
    }
}
JwtAccessManager类
@Slf4j
@Component
//经过认证管理器JwtAuthenticationManager认证成功后,就需要对令牌进行鉴权,如果该令牌无访问资源的权限,则不允通过。
public class JwtAccessManager implements ReactiveAuthorizationManager<AuthorizationContext> {


    @Override
    public Mono<AuthorizationDecision> check(Mono<Authentication> mono, AuthorizationContext authorizationContext) {

        URI uri = authorizationContext.getExchange().getRequest().getURI();
        //设计权限角色,这里简单写一下,实际上应该从数据库或者缓存中获取
        List<String> authorities = new ArrayList<>();
        authorities.add("ROLE_admin");
        //认证通过且角色匹配的用户可访问当前路径
        return mono
                //判断是否认证成功
                .filter(Authentication::isAuthenticated)
                //获取认证后的全部权限
                .flatMapIterable(Authentication::getAuthorities)
                .map(GrantedAuthority::getAuthority)
                //如果权限包含则判断为true
                .any(authorities::contains)
                .map(AuthorizationDecision::new)
                .defaultIfEmpty(new AuthorizationDecision(false));
    }

}
JwtAuthenticationManager类
/**
 * JWT认证管理器,主要的作用就是对携带过来的token进行校验,比如过期时间,加密方式等
 * 一旦token校验通过,则交给鉴权管理器进行鉴权
 */
@Component
public class JwtAuthenticationManager implements ReactiveAuthenticationManager {
    /**
     * 使用JWT令牌进行解析令牌
     */
    @Autowired
    private TokenStore tokenStore;

    @Override
    public Mono<Authentication> authenticate(Authentication authentication) {
        return Mono.justOrEmpty(authentication)
                .filter(a -> a instanceof BearerTokenAuthenticationToken)
                .cast(BearerTokenAuthenticationToken.class)
                .map(BearerTokenAuthenticationToken::getToken)
                .flatMap((accessToken -> {
                    OAuth2AccessToken oAuth2AccessToken = this.tokenStore.readAccessToken(accessToken);
                    //根据access_token从数据库获取不到OAuth2AccessToken
                    if (oAuth2AccessToken == null) {
                        return Mono.error(new InvalidTokenException("无效的token!"));
                    } else if (oAuth2AccessToken.isExpired()) {
                        return Mono.error(new InvalidTokenException("token已过期!"));
                    }
                    OAuth2Authentication oAuth2Authentication = this.tokenStore.readAuthentication(accessToken);
                    if (oAuth2Authentication == null) {
                        return Mono.error(new InvalidTokenException("无效的token!"));
                    } else {
                        return Mono.just(oAuth2Authentication);
                    }
                })).cast(Authentication.class);
    }
}
SecurityConfig类
@Configuration
@EnableWebFluxSecurity
public class SecurityConfig {

    /**
     * JWT的鉴权管理器
     */
    @Autowired
    private ReactiveAuthorizationManager<AuthorizationContext> accessManager;

    @Autowired
    private RequestAuthenticationEntryPoint requestAuthenticationEntryPoint;

    @Autowired
    private RequestAccessDeniedHandler requestAccessDeniedHandler;

    /**
     * 系统参数配置
     */
    @Autowired
    private SysParameterConfig sysConfig;

    /**
     * token校验管理器
     */
    @Autowired
    private ReactiveAuthenticationManager tokenAuthenticationManager;

    @Autowired
    private CorsFilter corsFilter;

    @Bean
    SecurityWebFilterChain webFluxSecurityFilterChain(ServerHttpSecurity http) throws Exception{
        //认证过滤器,放入认证管理器tokenAuthenticationManager
        AuthenticationWebFilter authenticationWebFilter = new AuthenticationWebFilter(tokenAuthenticationManager);
        authenticationWebFilter.setServerAuthenticationConverter(new ServerBearerTokenAuthenticationConverter());

        http
                .httpBasic().disable()
                .csrf().disable()
                .authorizeExchange()
                //白名单直接放行
                .pathMatchers(ArrayUtil.toArray(sysConfig.getIgnoreUrls(),String.class)).permitAll()
                //其他的请求必须鉴权,使用鉴权管理器
                .anyExchange().access(accessManager)
                //异常处理
                .and().exceptionHandling()
                .authenticationEntryPoint(requestAuthenticationEntryPoint)
                .accessDeniedHandler(requestAccessDeniedHandler)
                .and()
                // 跨域过滤器
                .addFilterAt(corsFilter, SecurityWebFiltersOrder.CORS)
                //token的认证过滤器,用于校验token和认证
                .addFilterAt(authenticationWebFilter, SecurityWebFiltersOrder.AUTHENTICATION);
        return http.build();
    }
}
RequestAccessDeniedHandler
/**

 * 自定义返回结果:没有权限访问时
 */
@Component
public class RequestAccessDeniedHandler implements ServerAccessDeniedHandler {
    @Override
    public Mono<Void> handle(ServerWebExchange exchange, AccessDeniedException denied) {
        ServerHttpResponse response = exchange.getResponse();
        response.setStatusCode(HttpStatus.OK);
        response.getHeaders().add(HttpHeaders.CONTENT_TYPE, MediaType.APPLICATION_JSON_VALUE);
        String body= JSONUtil.toJsonStr(new ResultMsg(1005,"无权限访问",null));
        DataBuffer buffer =  response.bufferFactory().wrap(body.getBytes(Charset.forName("UTF-8")));
        return response.writeWith(Mono.just(buffer));
    }
}
GlobalAuthenticationFilter
/**
 * 全局过滤器,对token的拦截,解析token放入header中,便于下游微服务获取用户信息
 * 分为如下几步:
 *  1、白名单直接放行
 *  2、校验token
 *  3、读取token中存放的用户信息
 *  4、重新封装用户信息,加密成功json数据放入请求头中传递给下游微服务
 */
@Component
@Slf4j
public class GlobalAuthenticationFilter implements GlobalFilter, Ordered {
    /**
     * JWT令牌的服务
     */
    @Autowired
    private TokenStore tokenStore;


    /**
     * 系统参数配置
     */
    @Autowired
    private SysParameterConfig sysConfig;


    @Override
    public Mono<Void> filter(ServerWebExchange exchange, GatewayFilterChain chain) {
        String requestUrl = exchange.getRequest().getPath().value();
        //1、白名单放行,比如授权服务、静态资源.....
        if (checkUrls(sysConfig.getIgnoreUrls(),requestUrl)){
            return chain.filter(exchange);
        }

        //2、 检查token是否存在
        String token = getToken(exchange);
        if (StringUtils.isBlank(token)) {
            return invalidTokenMono(exchange);
        }

        //3 判断是否是有效的token
        OAuth2AccessToken oAuth2AccessToken;
        try {
            //解析token,使用tokenStore
            oAuth2AccessToken = tokenStore.readAccessToken(token);
            Map<String, Object> additionalInformation = oAuth2AccessToken.getAdditionalInformation();
            System.out.println(additionalInformation);

            //取出用户身份信息
            String user_name = additionalInformation.get("user_name").toString();
            //获取用户权限
            List<String> authorities = (List<String>) additionalInformation.get("authorities");

            //将用户名和权限进行Base64加密
            JSONObject jsonObject=new JSONObject();
            jsonObject.put("user_name", user_name);
            jsonObject.put("authorities",authorities);
            String base = Base64.encode(jsonObject.toJSONString());


           // ServerHttpRequest 中的 mutate 方法是用于创建一个修改后的请求对象的方法,而不改变原始请求对象。这个方法是为了在处理请求过程中创建一个新的请求对象,以便进行一些修改或增强。
            ServerHttpRequest tokenRequest = exchange.getRequest().mutate().header("token",base).build();
            ServerWebExchange build = exchange.mutate().request(tokenRequest).build();
            return chain.filter(build);
        } catch (InvalidTokenException e) {
            //解析token异常,直接返回token无效
            return invalidTokenMono(exchange);
        }


    }

    @Override
    public int getOrder() {
        return 0;
    }

    /**
     * 对url进行校验匹配
     */
    private boolean checkUrls(List<String> urls,String path){
        AntPathMatcher pathMatcher = new AntPathMatcher();
        for (String url : urls) {
            if (pathMatcher.match(url,path))
                return true;
        }
        return false;
    }

    /**
     * 从请求头中获取Token
     */
    private String getToken(ServerWebExchange exchange) {
        String tokenStr = exchange.getRequest().getHeaders().getFirst("Authorization");
        if (StringUtils.isBlank(tokenStr)) {
            return null;
        }
        String token = tokenStr.split(" ")[1];
        if (StringUtils.isBlank(token)) {
            return null;
        }
        return token;
    }

    /**
     * 无效的token
     */
    private Mono<Void> invalidTokenMono(ServerWebExchange exchange) {
        return buildReturnMono(ResultMsg.builder()
                .code(1004)
                .msg("无效的token")
                .build(), exchange);
    }


    private Mono<Void> buildReturnMono(ResultMsg resultMsg, ServerWebExchange exchange) {
        ServerHttpResponse response = exchange.getResponse();
        byte[] bits = JSON.toJSONString(resultMsg).getBytes(StandardCharsets.UTF_8);
        DataBuffer buffer = response.bufferFactory().wrap(bits);
        response.setStatusCode(HttpStatus.UNAUTHORIZED);
        response.getHeaders().add("Content-Type", "application/json;charset:utf-8");
        return response.writeWith(Mono.just(buffer));
    }
}
SysParameterConfig
@ConfigurationProperties(prefix = "oauth2.cloud.sys.parameter")
@Data
@Component
public class SysParameterConfig {
    /**
     * 白名单
     */
    private List<String> ignoreUrls;
}
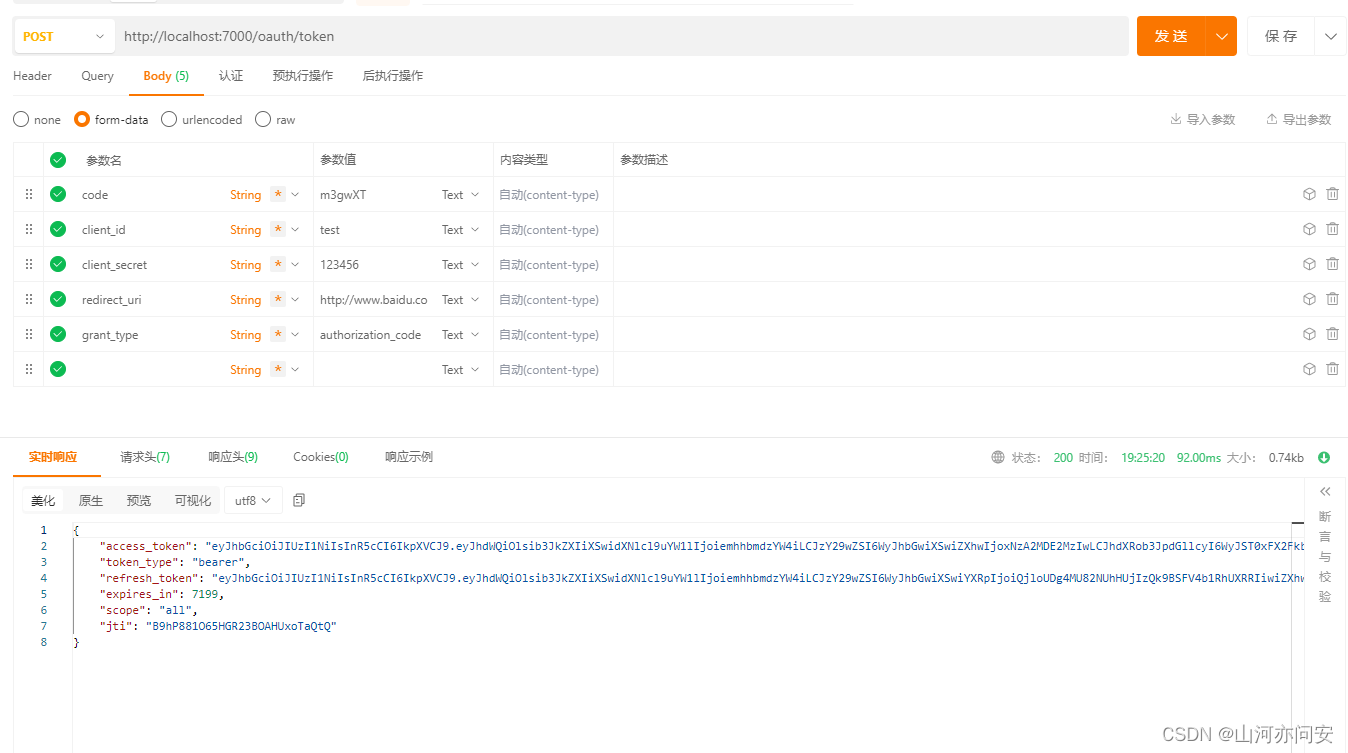
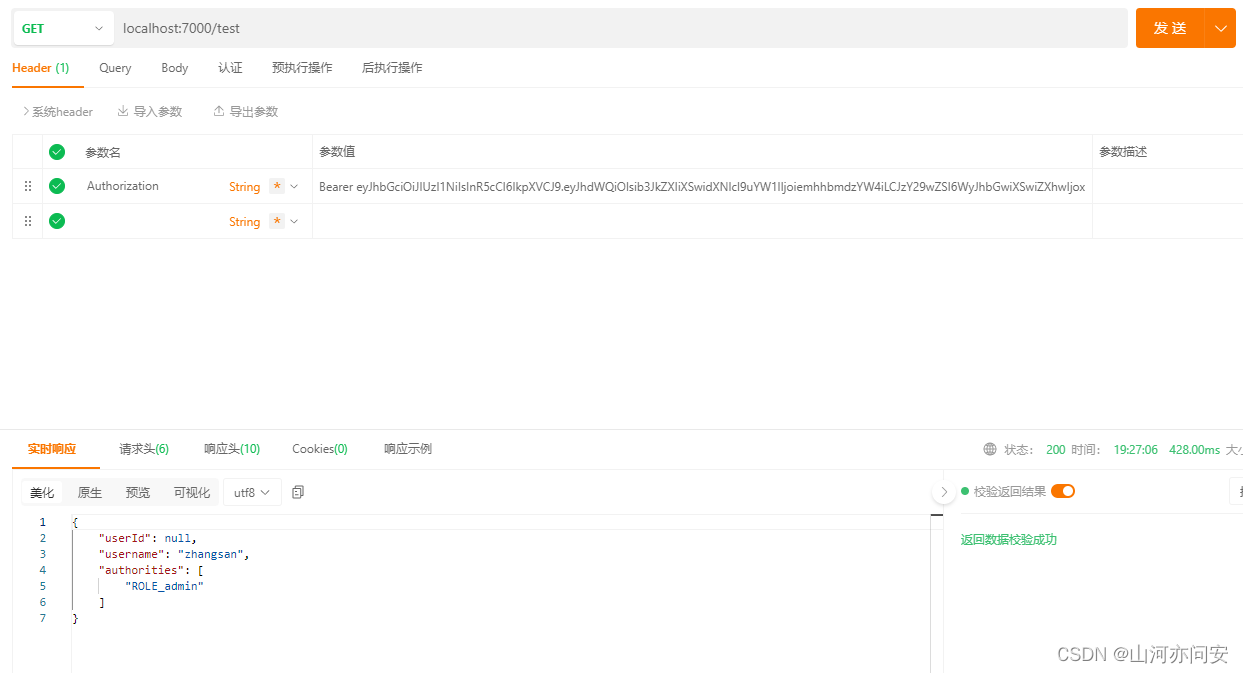
4. 测试


?
代码链接:Gateway+Springsecurity+OAuth2.0+JWT实现分布式统一认证授权资源-CSDN文库?
文章来源:https://blog.csdn.net/qq_43649937/article/details/135781182
本文来自互联网用户投稿,该文观点仅代表作者本人,不代表本站立场。本站仅提供信息存储空间服务,不拥有所有权,不承担相关法律责任。 如若内容造成侵权/违法违规/事实不符,请联系我的编程经验分享网邮箱:chenni525@qq.com进行投诉反馈,一经查实,立即删除!
本文来自互联网用户投稿,该文观点仅代表作者本人,不代表本站立场。本站仅提供信息存储空间服务,不拥有所有权,不承担相关法律责任。 如若内容造成侵权/违法违规/事实不符,请联系我的编程经验分享网邮箱:chenni525@qq.com进行投诉反馈,一经查实,立即删除!
最新文章
- Python教程
- 深入理解 MySQL 中的 HAVING 关键字和聚合函数
- Qt之QChar编码(1)
- MyBatis入门基础篇
- 用Python脚本实现FFmpeg批量转换
- DWM1000 物理层
- Windows PowerShell扩展命令——运行网络故障诊断包
- 基于Java SSM框架实现宜百丰超市进销存购物商城系统项目【项目源码+论文说明】
- Python+Selenium+ChromeDriver的配置和问题解决
- Dpdk Ubuntu大页内存大小配置
- 【INF4000】Data Visualisation
- qt获取多窗口中活动窗口
- 机器学习模型超参数优化,最频繁使用的5个工具包
- gitlab中配置公钥,使用ssh拉取代码
- (一)Matlab数值计算基础