mmdetection3.2.0之RetinaNet源码解读
该片解读在官网的这篇文章的基础之上对细节进行补充,仅供自己学习使用,不足之处请在评论区指出。轻松掌握 MMDetection 中常用算法(一):RetinaNet 及配置详解 - 知乎 (zhihu.com)
本文是结合上面官方提供的文章和b站噼里啪啦博主的讲解结合起来学习的。
解读总共包含两部分,第一部分是对代码含义解读,第二部分就是对代码debug进行调试,了解数据流。?
本文不同于官方提供的解读文章共有两点:debug调试和3.2.0版本的代码位置说明。
1.RetinaNet网络结构图
?该图片引用B站噼里啪啦博主。该网络的创新点是提出Focal Loss焦点损失函数。从而使得一阶段检测器的精度能够超过二阶段检测器。

? ? ? ? ? ? ? ? ? ? ? ? ? ? ? ? ? ? ? ? ? ? ? ? ? ? ? ? ? ? ? 1.retinanet整体网络结构图

? ? ? ? ? ? ? ? ? ? ? ? ? ? ? ? ? ? ? ? ? ? ? ? ? ? ? ? ? ? ? ? ? ?2.retinanet分类回归分支图?
2.RetinaNet代码详解?
2.1Backbone
这里我选用的配置文件位置在configs/retinanet/retinanet_r18_fpn_1x_coco.py。配置文件的含义如下。
- ? retinanet表示算法名称
- ? r18表示骨干网络名
- ? caffe和PyTorch是指Bottleneck模块的区别,省略情况下是PyTorch
- ? fpn表示Neck模块采用了FPN结构
- ? mstrain表示多尺度训练,一般对应pipeline中的resize类
- ?1X表示1倍数的epoch训练,即12个epoch
- ? coco表示在COCO数据集上训练
以Resnet18为例,骨干网络配置如下。
    backbone=dict(
#表示使用resnet18
        depth=18,
#表示固定stem+第一个stage的权重,不进行训练
        frozen_stages=1,
#使用pytorch提供的在imagenet上面训练过的权重作为预训练权重
        init_cfg=dict(checkpoint='torchvision://resnet18', type='Pretrained'),
#所有BN层的可学习参数都需要梯度更新
        norm_cfg=dict(requires_grad=True, type='BN'),
#backbone所有的BN层的均值和方差都直接采用全局预训练值,不进行更新
        norm_eval=True,
#Resnet系列包含stem+4个stage输出
        num_stages=4,
#表示四个stage的输出索引
        out_indices=(
            0,
            1,
            2,
            3,
        ),
#默认采用pytorch模式
        style='pytorch',
#骨架网络名
        type='ResNet'),
? ? ? ? ? ? ? ? ? ? ? ? ? ? ? ? ? ? ? ? ? ? ? ? ? ? ?3.retinanet骨干网络配置?
?在训练过程中stem+第一个stage不进行训练即参数不更新。BN层的均值和方差不更新,但β和γ这些可学习参数进行更新。尽量不更改上面的设置,效果更稳定。
2.1.1out_indices
resnet提出了骨架网络设计范式即stem+ n个stage+cls head,其forward流程是stem->4个stage->分类head,stem的输出stride是4,而4个stage的输出stride是4,8,16,32。这里的stride指的是下采样率。因为retinanet后面需要接FPN,故需要输出4个尺度特征图,因此四个stage的索引都需要。
以下代码位置:mmdet/models/backbones/resnet.py的641行左右。简要代码如下
        for i, layer_name in enumerate(self.res_layers):
            res_layer = getattr(self, layer_name)
            x = res_layer(x)
#如果i在out_incices中才保留
            if i in self.out_indices:
                outs.append(x)
        return tuple(outs)
? ? ? ? ? ? ? ? ? ? ? ? ? ? ? ? ? ? ? ? ? ? ? ? ? ? ? ? ? ? ? 4.out_indices代码?
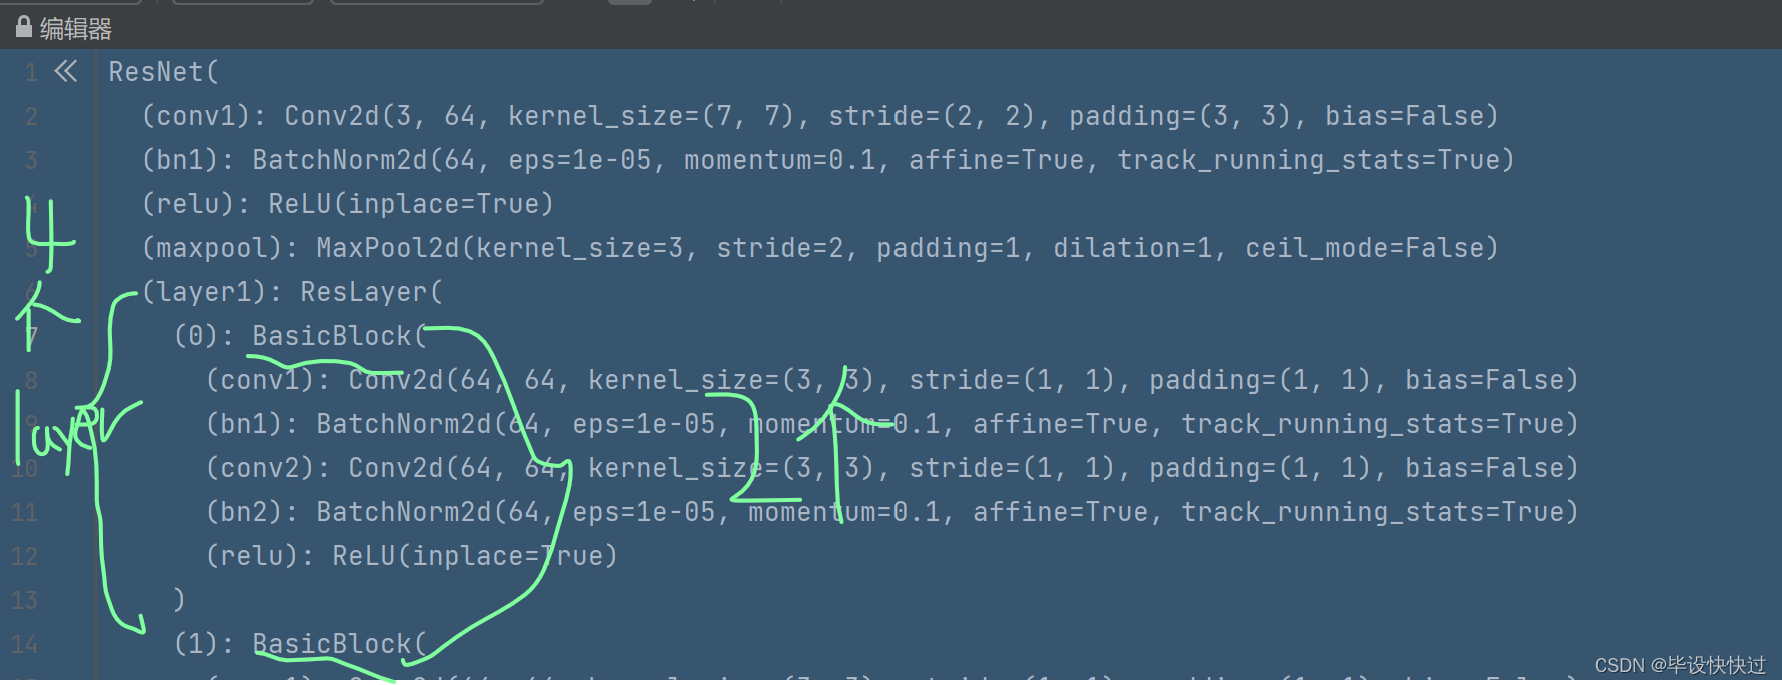
?首先由下图可以看出,该骨干网络由stem+4个layer和分类head构成,其中每个layer又包含2个basicblock,接下来debug看一下self的属性构成是否和分析一样。

? ? ? ? ? ? ? ? ? ? ? ? ? ? ? ? ? ? ? ? ? ? ? ? ? ? ? ? ? ? ? ?5.resnet18网络结构图?
?按照以下操作可以查看backbone网络结构。

? ? ? ? ? ? ? ? ? ? ? ? ? ? ? ? ? ? ? ? ? ? ? ? ? ? ? ? ? ? ? ? 6.debug? backbone?
?操作4及可以看到backbone网络构成和分析一致。

? ? ? ? ? ? ? ? ? ? ? ? ? ? ? ? ? ? ? ? ? ? ? ? ? ? ? ? ? ? ? ? ??7.backbone 的调试结果图?
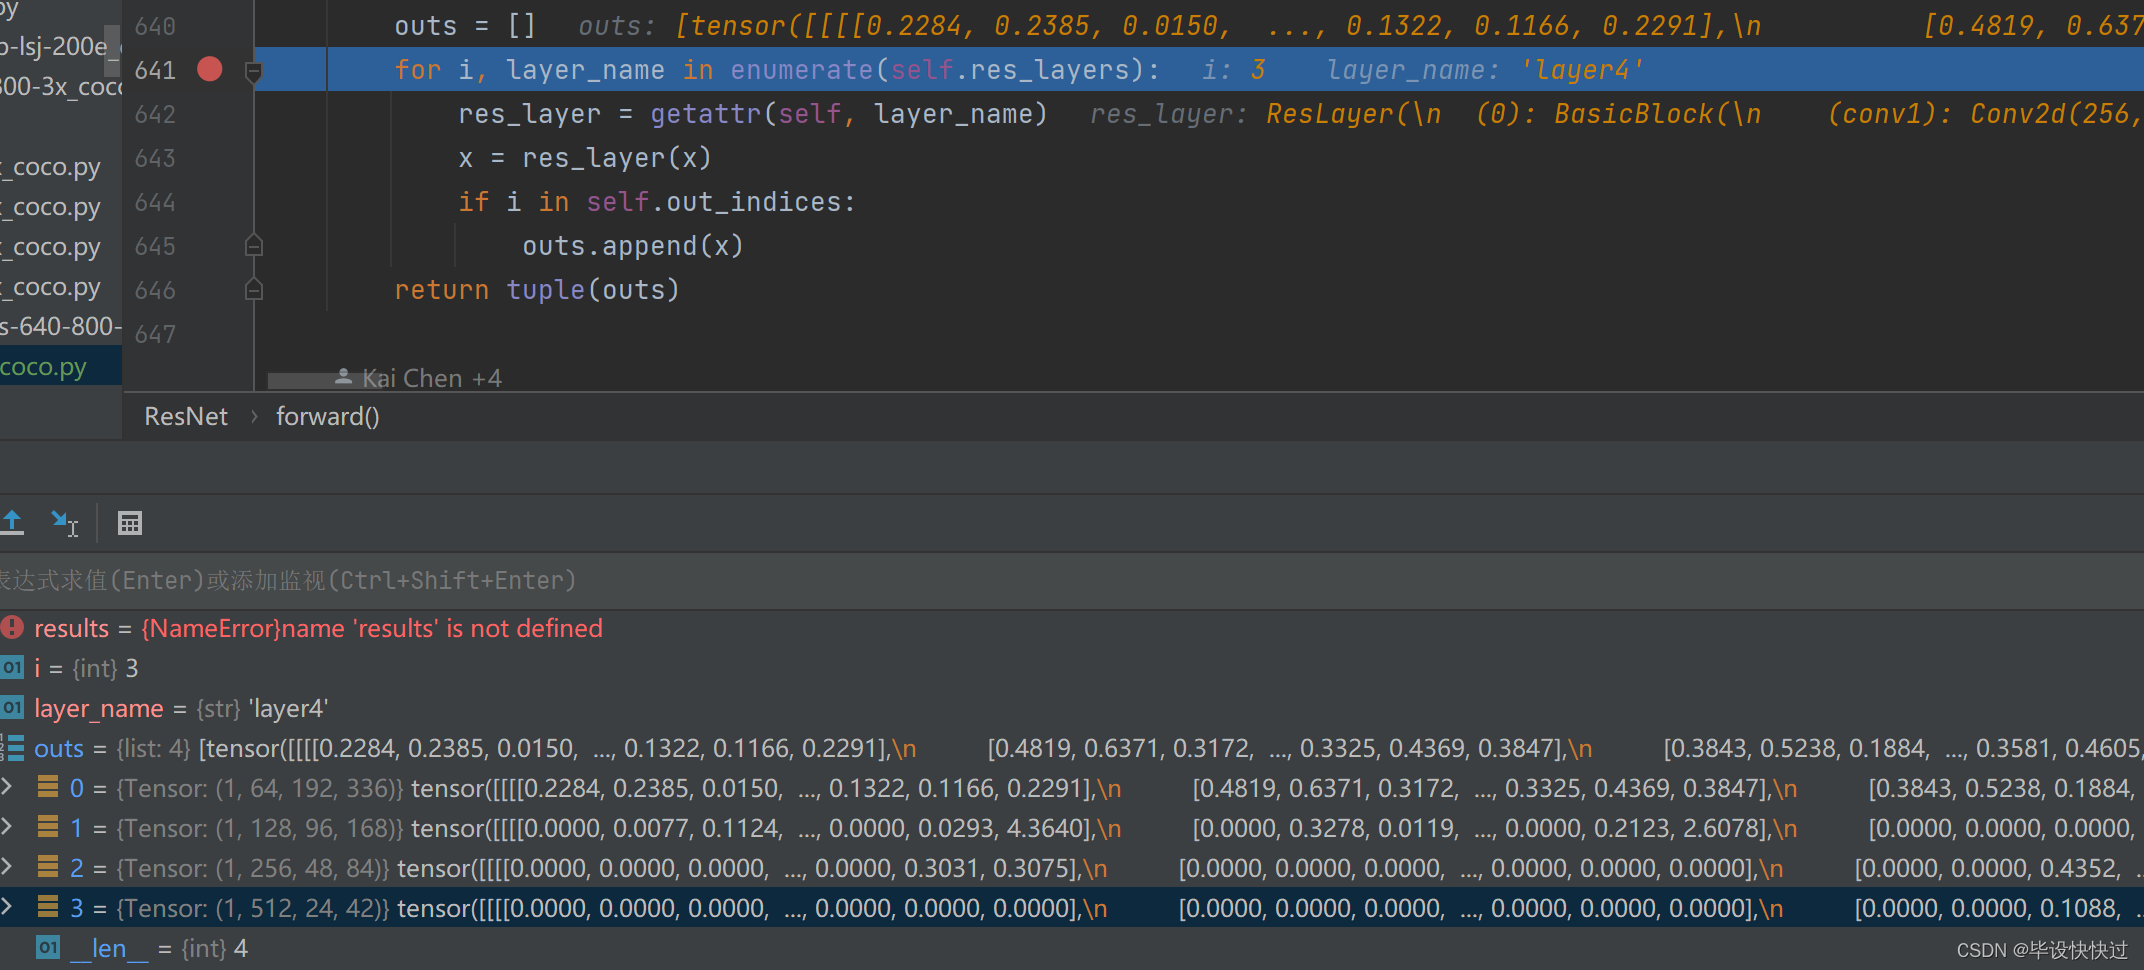
?接着继续往下debug。循环四轮后结果如下,可以看出此时已经将layer0~layer3的输出均已添加至outs列表中。

? ? ? ? ? ? ? ? ? ? ? ? ? ? ? ? ? ? ? ? ? ? ? ? ? ? ? ? ? ? ? 8.呼应图4所需的outs输出层?
?2.1.2frozen_stages
该参数表示你想冻结前几个stages的权重,Resnet结构包括stem+4个stage。
- frozen_stages=-1,表示全部可学习。
- frozen_stages=0,表示stem权重固定。
- frozen_stages=1,表示stem+第一个stage权重固定
- frozen_stages=2,表示stem和前两个stage权重固定
以下代码所在位置mmdet/models/backbones/resnet.py的613行左右。
#固定权重,需要两个步骤:1,设置eval模式; 2.requires_grad=False
   def _freeze_stages(self):
        if self.frozen_stages >= 0:
#固定stem权重
            if self.deep_stem:
                self.stem.eval()
                for param in self.stem.parameters():
                    param.requires_grad = False
            #上面的if条件不懂,直接跳到这里
            else:
            #将stem中的BN层和卷积层都设置为eval模式
                self.norm1.eval()
            #遍历stem中的BN层和卷积层
                for m in [self.conv1, self.norm1]:
            #遍历stem中的BN层和卷积层的参数
                    for param in m.parameters():
            #设置上面遍历的参数不需要梯度更新
                        param.requires_grad = False
#固定stage权重
        for i in range(1, self.frozen_stages + 1):
            m = getattr(self, f'layer{i}')
            m.eval()
            for param in m.parameters():
                param.requires_grad = False
? ? ? ? ? ? ? ? ? ? ? ? ? ? ? ? ? ? ? ? ? ? ? ? ? ? ? 9.frozen_stages代码?
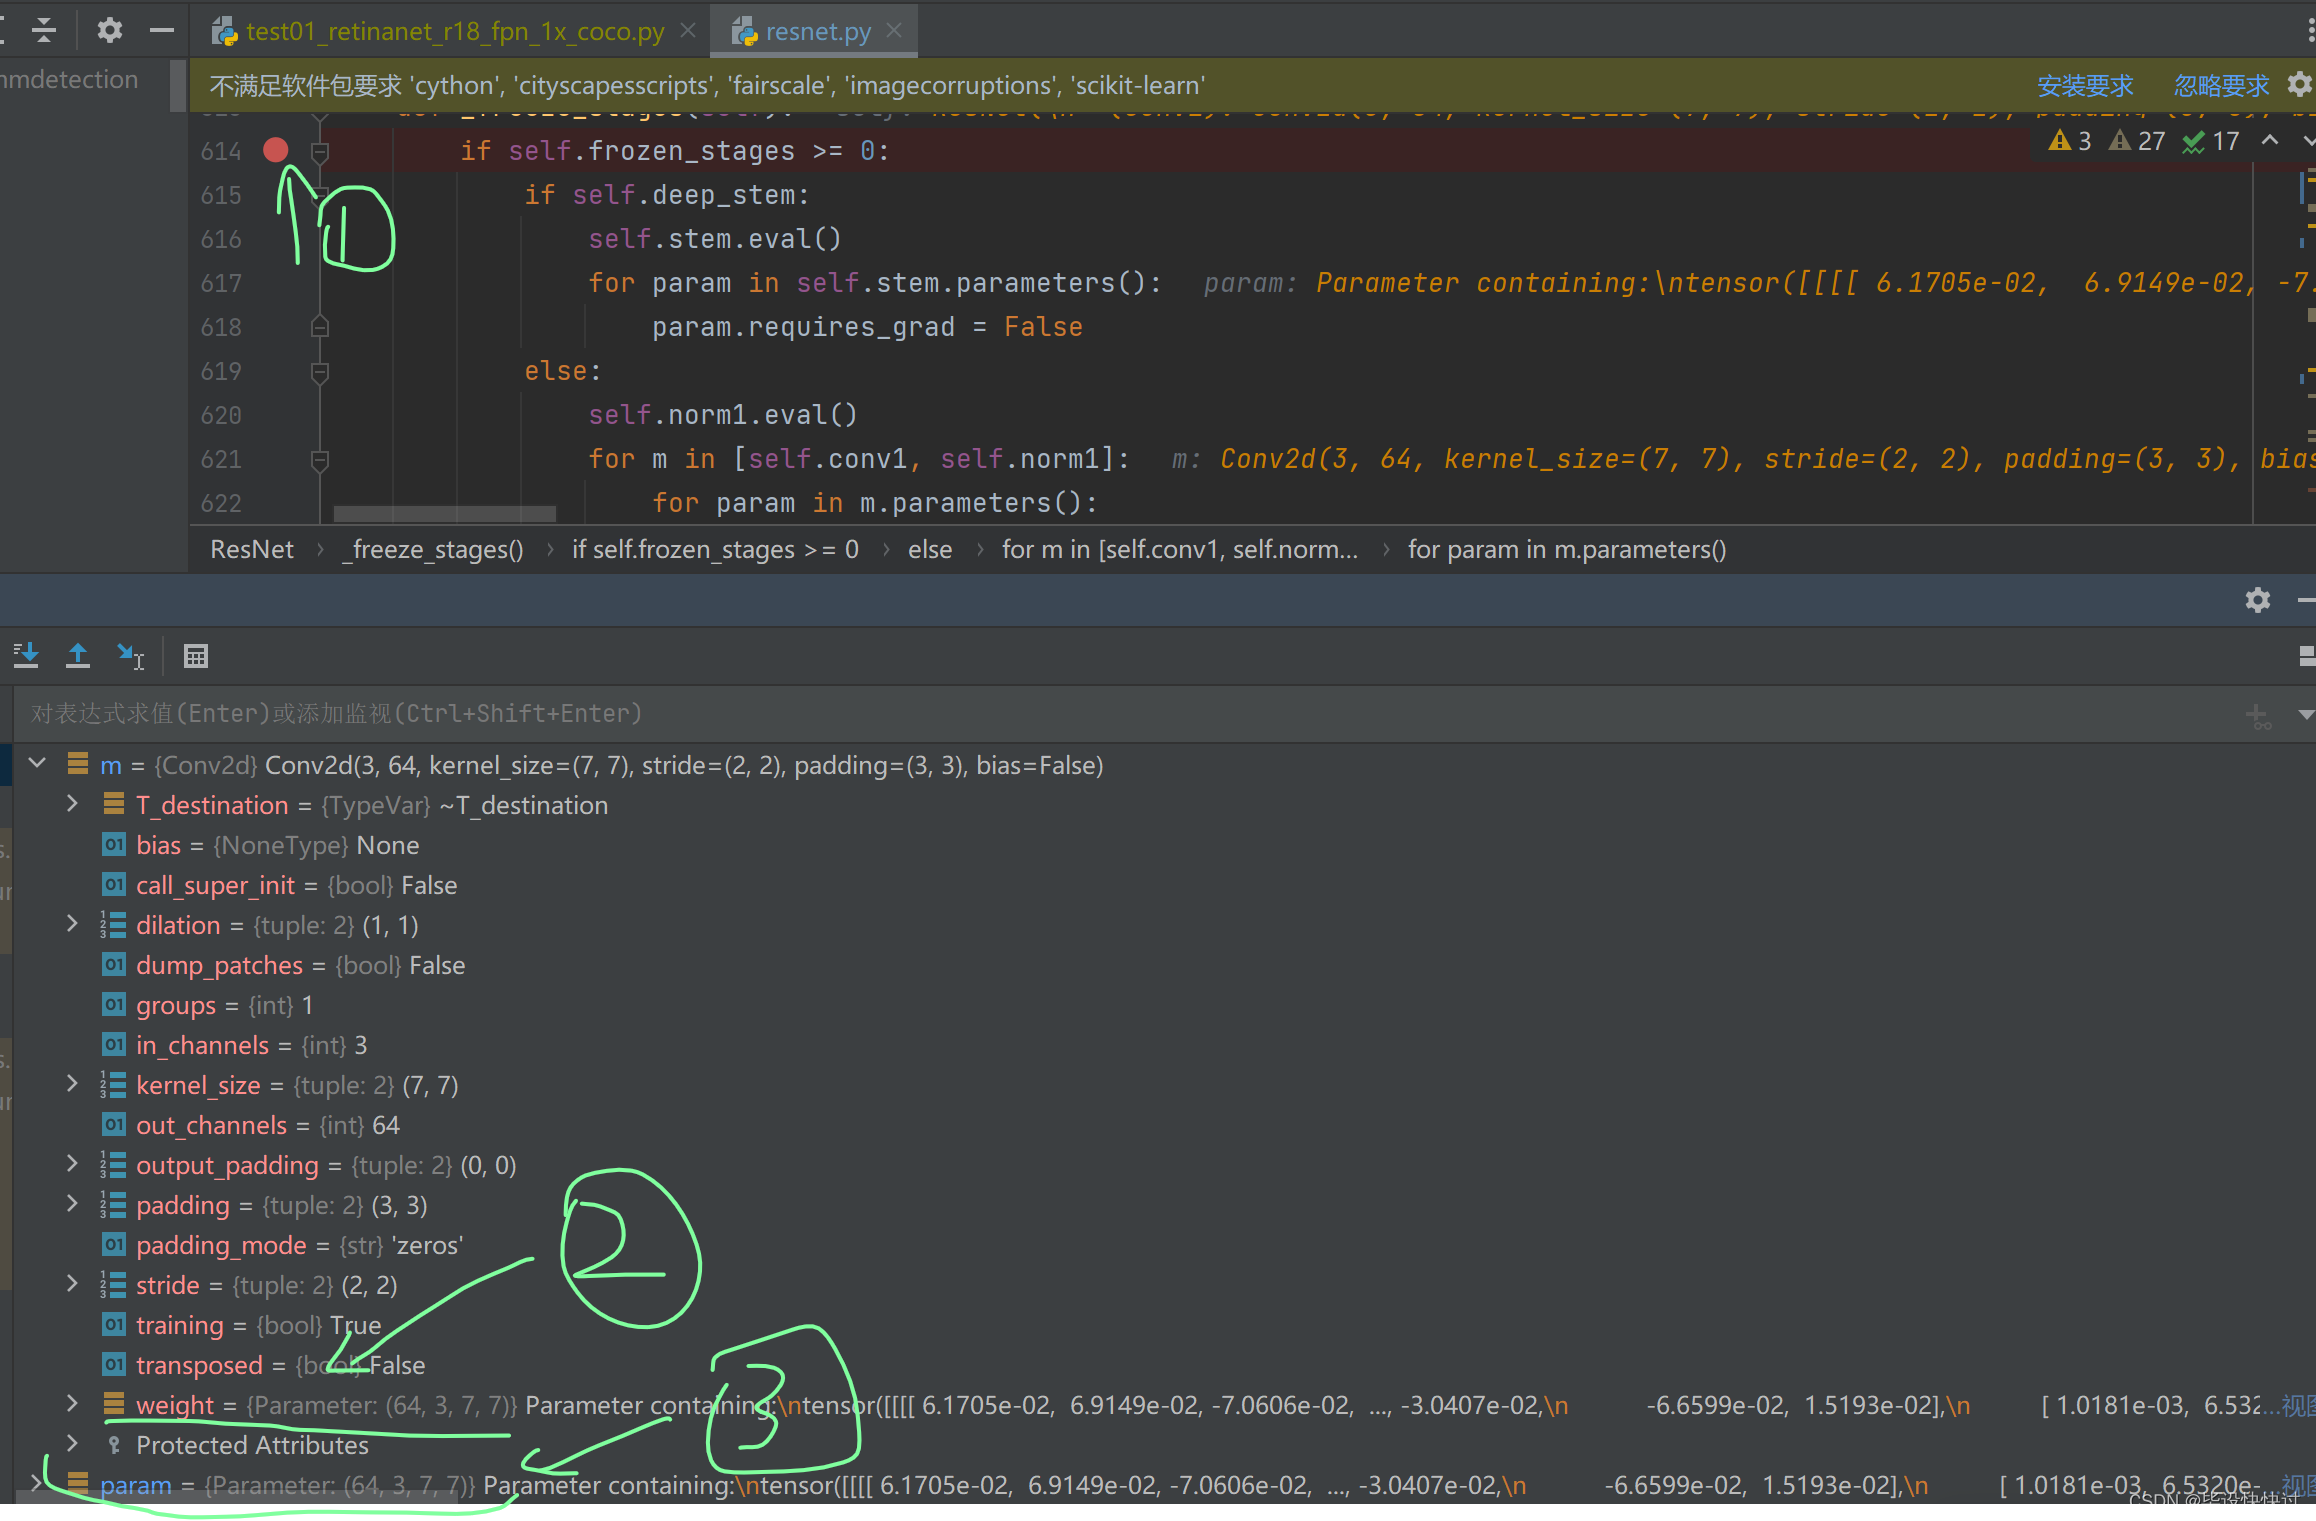
(1)debug调试查看stem的权重如何固定
? ? 由图7我们可以看出stem的构成包含conv1+bn1+relu+maxpool。这里只需要更新stem中的conv1+bn1的参数即可。
? ?由以下debug图得知,m参数遍历conv1+bn1两大层(不遍历里面的具体参数),当m遍历到conv1时,conv1内包含的参数如绿色箭头2所示。然后param再遍历conv1内的参数,如绿色箭头3所指。

? ? ? ? ? ? ? ? ? ? ? ? ? ? ? ? ? ? ? ? ? ? ? ? ? ? ? ? ? ? ? ? ?10.stem权重固定数据流?
?(2)debug调试查看stage权重如何固定
? ? ?由图7我们可知backbone由stem+4个layer+分类head构成,而每个layer又包含一个ResLayer,每个ResLayer又包含两个BasicBlock。理解这里的stage指的是layer,
? ? ?在627行调试,可以看到m的结果如绿色箭头1,点击右侧的“视图”如绿色箭头2所示,页面就会呈现绿色箭头3的画面。debug调试后可以看出,m取出layer1的所有属性,而param则是依次取出绿色箭头所指的conv1->bn1->conv2...。

? ? ? ? ? ? ? ? ? ? ? ? ? ? ? ? ? ? ? ? ? ? ? ? ? ? ? ? ? ? ?11.stage权重固定数据流?
? ?(3)train处的设置
需要特别注意的是:上述函数不能仅仅在类初始化的时候调用,因为在训练模式下,运行时候会调用model.train()导致BN层又进入train模式,最终BN没有固定,故需要在resnet中重写train方法。
以下代码的位置mmdet/models/backbones/resnet.py的648行左右。
    def train(self, mode=True):
        """Convert the model into training mode while keep normalization layer
        freezed."""
#这行代码会导致BN进入train模式
        super(ResNet, self).train(mode)
#再次调用,固定stem和前n个stage的BN
        self._freeze_stages()
#如果所有的BN都采用全局均值和方差,则需要对整个网络的BN都开启eval模式
        if mode and self.norm_eval:
            for m in self.modules():
                # trick: eval have effect on BatchNorm only
                if isinstance(m, _BatchNorm):
                    m.eval()
? ? ? ? ? ? ? ? ? ? ? ? ? ? ? ? ? ? ? ? ? ? ? ? ? ? ? ? ?12.train处设置BN冻结?
2.1.3norm_cfg和norm_eval
norm_cfg表示所采用的归一化算子,一般是BN或者GN,而requires_grad表示该算子是否需要梯度,也就是是否进行参数更新,而布尔参数norm_eval是 用于控制整个骨架网络的归一化算子是否需要变成eval模式。
RetinaNet中用法是norm_cfg=dict(type='BN',requires_grad=True),表示通过Registry模式实例化BN类,并且设置为参数可学习。在MMdetection中会常看到通过字典配置方式来实例化某个类的做法,底层是采用了装饰器模式进行构建,最大好处是扩展性极强,类和类之间的耦合度降低。
2.1.4style
style='caffe'和style='pytorch'的差别就在Bottleneck模块中

? ? ? ? ? ? ? ? ? ? ? ? ? ? ? ? ? ? ? ? ? ? ? ? 13.Bottleneck模块图?
Bottleneck是标准的1X1-3X3-1X1结构,考虑stride=2下采样的场景,caffe模式下,stride参数放置在第一个1X1卷积上,而Pytorch模式下,strde放在第二个3X3卷积上。
以下代码的位置:mmdet/models/backbones/resnet.py的154行左右。
        if self.style == 'pytorch':
            self.conv1_stride = 1
            self.conv2_stride = stride
        else:
            self.conv1_stride = stride
            self.conv2_stride = 1
? ? ? ? ? ? ? ? ? ? ? ? ? ? ? ? ? ? ? ? ? ? ? ? ?14 .style代码
?出现两种模式的原因是因为 ResNet 本身就有不同的实现,torchvision 的 resnet 和早期 release 的 resnet 版本不一样,使得目标检测框架在使用 Backbone 的时候有两种不同的配置,不过目前新网络都是采用 PyTorch 模式。
2.2Neck
Neck模块即为FPN,其简要结构如下所示。

? ? ? ? ? ? ? ? ? ? ? ? ? ? ? ? ? ? ? ? ? ? ? ? ? ? ? ? ? ? ? ? ?15.FPN简要结构图?
MMdetection中对应的配置为:
    neck=dict(
#额外输出层的特征图来源
        add_extra_convs='on_input',
#resnet模块输出的4个尺度特征图通道数
        in_channels=[
            64,
            128,
            256,
            512,
        ],
#FPN输出特征图个数
        num_outs=5,
#FPN输出的每个尺度特征图通道数
        out_channels=256,
#从输入多尺度特征图的第几个开始计算
        start_level=1,
        type='FPN')
? ? ? ? ? ? ? ? ? ? ? ? ? ? ? ? ? ? ? ? ? ? ? ? ? ? ? ? ? ? ? ?16.neck配置文件?
?
前面说过 ResNet 输出 4 个不同尺度特征图 (c2,c3,c4,c5),stride 分别是 (4,8,16,32),通道数为 (256,512,1024,2048),通过配置文件我们可以知道:
start_level=1?说明虽然输入是 4 个特征图,但是实际上 FPN 中仅仅用了后面三个,可见图一,只用了C3,C4,C5。num_outs=5?说明 FPN 模块虽然是接收 3 个特征图,但是输出 5 个特征图add_extra_convs='on_input'?说明额外输出的 2 个特征图的来源是骨架网络输出,而不是 FPN 层本身输出又作为后面层的输入out_channels=256?说明了 5 个输出特征图的通道数都是 256。
总结:FPN 模块接收 c3, c4, c5 三个特征图,输出 P3-P7 五个特征图,通道数都是 256, stride 为 (8,16,32,64,128),其中大 stride (特征图小)用于检测大物体,小 stride (特征图大)用于检测小物体。
?
2.3Head
Head的结构图可参见图2。
RetinaNet的Head包括分类和检测两个分支,且每个分支都包括4个卷积层,不进行参数共享,分类Head输出通道是num_class*K,检测head输出通道是4*K,K是anchor个数,虽然每个Head的分类和回归分支权重不共享,但5个输出特征图的Head模块权重是共享的。
其完整配置如下:
    bbox_head=dict(
        anchor_generator=dict(
            octave_base_scale=4,
            ratios=[
                0.5,
                1.0,
                2.0,
            ],
            scales_per_octave=3,
            strides=[
                8,
                16,
                32,
                64,
                128,
            ],
            type='AnchorGenerator'),
        bbox_coder=dict(
            target_means=[
                0.0,
                0.0,
                0.0,
                0.0,
            ],
            target_stds=[
                1.0,
                1.0,
                1.0,
                1.0,
            ],
            type='DeltaXYWHBBoxCoder'),
#中间特征图通道数
        feat_channels=256,
#FPN层输出特征图通道数
        in_channels=256,
        loss_bbox=dict(loss_weight=1.0, type='L1Loss'),
        loss_cls=dict(
            alpha=0.25,
            gamma=2.0,
            loss_weight=1.0,
            type='FocalLoss',
            use_sigmoid=True),
#自己数据集类别个数
        num_classes=4,
#每个分支堆叠4层卷积
        stacked_convs=4,
        type='RetinaHead'),
? ? ? ? ? ? ? ? ? ? ? ? ? ? ? ? ? ? ? ? ? ? ? ? ? ? ? ? ? ?17.head配置文件?
?2.3.1? head网络构建
以下代码位置mmdet/models/dense_heads/retina_head.py的64行左右。以下代码结合图2 和debug调试即可读懂。
    def _init_layers(self):
        """Initialize layers of the head."""
        self.relu = nn.ReLU(inplace=True)
        self.cls_convs = nn.ModuleList()
        self.reg_convs = nn.ModuleList()
        in_channels = self.in_channels
        for i in range(self.stacked_convs):
            self.cls_convs.append(
                ConvModule(
                    in_channels,
                    self.feat_channels,
                    3,
                    stride=1,
                    padding=1,
                    conv_cfg=self.conv_cfg,
                    norm_cfg=self.norm_cfg))
            self.reg_convs.append(
                ConvModule(
                    in_channels,
                    self.feat_channels,
                    3,
                    stride=1,
                    padding=1,
                    conv_cfg=self.conv_cfg,
                    norm_cfg=self.norm_cfg))
            in_channels = self.feat_channels
        self.retina_cls = nn.Conv2d(
            in_channels,
            self.num_base_priors * self.cls_out_channels,
            3,
            padding=1)
        reg_dim = self.bbox_coder.encode_size
        self.retina_reg = nn.Conv2d(
            in_channels, self.num_base_priors * reg_dim, 3, padding=1)
? ? ? ? ? ? ? ? ? ? ? ? ? ? ? ? ? ? ? ? ? ? ? ? ? ? ? ? ? ? ? ? ? ? ? 18.head层构建代码?
?在下图的位置处调试,
 ? ? ? ? ? ? ? ? ? ? ? ? ? ? ? ? ? ? ? ? ? ? ? ? ? ? ? ? ? ?19.head层构建代码调试点
?如图20可以看出,此时代码仅仅运行到64行,所以head内部的结构并没有堆叠的4个卷积快。
 ? ? ? ? ? ? ? ? ? ? ? ? ? ? ? ? ? ? ? ? ? ? ? ? ? ? ? ? ? ?20.还未构建卷积块时head的网络结构
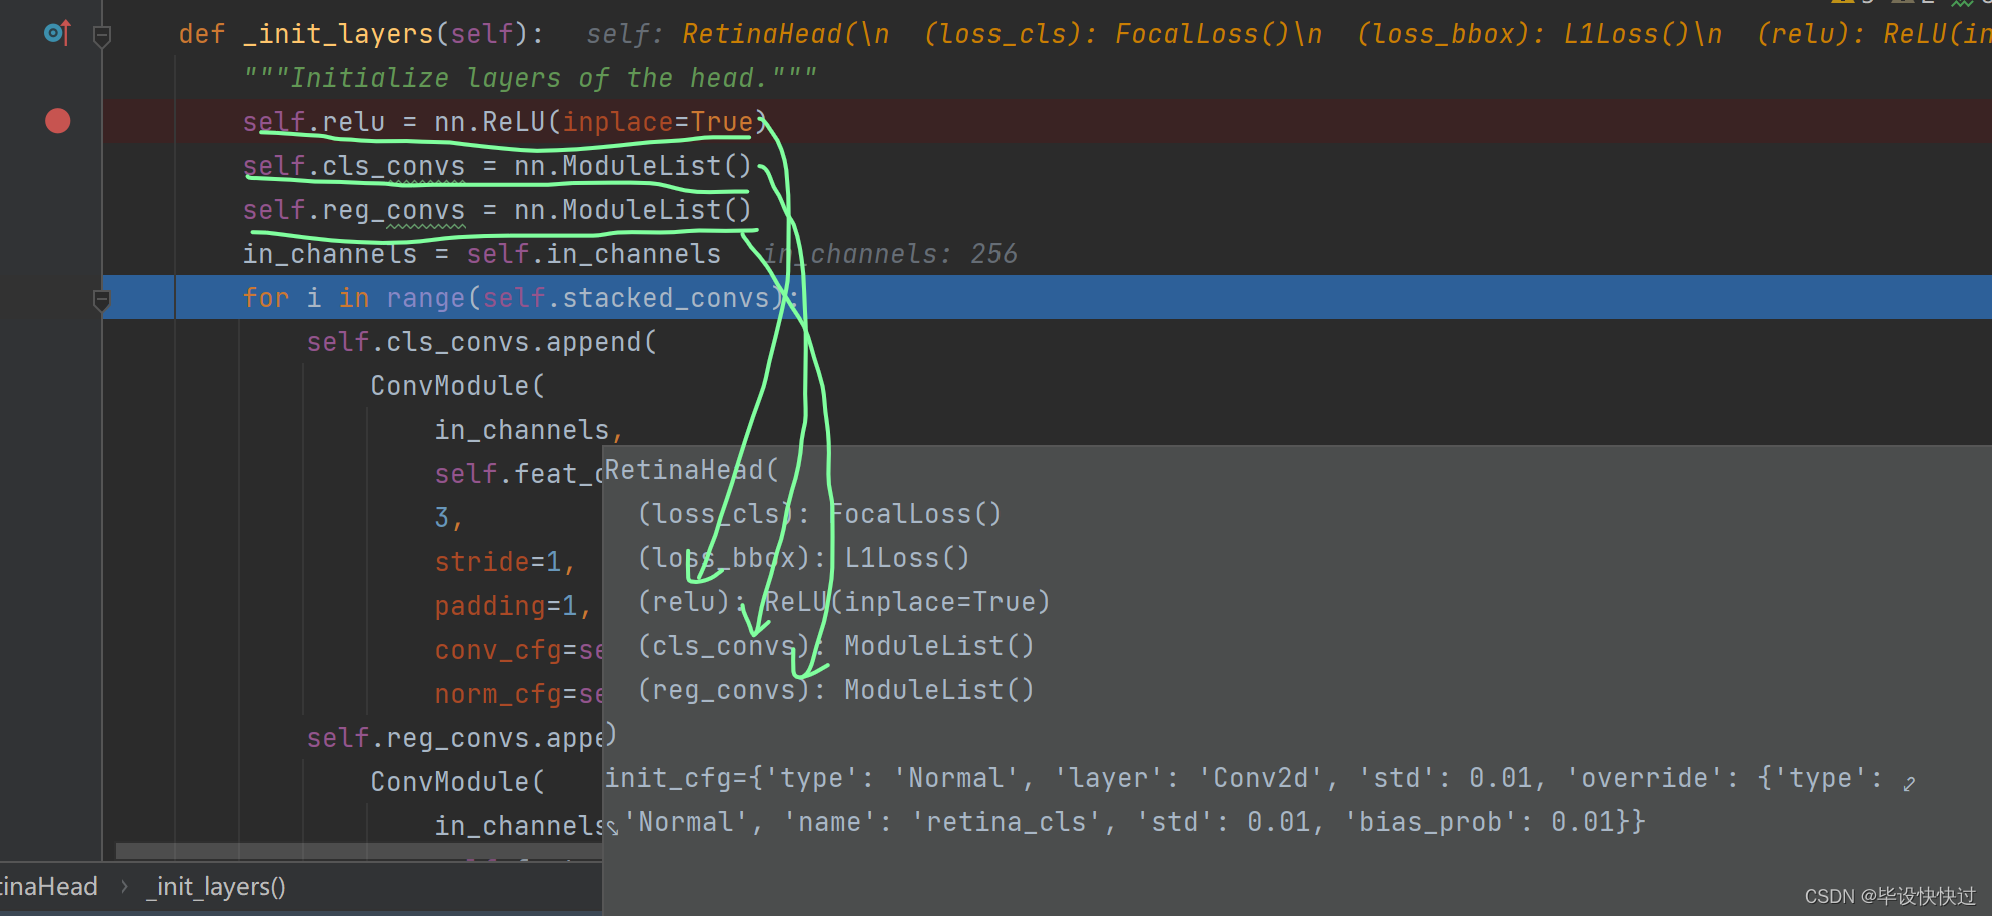
由图21可以看出,随着代码的一行又一行的运行,head的内部结构正在逐步增添新的子模块。

? ? ? ? ? ? ? ? ? ? ? ? ? ? ? ? ? ? ? ? ? ? ? ? ? ? ? ? ? 21.构建了分类和回归分支的head内部结构?
?由图22可以得知,此时的head内部已经是分类和回归分支上分别堆叠了4个卷积块。
? ? ? ? ? ? ? ? ? ? ? ? ? ? ? ? ? ? ? ? ? ? ? ? ? ? ? ? ? ? 22.构建完毕后的head内部结构
?2.3.2单张特征图的forward流程
以下代码的位置:mmdet/models/dense_heads/retina_head.py的112行左右。
#x是p3-p7中的某个特征图
        cls_feat = x
        reg_feat = x
        #4层不共享卷积参数
        for cls_conv in self.cls_convs:
            cls_feat = cls_conv(cls_feat)
        for reg_conv in self.reg_convs:
            reg_feat = reg_conv(reg_feat)
#输出特征图
        cls_score = self.retina_cls(cls_feat)
        bbox_pred = self.retina_reg(reg_feat)
        return cls_score, bbox_pred
? ? ? ? ? ? ? ? ? ? ? ? ? ? ? ? ? ? ? ? ? ? ? ? ? ? ? ? ? ? ? ? ? ? 23.单张图forward代码
?debug后的得分矩阵如绿色箭头所示。
 ? ? ? ? ? ? ? ? ? ? ? ? ? ? ? ? ? ? ? ? ? ? ? ? ? ? ? ? ? ? ? ? ? ? ? ? ?24.单张图forward调试
2.4BBox Assigner
2.4.1AnchorGeneratior
RetinaNet属于Anchor-based算法,在运行bbox属性分配前需要得到每个输出特征图位置的anchor列表,故在分析BBox Assigner前,需要先详细说明下anchor生成过程,其配置文件如下:
        anchor_generator=dict(
#特征图anchor的base scale,值越大,所有的anchor的尺度会越大
            octave_base_scale=4,
#每个特征图有3个高宽比例
            ratios=[
                0.5,
                1.0,
                2.0,
            ],
#每个特征图有3个尺度,octave_base_scaleXstridesX(2**0, 2**(1/3), 2**(2/3))
            scales_per_octave=3,
#特征图对应的stride,必须与特征图stride一致,不可以随意更改。
            strides=[
                8,
                16,
                32,
                64,
                128,
            ],
            type='AnchorGenerator'),
? ? ? ? ? ? ? ? ? ? ? ? ? ? ? ? ? ? ? ? ? ? ? ? ? ? ? ? ? ? ? ? 25.anchor Generator配置?
从上面配置可以看出:RetinaNet一共5个输出特征图,每个特征图上有3种尺度和3种宽高比,每个位置(每个像素)一共9个anchor,并且通过octave_base_scale参数来控制全局anchor的base scales,如果自定义数据集中普遍都是大物体或者小物体,则可以修改octave_base_scale参数。
(1)先对单个位置(0,0)生成base anchors
以下代码所在位置:mmdet/models/task_modules/prior_generators/anchor_generator.py的715行左右。
        w = base_size
        h = base_size
#检查center变量是否为None,是则计算中心点,否则采用所传中心点
        if center is None:
            x_center = self.center_offset * (w - 1)
            y_center = self.center_offset * (h - 1)
        else:
            x_center, y_center = center
#计算特征图相对于原图的高宽比例,可以理解为特征图的缩小倍数
        h_ratios = torch.sqrt(ratios)
        w_ratios = 1 / h_ratios
#base_size 乘上宽高比例乘上尺度,就可以得到 n 个 anchor 的原图尺度wh值
        if self.scale_major:
            ws = (w * w_ratios[:, None] * scales[None, :]).view(-1)
            hs = (h * h_ratios[:, None] * scales[None, :]).view(-1)
        else:
            ws = (w * scales[:, None] * w_ratios[None, :]).view(-1)
            hs = (h * scales[:, None] * h_ratios[None, :]).view(-1)

        # use float anchor and the anchor's center is aligned with the
        # pixel center
# 得到 x1y1(左上角坐标)x2y2(右下角坐标) 格式的 base_anchor 坐标值
        base_anchors = [
            x_center - 0.5 * (ws - 1), y_center - 0.5 * (hs - 1),
            x_center + 0.5 * (ws - 1), y_center + 0.5 * (hs - 1)
        ]
        base_anchors = torch.stack(base_anchors, dim=-1).round()
? ? ? ? ? ? ? ? ? ? ? ? ? ? ? ? ? ? ? ? ? ? ? ? ? ? ? ? ? ? ? ?26.base_anchor生成代码?
?(2)利用输入特征图尺寸加上base anchors,得到每个特征图位置的对于原图的anchors
以下代码位置:mmdet/models/task_modules/prior_generators/anchor_generator.py的398行左右。
        #从特征图的大小中获取高度和宽度。
        feat_h, feat_w = featmap_size
        #根据特征图的宽度和高度以及步长计算出在原图上的x轴和y轴方向上的偏移量
        shift_x = torch.arange(0, feat_w, device=device) * stride[0]
        shift_y = torch.arange(0, feat_h, device=device) * stride[1]
        #使用_meshgrid方法生成一个网格,该网格的每个点的坐标都是其在x轴和y轴方向上的偏移量。
        shift_xx, shift_yy = self._meshgrid(shift_x, shift_y)
        #将x轴和y轴方向上的偏移量堆叠在一起,形成一个形状为(K, 1, 4)的张量,其中K是锚点的数量。
        shifts = torch.stack([shift_xx, shift_yy, shift_xx, shift_yy], dim=-1)
        #将偏移量张量的类型设置为与基础锚点相同。
        shifts = shifts.type_as(base_anchors)
        # first feat_w elements correspond to the first row of shifts
        # add A anchors (1, A, 4) to K shifts (K, 1, 4) to get
        # shifted anchors (K, A, 4), reshape to (K*A, 4)
        #将基础锚点和偏移量相加,得到所有可能的锚点。
        all_anchors = base_anchors[None, :, :] + shifts[:, None, :]
        #将所有可能的锚点展平成一维张量
        all_anchors = all_anchors.view(-1, 4)
        # first A rows correspond to A anchors of (0, 0) in feature map,
        # then (0, 1), (0, 2), ...
        return all_anchors
? ? ? ? ? ? ? ? ? ? ? ? ? ? ? ? ? ? ? ? ? ? ? ? ? ? ? ? ? ? ? ? ? ? ? ? ? 27.映射到原图上的anchor?
?简单来说就是:假设一共m个输出特征图
- 遍历m个输出特征图,在每个特征图的(0,0)或者说原图的(0,0)坐标位置生成base_anchors,注意base_anchors不是特征图尺寸,而是原图尺寸。
- 遍历m个输出特征图中每个特征图上每个坐标点,将其映射到原图坐标上
- 原图坐标加上base_anchors,就可以得到特征图每个位置的对应到原图尺度的anchor列表,anchor列表长度为m。
2.4.2 BBox Assigner
计算得到输出特征图上面每个点对应原图anchor坐标后,就可以和gt信息计算每个anchor的正负样本属性,对应配置如下
        assigner=dict(
        #忽略bboxes的阈值,-1表示不忽略
            ignore_iof_thr=-1,
        #正样本阈值下限
            min_pos_iou=0,
        #负样本阈值
            neg_iou_thr=0.4,
        #正样本阈值
            pos_iou_thr=0.5,
        #最大iou原则分配器
            type='MaxIoUAssigner'),
? ? ? ? ? ? ? ? ? ? ? ? ? ? ? ? ? ? ? ? ? ? ? ? ? ? ? ? ? ? ? 28.bbox assigner配置?
?(1)初始化所有anchor为忽略样本
假设所有输出特征的所有anchor总数一共n个,对应某张图片中gt bbox个数为m,首先初始化长度为n的assigned_gt_inds,全部赋值为-1,表示当前全部设置为忽略样本。
以下代码位置:mmdet/models/task_modules/assigners/max_iou_assigner.py的257行左右。
        # 1. assign -1 by default
        assigned_gt_inds = overlaps.new_full((num_bboxes, ),
                                             -1,
                                             dtype=torch.long)
? ? ? ? ? ? ? ? ? ? ? ? ? ? ? ? ? ? ? ? ? ? ? ? ? ? ? ? ? ? ? ? ?29.初始anchor索引代码
由下图可以看出,该张图片的所有特征图的anchor一共有193374个,gt一共有两个。

? ? ? ? ? ? ? ? ? ? ? ? ? ? ? ? ? ? ? ? ? ? ? ? ? ? ? ? ? ? ? ? ?30.debug图片anchor数量
由下图可以看出已经将该张图片的193374个anchor的对应索引全部赋值为-1。

? ? ? ? ? ? ? ? ? ? ? ? ? ? ? ? ? ? ? ? ? ? ? ? ? ? ? ? ? ? ? ? ?31.初始anchor索引值为-1
(2)计算背景样本
将每个anchor与所有gt bbox计算iou,找到最大iou,如果该iou小于neg_iou_thr或者在背景样本阈值范围内,则该anchor对应索引位置的assigned_gt_inds设置为0,表示负样本(背景样本)
以下代码位置:mmdet/models/task_modules/assigners/max_iou_assigner.py的278行左右。
        # for each anchor, which gt best overlaps with it
        # for each anchor, the max iou of all gts
        max_overlaps, argmax_overlaps = overlaps.max(dim=0)
        # for each gt, which anchor best overlaps with it
        # for each gt, the max iou of all proposals
        gt_max_overlaps, gt_argmax_overlaps = overlaps.max(dim=1)

        # 2. assign negative: below
        # the negative inds are set to be 0
        if isinstance(self.neg_iou_thr, float):
            assigned_gt_inds[(max_overlaps >= 0)
                             & (max_overlaps < self.neg_iou_thr)] = 0
        elif isinstance(self.neg_iou_thr, tuple):
            assert len(self.neg_iou_thr) == 2
        #可以设置一个范围
            assigned_gt_inds[(max_overlaps >= self.neg_iou_thr[0])
                             & (max_overlaps < self.neg_iou_thr[1])] = 0
? ? ? ? ? ? ? ? ? ? ? ? ? ? ? ? ? ? ? ? ? ? ? ? ? ? ? ? ?32.计算背景样本代码实现
(3)计算高质量正样本
将每个anchor和所有的gt bbox计算iou,找出最大iou,如果当前iou大于等于pos_iou_thr,则设置该anchor对应所有的assigner_gt_inds设置为当前匹配gt bbox的编号+1(后面会减掉1),表示该anchor负责预测该gt bbox,且是高质量anchor,之所以要加一,是为了区分背景样本(背景样本的assigned_gt_inds值为0),这里建议看b站霹雳巴拉博主讲的faster rcnn的那一块。
以下代码位置:mmdet/models/task_modules/assigners/max_iou_assigner.py的294行左右。
        pos_inds = max_overlaps >= self.pos_iou_thr
        assigned_gt_inds[pos_inds] = argmax_overlaps[pos_inds] + 1
(4)适当增加更多正样本?
在第三步计算高质量正样本中可能会出现某些 gt bbox 没有分配给任何一个 anchor (由于 iou 低于?pos_iou_thr),导致该 gt bbox 不被认为是前景物体,此时可以通过?self.match_low_quality=True?配置进行补充正样本。
对于每个 gt bbox 需要找出和其最大 iou 的 anchor 索引,如果其 iou 大于?min_pos_iou,则将该 anchor 对应索引的?assigned_gt_inds?设置为正样本,表示该 anchor 负责预测对应的 gt bbox。通过本步骤,可以最大程度保证每个 gt bbox 都有相应的 anchor 负责预测,但是如果其最大 iou 值还是小于?min_pos_iou,则依然不被认为是前景物体。
代码位置:mmdet/models/task_modules/assigners/max_iou_assigner.py的297行。
        if self.match_low_quality:
            # Low-quality matching will overwrite the assigned_gt_inds assigned
            # in Step 3. Thus, the assigned gt might not be the best one for
            # prediction.
            # For example, if bbox A has 0.9 and 0.8 iou with GT bbox 1 & 2,
            # bbox 1 will be assigned as the best target for bbox A in step 3.
            # However, if GT bbox 2's gt_argmax_overlaps = A, bbox A's
            # assigned_gt_inds will be overwritten to be bbox 2.
            # This might be the reason that it is not used in ROI Heads.
            for i in range(num_gts):
                if gt_max_overlaps[i] >= self.min_pos_iou:
                    if self.gt_max_assign_all:
                        max_iou_inds = overlaps[i, :] == gt_max_overlaps[i]
                        assigned_gt_inds[max_iou_inds] = i + 1
                    else:
                        assigned_gt_inds[gt_argmax_overlaps[i]] = i + 1
?
此时可以可以得到如下总结:
- 如果 anchor 和所有 gt bbox 的最大 iou 值小于 0.4,那么该 anchor 就是背景样本
- 如果 anchor 和所有 gt bbox 的最大 iou 值大于等于 0.5,那么该 anchor 就是高质量正样本
- 如果 gt bbox 和所有 anchor 的最大 iou 值大于等于 0(可以看出每个 gt bbox 都一定有至少一个 anchor 匹配),那么该 gt bbox 所对应的 anchor 也是正样本
- 其余样本全部为忽略样本即 anchor 和所有 gt bbox 的最大 iou 值处于 [0.4,0.5) 区间的 anchor 为忽略样本,不计算 loss
2.5BBox Encoder Decoder
在anchor-based算法中,为了利用anchor信息进行更快更好的收敛,一般会对head输出的 bbox分支4个值进行编解码操作,作用有两个:
1.更好的平衡分类和回归loss,以及平衡bbox四个预测值的loss
2.训练过程中引入anchor信息,加快收敛。
RetinaNet采用的编解码函数是主流的DeltaXYWHBBoxCoder,其配置如下:
        bbox_coder=dict(
            target_means=[
                0.0,
                0.0,
                0.0,
                0.0,
            ],
            target_stds=[
                1.0,
                1.0,
                1.0,
                1.0,
            ],
type='DeltaXYWHBBoxCoder'),编解码具体步骤和公式参考官网轻松掌握 MMDetection 中常用算法(一):RetinaNet 及配置详解 - 知乎 (zhihu.com)
这段设计的代码位置:mmdet/models/task_modules/coders/delta_xywh_bbox_coder.py
2.6Loss
依然是参考原文。同时推荐去b站噼里啪啦博主的yolov3第三小节的讲解处观看理解。
2.7测试流程
对应的配置如下所示。更多调试过程和faster-rcnn差不多。mmdetection3.2.0之faster-rcnn源码解读-CSDN博客
    test_cfg=dict(
#最终输出的每张图片最多bbox个数
        max_per_img=100,
#过滤掉最小的bbpx尺寸
        min_bbox_size=0,
#nms方法和nms阈值
        nms=dict(iou_threshold=0.5, type='nms'),
#nms前每个输出层最多保留1K个proposal
        nms_pre=1000,
#分值阈值
score_thr=0.05),本文来自互联网用户投稿,该文观点仅代表作者本人,不代表本站立场。本站仅提供信息存储空间服务,不拥有所有权,不承担相关法律责任。 如若内容造成侵权/违法违规/事实不符,请联系我的编程经验分享网邮箱:chenni525@qq.com进行投诉反馈,一经查实,立即删除!