Vue学习计划-Vue2--VueCLi(九)vue路由详解
发布时间:2023年12月18日
1. 介绍
- 理解: 一个路由(
route)就是一组映射关系(key-value), 多个路由需要路由器(router)进行管理 - 前端路由:
key是路径,value是组件,通俗的将就是通过一个路径key,可以访问vue的组件,实现组件的访问与跳转以及传参
2. 基本使用
- 安装
vue-router, 命令npm i vue-router - 应用插件:
Vue.use(vueRouter) - 编写
router配置项:
配置
component有两种方式
- 第一种:提前加载
import HomeView from '../views/HomeView.vue'
component: HomeView- 第二种:懒加载,等跳转到该路由的时候再加载
component: () => import('../views/AboutView.vue')
import Vue from 'vue'
// 引入 VueRouter
import VueRouter from 'vue-router'
// 引入 HomeView 组件
import HomeView from '../views/HomeView.vue'
// 应用VueRouter
Vue.use(VueRouter)

// 配置路由规则
const routes = [
    {
        path: '/',
        name: 'home',
        component: HomeView
    },
    {
        path: '/about',
        name: 'about',
        component: () => import('../views/AboutView.vue')
    }
]

// 创建router实例对象,去管理一组一组的路由规则
const router = new VueRouter({
mode: 'history',
base: process.env.BASE_URL,
routes
})

// 暴露router
export default router
-
实现切换(选择路由会有默认class名
router-link-exact-active)可设置高亮样式
<router-link to="/about">About</router-link> -
指定显示位置
<router-view/>
3. 几个注意点
- 路由组件通常存放在
views/pages文件夹,一般组件通常存放在components文件夹 - 通过切换,“隐藏”了的路由组件,默认是被销毁的,需要的时候再去挂载
- 每个组件都有自己的
$route属性,里面存储这自己的路由信息,当然如果有时候我们需要在组件内监听路由的变化或者拿到路由的参数,在watch内深度监听$route试试吧 - 每个应用只有一个
router,可以通过$router属性获取到
4. 多级路由
- 配置路由规则,使用
children配置项:
const routes = [
    {
        path: "/home",
        name: "home",
        component: HomeView,
    },
    {
        path: "/about",
        name: "about",
        component: () => import("../views/AboutView.vue"),
        children: [
        <!-- 子路由path不加 / -->
        {
            path: "news",
            name: "news",
            component: () => import("../views/NewsView.vue"),
        },
        {
            path: "message",
            name: "news",
            component: () => import("../views/MessageView.vue"),
        },
        ],
    },
];
- 跳转(需要完整路径):
<router-link to="/about/news">News</router-link>
5. 命名路由(给路由添加name)
- 作用: 可以简化路由的跳转
- 如何使用:
- 给路由命名:
{ path: "/about", name: "about", // 给路由起名字 component: () => import("../views/AboutView.vue"), children: [ { path: "news", name: "news", component: () => import("../views/NewsView.vue"), }, ], }- 简化跳转:
 // 字符串跳转
 <router-link :to="{ name: 'news' }">News</router-link>
 // 对象跳转
  :to="{
     name: 'news',
     query: {
       id: item.id,
       name: item.name,
     },
   }"
6. 路由的query参数
路径呈现就是
http://localhost:8080/news?id=1&name=hello
- 传递参数
<ul>
<li v-for="item in list" :key="item.id">
<!-- 跳转路由并携带query参数,to的字符串写法 -->
<!-- <router-link
    :to="`/about/message/article?id=${item.id}&name=${item.name}`"
    >{{ item.name }}</router-link
> -->
<!-- 跳转路由并携带query参数,to的对象写法 -->
<router-link
    :to="{
    path: '/about/message/article',
    query: {
        id: item.id,
        name: item.name,
    },
    }"
    >{{ item.name }}</router-link
>
</li>
</ul>
- 接收参数:
$route.query.id
$route.query.name
7. 路由的params参数
路径呈现就是
http://localhost:8080/news/1/hello
- 配置路由,声明接收
params参数
 {
    path: "message",
    name: "messages",
    component: () => import("../views/MessageView.vue"),
    children: [
      {
        path: "article/:id/:name",
        name: "article",
        component: () => import("../views/ArticleView.vue"),
      },
    ],
  },
- 传递参数
   <!-- 路由跳转并携带params参数 -->
    <!-- <router-link :to="`/about/message/article/${item.id}/${item.name}`">{{
      item.name
    }}</router-link> -->
    <!-- 跳转路由并携带params参数,to的对象写法 -->
    <router-link
      :to="{
        name: 'article',
        params: {
          id: item.id,
          name: item.name,
        },
      }"
      >{{ item.name }}</router-link
    >
特别注意:路由携带params参数时,若使用to的对象写法,则不能使用path配置项,必须使用name配置!!
- 接收参数
    $route.params.id
    $route.params.name
8. 路由的props配置
- 作用: 让路由组件更方便的收到参数
{
    name: 'about',
    path: '/about/:id',
    component: About
    // 第一种写法:props值为对象,该对象中所有的key-value的组合最终都会通过props传给About组件
    // props: {a: 900}
    // 第二种写法:props值为布尔值,布尔值为true,则把路由收到的所以params参数通过props传给ABout组件
    // props: true
    // 第三种写法:props值为函数,该函数返回的对象中每一组key-value都会通过props传给About组件
    props(route) {
        return {
            id: route.query.id
            name: route.query.name
        }
    }
}
9. <router-link>的replace属性
- 作用:控制路由跳转时操作浏览器历史记录的模式
- 浏览器的记录有两中写入方式: 分别为
push和replace,push是追加历史记录,replace是替换当前记录,路由跳转时候默认为push
3.如何开启replace模式:<router-link replace ....>About</router-link>
10. 编程式路由导航
- 作用: 不借助
<router-link>实现路由跳转,让路由跳转更加灵活 - 具体代码
<!-- 路由跳转 -->
this.$router.push({
    name: "article",
    params: {
        id: item.id,
        name: item.name,
    },
})
.catch(() => {
    // console.log(res);
});

<!-- 路由替换 -->
this.$router.replace({
    name: "article",
    params: {
        id: item.id,
        name: item.name,
    },
})
.catch(() => {
    // console.log(res);
});

this.$router.back() // 后退
this.$router.forward() // 前进
<!-- go可返回可前进, 正数前进,负数后退 -->
this.$router.go(number)
11. 缓存路由组件(keep-alive包裹)
路由组件在切换的时候 是会被销毁的。当有时候我们切换的时候想要做一个缓存,把上一个路由组件缓存下来
- 作用:让不显示的路由保持挂载,不被销毁
- 具体编码:
<!-- include 是组件名 -->
<keep-alive include="NewsView">
  <router-view></router-view>
</keep-alive>
<!-- 若是多个 -->
 <keep-alive :include="['NewsView']">
  <router-view></router-view>
</keep-alive>
12. 两个新的生命周期钩子(当缓存路由的时候激活)
- 作用: 路由组件所独有的两个钩子,用于捕获路由组件的激活状态
- 具体名字:
activated路由组件被激活时触发deactivated路由组件失活时触发
- 我们重点解释一下这两个生命周期的钩子的用处?举个栗子:
-
我们的路由组件内有
news路由:

-
news组件内部呢我们代码如下:

-
- 在要展示路由组件内呢,我们第一次不对路由组件做缓存:

- 在要展示路由组件内呢,我们第一次不对路由组件做缓存:
-
浏览器运行效果,以及我们切换路由时的控制台输出
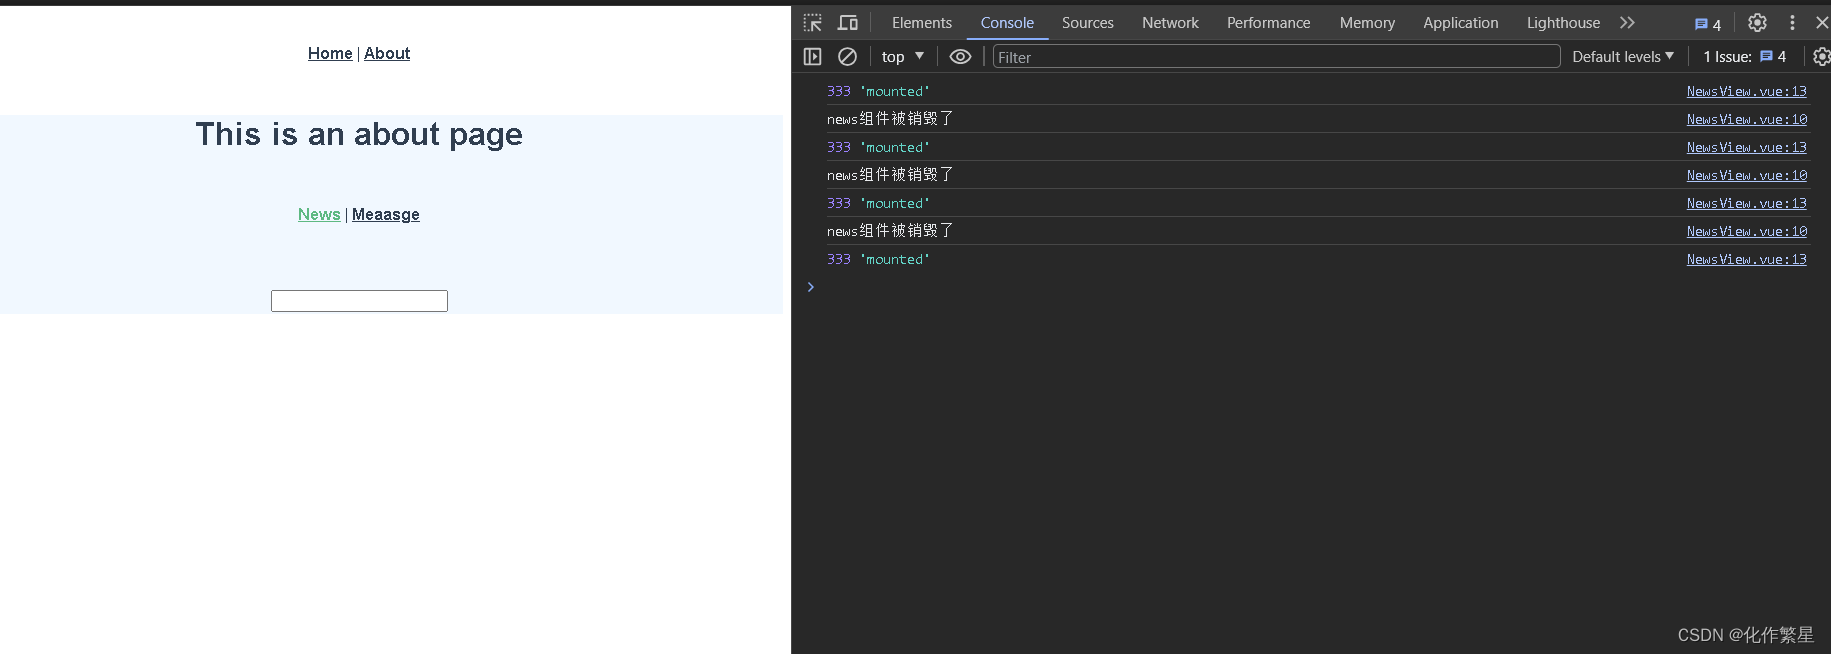
分析:我们可以看出,news路由组件内部的两个声明周期activated,deactivated并未进入 -
- 现在我们做缓存

- 现在我们做缓存
-
浏览器运行效果:

分析:我们可以看出:mounted只是在初次加载时进入了一次,后续就没有在进入beforeDestroy一直未进入,因为缓存起来了,input内的输入的内容页未重新渲染activated每次进入news路由的时候进入此生命周期deactivated每次离开news路由的时候进入此生命周期- 总结:所以当我们把某个路由组件缓存起来的时候,当我们想要初始或者离开的时候做些什么操作,可以在这两个生命周期里编写操作
13. 路由守卫(前置守卫beforeEach,后置守卫afterEach)
router.beforeEach/afterEach((to, from, next)接收三个参数
to:去往哪个路由
from: 来自于哪个路由
next: 放行,往下继续
- 作用: 对路由进行权限控制
- 分类:全局守卫、独享守卫、组件内守卫
- 全局守卫:
// 全局前置守卫,初始化时执行,每次路由切换前执行
router.beforeEach((to, from, next) => {
    console.log(to, from, next)
    if(to.meta.xxx){ // 判断路由跳转前的逻辑
        next() // 放行
    }
})

// 全局后置守卫,初始化时执行,每次路由切换后执行
router.afterEach((to, from) => {
    console.log(to, from)
    if(to.meta.title){
        document.title = to.meta.title
    }
})
- 独享守卫:写在固定某个路由内的,只针对个别路由做一些操作
path: "/about",
name: "about",
...
beforeEnter(to, from, next){
    console.log(to, from, next)
    if(to.meta.xxx){ // 判断路由跳转前的逻辑
        next() // 放行
    }
}
- 组件内路由守卫(进入守卫
beforeRouteEnter,离开守卫beforeRouteLeave)
...
mounted(){}
// 进入守卫,通过路由规则,进入该组件时被调用
beforeRouteEnter(to, from, next){}
// 离开守卫,通过路由规则,离开该组件时被调用
beforeRouteLeave(to, from, next){}
14. 路由器的两种工作模式
- 对于一个
url来说,什么是hash值? ————#及其后面的内容就是hash值. hash值不会包含在HTTP请求中,即:hash值不会带给服务器hash模式:- 地址中永远带着
#,不美观 - 若以后将地址通过第三方手机app分享,若app校验严格,则地址会被标记不合法
- 兼容性较好
- 地址中永远带着
history模式:- 地址干净,美观
- 兼容性和
hash模式相比略差 - 应用部署上线时需要后端人员支持,解决刷新页面服务端
404的问题
文章来源:https://blog.csdn.net/qq_35940731/article/details/135047560
本文来自互联网用户投稿,该文观点仅代表作者本人,不代表本站立场。本站仅提供信息存储空间服务,不拥有所有权,不承担相关法律责任。 如若内容造成侵权/违法违规/事实不符,请联系我的编程经验分享网邮箱:chenni525@qq.com进行投诉反馈,一经查实,立即删除!
本文来自互联网用户投稿,该文观点仅代表作者本人,不代表本站立场。本站仅提供信息存储空间服务,不拥有所有权,不承担相关法律责任。 如若内容造成侵权/违法违规/事实不符,请联系我的编程经验分享网邮箱:chenni525@qq.com进行投诉反馈,一经查实,立即删除!
最新文章
- Python教程
- 深入理解 MySQL 中的 HAVING 关键字和聚合函数
- Qt之QChar编码(1)
- MyBatis入门基础篇
- 用Python脚本实现FFmpeg批量转换
- 【文末送书】OpenCV4工业缺陷检测的六种方法
- Dockerfile模板和Docker Compose模板
- BDD - Python Behave 数据共享 context
- 金和OA C6 UploadFileEditorSave.aspx 文件上传漏洞复现
- SpringCloud-高级篇(十)
- 【PostgreSQL】表管理-分区表
- 资源下载地址汇总
- LeetCode——82. 删除排序链表中的重复元素II
- Redis的数据持久化
- java工作流详解