第八章 SpringCloud Alibaba 实现Sentinel规则配置和Feign整合
流控规则
流量控制,其原理是监控应用流量的QPS(每秒查询率) 或并发线程数等指标,当达到指定的阈值时
对流量进行控制,以避免被瞬时的流量高峰冲垮,从而保障应用的高可用性。
第1步: 点击簇点链路,我们就可以看到访问过的接口地址,然后点击对应的流控按钮,进入流控规则配
置页面。新增流控规则界面如下:
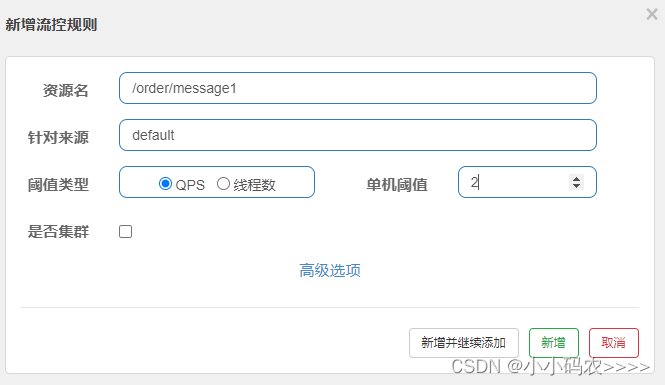
资源名:唯一名称,默认是请求路径,可自定义
针对来源:指定对哪个微服务进行限流,默认指default,意思是不区分来源,全部限制
阈值类型/单机阈值:
- QPS(每秒请求数量): 当调用该接口的QPS达到阈值的时候,进行限流
- 线程数:当调用该接口的线程数达到阈值的时候,进行限流、
**是否集群:**暂不需要集群
接下来我们以QPS为例来研究限流规则的配置。
简单配置
我们先做一个简单配置,设置阈值类型为QPS,单机阈值为3。即每秒请求量大于3的时候开始限流。
接下来,在流控规则页面就可以看到这个配置。

然后快速访问 /order/message1 接口,观察效果。此时发现,当QPS > 3的时候,服务就不能正常响
应,而是返回Blocked by Sentinel (flow limiting)结果。

配置流控模式
点击上面设置流控规则的编辑按钮,然后在编辑页面点击高级选项,会看到有流控模式一栏。

sentinel共有三种流控模式,分别是:
- 直接(默认):接口达到限流条件时,开启限流
- 关联:当关联的资源达到限流条件时,开启限流 [适合做应用让步]
- 链路:当从某个接口过来的资源达到限流条件时,开启限流
下面呢分别演示三种模式:
直接流控模式
直接流控模式是最简单的模式,当指定的接口达到限流条件时开启限流。上面案例使用的就是直接流控
模式。
关联流控模式
关联流控模式指的是,当指定接口关联的接口达到限流条件时,开启对指定接口开启限流。
第1步:配置限流规则, 将流控模式设置为关联,关联资源设置为的 /order/message2。

第3步:通过JMeter软件向/order/message2连续发送请求,注意QPS一定要大于3


第4步:访问/order/message1,会发现已经被限流

链路流控模式
链路流控模式指的是,当从某个接口过来的资源达到限流条件时,开启限流。它的功能有点类似于针对
来源配置项,区别在于:针对来源是针对上级微服务,而链路流控是针对上级接口,也就是说它的粒度
更细。
第1步: 编写一个service,在里面添加一个方法message
 @SentinelResource("message")
    @Override
    public void message() {
        System.out.println("message");
    }
第2步: 在Controller中声明两个方法,分别调用service中的方法
@RestController
@Slf4j
public class OrderController3 {
    @Autowired
    private OrderService orderService;

    @RequestMapping("/order/message1")
    public String message1() {
        orderService.message();
        return "message1";
    }
    @RequestMapping("/order/message2")
    public String message2() {
        orderService.message();
        return "message2";
    }
}
第3步: 禁止收敛URL的入口 context
从1.6.3 版本开始,Sentinel Web filter默认收敛所有URL的入口context,因此链路限流不生效。
1.7.0 版本开始(对应SCA的2.1.1.RELEASE),官方在CommonFilter 引入了
WEB_CONTEXT_UNIFY 参数,用于控制是否收敛context。将其配置为 false 即可根据不同的
URL 进行链路限流。
SCA 2.1.1.RELEASE之后的版本,可以通过配置spring.cloud.sentinel.web-context-unify=false即
可关闭收敛
我们当前使用的版本是SpringCloud Alibaba 2.1.0.RELEASE,无法实现链路限流。
目前官方还未发布SCA 2.1.2.RELEASE,所以我们只能使用2.1.1.RELEASE,需要写代码的形式实
现
(1) 暂时将SpringCloud Alibaba的版本调整为2.1.1.RELEASE
<spring-cloud-alibaba.version>2.1.1.RELEASE</spring-cloud-alibaba.version>
(2) 配置文件中关闭sentinel的CommonFilter实例化
server:
  port: 8091
  tomcat:
    max-threads: 5
spring:
  application:
    name: service-order
  datasource:
    driver-class-name: com.mysql.jdbc.Driver
    url: jdbc:mysql://127.0.0.1:3306/shop?serverTimezone=UTC&useUnicode=true&characterEncoding=utf-8&useSSL=true
    username: root
    password: root
  jpa:
    properties:
      hibernate:
        hbm2ddl:
          auto: update
      dialect: org.hibernate.dialect.MySQL5InnoDBDialect
  cloud:
    nacos:
      discovery:
        server-addr: 127.0.0.1:8848
    sentinel:
      filter:
        enabled: false
      transport:
        port: 9999 #跟控制台交流的端口,随意指定一个未使用的端口即可
        dashboard: localhost:8080 #配置Sentinel dashboard地址
        clientIp: localhost
      eager: true
(3) 添加一个配置类,自己构建CommonFilter实例
@Configuration
public class FilterContextConfig {
    @Bean
    public FilterRegistrationBean sentinelFilterRegistration() {
        FilterRegistrationBean registration = new FilterRegistrationBean();
        registration.setFilter(new CommonFilter());
        registration.addUrlPatterns("/*");
        // 入口资源关闭聚合
        registration.addInitParameter(CommonFilter.WEB_CONTEXT_UNIFY, "false");
        registration.setName("sentinelFilter");
        registration.setOrder(1);
        return registration;
    }
}
第4步: 控制台配置限流规则

第5步: 分别通过 /order/message1 和 /order/message2 访问, 发现2没问题, 1的被限流了

配置流控效果
- 快速失败(默认): 直接失败,抛出异常,不做任何额外的处理,是最简单的效果
- **Warm Up:**它从开始阈值到最大QPS阈值会有一个缓冲阶段,一开始的阈值是最大QPS阈值的
1/3,然后慢慢增长,直到最大阈值,适用于将突然增大的流量转换为缓步增长的场景。 - **排队等待:**让请求以均匀的速度通过,单机阈值为每秒通过数量,其余的排队等待; 它还会让设
置一个超时时间,当请求超过超时间时间还未处理,则会被丢弃。
降级规则
- 降级规则就是设置当满足什么条件的时候,对服务进行降级。Sentinel提供了三个衡量条件:
平均响应时间 :当资源的平均响应时间超过阈值(以 ms 为单位)之后,资源进入准降级状态。
如果接下来 1s 内持续进入 5 个请求,它们的 RT都持续超过这个阈值,那么在接下的时间窗口
(以 s 为单位)之内,就会对这个方法进行服务降级。

注意 Sentinel 默认统计的 RT 上限是 4900 ms,超出此阈值的都会算作 4900 ms,若需要
变更此上限可以通过启动配置项 -Dcsp.sentinel.statistic.max.rt=xxx 来配置。
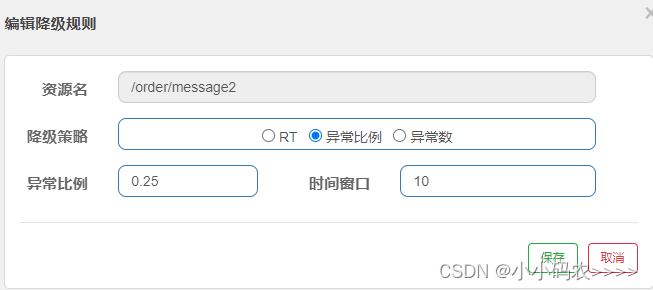
- 异常比例:当资源的每秒异常总数占通过量的比值超过阈值之后,资源进入降级状态,即在接下的
时间窗口(以 s 为单位)之内,对这个方法的调用都会自动地返回。异常比率的阈值范围是 [0.0,
1.0]。
第1步: 首先模拟一个异常
int i =0;
@RequestMapping("/order/message2")
    public String message2() {
        //异常比例为0.333
        if (i % 3 == 0){
            throw new RuntimeException();
        }
       // orderService.message();
        return "message2";
    }
第2步: 设置异常比例为0.25
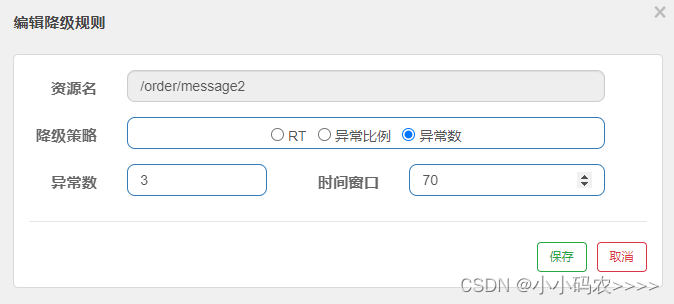
- 异常数 :当资源近 1 分钟的异常数目超过阈值之后会进行服务降级。注意由于统计时间窗口是分
钟级别的,若时间窗口小于 60s,则结束熔断状态后仍可能再进入熔断状态。
问题:
流控规则和降级规则返回的异常页面是一样的,我们怎么来区分到底是什么原因导致的呢?
热点规则
热点参数流控规则是一种更细粒度的流控规则, 它允许将规则具体到参数上。
热点规则简单使用
第1步: 编写代码
 @RequestMapping("/order/message3")
    @SentinelResource("message3")//注意这里必须使用这个注解标识,热点规则不生效
    public String message3(String name, Integer age) {
        return name + age;
    }
第2步: 配置热点规则
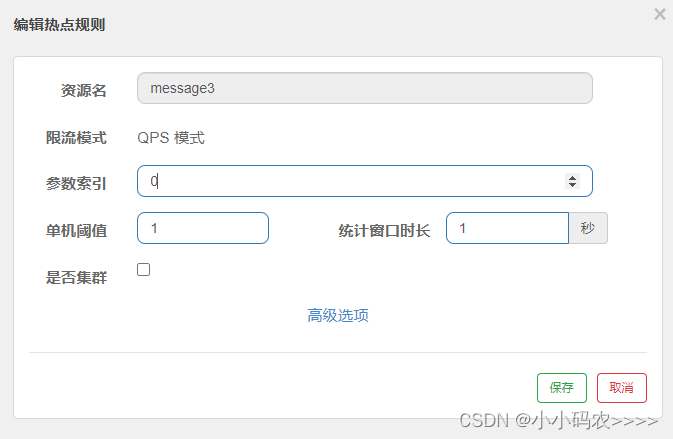
第3步: 分别用两个参数访问,会发现只对第一个参数限流了

热点规则增强使用
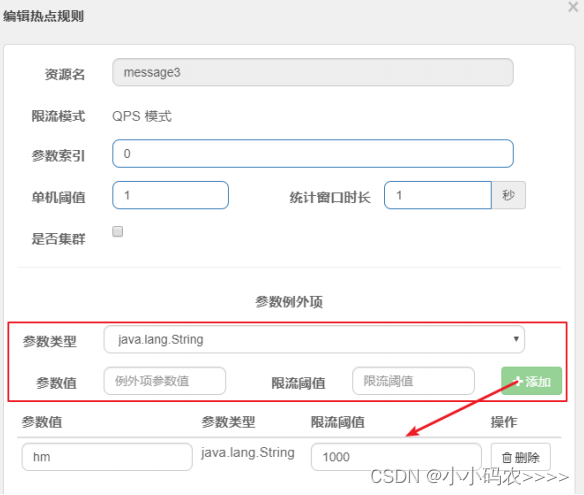
参数例外项允许对一个参数的具体值进行流控
编辑刚才定义的规则,增加参数例外项
授权规则
很多时候,我们需要根据调用来源来判断该次请求是否允许放行,这时候可以使用 Sentinel 的来源
访问控制的功能。来源访问控制根据资源的请求来源(origin)限制资源是否通过:
- 若配置白名单,则只有请求来源位于白名单内时才可通过;
- 若配置黑名单,则请求来源位于黑名单时不通过,其余的请求通过。

上面的资源名和授权类型不难理解,但是流控应用怎么填写呢?
其实这个位置要填写的是来源标识,Sentinel提供了 RequestOriginParser 接口来处理来源。
只要Sentinel保护的接口资源被访问,Sentinel就会调用 RequestOriginParser 的实现类去解析
访问来源。
第1步: 自定义来源处理规则
@Component
public class RequestOriginParserDefinition implements RequestOriginParser {
    @Override
    public String parseOrigin(HttpServletRequest request) {
        String serviceName = request.getParameter("serviceName");
        return serviceName;
    }
}
第2步: 授权规则配置
这个配置的意思是只有serviceName=pc不能访问(黑名单)

第3步: 访问 http://localhost:8091/order/message1?serviceName=pc观察结果

系统规则
系统保护规则是从应用级别的入口流量进行控制,从单台机器的总体 Load、RT、入口 QPS 、CPU
使用率和线程数五个维度监控应用数据,让系统尽可能跑在最大吞吐量的同时保证系统整体的稳定性。
系统保护规则是应用整体维度的,而不是资源维度的,并且仅对入口流量 (进入应用的流量) 生效。
- Load(仅对 Linux/Unix-like 机器生效):当系统 load1 超过阈值,且系统当前的并发线程数超过
系统容量时才会触发系统保护。系统容量由系统的 maxQps * minRt 计算得出。设定参考值一般
是 CPU cores * 2.5。 - RT:当单台机器上所有入口流量的平均 RT 达到阈值即触发系统保护,单位是毫秒。
- 线程数:当单台机器上所有入口流量的并发线程数达到阈值即触发系统保护。
- 入口 QPS:当单台机器上所有入口流量的 QPS 达到阈值即触发系统保护
- CPU使用率:当单台机器上所有入口流量的 CPU使用率达到阈值即触发系统保护。
扩展: 自定义异常返回
//异常处理页面
@Component
public class ExceptionHandlerPage implements UrlBlockHandler {
//BlockException 异常接口,包含Sentinel的五个异常

    @SentinelResource

    // FlowException 限流异常
// DegradeException 降级异常
// ParamFlowException 参数限流异常
// AuthorityException 授权异常
// SystemBlockException 系统负载异常
    @Override
    public void blocked(HttpServletRequest request, HttpServletResponse
            response, BlockException e) throws IOException {
        response.setContentType("application/json;charset=utf-8");
        ResponseData data = null;
        if (e instanceof FlowException) {
            data = new ResponseData(-1, "接口被限流了...");
        } else if (e instanceof DegradeException) {
            data = new ResponseData(-2, "接口被降级了...");
        }
        response.getWriter().write(JSON.toJSONString(data));
    }
}
@SentinelResource的使用
在定义了资源点之后,我们可以通过Dashboard来设置限流和降级策略来对资源点进行保护。同时还能
通过@SentinelResource来指定出现异常时的处理策略。
@SentinelResource 用于定义资源,并提供可选的异常处理和 fallback 配置项。其主要参数如下:
| 属性 | 作用 |
|---|---|
| value | 资源名称 |
| entryType | entry类型,标记流量的方向,取值IN/OUT,默认是OUT |
| blockHandler | 处理BlockException的函数名称,函数要求:1. 必须是 public2.返回类型 参数与原方法一致3. 默认需和原方法在同一个类中。若希望使用其他类的函数,可配置blockHandlerClass ,并指定blockHandlerClass里面的方法。 |
| blockHandlerClass | 存放blockHandler的类,对应的处理函数必须static修饰。 |
| fallback | 用于在抛出异常的时候提供fallback处理逻辑。fallback函数可以针对所有类型的异常(除了 exceptionsToIgnore 里面排除掉的异常类型)进行处理。函数要求:1. 返回类型与原方法一致2. 参数类型需要和原方法相匹配3. 默认需和原方法在同一个类中。若希望使用其他类的函数,可配置fallbackClass ,并指定fallbackClass里面的方法。 |
| fallbackClass | 存放fallback的类。对应的处理函数必须static修饰。 |
| defaultFallback | 用于通用的 fallback 逻辑。默认fallback函数可以针对所有类型的异常进行处理。若同时配置了 fallback 和 defaultFallback,以fallback为准。函数要求:1. 返回类型与原方法一致2. 方法参数列表为空,或者有一个 Throwable 类型的参数。3. 默认需要和原方法在同一个类中。若希望使用其他类的函数,可配置fallbackClass ,并指定 fallbackClass 里面的方法。 |
| exceptionsToIgnore | 指定排除掉哪些异常。排除的异常不会计入异常统计,也不会进入fallback逻辑,而是原样抛出。 |
| exceptionsToTrace | 需要trace的异常 |
定义限流和降级后的处理方法
方式一:直接将限流和降级方法定义在方法中
 int i = 0;
    @SentinelResource(
            value = "message",
            blockHandler = "blockHandler",//指定发生BlockException时进入的方法
            fallback = "fallback"//指定发生Throwable时进入的方法
    )
    public String message1() {
        i++;
        if (i % 3 == 0) {
            throw new RuntimeException();
        }
        return "message";
    }
     //BlockException时进入的方法
    public String blockHandler(BlockException ex) {
        log.error("{}", ex);
        return "接口被限流或者降级了...";
    }
    //Throwable时进入的方法
    public String fallback(Throwable throwable) {
        log.error("{}", throwable);
        return "接口发生异常了...";
    }
方式二: 将限流和降级方法外置到单独的类中
 @SentinelResource(
            value = "message",
            blockHandlerClass = OrderServiceImpl3BlockHandlerClass.class,
            blockHandler = "blockHandler",
            fallbackClass = OrderServiceImpl3FallbackClass.class,
            fallback = "fallback"
    )
    public String message2() {
        i++;
        if (i % 3 == 0) {
            throw new RuntimeException();
        }
        return "message4";
    }
    @Slf4j
public class OrderServiceImpl3FallbackClass {
    //注意这里必须使用static修饰方法
    public static String fallback(Throwable throwable) {
        log.error("{}", throwable);
        return "接口发生异常了...";
    }
}
@Slf4j
public class OrderServiceImpl3BlockHandlerClass {
    //注意这里必须使用static修饰方法
    public static String blockHandler(BlockException ex) {

        log.error("{}", ex);
        return "接口被限流或者降级了...";
    }
}
Sentinel规则持久化
通过前面的讲解,我们已经知道,可以通过Dashboard来为每个Sentinel客户端设置各种各样的规
则,但是这里有一个问题,就是这些规则默认是存放在内存中,极不稳定,所以需要将其持久化。
本地文件数据源会定时轮询文件的变更,读取规则。这样我们既可以在应用本地直接修改文件来更
新规则,也可以通过 Sentinel 控制台推送规则。以本地文件数据源为例,推送过程如下图所示:

首先 Sentinel 控制台通过 API 将规则推送至客户端并更新到内存中,接着注册的写数据源会将新的
规则保存到本地的文件中。
1 编写处理类
public class FilePersistence implements InitFunc {
    @Value("spring.application:name")
    private String appcationName;

    @Override
    public void init() throws Exception {
        String ruleDir = System.getProperty("user.home") + "/sentinelrules/" + appcationName;
        String flowRulePath = ruleDir + "/flow-rule.json";
        String degradeRulePath = ruleDir + "/degrade-rule.json";
        String systemRulePath = ruleDir + "/system-rule.json";
        String authorityRulePath = ruleDir + "/authority-rule.json";
        String paramFlowRulePath = ruleDir + "/param-flow-rule.json";
        this.mkdirIfNotExits(ruleDir);
        this.createFileIfNotExits(flowRulePath);
        this.createFileIfNotExits(degradeRulePath);
        this.createFileIfNotExits(systemRulePath);
        this.createFileIfNotExits(authorityRulePath);
        this.createFileIfNotExits(paramFlowRulePath);
// 流控规则
        ReadableDataSource<String, List<FlowRule>> flowRuleRDS = new
                FileRefreshableDataSource<>(
                flowRulePath,
                flowRuleListParser
        );
        FlowRuleManager.register2Property(flowRuleRDS.getProperty());
        WritableDataSource<List<FlowRule>> flowRuleWDS = new
                FileWritableDataSource<>(
                flowRulePath,
                this::encodeJson
        );
        WritableDataSourceRegistry.registerFlowDataSource(flowRuleWDS);
// 降级规则
        ReadableDataSource<String, List<DegradeRule>> degradeRuleRDS = new
                FileRefreshableDataSource<>(
                degradeRulePath,
                degradeRuleListParser
        );
        DegradeRuleManager.register2Property(degradeRuleRDS.getProperty());
        WritableDataSource<List<DegradeRule>> degradeRuleWDS = new
                FileWritableDataSource<>(
                degradeRulePath,
                this::encodeJson
        );
        WritableDataSourceRegistry.registerDegradeDataSource(degradeRuleWDS);
// 系统规则
        ReadableDataSource<String, List<SystemRule>> systemRuleRDS = new
                FileRefreshableDataSource<>(
                systemRulePath,
                systemRuleListParser
        );
        SystemRuleManager.register2Property(systemRuleRDS.getProperty());
        WritableDataSource<List<SystemRule>> systemRuleWDS = new
                FileWritableDataSource<>(
                systemRulePath,
                this::encodeJson
        );
        WritableDataSourceRegistry.registerSystemDataSource(systemRuleWDS);
// 授权规则
        ReadableDataSource<String, List<AuthorityRule>> authorityRuleRDS = new
                FileRefreshableDataSource<>(
                authorityRulePath,
                authorityRuleListParser
        );
        AuthorityRuleManager.register2Property(authorityRuleRDS.getProperty());
        WritableDataSource<List<AuthorityRule>> authorityRuleWDS = new
                FileWritableDataSource<>(
                authorityRulePath,
                this::encodeJson
        );
        WritableDataSourceRegistry.registerAuthorityDataSource(authorityRuleWDS);
// 热点参数规则
        ReadableDataSource<String, List<ParamFlowRule>> paramFlowRuleRDS = new
                FileRefreshableDataSource<>(
                paramFlowRulePath,
                paramFlowRuleListParser
        );
        ParamFlowRuleManager.register2Property(paramFlowRuleRDS.getProperty());
        WritableDataSource<List<ParamFlowRule>> paramFlowRuleWDS = new
                FileWritableDataSource<>(
                paramFlowRulePath,
                this::encodeJson
        );
        ModifyParamFlowRulesCommandHandler.setWritableDataSource(paramFlowRuleWDS);
    }

    private Converter<String, List<FlowRule>> flowRuleListParser = source ->
            JSON.parseObject(
                    source,
                    new TypeReference<List<FlowRule>>() {
                    }
            );
    private Converter<String, List<DegradeRule>> degradeRuleListParser = source
            -> JSON.parseObject(
            source,
            new TypeReference<List<DegradeRule>>() {
            }
    );
    private Converter<String, List<SystemRule>> systemRuleListParser = source ->
            JSON.parseObject(
                    source,

                    new TypeReference<List<SystemRule>>() {
                    }
            );
    private Converter<String, List<AuthorityRule>> authorityRuleListParser =
            source -> JSON.parseObject(
                    source,
                    new TypeReference<List<AuthorityRule>>() {
                    }
            );
    private Converter<String, List<ParamFlowRule>> paramFlowRuleListParser =
            source -> JSON.parseObject(
                    source,
                    new TypeReference<List<ParamFlowRule>>() {
                    }
            );

    private void mkdirIfNotExits(String filePath) throws IOException {
        File file = new File(filePath);
        if (!file.exists()) {
            file.mkdirs();
        }
    }

    private void createFileIfNotExits(String filePath) throws IOException {
        File file = new File(filePath);
        if (!file.exists()) {
            file.createNewFile();
        }
    }

    private <T> String encodeJson(T t) {
        return JSON.toJSONString(t);
    }
}
2 添加配置
在resources下创建配置目录 META-INF/services ,然后添加文件
com.alibaba.csp.sentinel.init.InitFunc

在文件中添加配置类的全路径
com.itheima.config.FilePersistence
Feign整合Sentinel
第1步: 引入sentinel的依赖
<dependency>
            <groupId>com.alibaba.cloud</groupId>
            <artifactId>spring-cloud-starter-alibaba-sentinel</artifactId>
            <version>2.1.1.RELEASE</version>
        </dependency>
第2步: 在配置文件中开启Feign对Sentinel的支持
server:
  port: 8091
  tomcat:
    max-threads: 5
spring:
  application:
    name: service-order
  datasource:
    driver-class-name: com.mysql.jdbc.Driver
    url: jdbc:mysql://127.0.0.1:3306/shop?serverTimezone=UTC&useUnicode=true&characterEncoding=utf-8&useSSL=true
    username: root
    password: root
  jpa:
    properties:
      hibernate:
        hbm2ddl:
          auto: update
      dialect: org.hibernate.dialect.MySQL5InnoDBDialect
  cloud:
    nacos:
      discovery:
        server-addr: 127.0.0.1:8848
    sentinel:
      filter:
        enabled: false
      transport:
        port: 9999 #跟控制台交流的端口,随意指定一个未使用的端口即可
        dashboard: localhost:8080 #配置Sentinel dashboard地址
        clientIp: localhost
      eager: true
feign: #支持feign
  sentinel:
    enabled: true
第3步: 创建容错类
//容错类要求必须实现被容错的接口,并为每个方法实现容错方案
@Component
@Slf4j
public class ProductServiceFallBack implements ProductService {
    @Override
    public Product findByPid(Integer pid) {
        Product product = new Product();
        product.setPid(-1);
        return product;
    }
}
第4步: 为被容器的接口指定容错类
//value用于指定调用nacos下哪个微服务
//fallback用于指定容错类
@FeignClient(value = "service-product",
        fallback = ProductServiceFallBack.class)
public interface ProductService {
    @GetMapping(value = "/product/{pid}")
    Product findByPid(@PathVariable("pid") Integer pid);
}
第5步: 修改controller
@RequestMapping("/order/prod/{pid}")
    public Order order1(@PathVariable("pid") Integer pid) {
        log.info("接收到{}号商品的下单请求,接下来调用商品微服务查询此商品信息", pid);
		//调用商品微服务,查询商品信息
        Product product = productService.findByPid(pid);
        if (product.getPid() == -1) {
            Order order = new Order();
            order.setPname("下单失败");
            return order;
        }
        log.info("查询到{}号商品的信息,内容是:{}", pid, JSON.toJSONString(product));
		//下单(创建订单)
        Order order = new Order();
        order.setUid(1);
        order.setUsername("测试用户");
        order.setPid(pid);
        order.setPname(product.getPname());
        order.setPprice(product.getPprice());
        order.setNumber(1);
        orderService.save(order);
        log.info("创建订单成功,订单信息为{}", JSON.toJSONString(order));
        try {
            Thread.sleep(100);
        } catch (InterruptedException e) {
            e.printStackTrace();
        }
        return order;
    }
}
第6步: 停止所有 shop-product 服务,重启 shop-order 服务,访问请求,观察容错效果

扩展: 如果想在容错类中拿到具体的错误,可以使用下面的方式
@FeignClient(
        value = "service-product",
//fallback = ProductServiceFallBack.class,
        fallbackFactory = ProductServiceFallBackFactory.class)
public interface ProductService {
    @GetMapping(value = "/product/{pid}")
    Product findByPid(@PathVariable("pid") Integer pid);
}
@Component
public class ProductServiceFallBackFactory implements FallbackFactory<ProductService> {
    @Override
    public ProductService create(Throwable throwable) {
        return new ProductService() {
            @Override
            public Product findByPid(Integer pid) {
                throwable.printStackTrace();
                Product product = new Product();
                product.setPid(-1);
                return product;
            }
        };
    }
}
注意: fallback和fallbackFactory只能使用其中一种方式
本文来自互联网用户投稿,该文观点仅代表作者本人,不代表本站立场。本站仅提供信息存储空间服务,不拥有所有权,不承担相关法律责任。 如若内容造成侵权/违法违规/事实不符,请联系我的编程经验分享网邮箱:chenni525@qq.com进行投诉反馈,一经查实,立即删除!
- Python教程
- 深入理解 MySQL 中的 HAVING 关键字和聚合函数
- Qt之QChar编码(1)
- MyBatis入门基础篇
- 用Python脚本实现FFmpeg批量转换
- Spark安装笔记——备赛笔记——2024全国职业院校技能大赛“大数据应用开发”赛项——任务2:离线数据处理
- Spring Boot 整合多 Redis 数据源配置及操作
- Pytest+Requests+Allure实现接口自动化测试
- OpenCV-Python(22):2D直方图
- 如何在PHP中使用PDO预处理语句?
- 解决全彩LED显示屏像素失控的问题
- [spark] dataframe的数据导入Mysql5.6
- 基于Java餐厅叫号通知管理系统
- LeetCode.2765. 最长交替子数组
- cloudflare加速方法