Ansible简述
1.abstract-简介
ansible是新出现的自动化运维工具,基于Python开发,集合了众多运维工具(puppet、cfengine、chef、func、fabric)的优点,
实现了批量系统配置、批量程序部署、批量运行命令等功能。
无客户端。
工作原理

2.install-部署
yum install -y epel-release
安装epel源,如果您在非学校环境,请使用下方阿里YUM
rm ?-rf /etc/yum.repos.d/*
wget -O /etc/yum.repos.d/epel.repo http://mirrors.aliyun.com/repo/epel-7.repo
wget -O /etc/yum.repos.d/CentOS-Base.repo http://mirrors.aliyun.com/repo/Centos-7.repo?
yum install -y ansible
检测部署是否完成
rpm -qc ansible查看配置文件
ansible --help查看ansible帮助
ansible-doc -l看所有模块(A10,华为,docker,EC2,aws等等广大厂商设备)
ansible-doc -s yum看yum模块,了解其功能
3.ansible基础
1.定义主机清单
vim /etc/ansible/hosts
host1
host2
host3
2.测试连通性
ansible ? localhost ? -m ping
3.简洁输出
ansible host1 -m ping ?-o?
4.know_hosts
ansible host2 -m ping -u root -k -o?
-u增加用户名选项
-k增加密码选项
去掉(yes/no)的询问
vim /etc/ssh/ssh_config
StrictHostKeyChecking no
systemctl restart sshd
5.请注意ping和ssh
ping
ICMP:网际消息管理协议
ansible的ping,是探测ssh程序是否连接。不是icmp协议
4.Inventory -主机清单
1 增加主机组
官方链接
http://docs.ansible.com/ansible/intro_inventory.html#
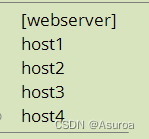
vim /etc/ansible/hosts

ansible webserver ?-m ping ?-o

2 增加用户名 密码
vim /etc/ansible/hosts

ansible webservers ?-m ping -o
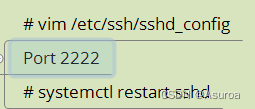
3 增加端口

vim /etc/ansible/hosts

4 组:变量
ansible内部变量可以帮助我们简化主机清单的设置
vim /etc/ansible/hosts

常用变量

5.子分组
vim /etc/ansible/hosts

6 自定义主机列表
vim hostlist

ansible -i ?hostlist dockers ?-m ping ?-o
5.Ad-Hoc-点对点模式
临时的,在ansible中是指需要快速执行的单条命令,并且不需要保存的命令。对于复杂的命令则为 playbook。
1.shell模块
ansible webserver -m shell -a 'hostname' -o 获取主机名
ansible webserver -m shell -a 'hostname' -o -f 2? ? ? f 2 ? 指定线程数
ansible host2 -m shell -a 'yum -y install httpd' -o
ansible host3 -m shell -a 'uptime' -o
2.复制模块
ansible webserver -m copy -a 'src=/etc/hosts dest=/tmp/2.txt owner=root group=bin mode=777'
ansible webserver -m copy -a 'src=/etc/hosts dest=/tmp/2.txt owner=root group=bin mode=777 backup=yes'
3.用户模块
创建用户
ansible webserver -m user -a 'name=qianfeng state=present'
修改密码
1.生成加密密码
echo '512050951' | openssl passwd -1 -stdin
2.修改密码
ansible webserver -m user -a 'name=qianfeng password="$1$XVzsJMDr$5wI4oUaQ.emxap6s.N272."'
修改shell
ansible webserver -m user -a 'name=qianfeng shell=/sbin/nologin append=yes'
删除用户
ansible webserver -m user -a 'name=qianfeng state=absent'
4.软件包管理
ansible host1 -m yum -a 'name="*" state=latest'
ansible host2 -m yum -a 'name="httpd" state=latest'
5.服务模块
ansible host2 -m service -a 'name=httpd state=started'
ansible host2 -m service -a 'name=httpd state=started enabled=yes'
ansible host2 -m service -a 'name=httpd state=stopped'
ansible host2 -m service -a 'name=httpd state=restarted'
ansible host2 -m service -a 'name=httpd state=started enabled=no'
6.文件模块
ansible host1 -m file -a 'path=/tmp/88.txt mode=777 state=touch'
ansible host1 -m file -a 'path=/tmp/99 mode=777 state=directory'
7.收集模块
ansible host3 -m setup
ansible host3 -m setup -a 'filter=ansible_all_ipv4_addresses'
本文来自互联网用户投稿,该文观点仅代表作者本人,不代表本站立场。本站仅提供信息存储空间服务,不拥有所有权,不承担相关法律责任。 如若内容造成侵权/违法违规/事实不符,请联系我的编程经验分享网邮箱:chenni525@qq.com进行投诉反馈,一经查实,立即删除!