Flume介绍
一、介绍
Apache Flume 是一种分布式、可靠且可用的系统,用于有效地收集、汇总大量日志数据,并将其从多个不同来源转移到集中式数据存储区。
Apache Flume 的使用不仅限于日志数据聚合。由于数据源是可定制的,Flume 可用于传输大量事件数据,包括但不限于网络流量数据、社交媒体生成的数据、电子邮件信息以及几乎所有可能的数据源。
文档地址:https://flume.apache.org/releases/content/1.11.0/FlumeUserGuide.html
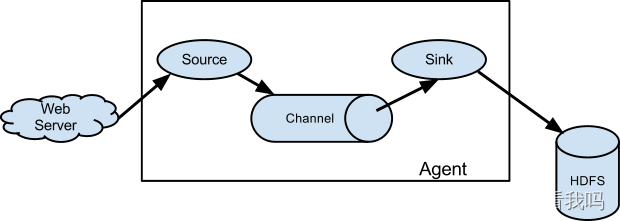
数据流模型:
Source:数据收集组件,从外部数据源收集数据,并存储到 Channel 中。包括:Avro、Thrift、Kafka、Jms、Console、RPC、Text、Tail、Syslog、Exec
Channel:源和接收器之间的管道,用于临时存储数据。Flume自带:Memory Channel和File Channel。
Sink:从 Channel 中读取 Event,并将其存入外部存储系统或将其转发到下一个 Source,成功后再从 Channel 中移除 Event。包括:Avro、Hdfs、Logger、File、Hbase、Hive、Thrift、Solr、自定义
Agent:是一个独立的 (JVM) 进程,包含 Source、 Channel、 Sink 等组件。
Event:Flume数据传输的基本单元,Event分为Header和Body两部分,Header用于存放Event的一些属性,为K-V结构,Body用于存放数据,为字节数组。
二、部署
# 解压缩
tar -zxvf apache-flume-1.10.1-bin.tar.gz -C /opt/module/
三、使用
3.1、netcat to logger
vim /opt/module/flume/job/net_to_log.conf
# example.conf: A single-node Flume configuration

# Name the components on this agent
a1.sources = r1
a1.sinks = k1
a1.channels = c1

# Describe/configure the source
a1.sources.r1.type = netcat
a1.sources.r1.bind = localhost
a1.sources.r1.port = 44444

# Describe the sink
a1.sinks.k1.type = logger

# Use a channel which buffers events in memory
# capacity:Maximum capacity of the channel
# transactionCapacity:The maximum size of transaction supported by the channel
a1.channels.c1.type = memory
a1.channels.c1.capacity = 1000
a1.channels.c1.transactionCapacity = 100

# Bind the source and sink to the channel
a1.sources.r1.channels = c1
a1.sinks.k1.channel = c1
# 启动该Agent
bin/flume-ng agent -n a1 -c /opt/module/flume/conf/ -f /opt/module/flume/job/net_to_log.conf
# 开启客户端消息推送
nc 127.0.0.1 44444
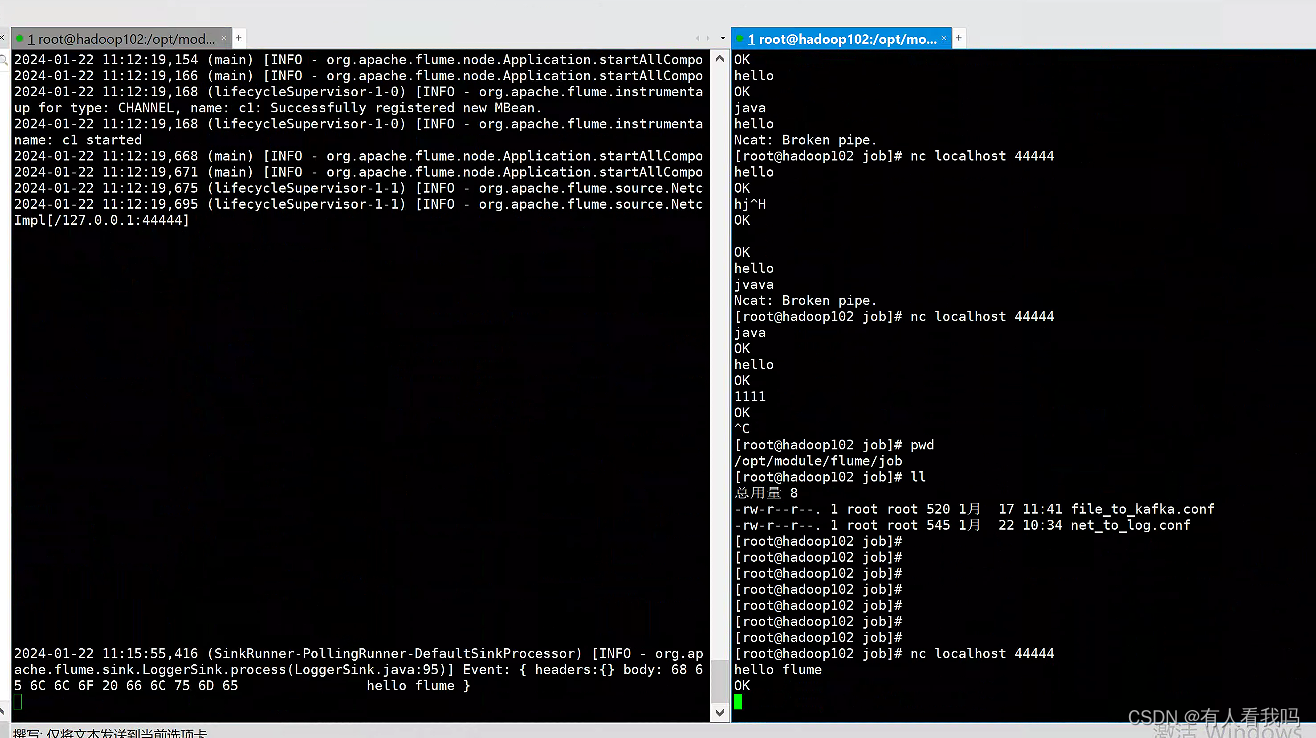
效果
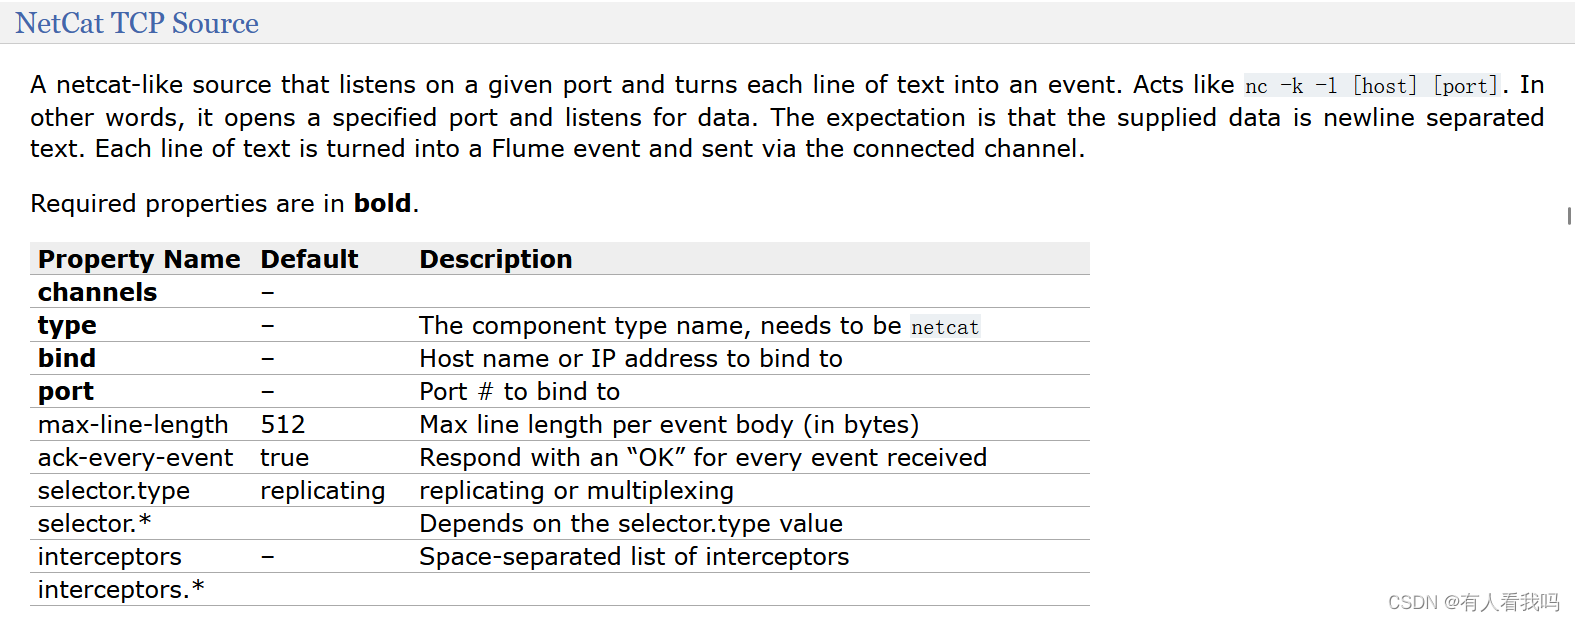
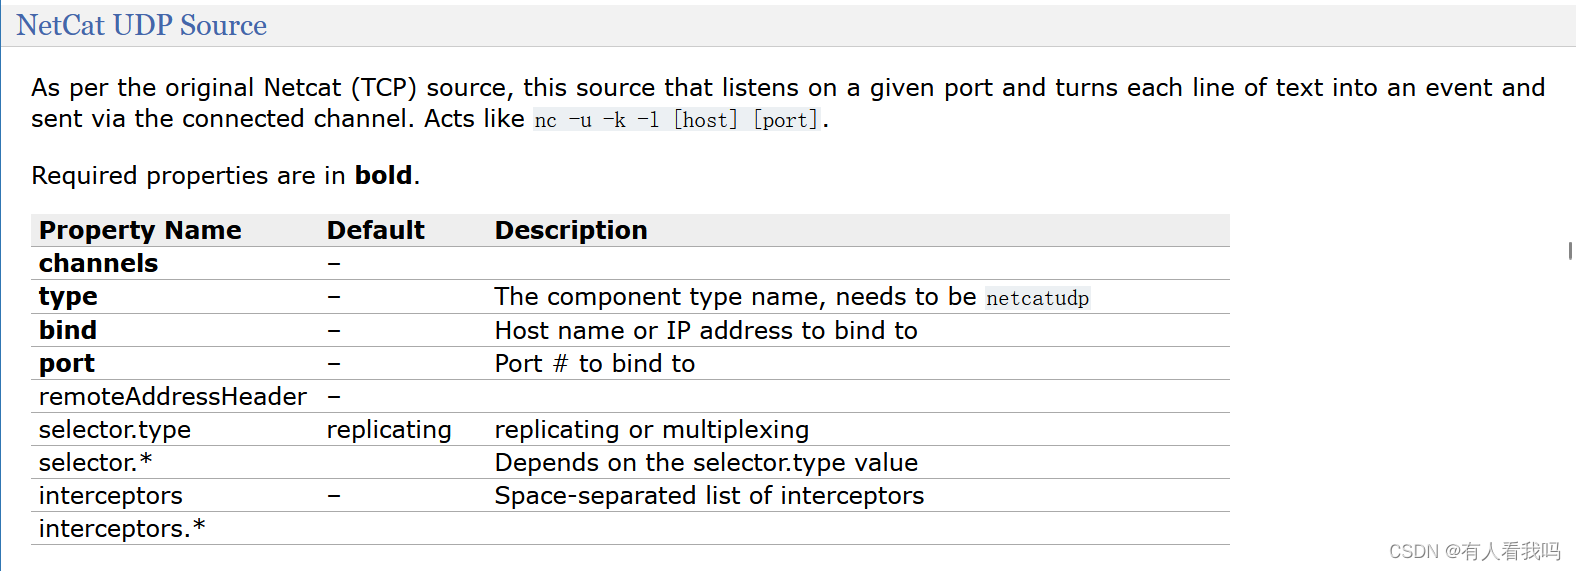
参数说明
3.2、netcat to kafka
# example.conf: A single-node Flume configuration

# Name the components on this agent
a1.sources = r1
a1.channels = c1

# Describe/configure the source
a1.sources.r1.type = netcat
a1.sources.r1.bind = localhost
a1.sources.r1.port = 44444


a1.channels.c1.type = org.apache.flume.channel.kafka.KafkaChannel
a1.channels.c1.kafka.bootstrap.servers = hadoop102:9092,hadoop103:9092
a1.channels.c1.kafka.topic = netcat_to_kafka_topic
a1.channels.c1.parseAsFlumeEvent = false

# Bind the source and sink to the channel
a1.sources.r1.channels = c1
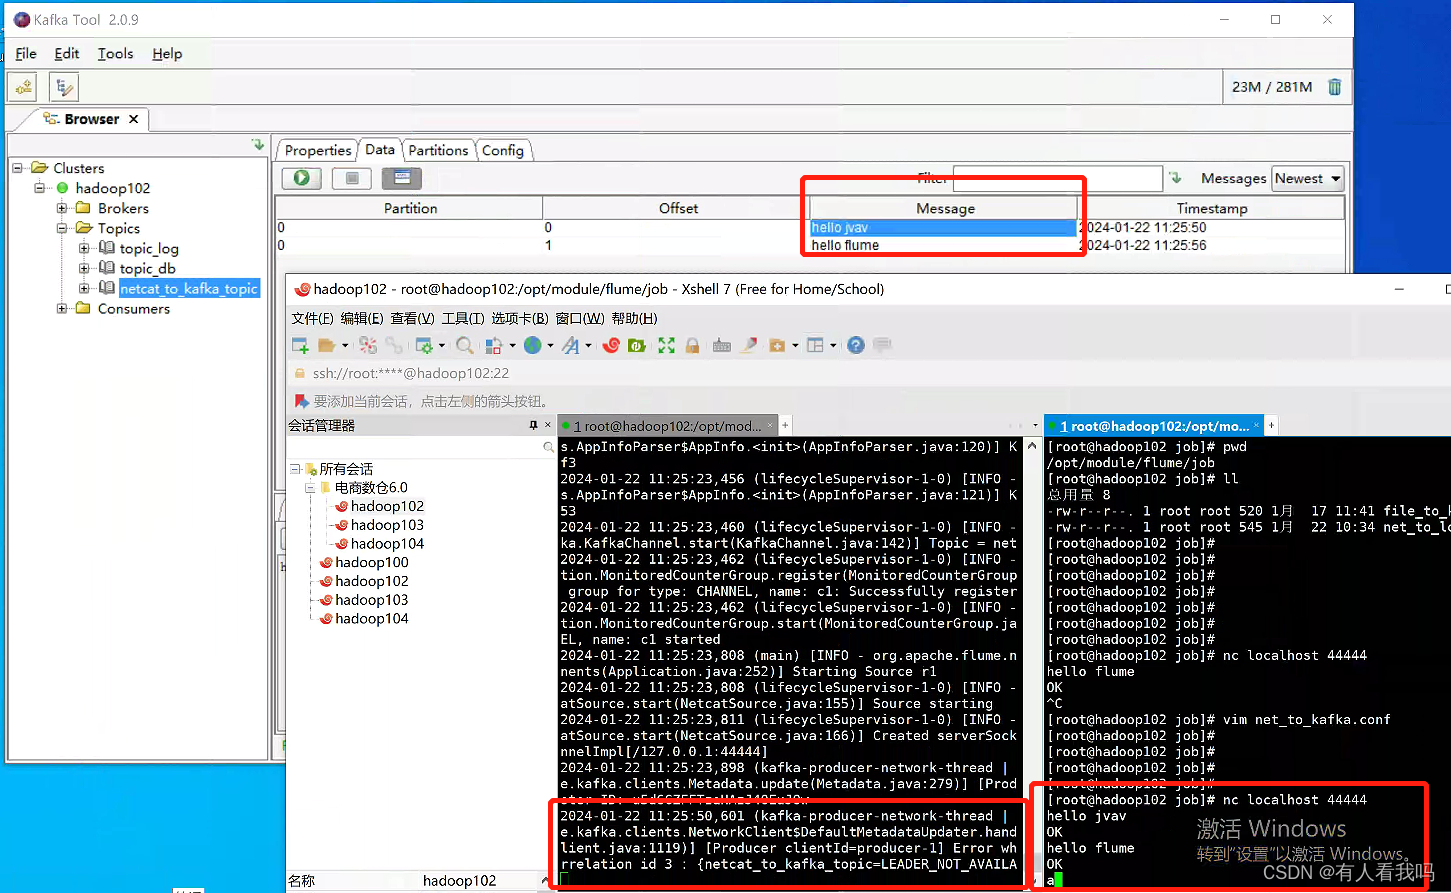
效果
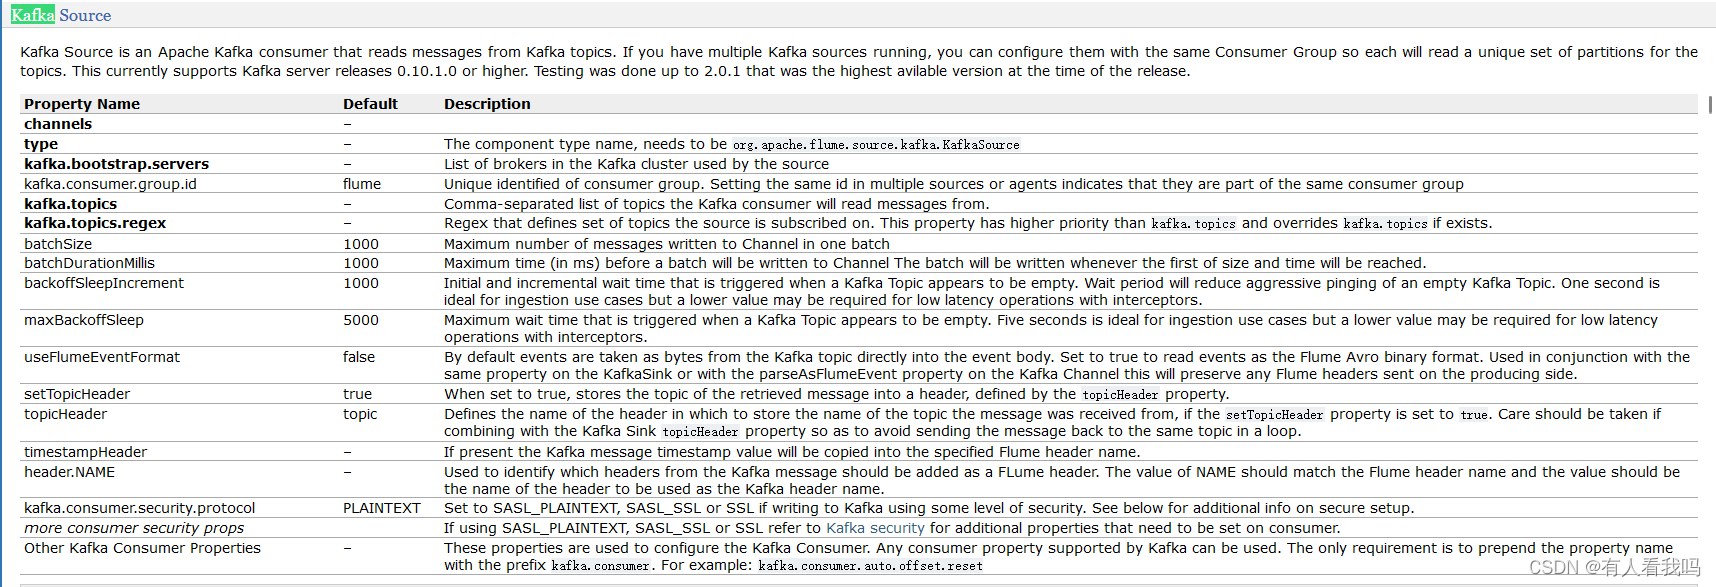
参数说明
3.3、file to hdfs
# Name the components on this agent
a1.sources = r1
a1.sinks = k1
a1.channels = c1

# Describe/configure the source
a1.sources.r1.type = exec
a1.sources.r1.command = tail -F /opt/module/logs/file.log
a1.sources.r1.channels = c1

# Describe the sink
a1.sinks.k1.type = hdfs
a1.sinks.k1.hdfs.path = hdfs://hadoop102:8020/flume/%Y%m%d/%H

# 上传文件的前缀
a1.sinks.k1.hdfs.filePrefix = events-
# 是否按照时间滚动文件夹
a1.sinks.k1.hdfs.round = true
# 多少时间单位创建一个新的文件夹
a1.sinks.k1.hdfs.roundValue = 10
# 重新定义时间单位
a1.sinks.k1.hdfs.roundUnit = hour
# 是否使用本地时间戳
a1.sinks.k1.hdfs.useLocalTimeStamp = true
# 积攒多少Ecent才flush一次到HDFS
a1.sinks.k1.hdfs.batchSize = 100
# 设置文件类型,可支持压缩
a1.sinks.k1.hdfs.fileType = DataStream
# 多久生成一个新的文件(单位:秒)
a1.sinks.k1.hdfs.rollInterval = 60
# 设置每个文件滚动的大小
a1.sinks.k1.hdfs.rollSize = 134217700
# 文件的滚动与Event数量无关
a1.sinks.k1.hdfs.rollCount = 0


# Use a channel which buffers events in memory
a1.channels.c1.type = memory
a1.channels.c1.capacity = 1000
a1.channels.c1.transactionCapacity = 100

# Bind the source and sink to the channel
a1.sources.r1.channels = c1
a1.sinks.k1.channel = c1
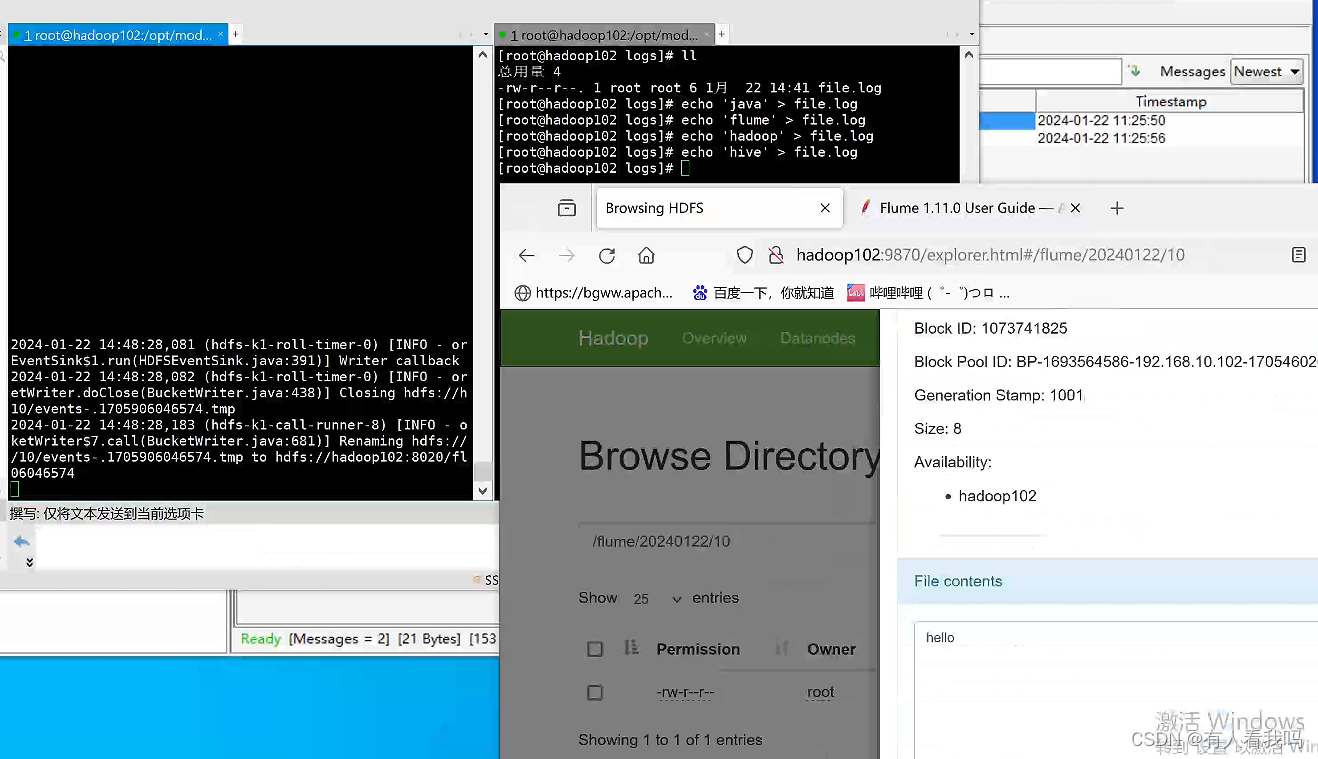
效果
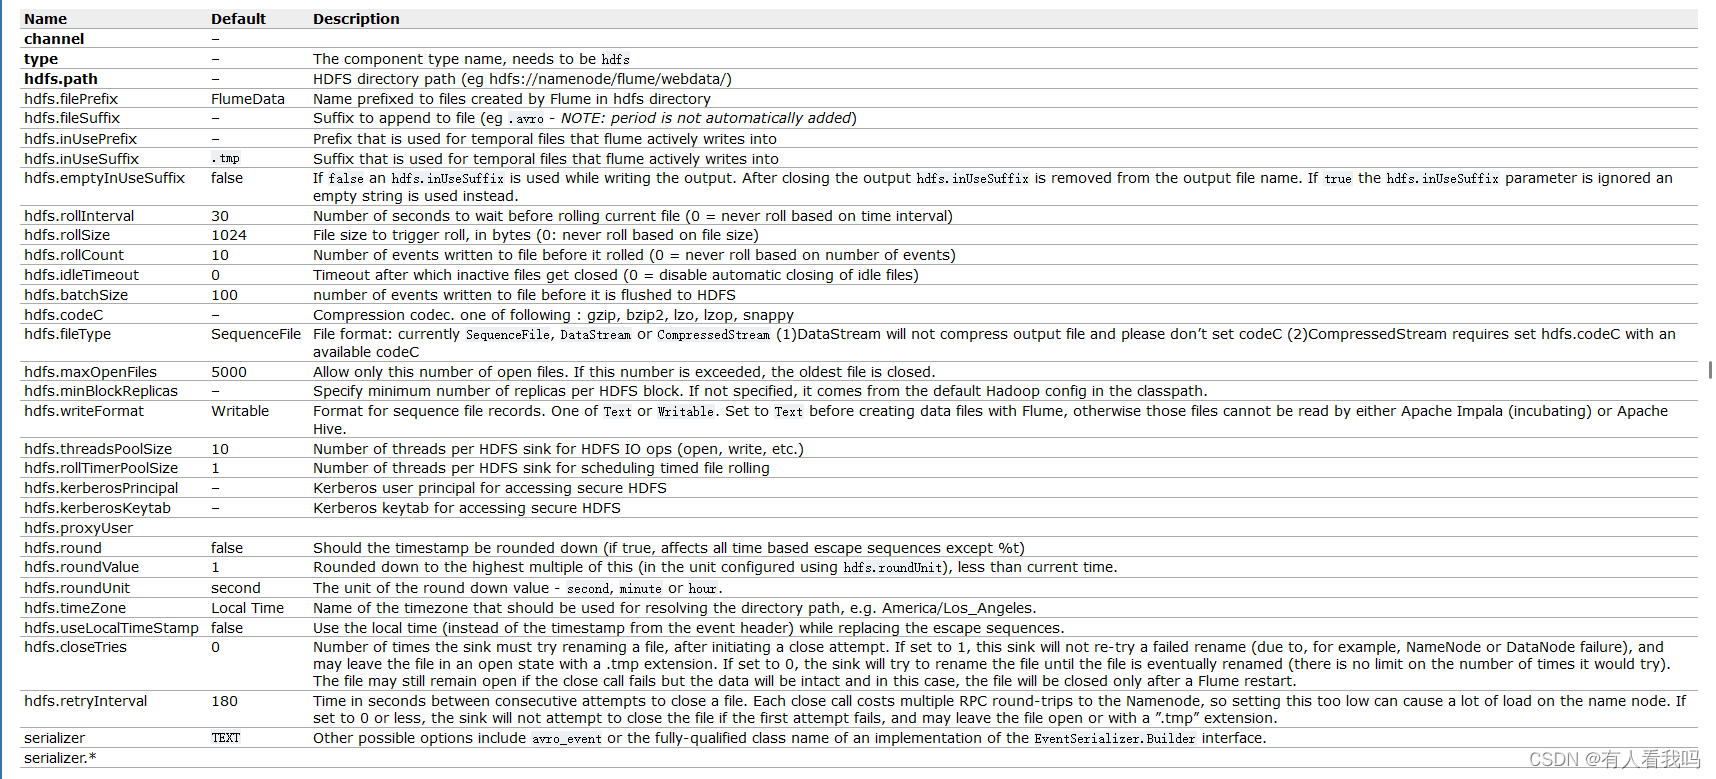
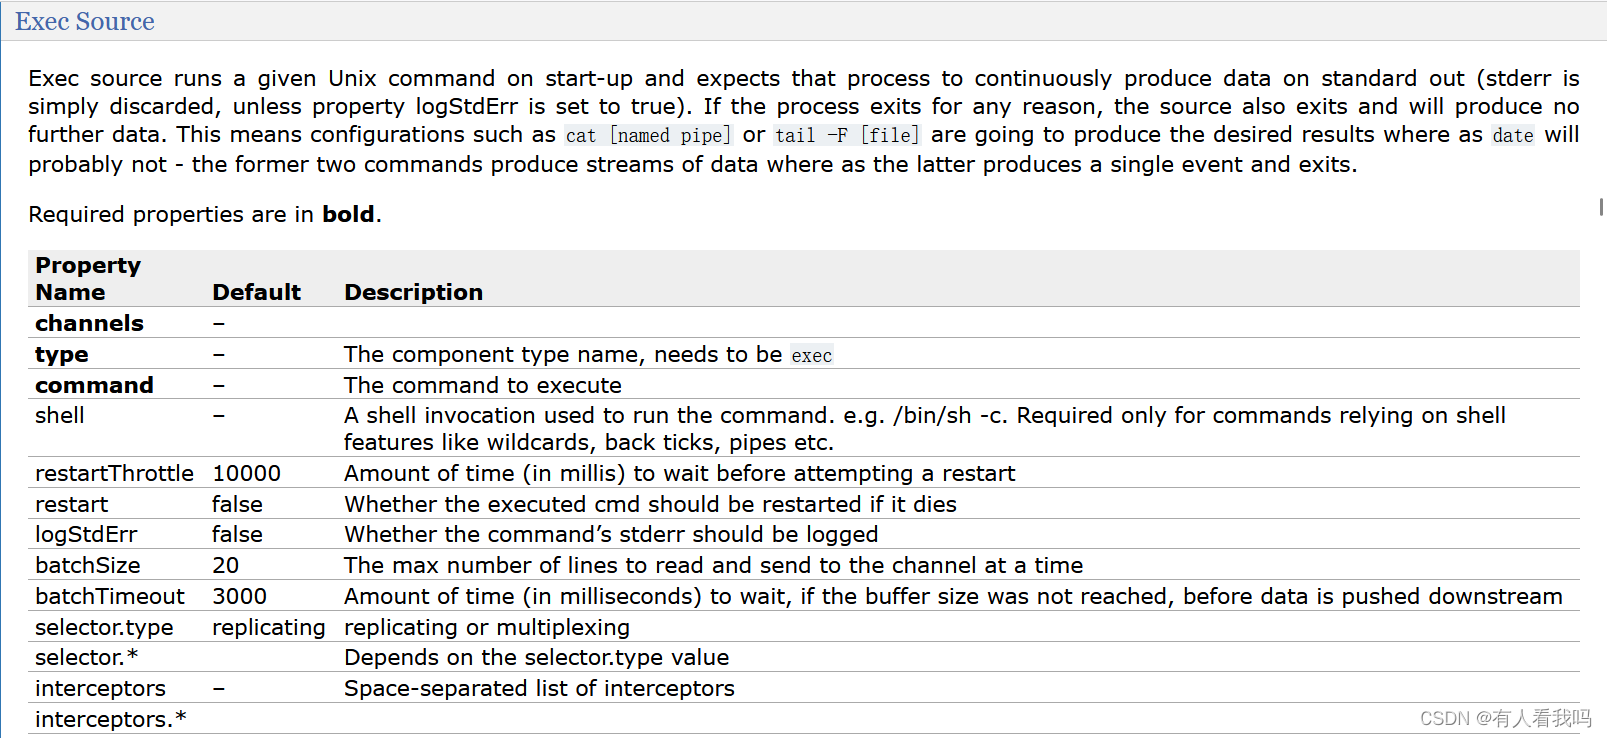
配置参数
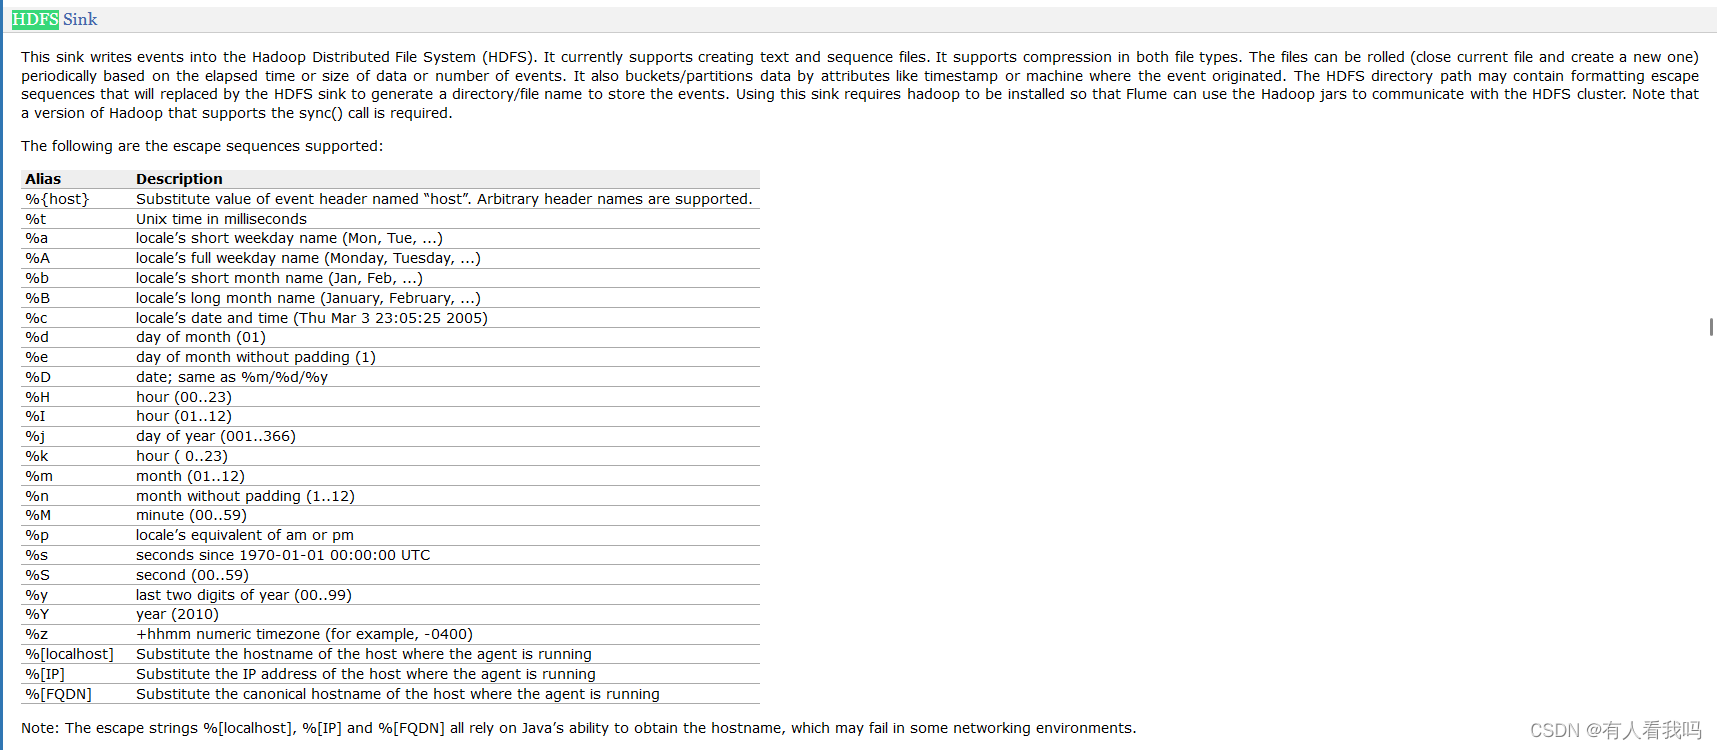
HDFS Sink配置参数
Exec Source配置参数
3.4、tail to hdfs
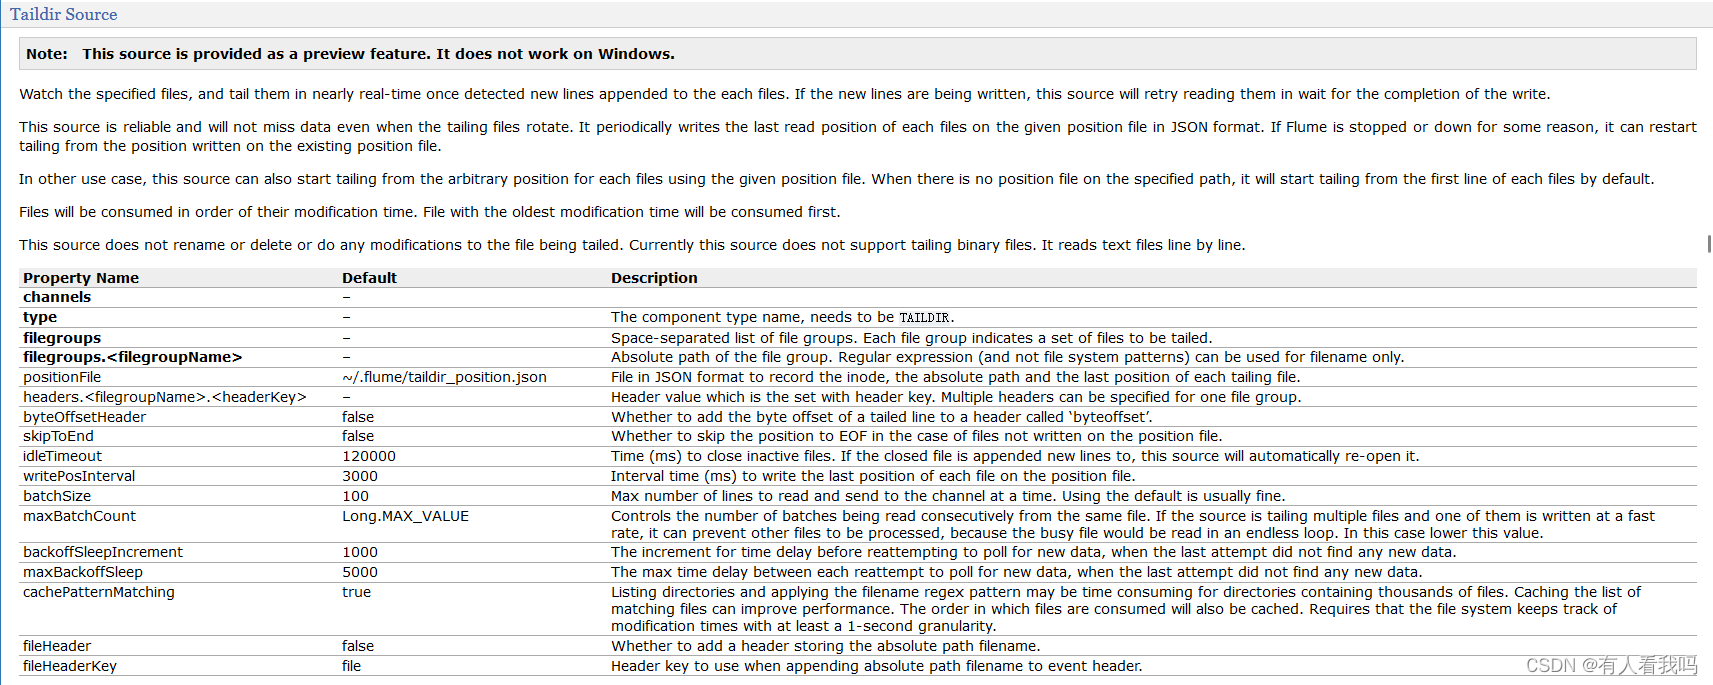
flume1.7开始支持的功能,用于读取文件,适合监听多个实时追加的文件,支持断定续传,相较于同样是读取文件的:Exec Source(适用于监控一个实时追加的文件,不能够实现断点续传)和Spooldir Source(适用于同步新文件,不适合对实时追加的文件经行监听)实用性更好。
# Name the components on this agent
a1.sources = r1
a1.sinks = k1
a1.channels = c1

# Describe/configure the source
a1.sources.r1.type = TAILDIR
# 存放断点续传的最后位置
a1.sources.r1.positionFile = /opt/module/logs/tail_dir.json
# 监控多个目录
a1.sources.r1.filegroups = f1 f2
a1.sources.r1.filegroups.f1 = /opt/module/logs/files/.*file.*
a1.sources.r1.filegroups.f2 = /opt/module/logs/files2/.*log.*


# Describe the sink
a1.sinks.k1.type = hdfs
a1.sinks.k1.hdfs.path = hdfs://hadoop102:8020/flume/files/%Y%m%d/%H

# 上传文件的前缀
a1.sinks.k1.hdfs.filePrefix = events-
# 是否按照时间滚动文件夹
a1.sinks.k1.hdfs.round = true
# 多少时间单位创建一个新的文件夹
a1.sinks.k1.hdfs.roundValue = 10
# 重新定义时间单位
a1.sinks.k1.hdfs.roundUnit = hour
# 是否使用本地时间戳
a1.sinks.k1.hdfs.useLocalTimeStamp = true
# 积攒多少Event才flush一次到HDFS
a1.sinks.k1.hdfs.batchSize = 100
# 设置文件类型,可支持压缩
a1.sinks.k1.hdfs.fileType = DataStream
# 多久生成一个新的文件(单位:秒)
a1.sinks.k1.hdfs.rollInterval = 20
# 设置每个文件滚动的大小
a1.sinks.k1.hdfs.rollSize = 134217700
# 文件的滚动与Event数量无关
a1.sinks.k1.hdfs.rollCount = 0

# Use a channel which buffers events in memory
a1.channels.c1.type = memory
a1.channels.c1.capacity = 1000
a1.channels.c1.transactionCapacity = 100

# Bind the source and sink to the channel
a1.sources.r1.channels = c1
a1.sinks.k1.channel = c1
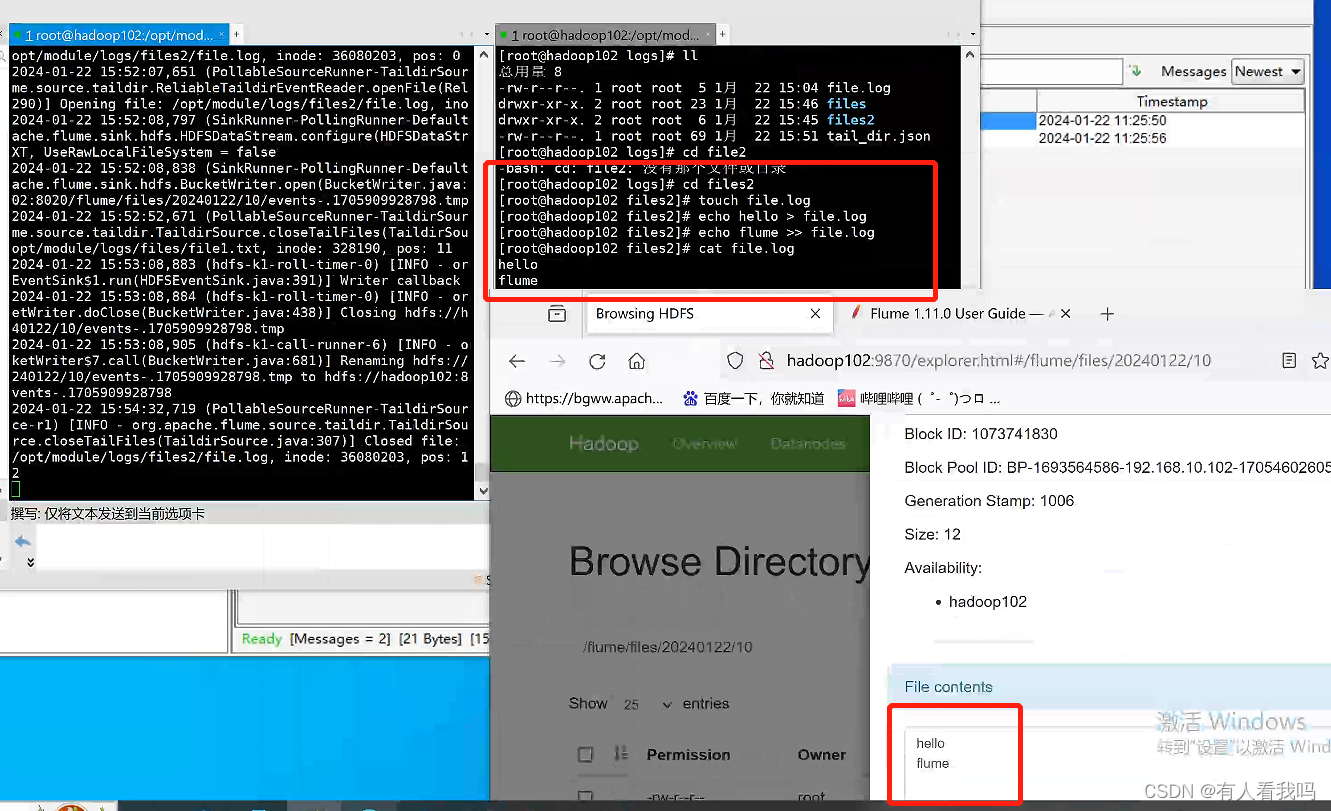
效果
配置说明
四、其他
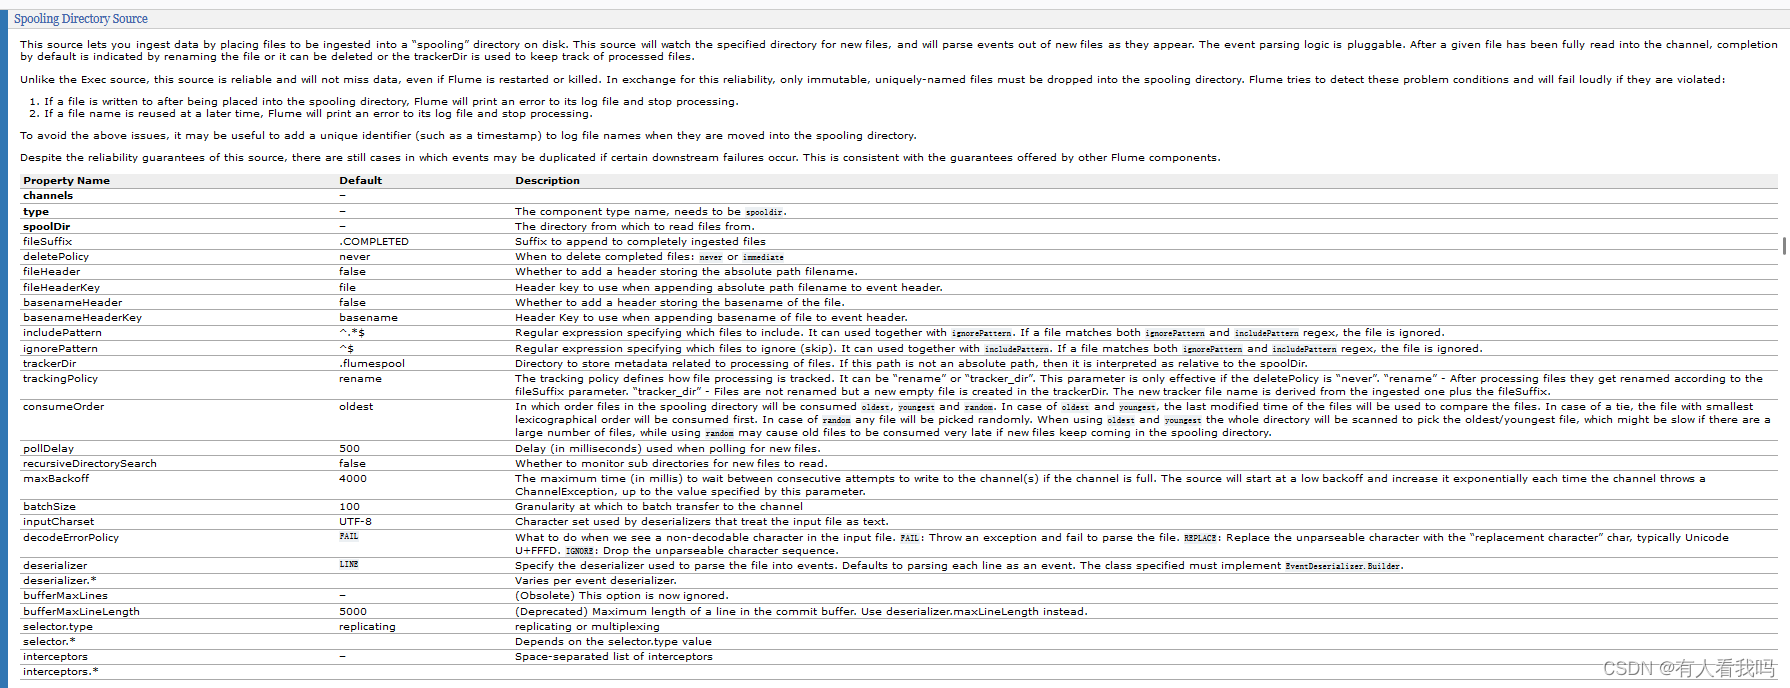
4.1、Spooling Directory Source
获取指定文件路径下的文件
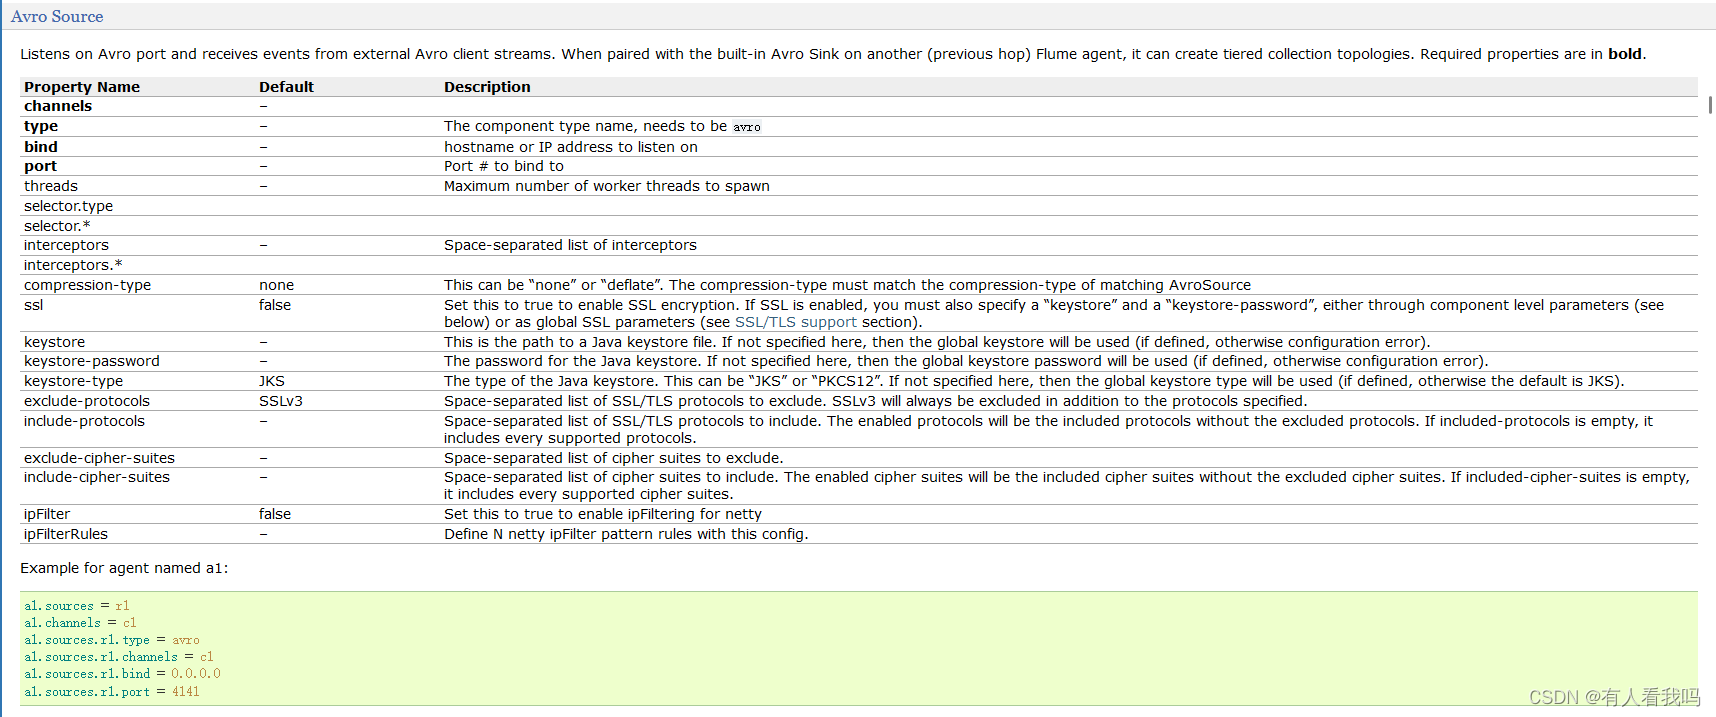
4.2、Avro Source
获取avro数据源
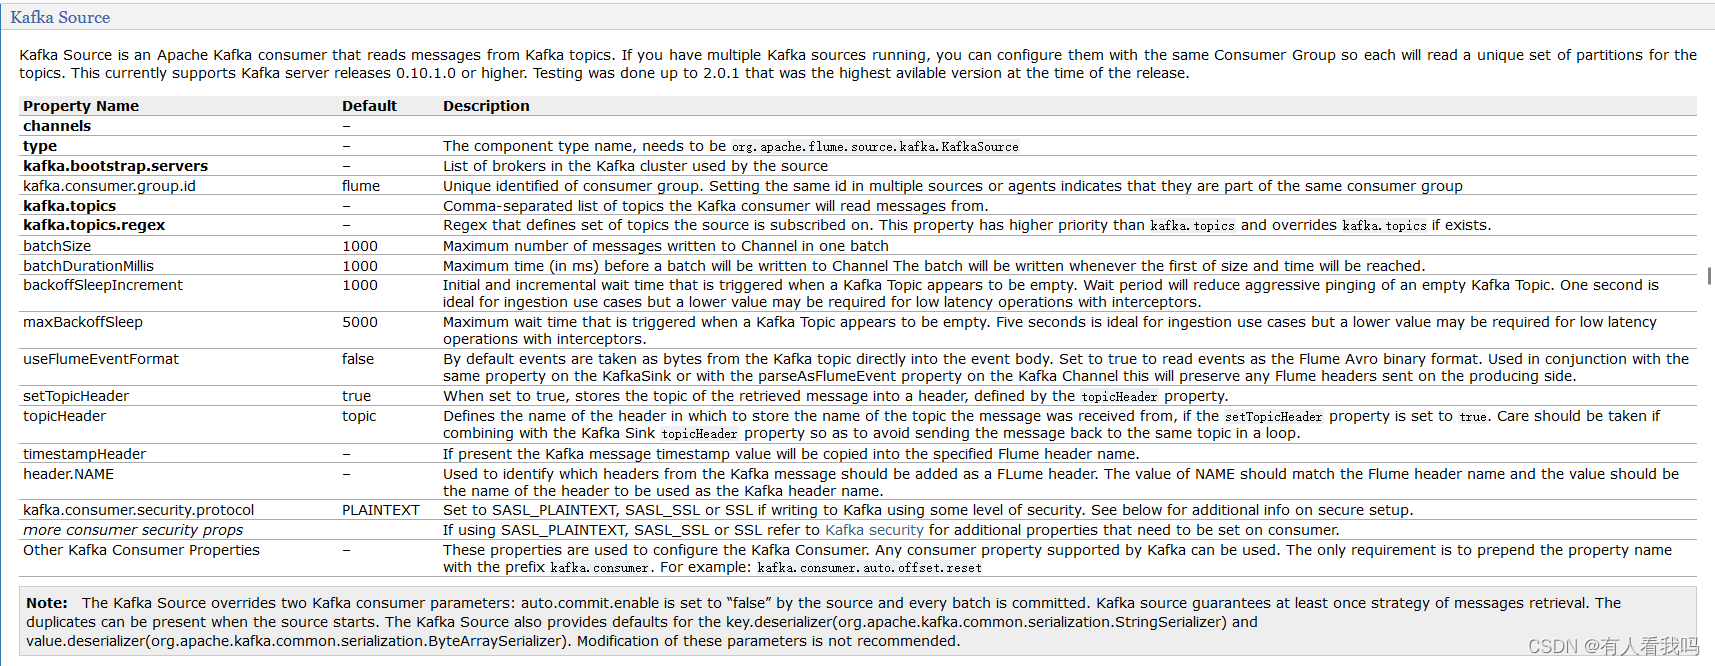
4.3、Kafka Source

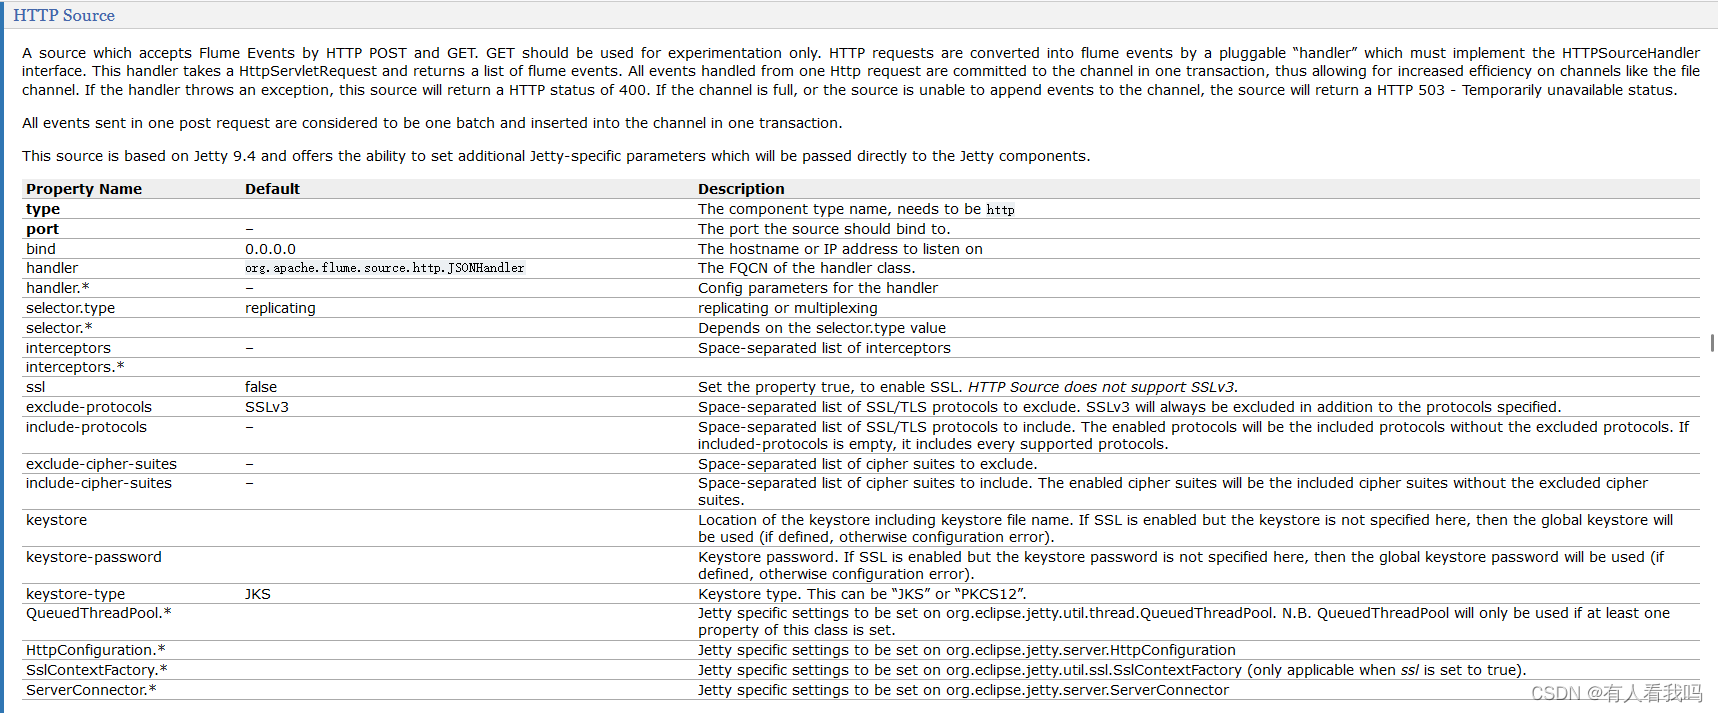
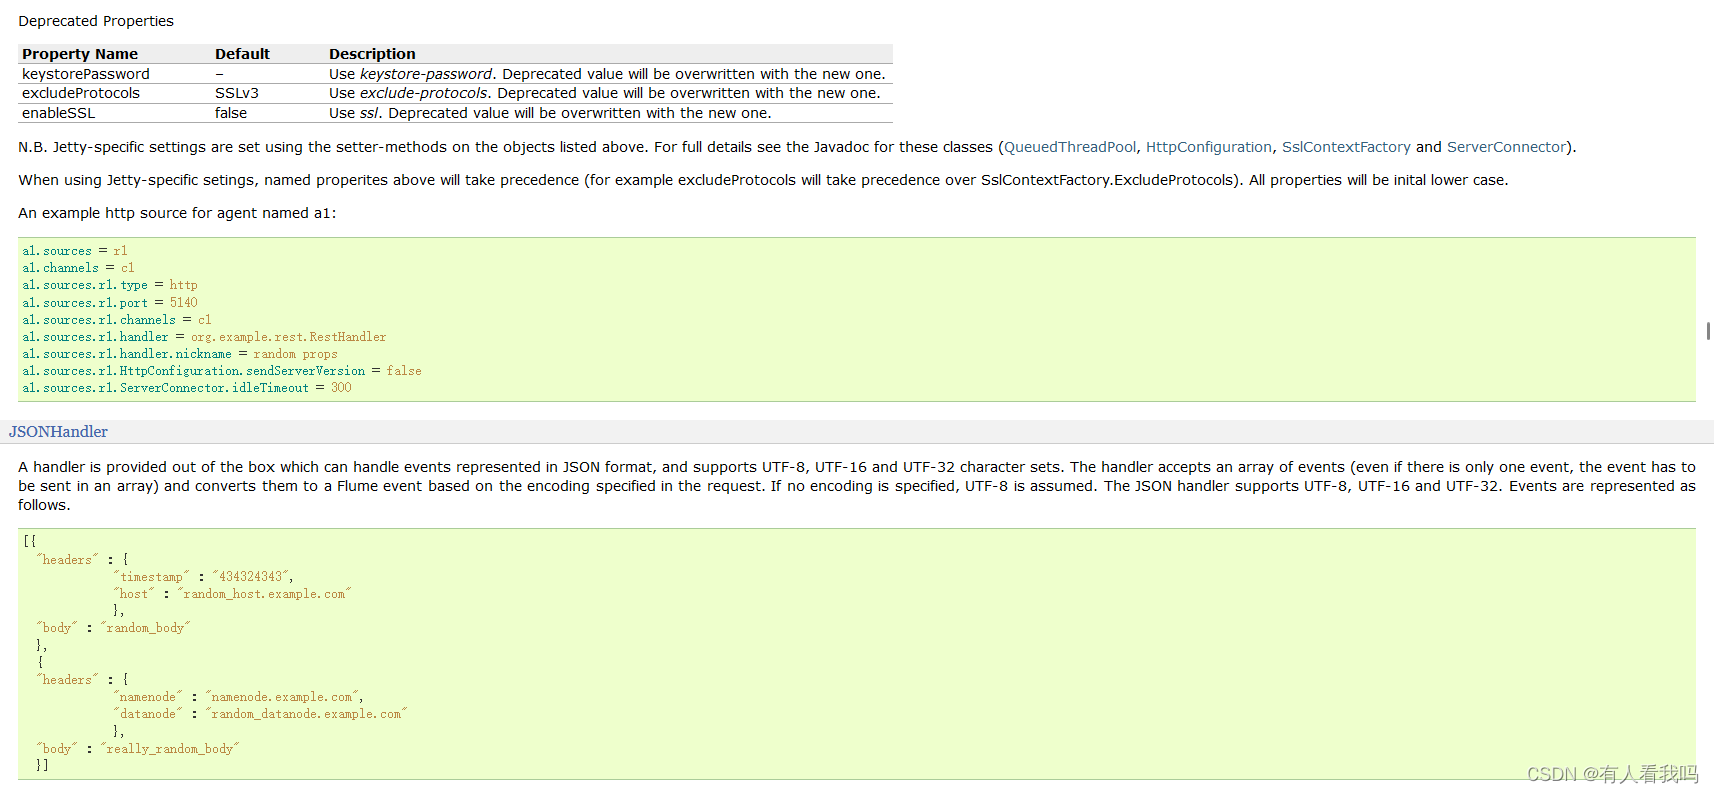
4.4、HTTP Source
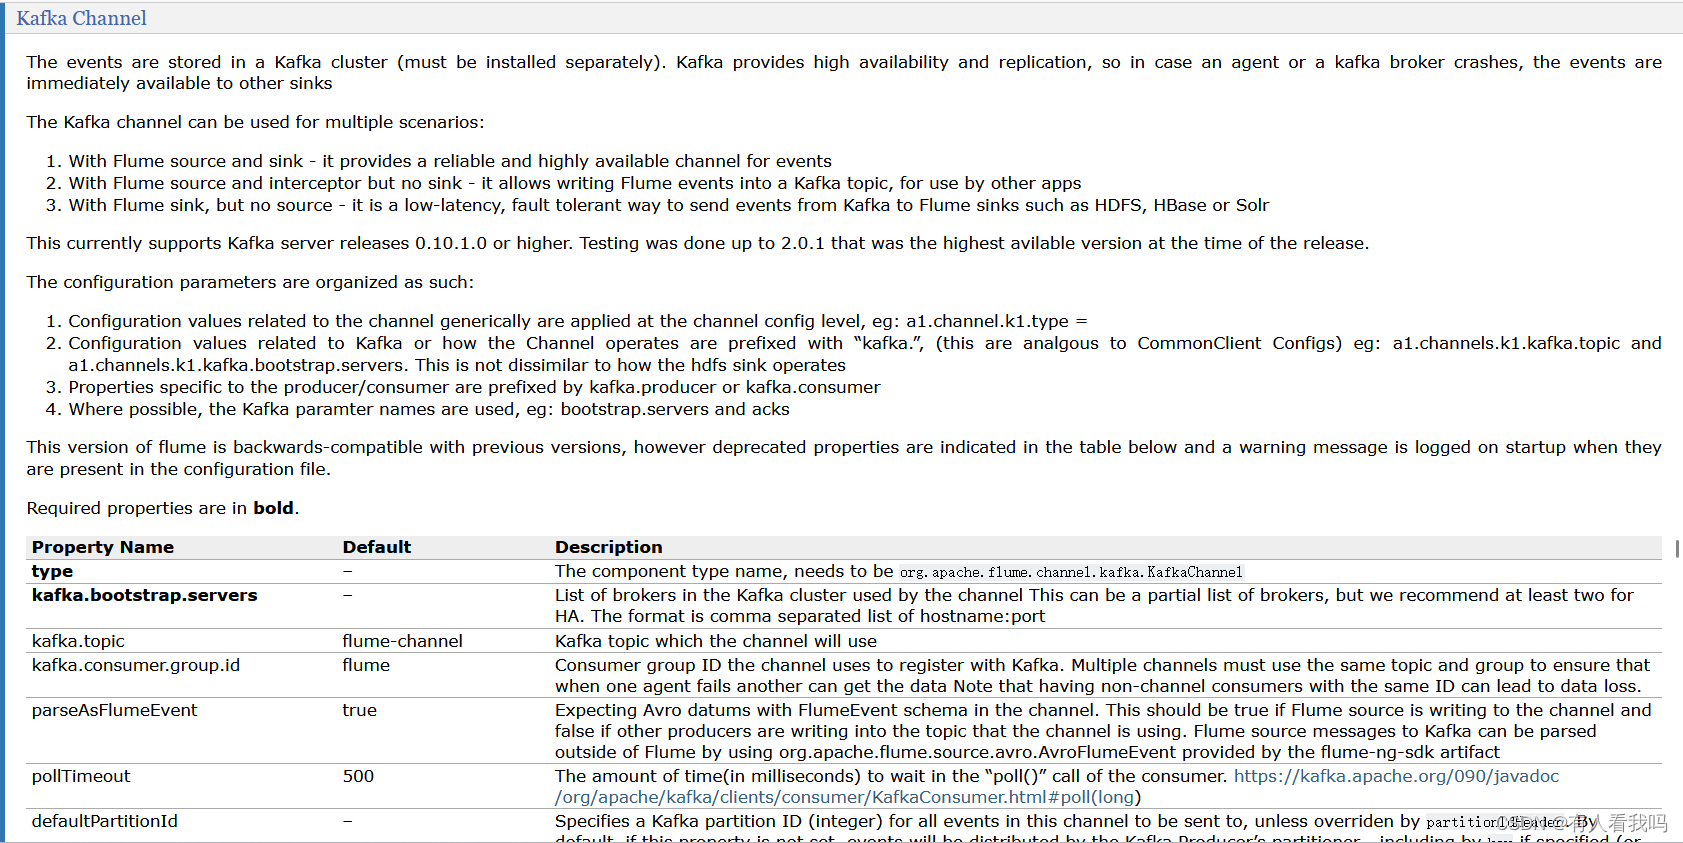
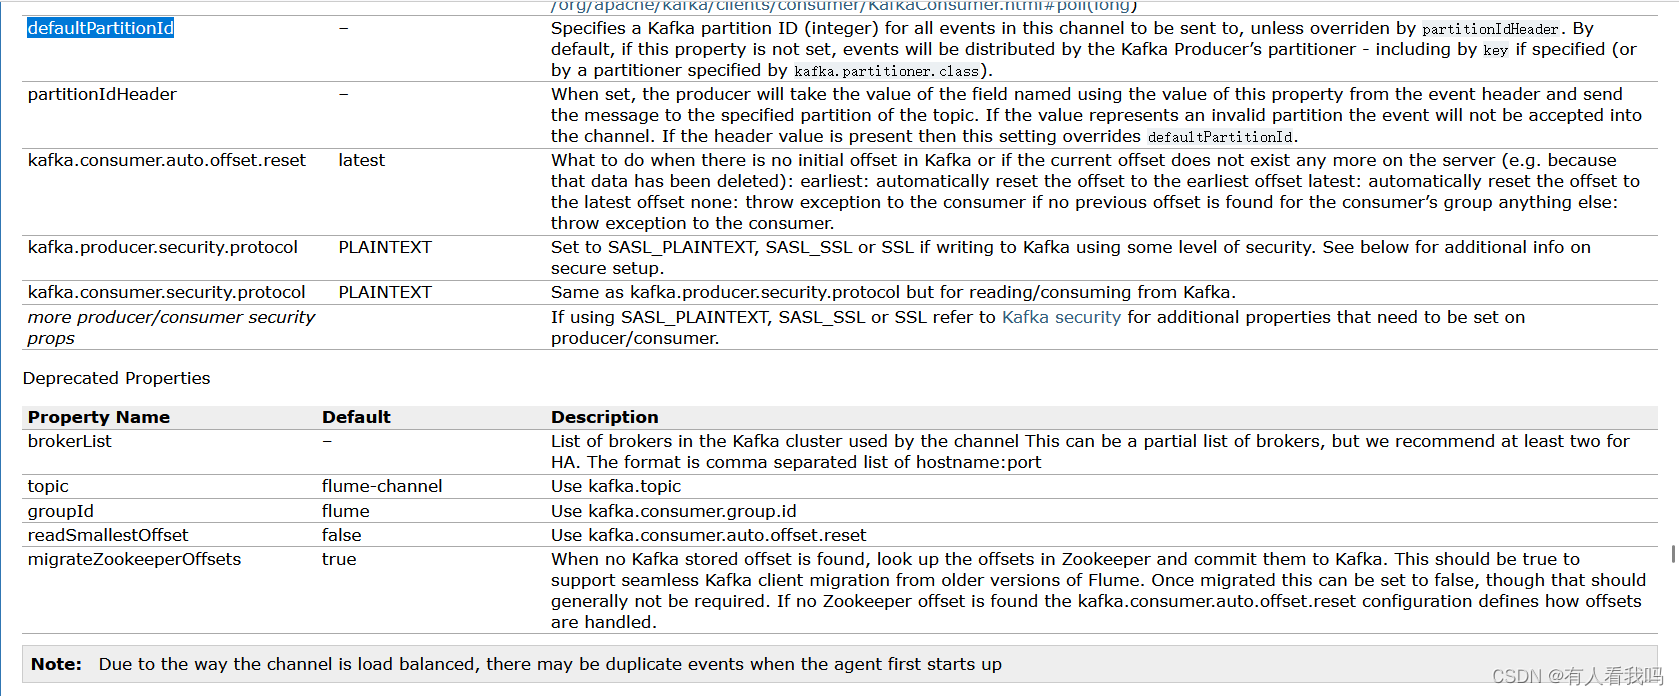
4.5、Kafka Channel

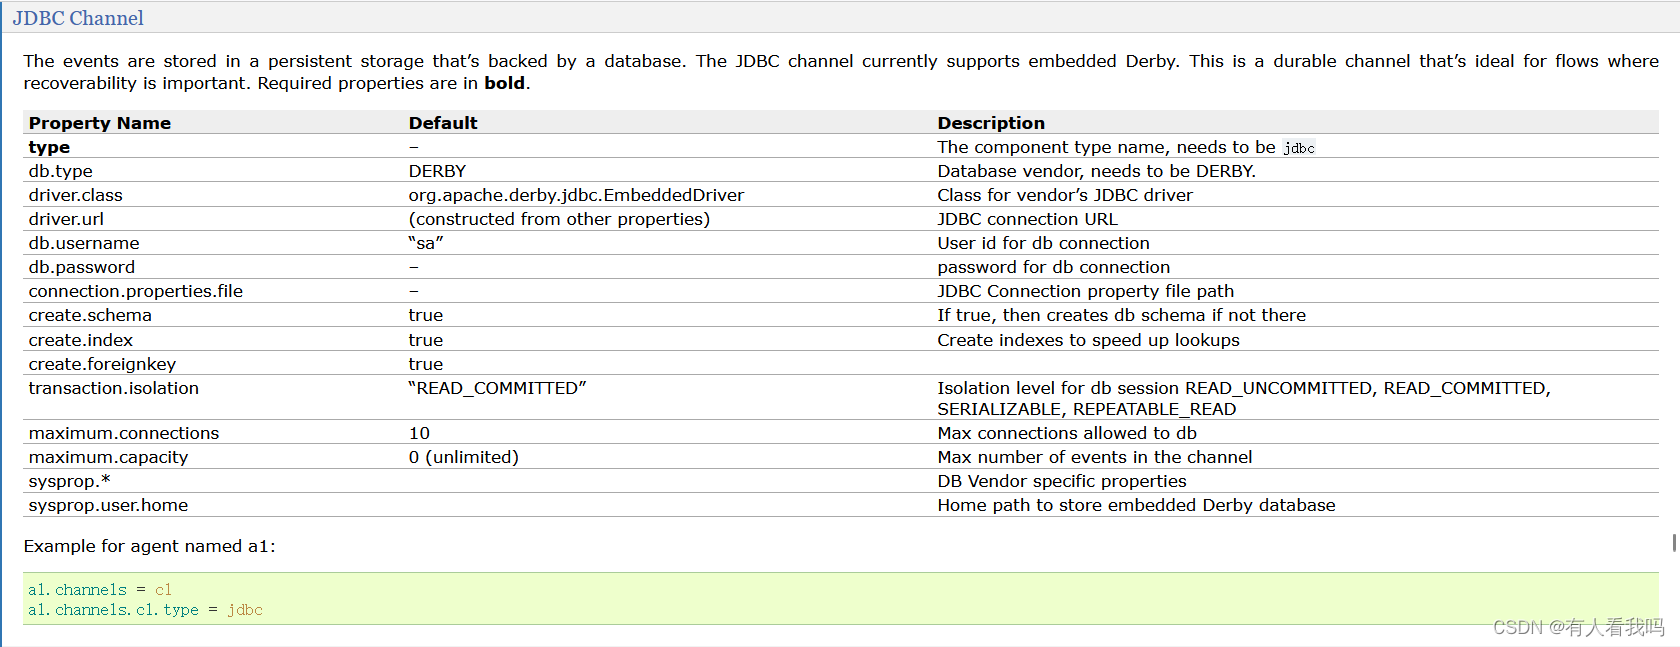
4.6、JDBC Channel
4.7、Hive Sink
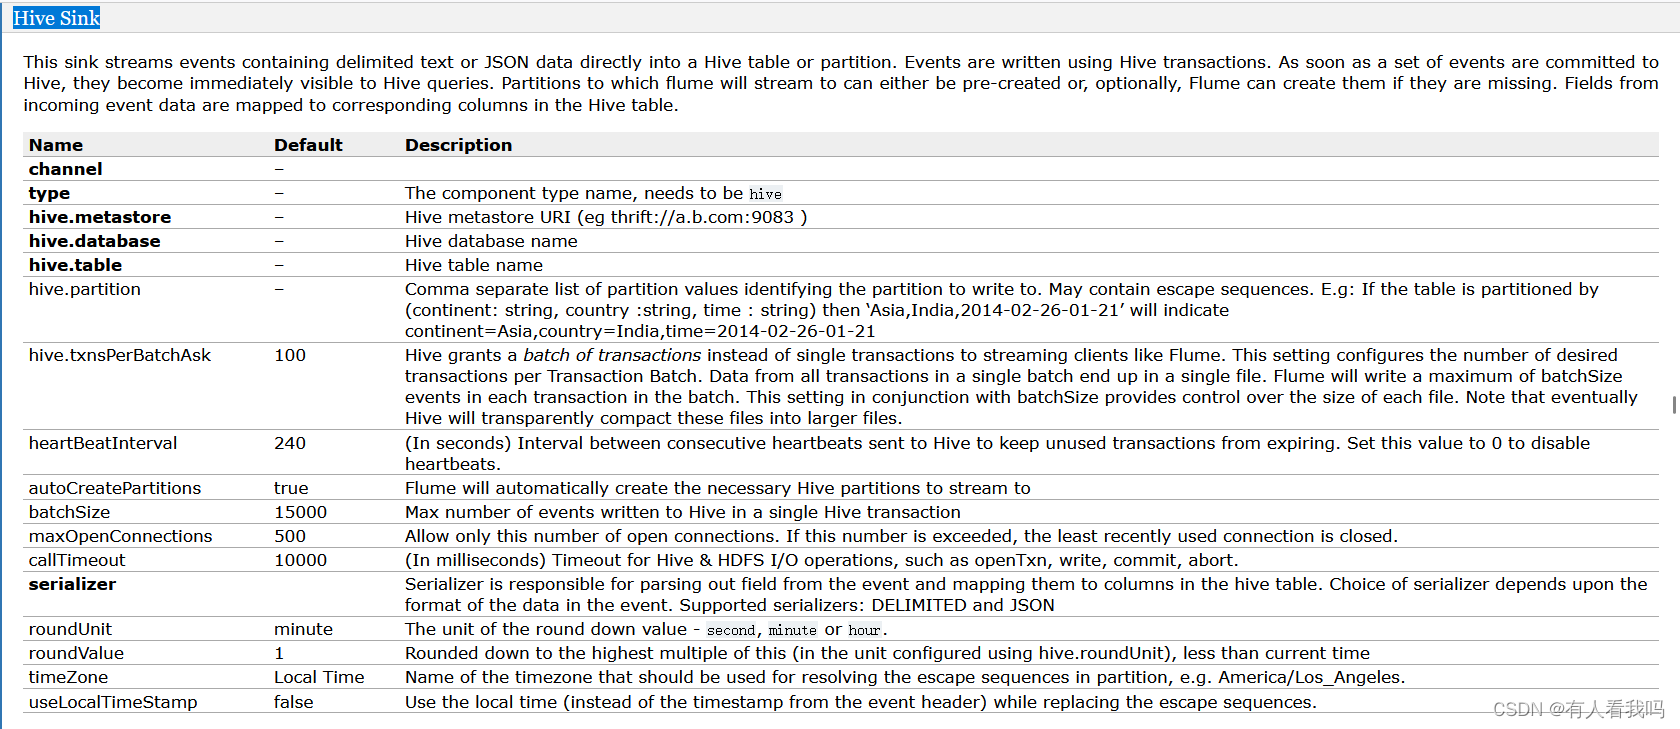

4.8、Kafka Sink
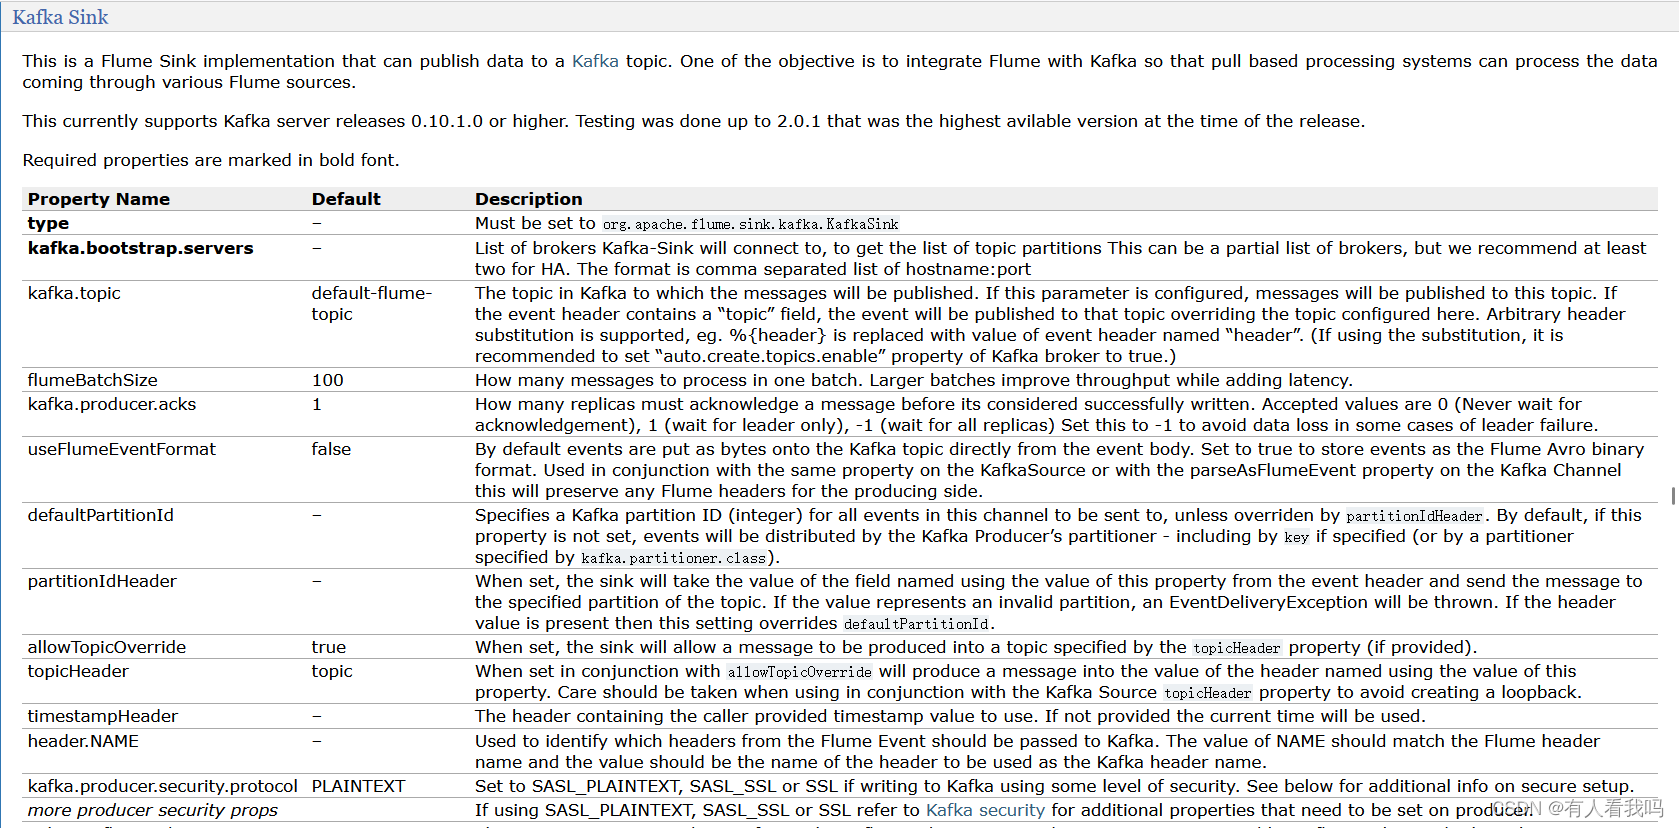
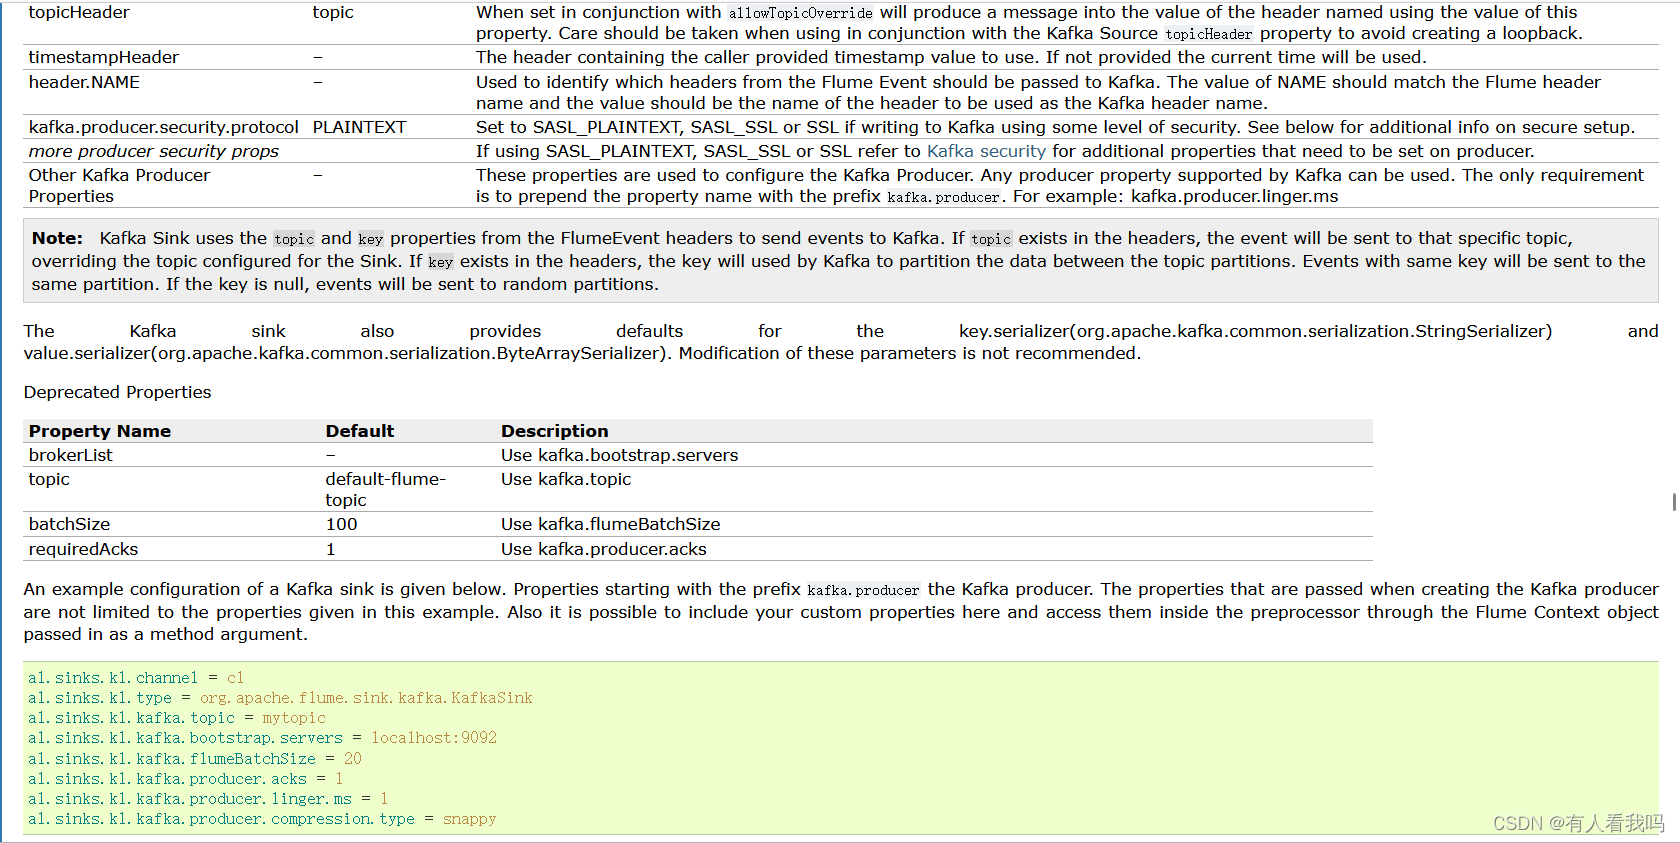
4.9、HTTP Sink
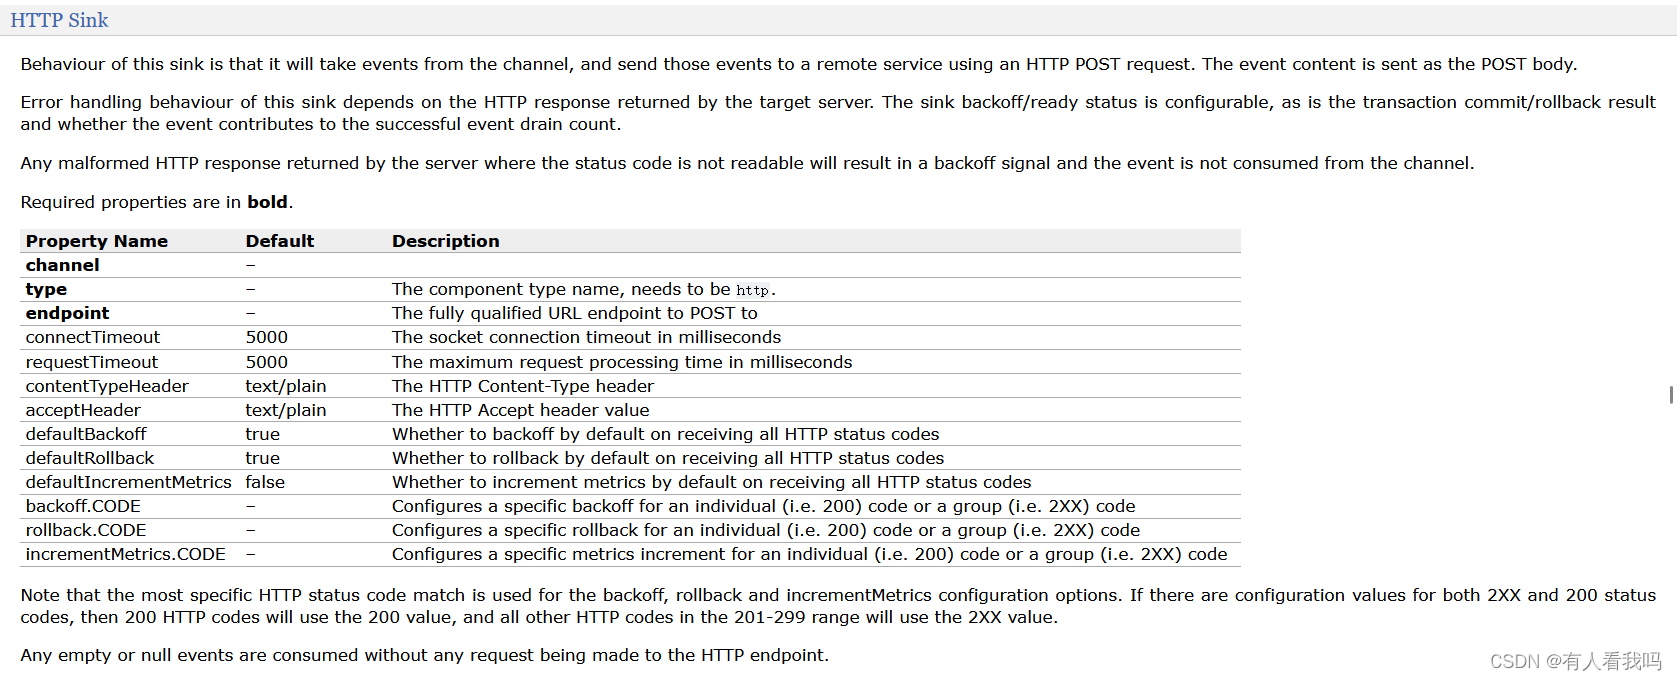

五、拓扑结构
5.1、Setting multi-agent flow
简单串联结构

5.1、Consolidation
聚合
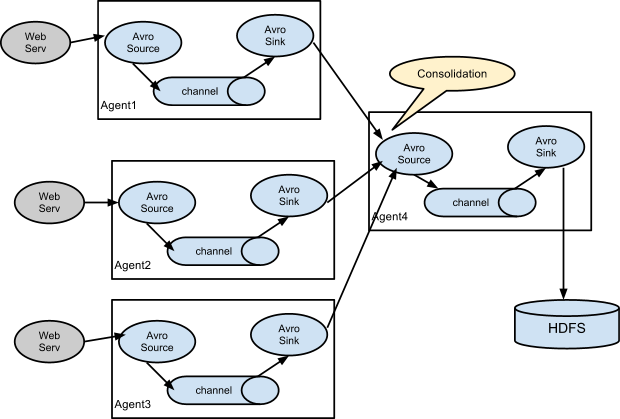
案例:多个Agent将数据发送到一个Agent中
从文件中获取数据发送到avro中
# Name the components on this agent
a1.sources = r1
a1.sinks = k1
a1.channels = c1

# Describe/configure the source
a1.sources.r1.type = TAILDIR
a1.sources.r1.filegroups = f1
a1.sources.r1.filegroups.f1 = /opt/module/logs/file.log


# Use a channel which buffers events in memory
a1.channels.c1.type = memory
a1.channels.c1.capacity = 1000
a1.channels.c1.transactionCapacity = 100


# Describe the sink
a1.sinks.k1.type = avro
a1.sinks.k1.hostname = hadoop104
a1.sinks.k1.port = 4141


# Bind the source and sink to the channel
a1.sources.r1.channels = c1
a1.sinks.k1.channel = c1
从netcat中获取数据发送到avro中
# Name the components on this agent
a1.sources = r1
a1.sinks = k1
a1.channels = c1

# Describe/configure the source
a1.sources.r1.type = netcat
a1.sources.r1.bind = hadoop103
a1.sources.r1.port = 44444


# Use a channel which buffers events in memory
a1.channels.c1.type = memory
a1.channels.c1.capacity = 1000
a1.channels.c1.transactionCapacity = 100


# Describe the sink
a1.sinks.k1.type = avro
a1.sinks.k1.hostname = hadoop104
a1.sinks.k1.port = 4141


# Bind the source and sink to the channel
a1.sources.r1.channels = c1
a1.sinks.k1.channel = c1
从avro中获取到聚合数据打印在日志中
# Name the components on this agent
a1.sources = r1
a1.sinks = k1
a1.channels = c1

# Describe/configure the source
a1.sources.r1.type = avro
a1.sources.r1.bind = hadoop104
a1.sources.r1.port = 4141


# Use a channel which buffers events in memory
a1.channels.c1.type = memory
a1.channels.c1.capacity = 1000
a1.channels.c1.transactionCapacity = 100


# Describe the sink
a1.sinks.k1.type = logger


# Bind the source and sink to the channel
a1.sources.r1.channels = c1
a1.sinks.k1.channel = c1
5.1、Multiplexing the flow
复制和多路复用
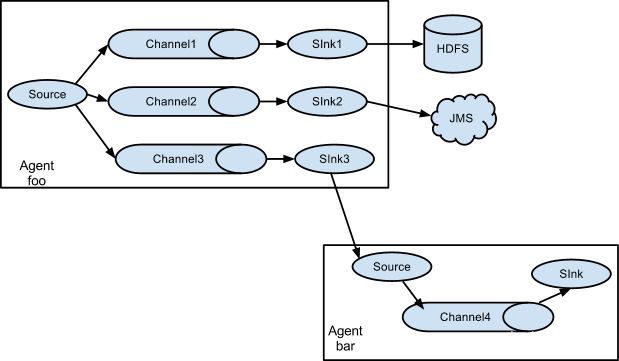
案例,一个数据源对应多个channel和sink
channel选择器包含:
Replicating Channel Selector (default):复制选择器,将数据流复制给所有channel
Load Balancing Channel Selector:负载均衡选择器,支持轮询和随机两种方式(round_robin or random),通过selector.policy配置
Multiplexing Channel Selector:多路复用拦截器,配合拦截器将指定数据推送到指定channel
Custom Channel Selector:自定义选择器
从文件中获取数据分别发送给多个avro
vim flume_channel_selectors_example.conf

# Name the components on this agent
a1.sources = r1
a1.sinks = k1 k2
a1.channels = c1 c2

# Channel选择器,默认为:replicating(将数据流复制给所有channel)
a1.sources.r1.selector.type = replicating

# Describe/configure the source
a1.sources.r1.type = TAILDIR
a1.sources.r1.filegroups = f1
a1.sources.r1.filegroups.f1 = /opt/module/logs/file.log


# Use a channel which buffers events in memory
a1.channels.c1.type = memory
a1.channels.c1.capacity = 1000
a1.channels.c1.transactionCapacity = 100

a1.channels.c2.type = memory
a1.channels.c2.capacity = 1000
a1.channels.c2.transactionCapacity = 100


# Describe the sink
a1.sinks.k1.type = avro
a1.sinks.k1.hostname = localhost
a1.sinks.k1.port = 4141

a1.sinks.k2.type = avro
a1.sinks.k2.hostname = localhost
a1.sinks.k2.port = 4142


# Bind the source and sink to the channel
a1.sources.r1.channels = c1 c2
a1.sinks.k1.channel = c1
a1.sinks.k2.channel = c2
从avro中获取数据
vim avro_to_logger1.conf


# Name the components on this agent
a2.sources = r1
a2.sinks = k1
a2.channels = c1


# Describe/configure the source
a2.sources.r1.type = avro
a2.sources.r1.bind = localhost
a2.sources.r1.port = 4141


# Use a channel which buffers events in memory
a2.channels.c1.type = memory
a2.channels.c1.capacity = 1000
a2.channels.c1.transactionCapacity = 100


# Describe the sink
a2.sinks.k1.type = logger


# Bind the source and sink to the channel
a2.sources.r1.channels = c1
a2.sinks.k1.channel = c1
从另一个avro中获取数据
vim avro_to_logger2.conf


# Name the components on this agent
a3.sources = r1
a3.sinks = k1
a3.channels = c2


# Describe/configure the source
a3.sources.r1.type = avro
a3.sources.r1.bind = localhost
a3.sources.r1.port = 4142


# Use a channel which buffers events in memory
a3.channels.c2.type = memory
a3.channels.c2.capacity = 1000
a3.channels.c2.transactionCapacity = 100


# Describe the sink
a3.sinks.k1.type = logger


# Bind the source and sink to the channel
a3.sources.r1.channels = c2
a3.sinks.k1.channel = c2
# 启动这三个agent
bin/flume-ng agent -n a2 -c /opt/module/flume/conf/ -f /opt/module/flume/job/group/avro_to_logger1.conf
bin/flume-ng agent -n a3 -c /opt/module/flume/conf/ -f /opt/module/flume/job/group/avro_to_logger2.conf
bin/flume-ng agent -n a1 -c /opt/module/flume/conf/ -f /opt/module/flume/job/group/flume_channel_selectors_example.conf
六、拦截器
拦截器可以根据拦截器开发人员选择的任何标准修改甚至删除事件。
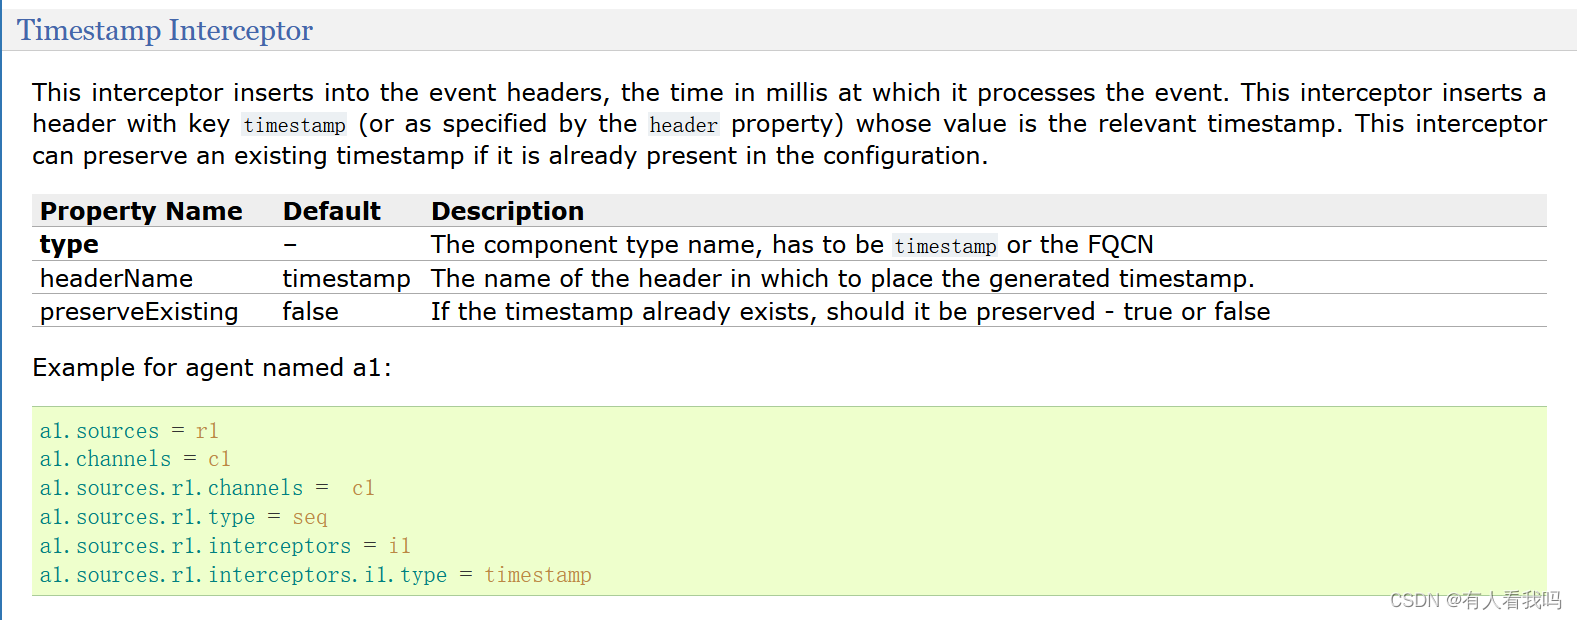
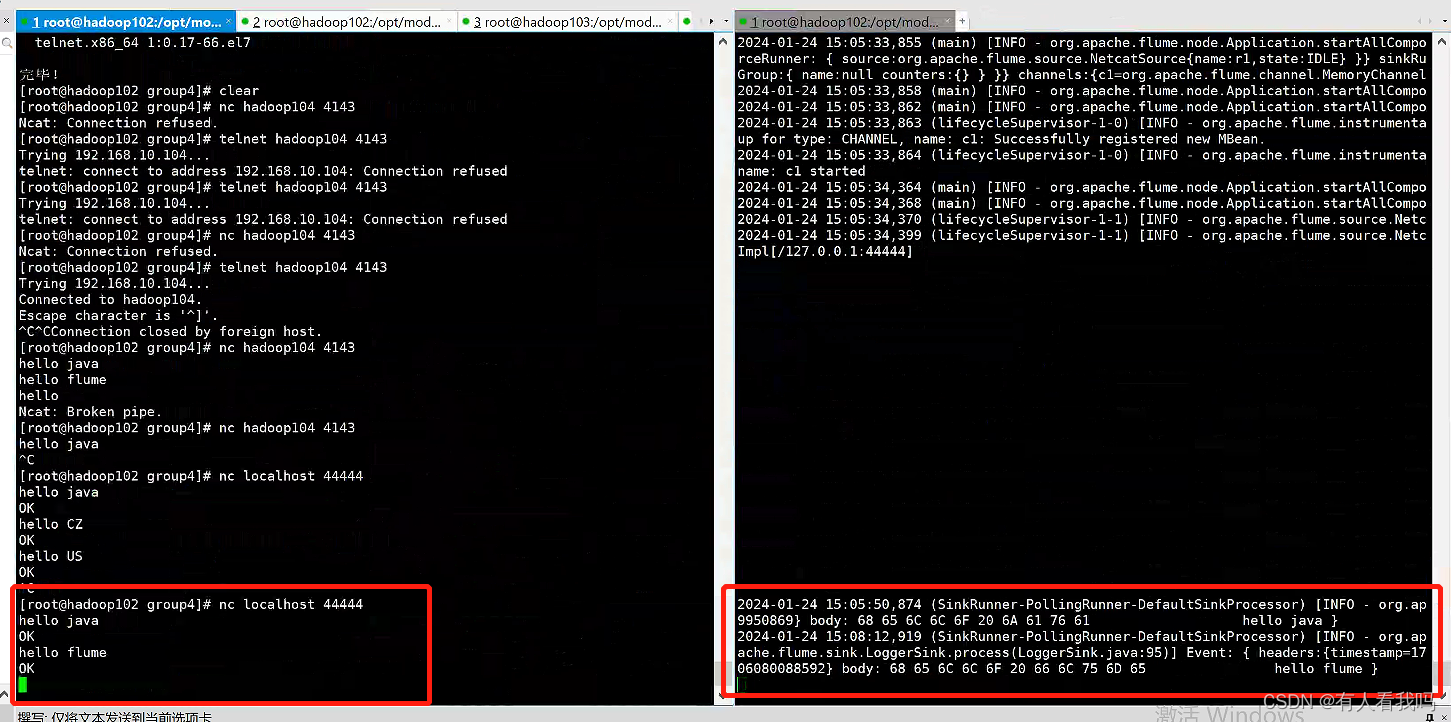
6.1、Timestamp Interceptor
此拦截器将处理事件的时间插入事件标头中
# Name the components on this agent
a1.sources = r1
a1.sinks = k1
a1.channels = c1


# Describe/configure the source
a1.sources.r1.type = netcat
a1.sources.r1.bind = 0.0.0.0
a1.sources.r1.port = 44444

# 配置拦截器
a1.sources.r1.interceptors = i1
a1.sources.r1.interceptors.i1.type = timestamp


# Use a channel which buffers events in memory
a1.channels.c1.type = memory
a1.channels.c1.capacity = 1000
a1.channels.c1.transactionCapacity = 100


# Describe the sink
a1.sinks.k1.type = logger


# Bind the source and sink to the channel
a1.sources.r1.channels = c1
a1.sinks.k1.channel = c1
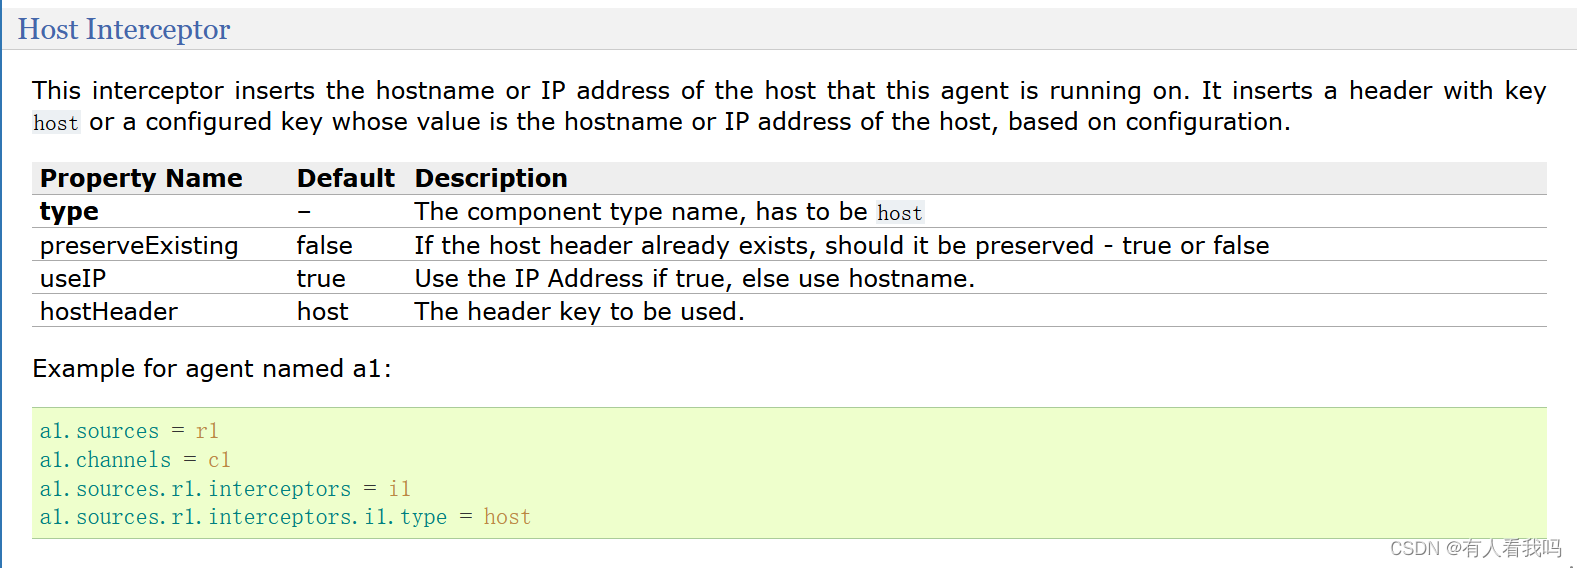
6.2、Host Interceptor
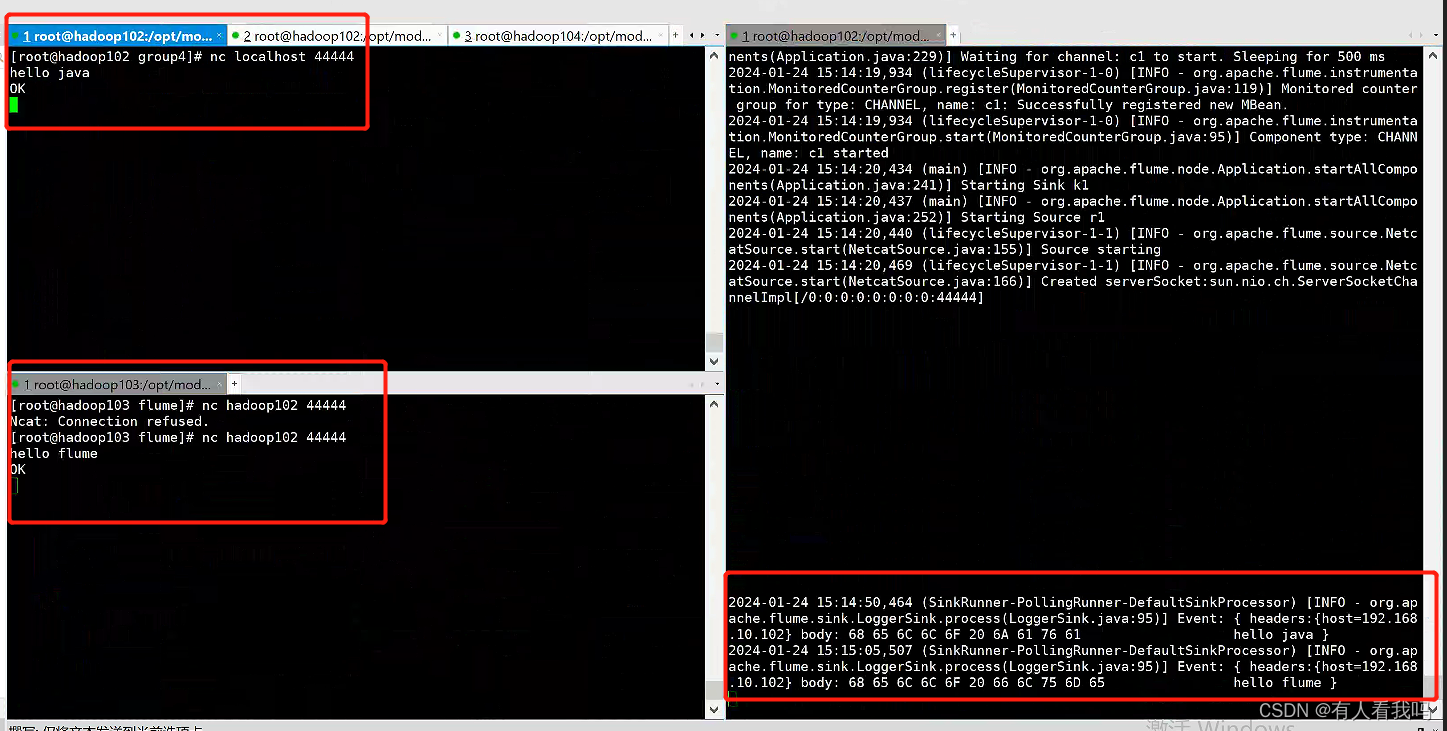
此拦截器插入运行此代理的主机的主机名或IP地址。它根据配置插入一个带有关键字host或已配置关键字的标头,该关键字的值是主机的主机名或IP地址
# Name the components on this agent
a1.sources = r1
a1.sinks = k1
a1.channels = c1


# Describe/configure the source
a1.sources.r1.type = netcat
a1.sources.r1.bind = 0.0.0.0
a1.sources.r1.port = 44444

# 配置拦截器
a1.sources.r1.interceptors = i1
a1.sources.r1.interceptors.i1.type = host


# Use a channel which buffers events in memory
a1.channels.c1.type = memory
a1.channels.c1.capacity = 1000
a1.channels.c1.transactionCapacity = 100


# Describe the sink
a1.sinks.k1.type = logger


# Bind the source and sink to the channel
a1.sources.r1.channels = c1
a1.sinks.k1.channel = c1
6.3、Static Interceptor
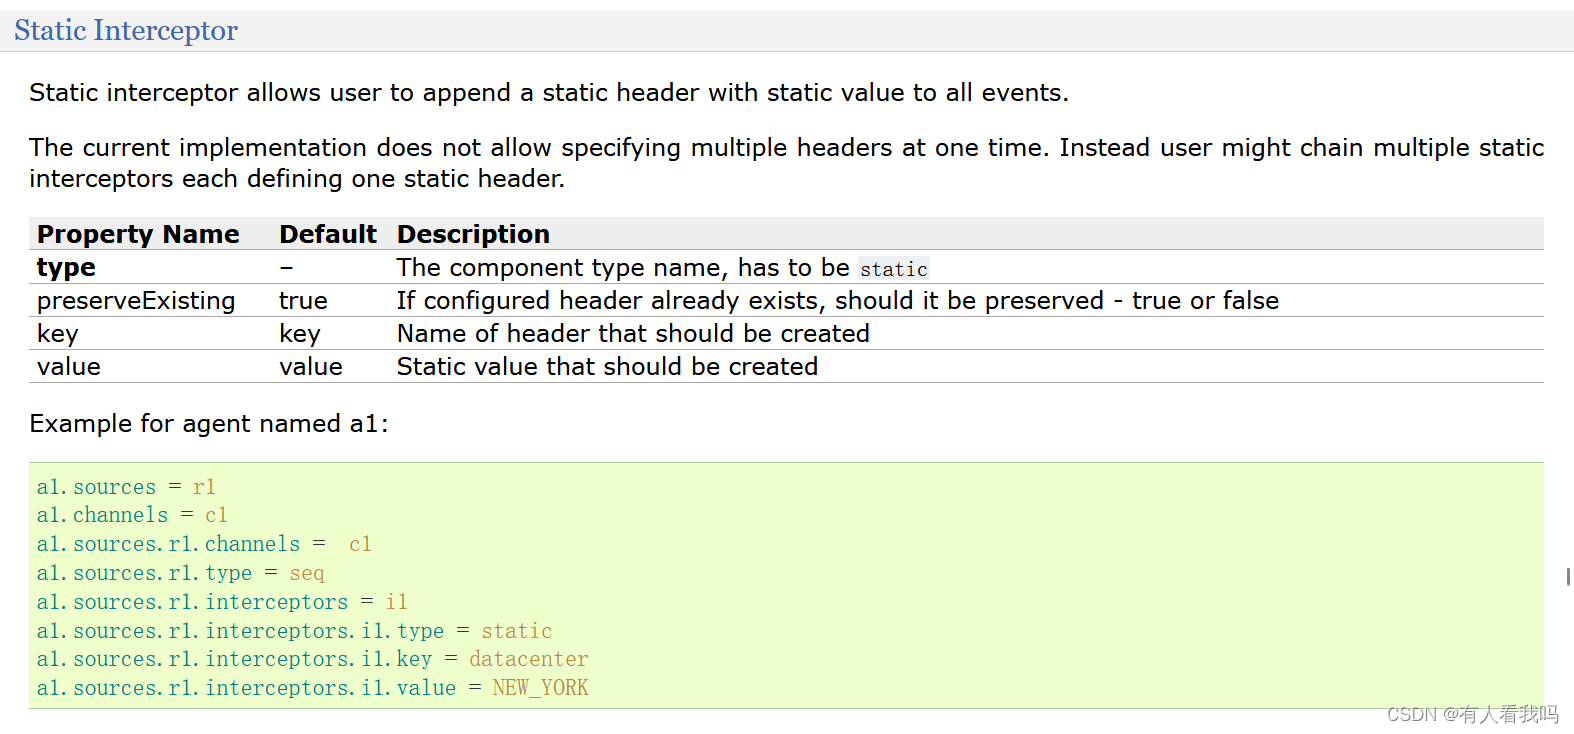
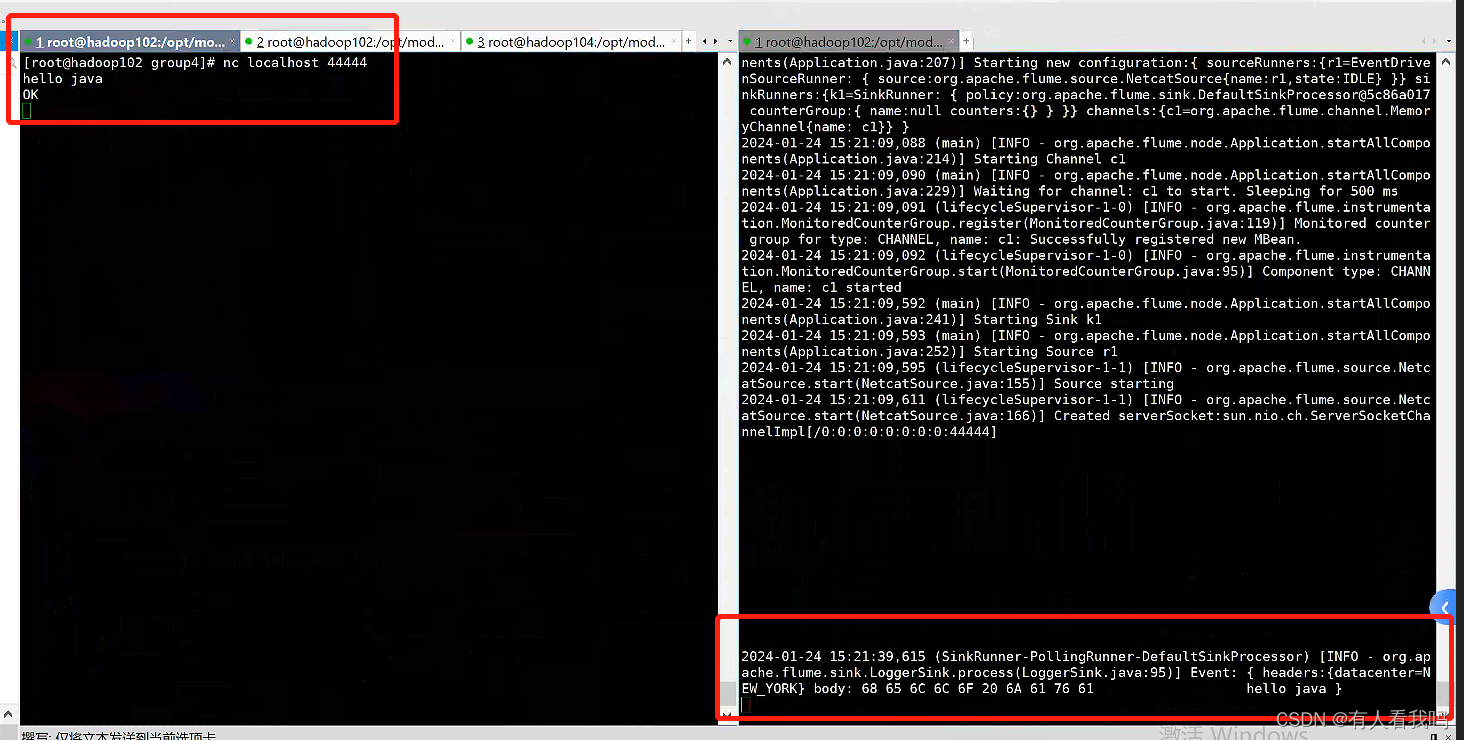
静态拦截器允许用户附加一个静态头与静态值的所有事件
# Name the components on this agent
a1.sources = r1
a1.sinks = k1
a1.channels = c1


# Describe/configure the source
a1.sources.r1.type = netcat
a1.sources.r1.bind = 0.0.0.0
a1.sources.r1.port = 44444

# 配置拦截器
a1.sources.r1.interceptors = i1
a1.sources.r1.interceptors.i1.type = static
a1.sources.r1.interceptors.i1.key = datacenter
a1.sources.r1.interceptors.i1.value = NEW_YORK


# Use a channel which buffers events in memory
a1.channels.c1.type = memory
a1.channels.c1.capacity = 1000
a1.channels.c1.transactionCapacity = 100


# Describe the sink
a1.sinks.k1.type = logger


# Bind the source and sink to the channel
a1.sources.r1.channels = c1
a1.sinks.k1.channel = c1
6.4、Remove Header Interceptor
这个拦截器通过删除一个或多个头来操纵Flume事件头。它可以删除静态定义的头、基于正则表达式的头或列表中的头。如果这些都没有定义,或者没有标头与条件匹配,则不会修改Flume事件。

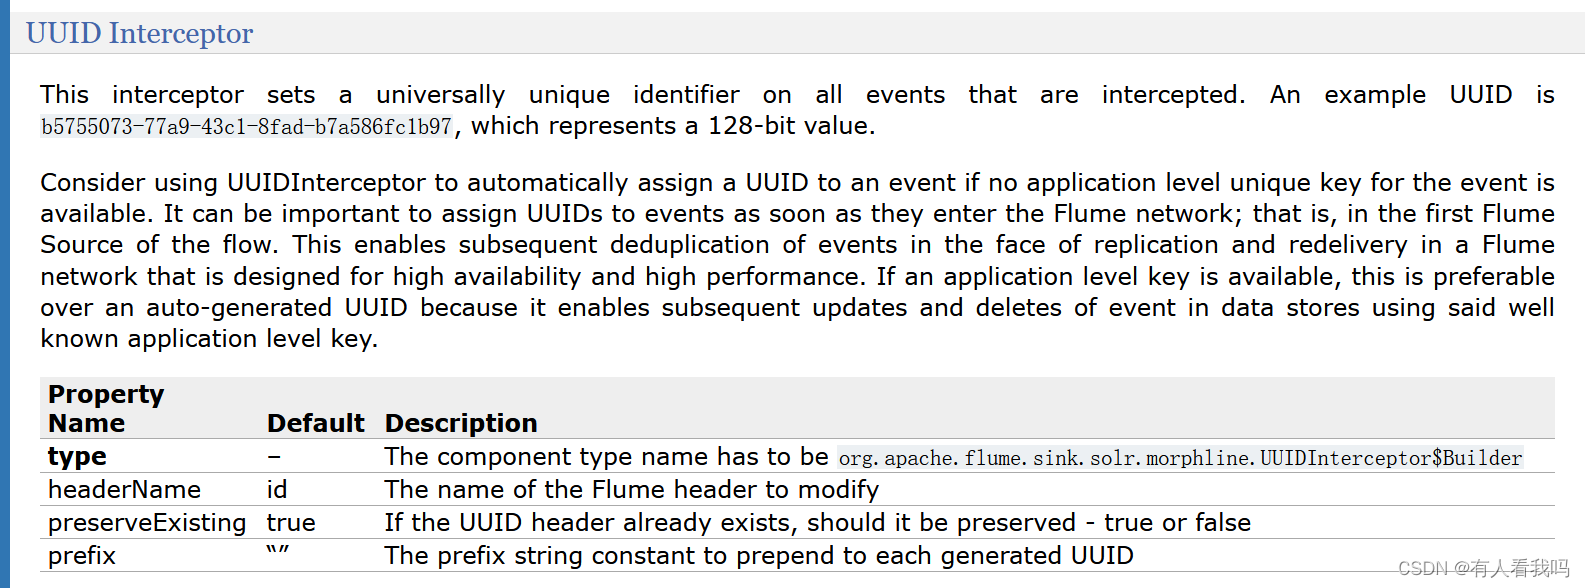
6.5、UUID Interceptor
这个拦截器在所有被拦截的事件上设置一个通用的唯一标识符。
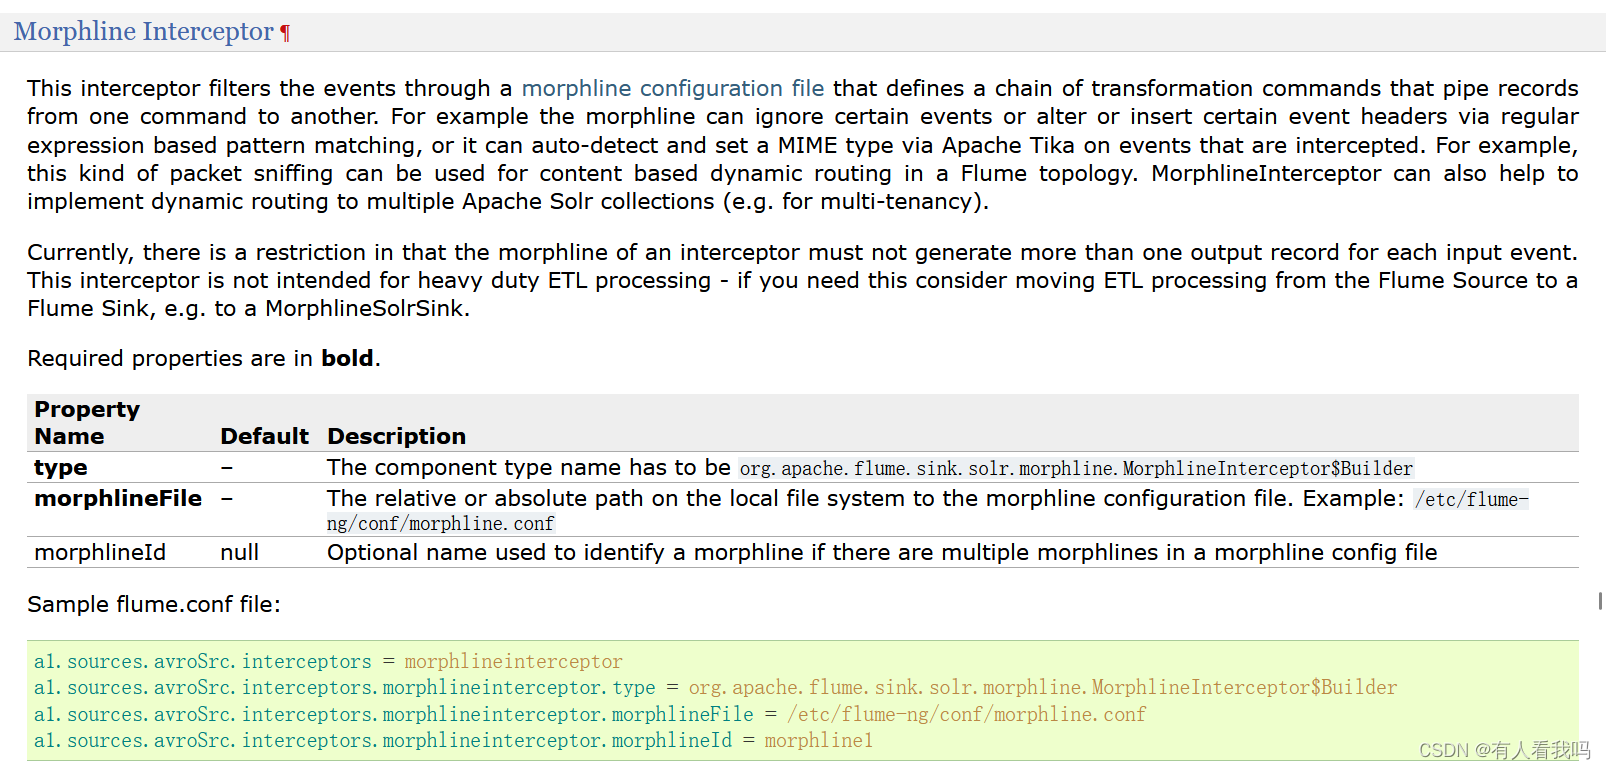
6.6、Morphline Interceptor
Morphline拦截器,该拦截器使用Morphline对每个events数据做相应的转换
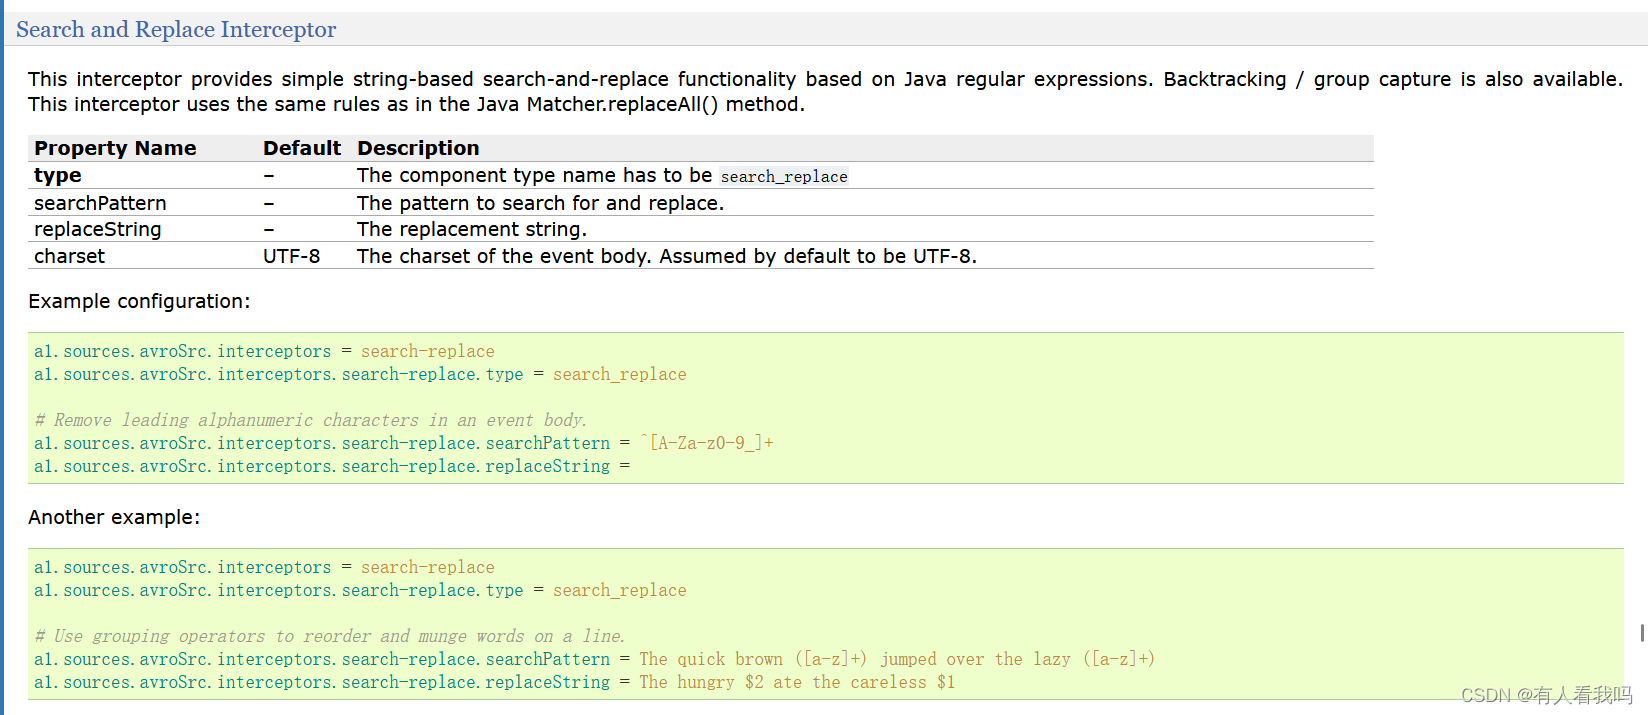
6.7、Search and Replace Interceptor
这个拦截器基于Java正则表达式提供简单的基于字符串的搜索和替换功能。还提供回溯/组捕获功能。这个拦截器使用与JavaMatcher.replaceAll()方法中相同的规则
6.8、Regex Filtering Interceptor
此拦截器通过将事件主体解释为文本并将文本与配置的正则表达式进行匹配来选择性地过滤事件。提供的正则表达式可用于包括事件或排除事件

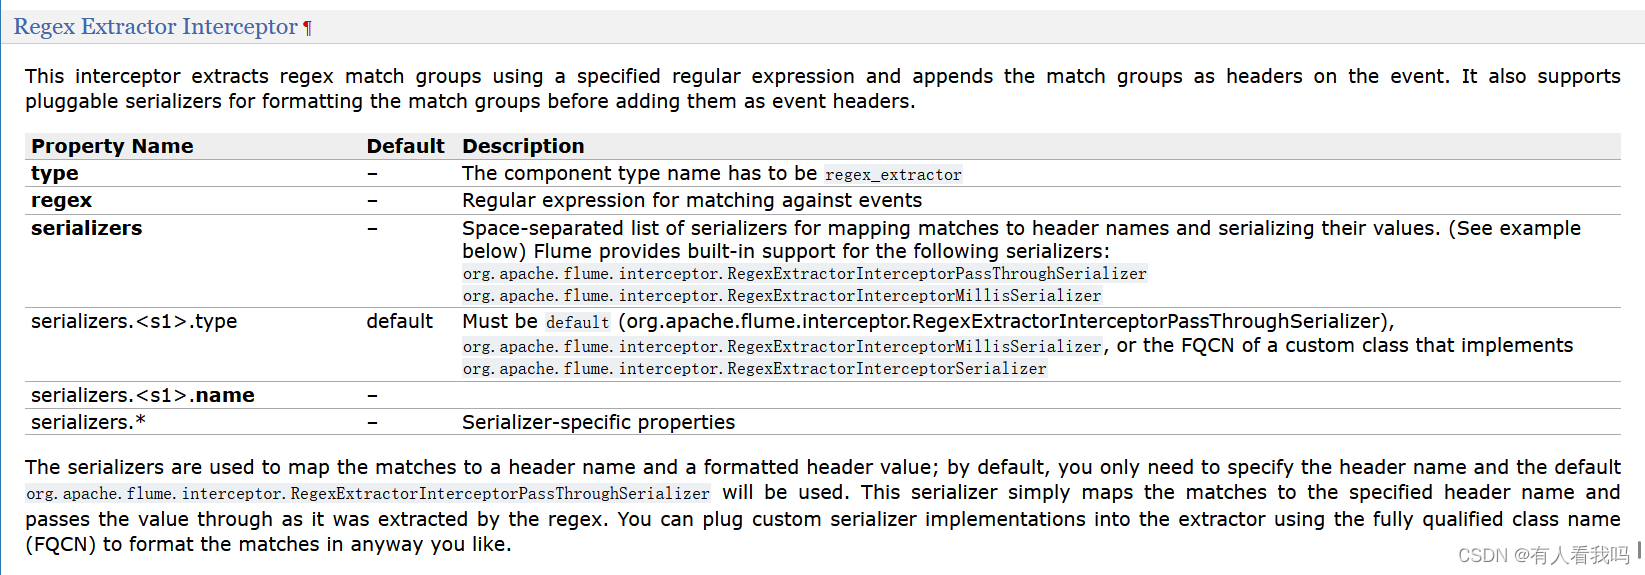
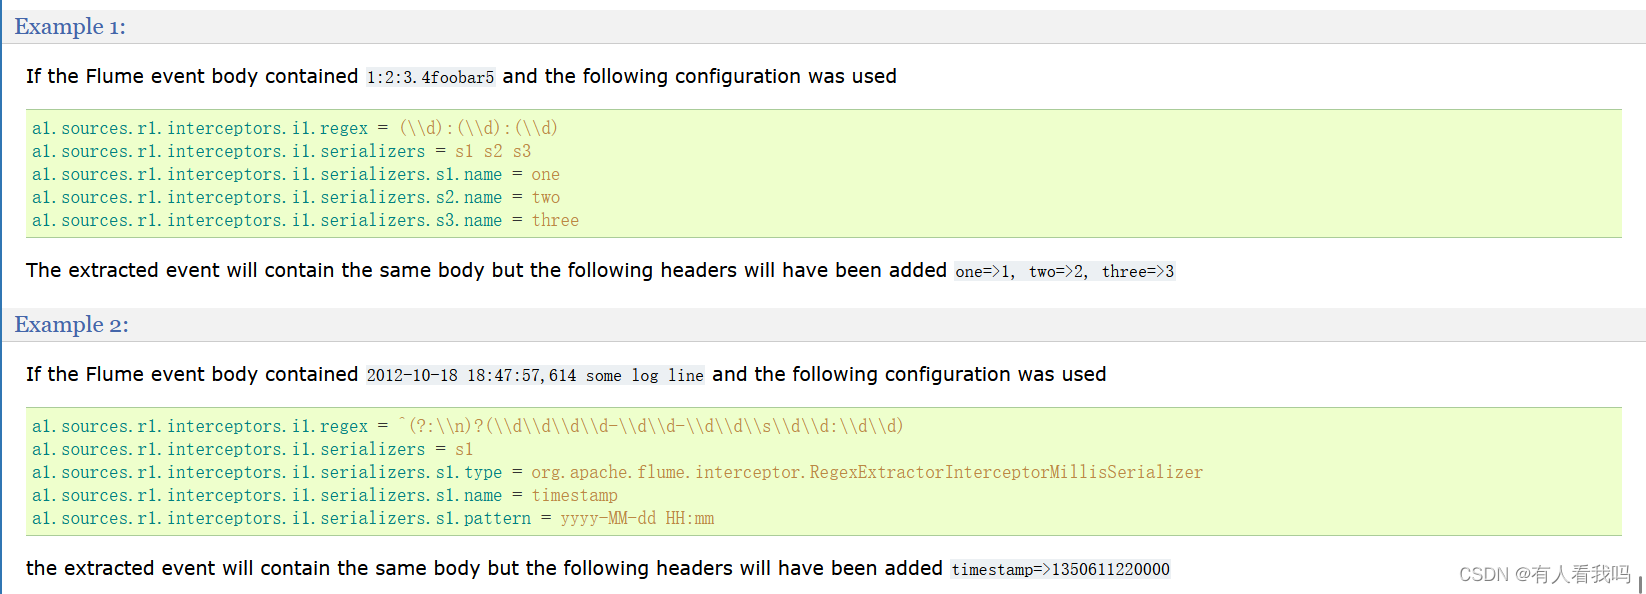
6.9、Regex Extractor Interceptor
这个拦截器使用指定的正则表达式提取正则表达式匹配组,并将匹配组作为标头附加到事件上。它还支持可插入的序列化器,用于在将匹配组作为事件头添加之前对其进行格式化。
6.10、自定义拦截器
- 引用POM依赖
<dependency>
    <groupId>org.apache.flume</groupId>
    <artifactId>flume-ng-core</artifactId>
    <version>1.10.1</version>
</dependency>
- 编写拦截器
package com.xx.interceptor;

import org.apache.flume.Context;
import org.apache.flume.Event;
import org.apache.flume.interceptor.Interceptor;

import java.util.ArrayList;
import java.util.List;
import java.util.Map;

/**
 * @author xiaxing
 * @describe flume拦截器
 * @since 2024/1/23 16:37
 */
public class TypeInterceptor implements Interceptor {

    private List<Event> addHeaderEvents;

    @Override
    public void initialize() {
        addHeaderEvents = new ArrayList<>();
    }

    @Override
    public Event intercept(Event event) {
        Map<String, String> headers = event.getHeaders();
        String body = new String(event.getBody());
        if (body.contains("CZ")) {
            headers.put("state", "CZ");
        } else if (body.contains("US")) {
            headers.put("state", "US");
        } else {
            headers.put("state", "UN");
        }
        return event;
    }

    @Override
    public List<Event> intercept(List<Event> list) {
        addHeaderEvents.clear();
        list.forEach(event -> {
            addHeaderEvents.add(this.intercept(event));
        });
        return addHeaderEvents;
    }

    @Override
    public void close() {

    }

    public static class Builder implements Interceptor.Builder {

        @Override
        public Interceptor build() {
            return new TypeInterceptor();
        }

        @Override
        public void configure(Context context) {

        }
    }
}
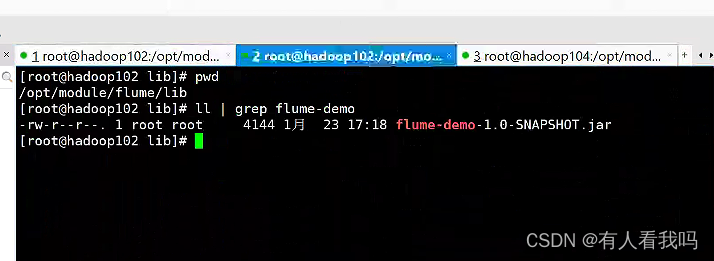
- 将打包好的jar包放到flume中
- 编写flume.conf
# Name the components on this agent
a1.sources = r1
a1.sinks = k1 k2 k3
a1.channels = c1 c2 c3


# Describe/configure the source
a1.sources.r1.type = netcat
a1.sources.r1.bind = localhost
a1.sources.r1.port = 44444

# 配置拦截器
# 拦截器名称
a1.sources.r1.interceptors = i1
# 拦截器路径
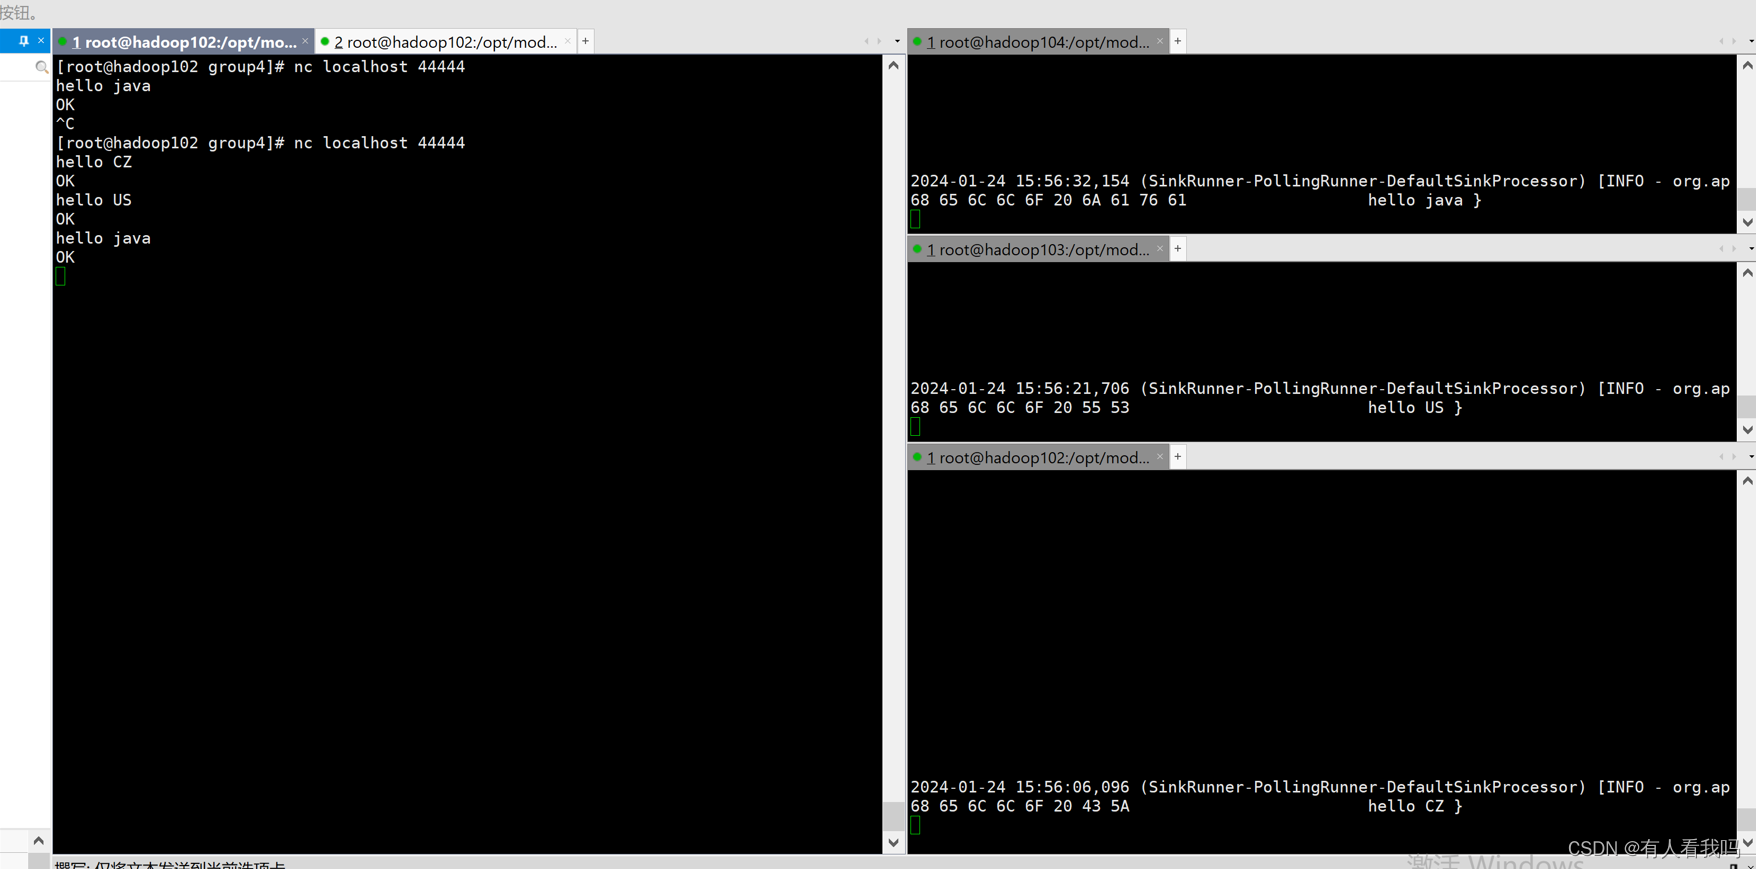
a1.sources.r1.interceptors.i1.type = com.xx.interceptor.TypeInterceptor$Builder
a1.sources.r1.selector.type = multiplexing

# 指定头信息中的key
a1.sources.r1.selector.header = state
# 如果value为CZ则将数据发送到c1这个channel
a1.sources.r1.selector.mapping.CZ = c1
# 如果value为CZ则将数据发送到c2这个channel
a1.sources.r1.selector.mapping.US = c2
# 没有命中的发往c3这个channel
a1.sources.r1.selector.default = c3


# Use a channel which buffers events in memory
a1.channels.c1.type = memory
a1.channels.c1.capacity = 1000
a1.channels.c1.transactionCapacity = 100

a1.channels.c2.type = memory
a1.channels.c2.capacity = 1000
a1.channels.c2.transactionCapacity = 100

a1.channels.c3.type = memory
a1.channels.c3.capacity = 1000
a1.channels.c3.transactionCapacity = 100


# Describe the sink
a1.sinks.k1.type = avro
a1.sinks.k1.hostname = hadoop102
a1.sinks.k1.port = 4141


a1.sinks.k2.type = avro
a1.sinks.k2.hostname = hadoop103
a1.sinks.k2.port = 4142


a1.sinks.k3.type = avro
a1.sinks.k3.hostname = hadoop104
a1.sinks.k3.port = 4143


# Bind the source and sink to the channel
a1.sources.r1.channels = c1 c2 c3
a1.sinks.k1.channel = c1
a1.sinks.k2.channel = c2
a1.sinks.k3.channel = c3
接收拦截器分发的内容
# Name the components on this agent
a1.sources = r1
a1.sinks = k1
a1.channels = c1


# Describe/configure the source
a1.sources.r1.type = avro
a1.sources.r1.bind = 0.0.0.0
a1.sources.r1.port = 4141


# Use a channel which buffers events in memory
a1.channels.c1.type = memory
a1.channels.c1.capacity = 1000
a1.channels.c1.transactionCapacity = 100


# Describe the sink
a1.sinks.k1.type = logger


# Bind the source and sink to the channel
a1.sources.r1.channels = c1
a1.sinks.k1.channel = c1
# Name the components on this agent
a1.sources = r1
a1.sinks = k1
a1.channels = c1


# Describe/configure the source
a1.sources.r1.type = avro
a1.sources.r1.bind = 0.0.0.0
a1.sources.r1.port = 4142


# Use a channel which buffers events in memory
a1.channels.c1.type = memory
a1.channels.c1.capacity = 1000
a1.channels.c1.transactionCapacity = 100


# Describe the sink
a1.sinks.k1.type = logger


# Bind the source and sink to the channel
a1.sources.r1.channels = c1
a1.sinks.k1.channel = c1
# Name the components on this agent
a1.sources = r1
a1.sinks = k1
a1.channels = c1


# Describe/configure the source
a1.sources.r1.type = avro
a1.sources.r1.bind = 0.0.0.0
a1.sources.r1.port = 4143


# Use a channel which buffers events in memory
a1.channels.c1.type = memory
a1.channels.c1.capacity = 1000
a1.channels.c1.transactionCapacity = 100


# Describe the sink
a1.sinks.k1.type = logger


# Bind the source and sink to the channel
a1.sources.r1.channels = c1
a1.sinks.k1.channel = c1
本文来自互联网用户投稿,该文观点仅代表作者本人,不代表本站立场。本站仅提供信息存储空间服务,不拥有所有权,不承担相关法律责任。 如若内容造成侵权/违法违规/事实不符,请联系我的编程经验分享网邮箱:chenni525@qq.com进行投诉反馈,一经查实,立即删除!
