UI5与后端的文件交互(三)
发布时间:2024年01月04日
文章目录
前言
这系列文章详细记录在Fiori应用中如何在前端和后端之间使用文件进行交互。
这篇的主要内容有:
- 后端RAP的开发(S4HANA On-Premise)
- 新建Action(保存base64)
- 前端(UI5)读取文件并保存到后端
- 传输文件流,并保存在ABAP数据库表
- 在前端下载已保存的文件
- 在前端显示已保存的图片
一、开发Action
1. 修改Table
- 新增3个字段 attachment ,filename,filetype
- 对应的CDS也添加三个字段
define table ymoon_t010 {
  key client : abap.clnt not null;
  key uuid   : sysuuid_x16 not null;
  name       : abap.char(40);
  age        : abap.int1;
  gender     : abap.char(10);
  city       : abap.char(40);
  attachment : abap.string(0);
  filename   : abap.char(100);
  filetype   : abap.char(100);

}
2. BDEF中新增Action
managed implementation in class zbp_moon_i_010 unique;
strict ( 2 );

define behavior for ymoon_i_010 alias Student
persistent table YMOON_T010
early numbering
lock master
authorization master ( instance )
//etag master <field_name>
{
  create;
  update;
  delete;

  //Add Action
  static action upload_file parameter ymoon_s010;
  //新增Action
  static action upload_attachment parameter ymoon_s011;

}
3. 新建结构,用于接收uuid以及附件数据
@EndUserText.label : 'uuid & Attachment'
@AbapCatalog.enhancement.category : #NOT_EXTENSIBLE
define structure ymoon_s011 {
  uuid       : sysuuid_x16;
  attachment : abap.string(0);
  filename   : abap.string(0);
}
4. 实现Method逻辑
这里把base64保存到string类型中
  method upload_attachment.

    "获取UI5传送的parameter
    data(uuid) = keys[ 1 ]-%param-uuid.
    data(attachment) = keys[ 1 ]-%param-attachment.
    data(filename_full) = keys[ 1 ]-%param-filename.

    "
    split filename_full at `.` into data(lv_filename) data(lv_filetype).

    "更新
    update ymoon_t010
      set filename = lv_filename
          filetype = lv_filetype
          attachment = attachment
    where uuid = uuid.

  endmethod.
二、UI5项目修改
1. 添加表格行
- 新增附件和文件名列, 并使用FileUploader和Link组成cell
<columns>
    <Column>
        <Text text="姓名" />
    </Column>
    <Column>
        <Text text="年龄" />
    </Column>
    <Column>
        <Text text="性别" />
    </Column>
    <Column>
        <Text text="城市" />
    </Column>
    <Column>
        <Text text="选择附件" />
    </Column>
    <Column>
        <Text text="文件名" />
    </Column>
</columns>
<items>
    <ColumnListItem>
        <cells>
            <Text text="{Name}" />
            <Text text="{Age}" />
            <Text text="{Gender}" />
            <Text text="{City}" />
            <u:FileUploader
                id="Attachment"
                name="Attachment"
                tooltip="Upload your Attachment to the server"
                buttonText="上传附件"
                change="onUploadAttachment"
            />
            <Link text="{= ${Filename} !== '' ? ${Filename} + '.' + ${Filetype} : ''}" />
        </cells>
    </ColumnListItem>
</items>
2. 事件处理函数
- 上传文件时,获取当前行的uuid并调用Action传输到后端
onUploadAttachment: function (e) {
   // console.log(e)
   var oModel = this.getView().getModel();
   var file = e.getParameter("files")[0]
   var filename = e.getSource().getProperty('value')
   var uuid = e.getSource().getBindingContext().getProperty().Uuid
   var reader = new FileReader();

   reader.onload = function (evt) {
       // 获取文件流
       var vContent = evt.currentTarget.result;

       oModel.callFunction("/upload_attachment",
           {
               method: "POST",
               urlParameters: {   //参数,首字母大写
                   "Uuid": uuid,
                   "Attachment": vContent,
                   "Filename": filename
               },
               success: function (odata, response) {
                   //Model Refresh
                   MessageBox.information("附件上传成功! " + filename);
                   oModel.refresh(true);
               },
               error: function (res) {
                   console.log(res)
               }
           })


   }
   reader.readAsDataURL(file);

}
3. 点击文件名时的事件
- 点击文件时,会下载对应的文件。 如果是图片类型,则直接显示在浏览器Dialog上
这里值得一提的是Image控件可以直接显示BASE64值的图片,不需要传入图片路径也可
onClickFilename: function (e) {

     var oData = e.getSource().getBindingContext().getProperty()
     var validFileTypes = ['gif', 'jpg', 'png', 'jpeg'];
     var vContent = oData.Attachment

     if (validFileTypes.includes(oData.Filetype)) {
         // 创建图片控件
         this.oImage = new Image({
             src: oData.Attachment,
             width: "100%"
         });

         // 创建对话框
         this.oDialog = new Dialog({
             title: "Image Dialog",
             content: this.oImage,
             beginButton: new Button({
                 text: "Close",
                 press: function () {
                     this.oDialog.close();
                 }.bind(this)
             })
         });

         // 打开对话框
         this.oDialog.open();

     } else {
         var sContent = vContent.split(";")
         var Mimetype = sContent[0].split(":")
         var Docum = sContent[1].split(",")

         //下载需要把base64转为blob
         var blob = this.base64toBlob(Docum[1], Mimetype[1]);
         File.save(blob, oData.Filename, oData.Filetype, Mimetype[1]);

     }


 },
 base64toBlob(base64Data, contentType) {
     contentType = contentType || '';

     var sliceSize = 512;
     var byteCharacters = atob(base64Data);
     var byteArrays = [];

     for (var offset = 0; offset < byteCharacters.length; offset += sliceSize) {
         var slice = byteCharacters.slice(offset, offset + sliceSize);
         var byteNumbers = new Array(slice.length);

         for (var i = 0; i < slice.length; i++) {
             byteNumbers[i] = slice.charCodeAt(i);
         }

         var byteArray = new Uint8Array(byteNumbers);
         byteArrays.push(byteArray);
     }

     var blob = new Blob(byteArrays, { type: contentType });
     return blob;
 }
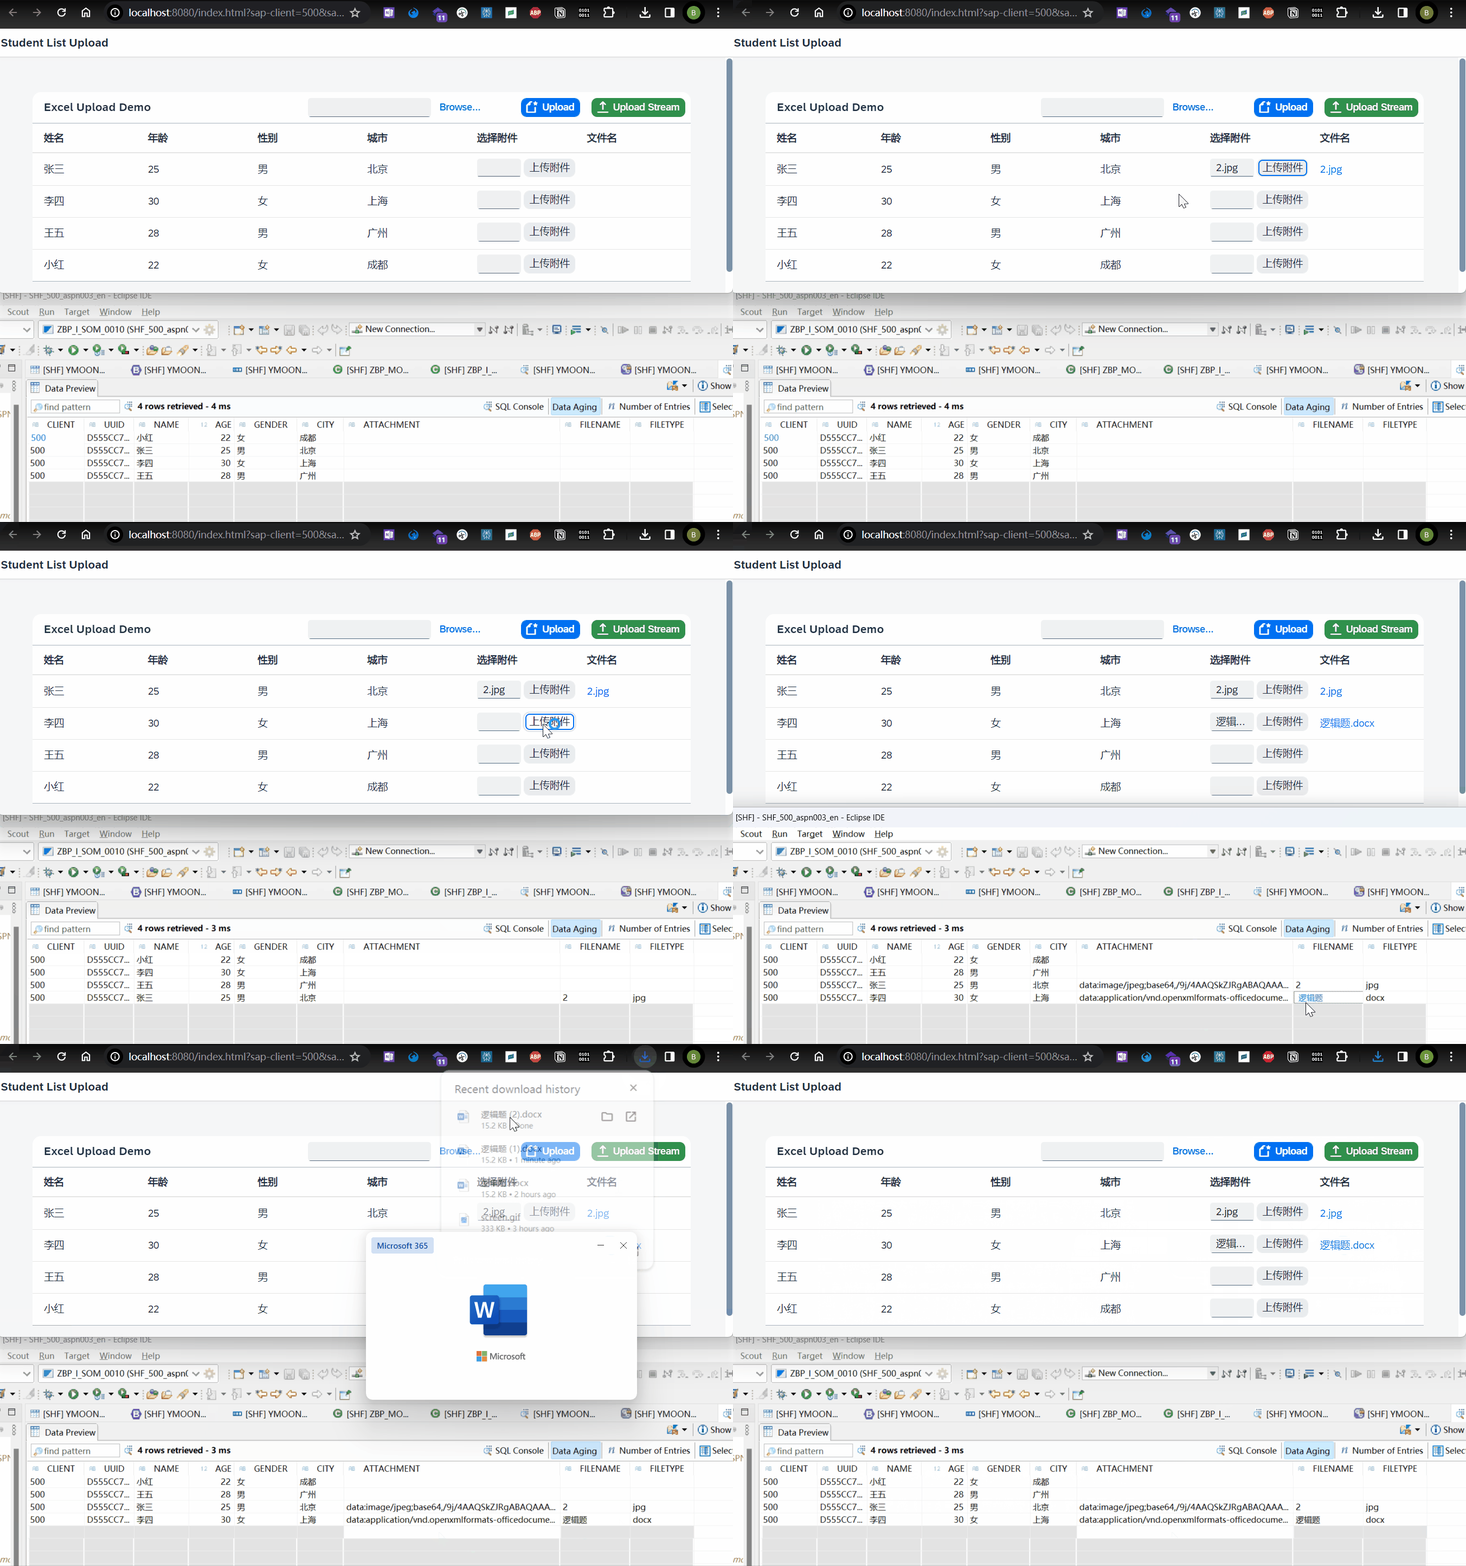
三、测试

文章来源:https://blog.csdn.net/pely122/article/details/135377369
本文来自互联网用户投稿,该文观点仅代表作者本人,不代表本站立场。本站仅提供信息存储空间服务,不拥有所有权,不承担相关法律责任。 如若内容造成侵权/违法违规/事实不符,请联系我的编程经验分享网邮箱:chenni525@qq.com进行投诉反馈,一经查实,立即删除!
本文来自互联网用户投稿,该文观点仅代表作者本人,不代表本站立场。本站仅提供信息存储空间服务,不拥有所有权,不承担相关法律责任。 如若内容造成侵权/违法违规/事实不符,请联系我的编程经验分享网邮箱:chenni525@qq.com进行投诉反馈,一经查实,立即删除!
最新文章
- Python教程
- 深入理解 MySQL 中的 HAVING 关键字和聚合函数
- Qt之QChar编码(1)
- MyBatis入门基础篇
- 用Python脚本实现FFmpeg批量转换
- 助力城市部件[标石/电杆/光交箱/人井]精细化管理,基于YOLOv5全系列模型【n/s/m/l/x】开发构建生活场景下城市部件检测识别系统
- Java 基础 - Java 多态性详解与实例解析
- 【CCF推荐】神经网络类SCI,最快2个月录用!仅10篇版面!
- springboot/java/php/node/python基于Java的信公OA办公系统【计算机毕设】
- C++ //习题 7.2 写一个函数days,实现上面的计算。由主函数将年、月、日传递给函数days,计算后将日子数传回主函数输出。
- echarts tree自适应高度调整,加滚动条
- flutter项目从创建到运行,以及一些常用的命令
- openssl数据压缩
- 【Meta 分析篇】纯干货,适合初学者,赶快进收藏夹吃灰!
- Python实战 -- PySide6 制作天气查询软件