微信支付小程序支付获取OpenID

在对接微信支付JSAPI支付的时候。怎么获取用户的OpenID,让我陷入了深深的绝望。特此整理一下流程和方法。
在接入微信支付前必须要做的一些步骤:
https://pay.weixin.qq.com/docs/merchant/products/jsapi-payment/preparation.html
1、选择接入模式:普通商户或普通服务商
2、申请参数:AppID、商户号
3、配置应用
上面这些可以自行参考官方文档做配置或者也可以留言讨论。
注意1:
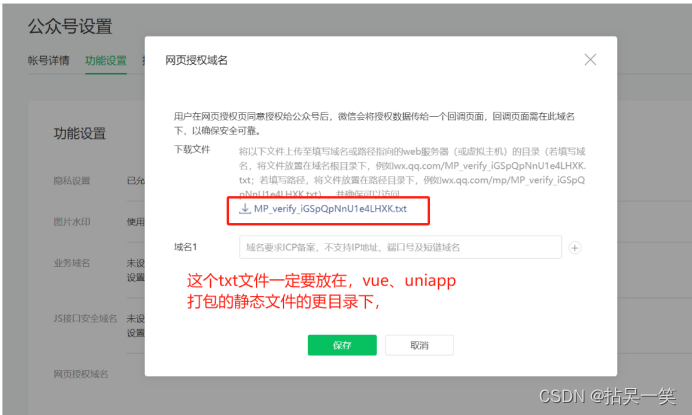
看一下我的服务器上的位置。这个是前端小程序的打包文件的存放地址。

如果这个txt放置的位置对。配置这个网页授权域名的时候就会无法保存。
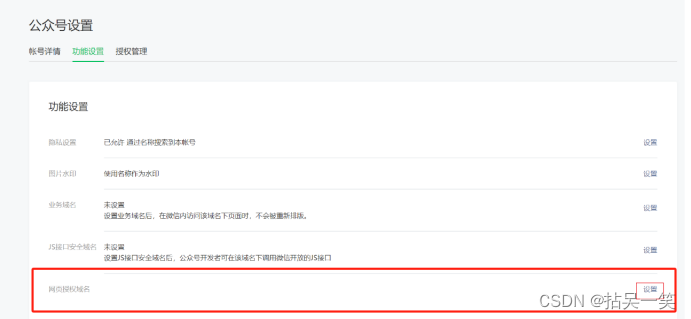
注意2
OpenID: OpenID是微信用户在AppID下的唯一用户标识(AppID不同,则获取到的OpenID就不同),可用于永久标记一个用户。OpenID获取方式请参考以下文档小程序获取OpenID?(opens new window)、公众号获取OpenID?(opens new window)、App获取OpenID?(opens new window)。
OpenID获取方式:
前端部分:
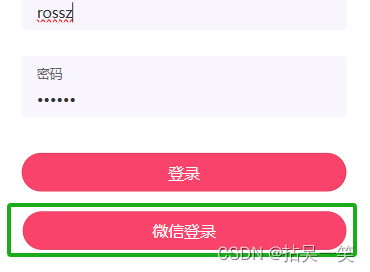
微信登录方法:
wxLogin() {
	window.location.href =
		`https://open.weixin.qq.com/connect/oauth2/authorize?appid=${APP_ID}&redirect_uri=${encodeURIComponent(REDIRECT)}&response_type=code&scope=snsapi_userinfo&state=STATE#wechat_redirect`;
},
https://ww.xxx.com/h5/index.html的页面中调用授权获取的code,拿到这个code,然后才能获取用户的OpenId。此方法需要注意两个APP_ID和REDIRECT,一个为微信应用ID(微信公众号ID、小程序ID)。
另一个就是授权成功后需要展示的页面。我这个地方放的是首页。注意。本地域名貌似不行。
https://ww.xxx.com/h5/index.html,
我们看看index页面中的写法:
getCode() {
	if (window.location.search.includes('code=')) {
		let url_params = Object.fromEntries(window.location.search.slice(1).split('&').map(v => v.split('=')))
		return url_params.code
	}else{
		this.$api.msg("获取Code失败")
		return null
	}
},
// 然后我在index页面中写了一个created,调用了一下后端获取用户OpenId的接口
created() {
	console.log("code====", this.getCode())
	let code = this.getCode()
	// 调用后端的接口获取openId,和用户的基本信息
	getUserInfo(code).then(res => {
		console.log('-getUserInfo获取OpenID-------', res)
	})
},
这个地方就是从window.location中获取code,拿到code 之后我们就可以调用后端的接口来获取用户的OpenID。
Java代码
<!-- 需要引入这个微信公众号仓库地址-->
<dependency>
	<groupId>com.github.binarywang</groupId>
	<artifactId>weixin-java-mp</artifactId>
	<version>4.4.0</version>
</dependency>
配置微信公众号好服务
/**
 * 配置微信WxMpService
 */
@Configuration
@RequiredArgsConstructor
public class WxMpServiceConfig {
    @Autowired
    private WechatProperties properties;

    @Bean
    public WxMpService wxMpService() {
        WxMpService wxMpService = new WxMpServiceImpl();
        wxMpService.setWxMpConfigStorage(wxMpConfigStorage());
        return wxMpService;
    }

    @Bean
    public WxMpConfigStorage wxMpConfigStorage() {
        WxMpDefaultConfigImpl wxMpDefaultConfig = new WxMpDefaultConfigImpl();
        wxMpDefaultConfig.setAppId(properties.getAppId());
        wxMpDefaultConfig.setSecret(properties.getAppSecret());
        return wxMpDefaultConfig;
    }

}
获取用户OpenId和基本信息接口
@GetMapping("/getUserInfo")
@ApiOperation("获取微信用户基本信息")
public WxOAuth2UserInfo getUserInfo(@RequestParam("code") String code) throws WxErrorException {
    WxOAuth2Service oAuth2Service = this.wxMpService.switchoverTo(properties.getAppId()).getOAuth2Service();
    WxOAuth2AccessToken wxOAuth2AccessToken = oAuth2Service.getAccessToken(code);
    String accessToken = wxOAuth2AccessToken.getAccessToken();
    String openId = wxOAuth2AccessToken.getOpenId();
    log.info("[微信公众号] 授权回调 accessToken:[{}]", accessToken);
    log.info("[微信公众号] 授权回调 openId:[{}]", openId);
    WxOAuth2UserInfo userInfo = oAuth2Service.getUserInfo(wxOAuth2AccessToken, "zh_CN");
    log.info("[微信公众号] 授权回调 用户信息:[{}]", JSONUtil.toJsonStr(userInfo));
    return userInfo;
}
注意3
然后如果你直接Hbuilder运行到浏览器的方法微信登录的话。就会给你提示:

这个地方可以添加自定义的设备型号来不让这个提示。但是我这个好像没有用。
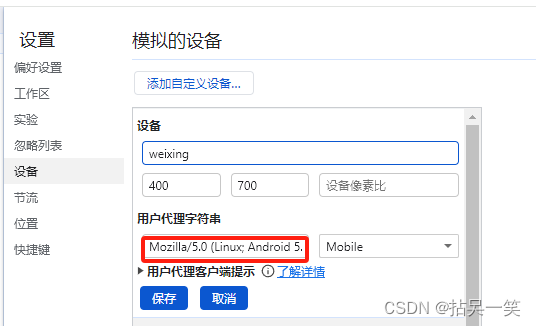
在用户代理字符串中输入下面的字符:
Mozilla/5.0 (Linux; Android 5.0; SM-N9100 Build/LRX21V) > AppleWebKit/537.36 (KHTML, like Gecko) Version/4.0 > Chrome/37.0.0.0 Mobile Safari/537.36 > MicroMessenger/6.0.2.56_r958800.520 NetType/WIFI
这个时候就可以使用微信开发者工具中的:公众号网页项目
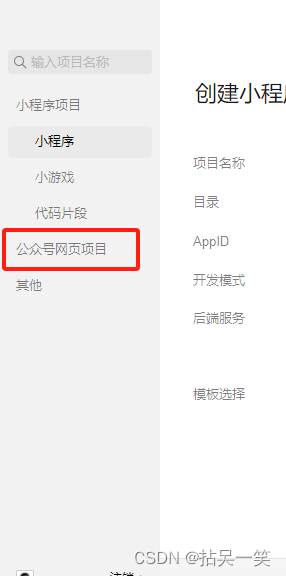

来做测试了。然后回车就可以了。
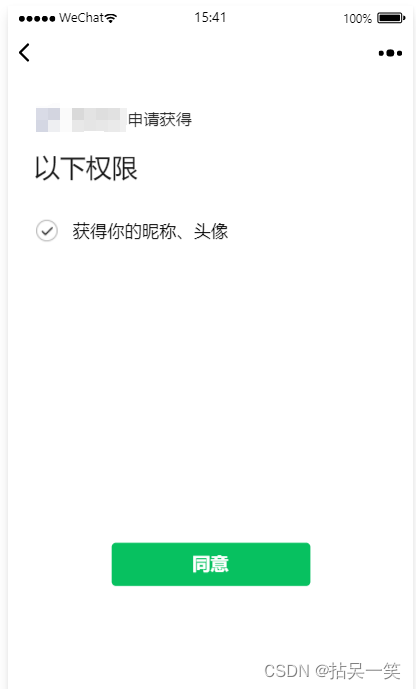
同意。就可以了。

由于我写了好几种获取Open的方法。而我们前面获取到的Code只能使用一次。所以后面的都会提示:错误代码:40163, 错误信息:oauth_code已使用,微信原始报文:
{"errcode":40163,"errmsg":"code been used, rid: 659f8fe0-3b83730b-10fb9122"}
同时大家也注意一下。如果微信开发者工具-公众号网页中没有拿到OpenId,建议大家看看服务器上的Jar的日志中是否打印了OpenId。我的就是在日志中获取到的
WechatpayController: [微信公众号] 授权回调 openId:[o7lso1XXXXXXX-XXXXXXXm4]
注意3
先看一下微信支付官方的文档,
/**
     * 微信 JSAPI 支付
     *
     * @param total       金额,单位分
     * @param description 订单说明
     * @param outTradeNo  订单
     * @return
     * @throws IOException
     */
    public Map<String, Object> jsapiPay(Integer total, String description, String outTradeNo) throws IOException {
        CloseableHttpResponse response = null;
        Map<String, Object> result = new HashMap<>();
        try {
            HttpPost httpPost = new HttpPost(PayConstants.PAY_URL_JSAPI);
            // 请求body参数
            Amount amount = new Amount();
            amount.setCurrency(PayConstants.CURRENCY);
            amount.setTotal(total);

            // 【支付者】 支付者信息。
            Payer payer=new Payer();
            // 这个是我获取到的自己的OpenId,做微信支付测试使用。
            payer.setOpenid("o7lso1XXXXXXX-XXXXXXXm4");

            // 支付参数必填参数
            PayParam nativePayParams = PayParam.builder().applicationId(properties.getApplicationId())
                    .description(description)
                    .merchantId(properties.getMerchantId())
                    .notifyUrl(properties.getNotifyUrl())
                    .outTradeNo(outTradeNo)
                    .amount(amount)
                    .payer(payer)
                    .build();

            String reqdata = JSON.toJSONString(nativePayParams);
            StringEntity entity = new StringEntity(reqdata, "utf-8");
            entity.setContentType("application/json");
            httpPost.setEntity(entity);
            httpPost.setHeader("Accept", "application/json");
            //完成签名并执行请求
            response = httpClient.execute(httpPost);
            int statusCode = response.getStatusLine().getStatusCode();
            if (statusCode == 200) { //处理成功
                logger.info("success,return body {}", EntityUtils.toString(response.getEntity()));
                result = JSON.parseObject(EntityUtils.toString(response.getEntity()), Map.class);
            } else if (statusCode == 204) { //处理成功,无返回Body
                logger.info("success");
            } else {
                logger.error("请求失败,响应结果Code {},返回结果Body {}", statusCode, EntityUtils.toString(response.getEntity()));
                throw new IOException("支付失败!");
            }


        } catch (IOException e) {
            logger.error("微信H5支付失败:{}", e.getMessage(), e);
        } finally {
            if (response != null) {
                response.close();
            }
        }
        return result;
    }
测试一下
@SpringBootTest
public class MallPortalApplicationTests {

    @Autowired
    private PayTemplate payTemplate;

    @Test
    public void contextLoadsJsapi() throws Exception {
        Map<String, Object> result = payTemplate.jsapiPay(1, "智慧商城静宁苹果1箱", IdUtil.nanoId());
        System.out.println(result);
    }

}
测试结果:
success,return body {"prepay_id":"wx11145921849880c1256a35dcff784a0000"}
{prepay_id=wx11145921849880c1256a35dcff784a0000}
下面这个是我的个人公共号 只会写Bug的程序猿,大家可以关注一下,一键三连。相互交流学习。

本文来自互联网用户投稿,该文观点仅代表作者本人,不代表本站立场。本站仅提供信息存储空间服务,不拥有所有权,不承担相关法律责任。 如若内容造成侵权/违法违规/事实不符,请联系我的编程经验分享网邮箱:chenni525@qq.com进行投诉反馈,一经查实,立即删除!
- Python教程
- 深入理解 MySQL 中的 HAVING 关键字和聚合函数
- Qt之QChar编码(1)
- MyBatis入门基础篇
- 用Python脚本实现FFmpeg批量转换
- Mendix 创客访谈录|太迅的闪电侠如何发动闪电战
- 【UE Niagara学习笔记】05 - 喷射火焰顶部的蓝色火焰
- 从0创建springboot项目并创建GitHub仓库
- 马蹄集oj赛(双周赛第十八次)
- 打破数据孤岛:ChatGPT如何打通金融大数据的任督二脉?
- 探索Flutter中常用的系统组件
- 蓝桥杯准备
- Copilot在IDEA中的应用:提升编码效率的得力助手
- YOLO同时对图片和标签进行重命名
- 不同的酿酒文化影响葡萄酒风格