Java学习(十六)--多线程
发布时间:2024年01月15日
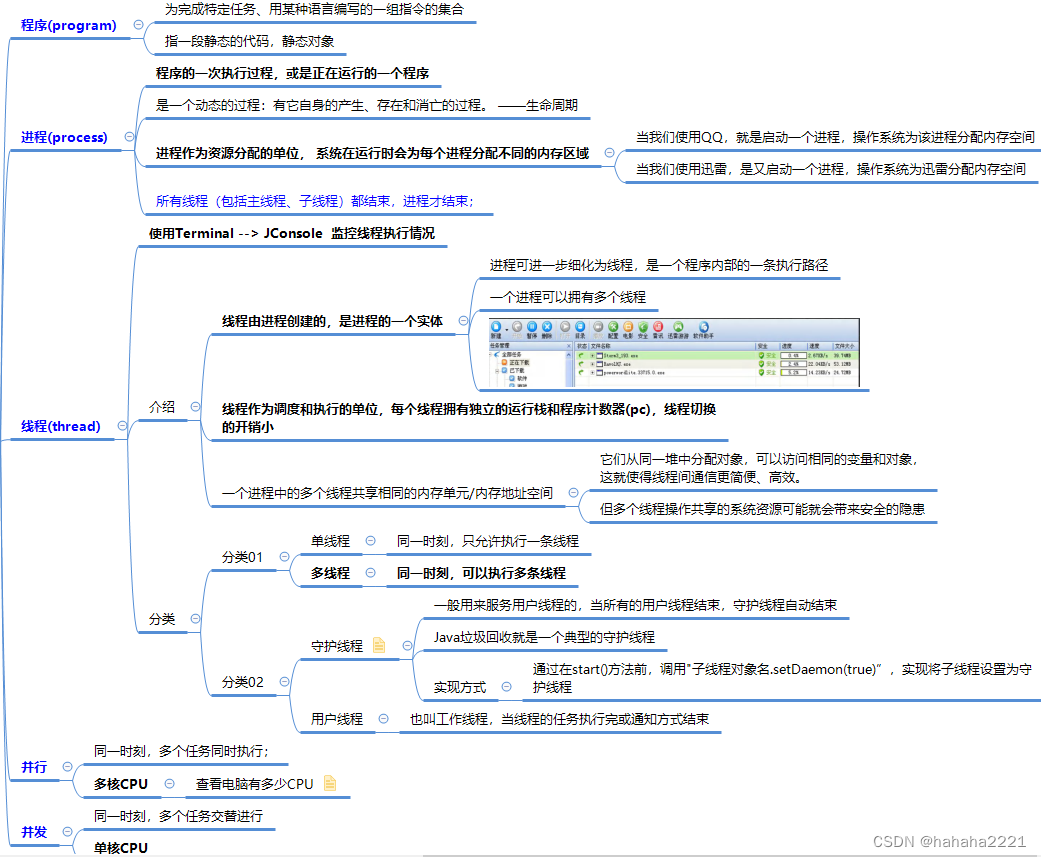
基本概念
public class Thread03 {
	public static void main(String[] args) {
		Thread t2 = new Thread(new T2());//创建子线程

        //将当前进程变成后台进程,即守护线程
        //当main线程结束后,子线程自动结束。
		t2.setDaemon(true);

		t2.start();
		for (int i = 0; i < 10; i++) {//main线程
			System.out.println("工作。。。");
			try {
				Thread.sleep(1000);
			} catch (InterruptedException e) {
				e.printStackTrace();
			}
		}
	}
}
class T2 implements Runnable{
	@Override
	public void run() {
		for (;;) {//无限循环
			System.out.println("聊天。。。");
			try {
				Thread.sleep(100);
			} catch (InterruptedException e) {
				e.printStackTrace();
			}
		}
	}
}
多线程
特点
- ?? ?1.提高应用程序的响应。对图形化界面更有意义,可增强用户体验。
- ?? ?2. 提高计算机系统CPU的利用率
- ?? ?3. 改善程序结构。
应用场景
- ?? ?程序需要同时执行两个或多个任务。
- ?? ?程序需要实现一些需要等待的任务时,如用户输入、文件读写操作、网络操作、搜索等。
- ?? ?需要一些后台运行的程序时。
//多线程的实现
//需求:编写一个程序,创建两个线程,一个线程每隔1s输出:“hello,world”,输出10次,退出;一个现成每隔1s输出“hi”,输出5次退出。

public class Thread02 {
	public static void main(String[] args) {
		Thread t1 = new Thread(new T1());//创建线程1
		Thread t2 = new Thread(new T2());//创建线程2
		t1.start();//启动第 1 个线程
		t2.start();//启动第 1 个线程
		for (int i = 0; i < 10; i++) {//main线程
			System.out.println("工作。。。");
			try {
				Thread.sleep(1000);
			} catch (InterruptedException e) {
				e.printStackTrace();
			}
		}
	}
}
class T1 implements Runnable{
	int count;
	@Override
	public void run() {
		while (true) {
			//每隔 1 秒输出 “hello,world” ,输出 10 次
			System.out.println("hello,world " + (++count));
			try {
				Thread.sleep(1000);
			} catch (InterruptedException e) {
				e.printStackTrace();
			}
			if(count == 10) {
				break;
			}
		}
	}
}

class T2 implements Runnable{
	@Override
	public void run() {
		//每隔 1 秒输出 “hi” ,输出 5 次
		for (int i = 0;i<5;i++) {
			System.out.println("hi");
			try {
				Thread.sleep(1000);
			} catch (InterruptedException e) {
				e.printStackTrace();
			}
		}
	}
}
创建
继承Thread类

说明
- 每个线程都是通过某个特定Thread对象的run()方法来完成操作的,经常把run()方法的主体称为线程体;
构造器
- Thread(): 创建新的Thread对象
- Thread(String threadname): 创建线程并指定线程实例名
- Thread(Runnable target): 指定创建线程的目标对象,它实现了Runnable接口中的run方法
- Thread(Runnable target, String name): 创建新的Thread对象
实现步骤
- ?? ?1) 定义子类继承Thread类。
- ?? ?2) 子类中重写Thread类中的run方法。
- ?? ?3) 创建Thread子类对象,即创建了线程对象。
- ?? ?4) 调用线程对象(Thread对象)的start()方法:启动线程,调用run方法。? 注意:?不能直接调用run()方法
// 需求:开启一个线程,该线程每隔1秒,在控制台输出“喵喵,我是小猫咪”;当输出80次,结束该线程
public class Thread01 {
	public static void main(String[] args) throws InterruptedException {

		// 创建Cat对象,可以当做线程使用
		Cat cat = new Cat();

		// 源码
			/*
			(1)public synchronized void start() {
							start0();
						}
			(2) start0() 是本地方法,是JVM调用, 底层是c/c++实现;真正实现多线程的效果, 是start0(), 而不是 run
				  private native void start0();
			*/
		cat.start();// 启动线程-> 最终会执行cat的run方法

		// cat.run();
		// run方法就是一个普通的方法, 没有真正的启动一个线程,就会把run方法执行完毕,才向下执行;
		// 相当于串行化执行;
		// 说明: 当main线程启动一个子线程 Thread-0, 主线程不会阻塞, 会继续执行,这时 主线程和子线程是交替执行..

		System.out.println("主线程继续执行" + Thread.currentThread().getName());// 线程名字:main

		for (int i = 0; i < 60; i++) {
			System.out.println("主线程 i=" + i);
			// 让主线程休眠
			Thread.sleep(1000);
		}
	}
}

// 说明
// 1. 当一个类继承了 Thread 类, 该类就可以当做线程使用
// 2. 我们会重写 run方法,写上自己的业务代码
// 3. run Thread 类 实现了 Runnable 接口的run方法
			/*
				@Override
				public void run() {
					if (target != null) {
						target.run();
					}
				}
			 */
class Cat extends Thread {
	int times = 0;

	@Override
	public void run() {// 重写run方法,写上自己的业务逻辑
		while (true) {
			// 该线程每隔1秒。在控制台输出 “喵喵, 我是小猫咪”
			System.out.println("喵喵, 我是小猫咪" + (++times) + " 线程名=" + Thread.currentThread().getName());
			// 让该线程休眠1秒 ctrl+alt+t
			try {
				Thread.sleep(1000);
			} catch (InterruptedException e) {
				e.printStackTrace();
			}
			if (times == 80) {
				break;// 当times 到80, 退出while, 这时线程也就退出..
			}
		}
	}
}
实现Runnable接口的方式
实现步骤
- ?? ?1) 定义子类,实现Runnable接口。
- ?? ?2) 子类中重写Runnable接口中的run方法。
- ?? ?3) 通过Thread类含参构造器创建线程对象。? ? ? ?底层使用设计模式(代理模式)
- ?? ?4) 将Runnable接口的子类对象作为实际参数传递给Thread类的构造器;
- ?? ?5) 调用Thread类的start方法:开启线程, 调用Runnable子类接口的run方法
//通过实现接口Runnable 来开发线程

//需求:该程序可以每隔1秒在控制台输出“hi”,当输出10次后,自动退出
public class Thread02 {
    public static void main(String[] args) {
        Dog dog = new Dog();
        //dog.start(); 这里不能调用start,Runnable接口没有start()方法;

        //创建了Thread对象,把 dog对象(实现Runnable),放入Thread
        Thread thread = new Thread(dog);
        thread.start();
    }
}
class Dog implements Runnable { //通过实现Runnable接口,开发线程
    int count = 0;
    @Override
    public void run() { //普通方法
        while (true) {
            System.out.println("小狗汪汪叫..hi" + (++count) + Thread.currentThread().getName());

            //休眠1秒
            try {
                Thread.sleep(1000);
            } catch (InterruptedException e) {
                e.printStackTrace();
            }
            if (count == 10) {
                break;
            }
        }
    }
}
区别
继承Thread:线程代码存放Thread子类run方法中。
实现Runnable:线程代码存在接口的子类的run方法;
- ?? ?更适合多个线程共享一个资源的情况,且避免了单继承的限制
从java设计上,通过extends Thread或implements Runnable 来创建线程,本质上没有区别
- ?? ?Thread 类 implement Runnable接口;
常用方法
基本方法

//isInterrupted()方法

public class Thread04 {
    public static void main(String[] args) {
        Thread t3 = new T3();
        t3.interrupt();
    }
}

public class T3 extends Thread{
    @Override
    public void run() {
        if (!Thread.currentThread().isInterrupted()){
            try {
                //1.这里处理正常的线程业务逻辑
                System.out.println("hello");
                sleep(1000);
            } catch (InterruptedException e) {
                Thread.currentThread().interrupt();//重新设置中断标识
            }
        }
        if (Thread.currentThread().isInterrupted()){
            //2.处理线程结束前必要的一些资源释放和清理工作;
            //比如释放锁、存储数据到持久化层、发出异常通知等;用于线程的安全退出
            System.out.println("保存数据");
            try {
                sleep(10);
            } catch (InterruptedException e) {
                e.printStackTrace();
            }
        }
    }
}

注意:
sleep在抛出InterruptedException异常前会清楚终端标志位,在抛出异常后调用isInterrupted方法会返回false;
//join方法
低优先级的线程也可以获得执行;

应用案例:
1、主线程每隔1s,输出hi,一共10次;
2、当输出到hi 5时,启动一个子线程(要求实现Runnable),每隔1s输出hello,等该线程输出10次hello后,退出
3、主线程继续输出hi,直到主线程退出

代码实现:
Thread子类;
public class T1 implements Runnable{
    private int count = 0;
    @Override
    public void run() {
    while (true){
        System.out.println("hello"+"子线程"+Thread.currentThread().getName()+(++count));
        try {
            Thread.sleep(1000);
        } catch (InterruptedException e) {
            e.printStackTrace();
        }
        if (count==10){
            break;
        }
    }
    }
}

主程序

public class Thread02 {
    public static void main(String[] args) throws InterruptedException {
        Thread t1 = new Thread(new T1());//创建子线程
        for (int i = 1; i < 11; i++) {
            System.out.println("hi" + i);
            if (i == 5) {//说明主线程已输出5次hi
                t1.start();//启动子线程,输出hello
                t1.join();//立即将t1子线程插入到main线程,让t1先执行
            }
            try {
                Thread.sleep(1000);//输出一次hi,让main线程休眠1s
            } catch (InterruptedException e) {
                e.printStackTrace();
            }
        }
    }
}
其他

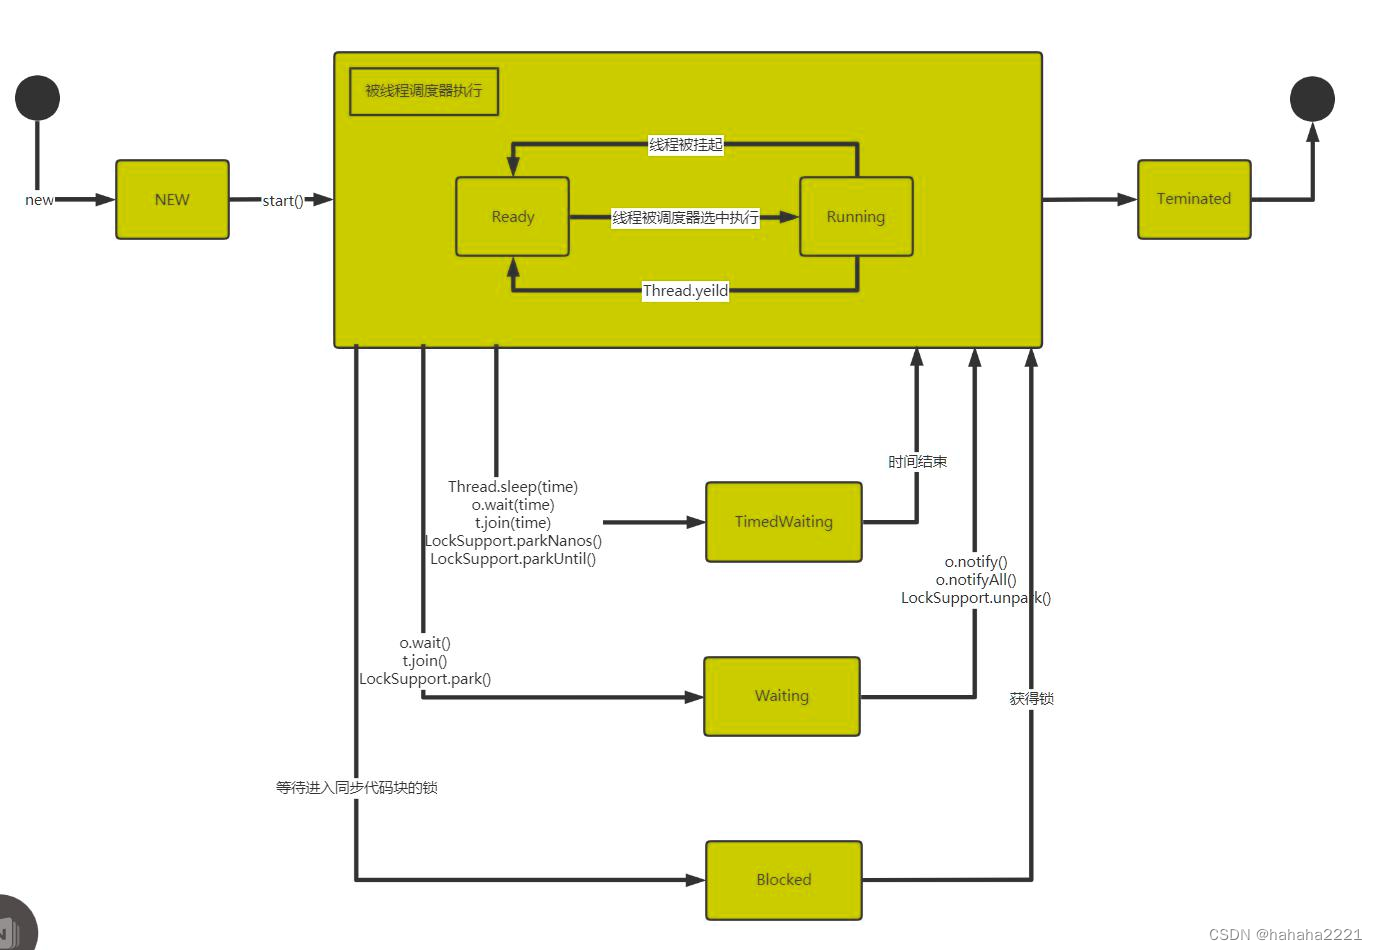
?生命周期

线程终止
- 当线程完成任务后,会自动退出;
- 可以通过使用变量来控制run方法退出的方式停止线程,即通知方式。
1、主程序
public class ThreadExit_ {
    public static void main(String[] args) throws InterruptedException {
        T t1 = new T();
        t1.start();

        //如果希望main线程去控制t1 线程的终止, 必须可以修改 loop
        //让t1 退出run方法,从而终止 t1线程 -> 通知方式

        //让主线程休眠 10 秒,再通知 t1线程退出
        System.out.println("main线程休眠10s...");
        Thread.sleep(10 * 1000);
        t1.setLoop(false);
    }
}

2、子线程
class T extends Thread {
    private int count = 0;
    //设置一个控制变量
    private boolean loop = true;
    @Override
    public void run() {
        while (loop) {
            try {
                Thread.sleep(50);// 让当前线程休眠50ms
            } catch (InterruptedException e) {
                e.printStackTrace();
            }
            System.out.println("T 运行中...." + (++count));
        }

    }

    public void setLoop(boolean loop) {
        this.loop = loop;
    }
}
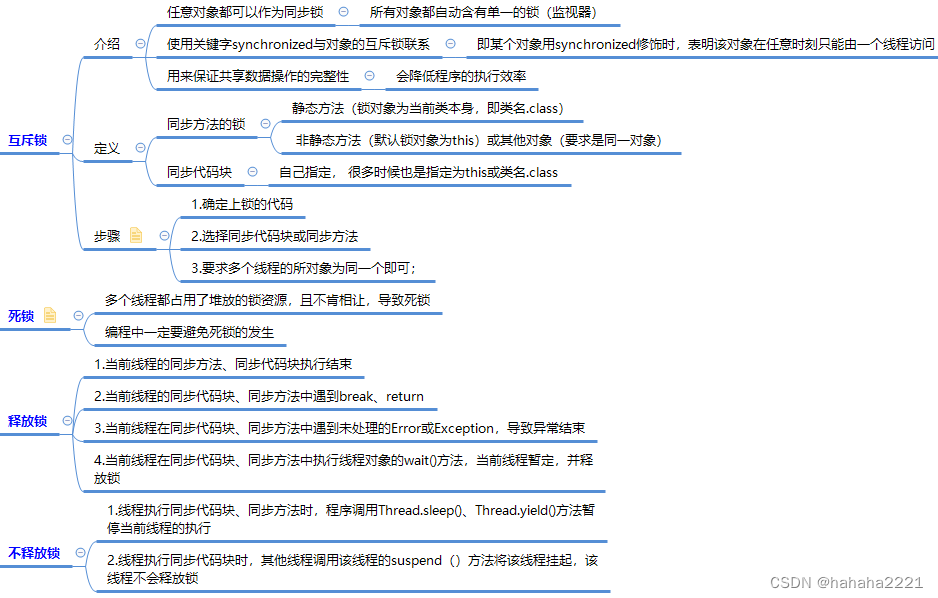
同步机制

分类
//互斥锁

// 需求:使用多线程,模拟三个窗口同时售票100张
public class SellTicket {
    public static void main(String[] args) {

        SellTicket03 sellTicket03 = new SellTicket03();
        new Thread(sellTicket03).start();//第1个线程-窗口
        new Thread(sellTicket03).start();//第2个线程-窗口
        new Thread(sellTicket03).start();//第3个线程-窗口

    }
}


//实现接口方式, 使用synchronized实现线程同步
class SellTicket03 implements Runnable {
    private int ticketNum = 100;//让多个线程共享 ticketNum
    private boolean loop = true;//控制run方法变量
    Object object = new Object();


    //同步方法(静态的)的锁为当前类本身
    //老韩解读
    //1. public synchronized static void m1() {} 锁是加在 SellTicket03.class
    //2. 如果在静态方法中,实现一个同步代码块.
    /*
        synchronized (SellTicket03.class) {
            System.out.println("m2");
        }
     */

    public synchronized static void m1() {

    }
    public static  void m2() {
        synchronized (SellTicket03.class) {
            System.out.println("m2");
        }
    }

    //说明
    //1. public synchronized void sell() {} 就是一个同步方法
    //2. 这时锁在 this对象
    //3. 也可以在代码块上写 synchronize ,同步代码块, 互斥锁还是在this对象
    public /*synchronized*/ void sell() { //同步方法, 在同一时刻, 只能有一个线程来执行sell方法

        synchronized (/*this*/ object) {
            if (ticketNum <= 0) {
                System.out.println("售票结束...");
                loop = false;
                return;
            }

            //休眠50毫秒, 模拟
            try {
                Thread.sleep(50);
            } catch (InterruptedException e) {
                e.printStackTrace();
            }

            System.out.println("窗口 " + Thread.currentThread().getName() + " 售出一张票"
                    + " 剩余票数=" + (--ticketNum));//1 - 0 - -1  - -2
        }
    }

    @Override
    public void run() {
        while (loop) {
            sell();//sell方法是一共同步方法
        }
    }
}
//死锁
//模拟线程死锁
public class DeadLock_ {
public static void main(String[] args) {
//模拟死锁现象
DeadLockDemo A = new DeadLockDemo(true);
A.setName("A线程");
DeadLockDemo B = new DeadLockDemo(false);
B.setName("B线程");
A.start();
B.start();
}
}
//线程
class DeadLockDemo extends Thread {
static Object o1 = new Object();// 保证多线程,共享一个对象,这里使用static
static Object o2 = new Object();
boolean flag;
public DeadLockDemo(boolean flag) {//构造器
this.flag = flag;
}
@Override
public void run() {
//下面业务逻辑的分析
//1. 如果flag 为 T, 线程A 就会先得到/持有 o1 对象锁, 然后尝试去获取 o2 对象锁
//2. 如果线程A 得不到 o2 对象锁,就会Blocked
//3. 如果flag 为 F, 线程B 就会先得到/持有 o2 对象锁, 然后尝试去获取 o1 对象锁
//4. 如果线程B 得不到 o1 对象锁,就会Blocked
if (flag) {
synchronized (o1) {//对象互斥锁, 下面就是同步代码
System.out.println(Thread.currentThread().getName() + " 进入1");
synchronized (o2) { // 这里获得li对象的监视权
System.out.println(Thread.currentThread().getName() + " 进入2");
}
}
} else {
synchronized (o2) {
System.out.println(Thread.currentThread().getName() + " 进入3");
synchronized (o1) { // 这里获得li对象的监视权
System.out.println(Thread.currentThread().getName() + " 进入4");
}
}
}
}
}
文章来源:https://blog.csdn.net/hahaha2221/article/details/135532620
本文来自互联网用户投稿,该文观点仅代表作者本人,不代表本站立场。本站仅提供信息存储空间服务,不拥有所有权,不承担相关法律责任。 如若内容造成侵权/违法违规/事实不符,请联系我的编程经验分享网邮箱:chenni525@qq.com进行投诉反馈,一经查实,立即删除!
本文来自互联网用户投稿,该文观点仅代表作者本人,不代表本站立场。本站仅提供信息存储空间服务,不拥有所有权,不承担相关法律责任。 如若内容造成侵权/违法违规/事实不符,请联系我的编程经验分享网邮箱:chenni525@qq.com进行投诉反馈,一经查实,立即删除!
最新文章
- Python教程
- 深入理解 MySQL 中的 HAVING 关键字和聚合函数
- Qt之QChar编码(1)
- MyBatis入门基础篇
- 用Python脚本实现FFmpeg批量转换
- java SSM酒店客房管理系统myeclipse开发mysql数据库springMVC模式java编程计算机网页设计
- 集帅集美们都在看的MySQL详细安装教程~
- Textual Inversion: 一种精调Stable Diffusion模型的方法
- Selenium自动化教程03:延时等待的3种方式
- 京东物流js逆向加密解析
- 迅为RK3568开发板Linux_NVR_SDK 编译源码
- uniapp中uview组件库中的Badge 徽标数 使用
- 使用 Next.js 构建电商购物车
- Java中的代理模式(二)JDK动态代理
- Ui自动化测试搭建