【保姆级教程|YOLOv8添加注意力机制】【2】在C2f结构中添加ShuffleAttention注意力机制并训练
《博主简介》
小伙伴们好,我是阿旭。专注于人工智能、AIGC、python、计算机视觉相关分享研究。
?更多学习资源,可关注公-仲-hao:【阿旭算法与机器学习】,共同学习交流~
👍感谢小伙伴们点赞、关注!
《------往期经典推荐------》
二、机器学习实战专栏【链接】,已更新31期,欢迎关注,持续更新中~~
三、深度学习【Pytorch】专栏【链接】
四、【Stable Diffusion绘画系列】专栏【链接】
《------正文------》
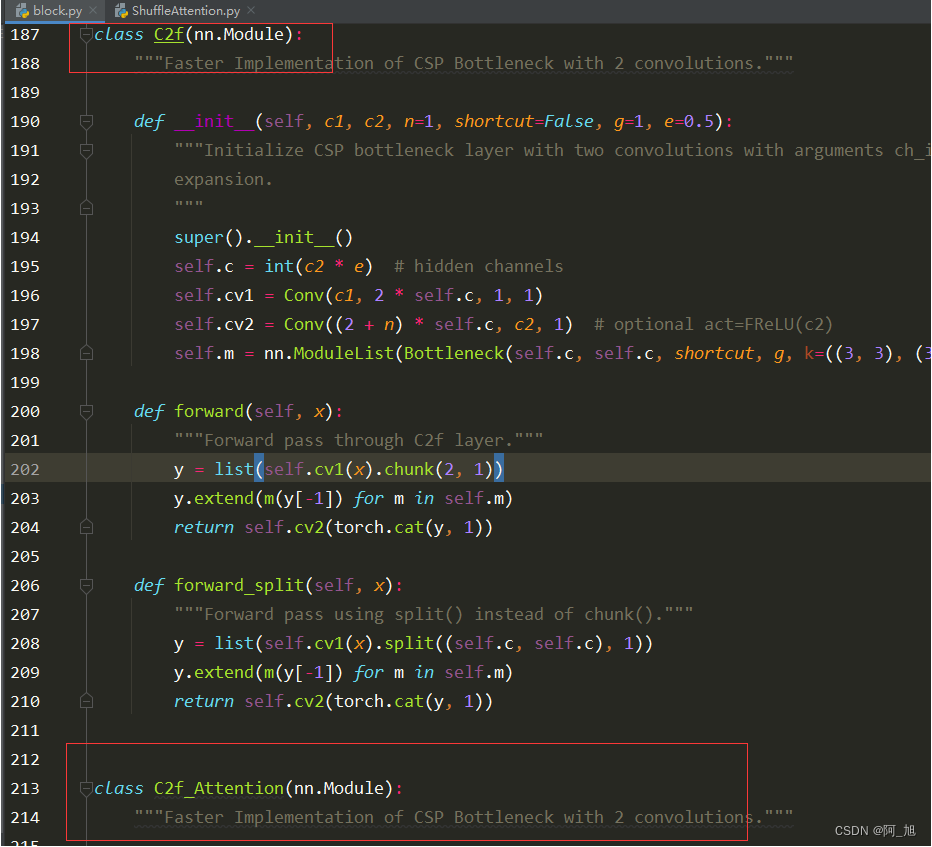
## 搜索C2f源码位置并新建C2f类在项目目录中全局搜索class c2f即可找到c2f的源码位置。然后打开源码位置,进行相应修改。源码路径为:ultralytics/nn/modules/block.py
在原文件中直接copy一份c2f类的源码,然后命名为c2f_Attention,如下所示:
在不同文件导入新建的C2f类
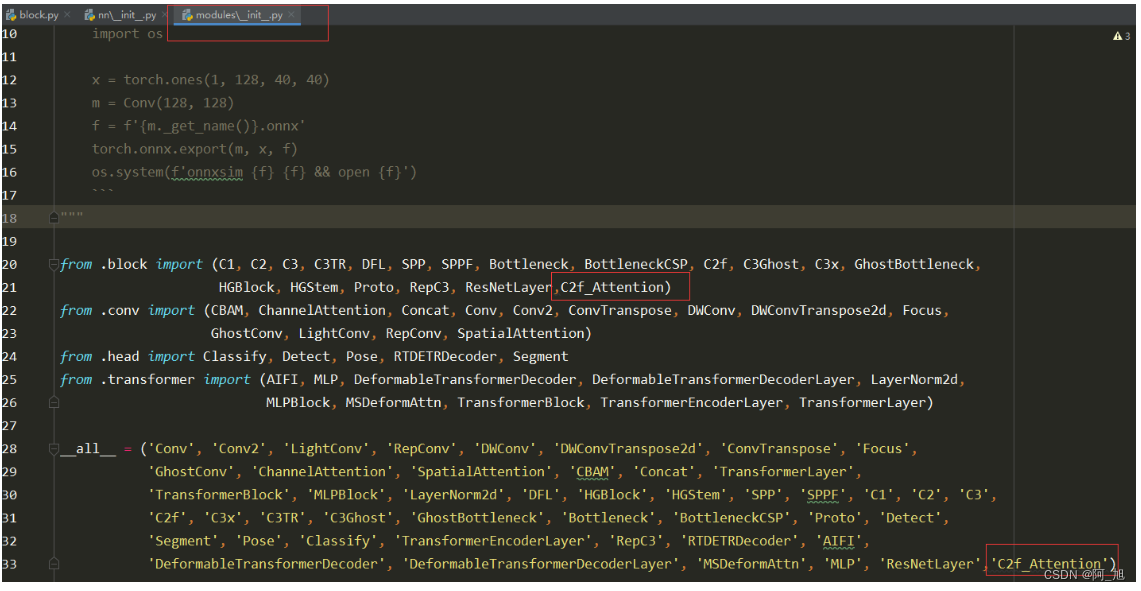
在ultralytics/nn/modules/block.py顶部,all中添加刚才创建的类的名称:c2f_Attention,如下图所示:

同样需要在ultralytics/nn/modules/__init__.py文件,相应位置导入刚出创建的c2f_Attention类。如下图:
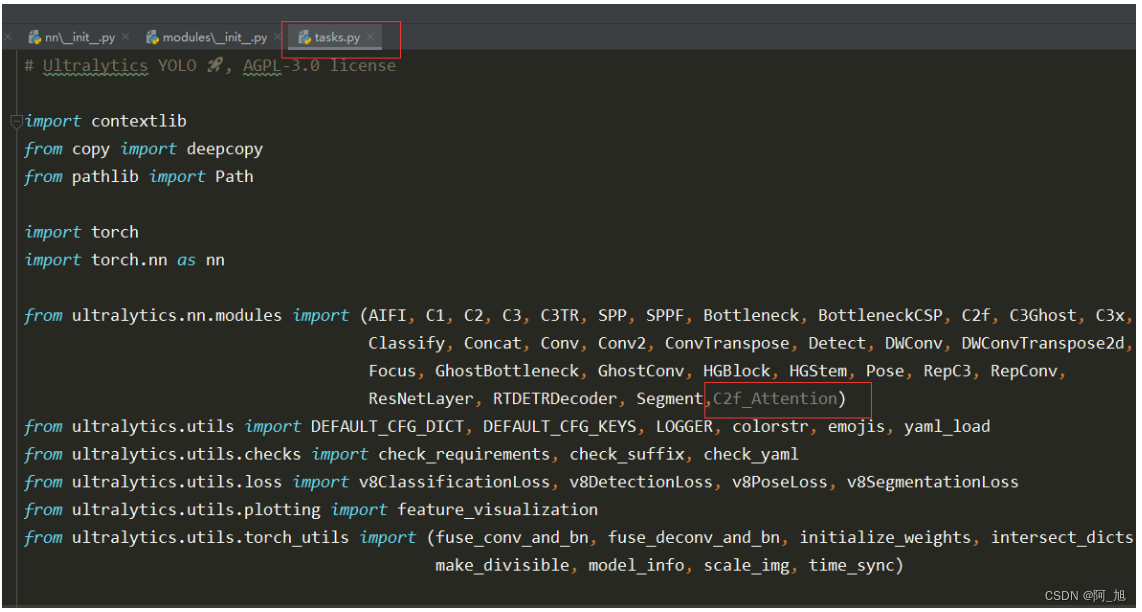
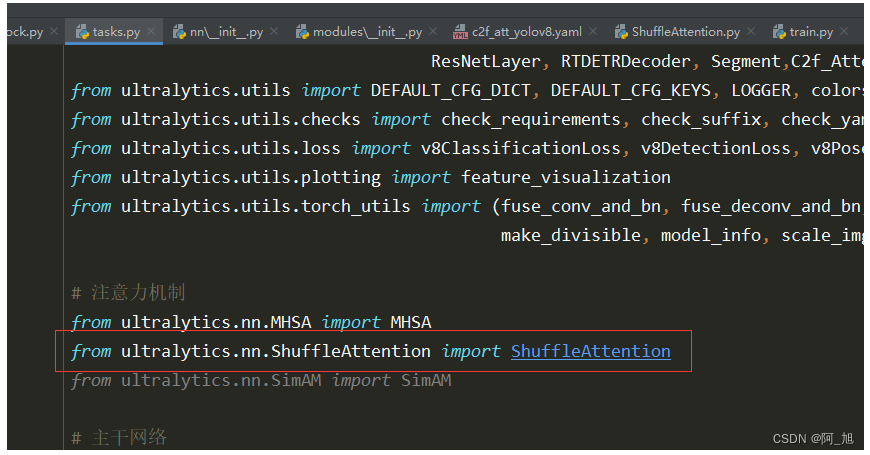
还需要在ultralytics/nn/tasks.py中导入创建的c2f_Attention类,,如下图:
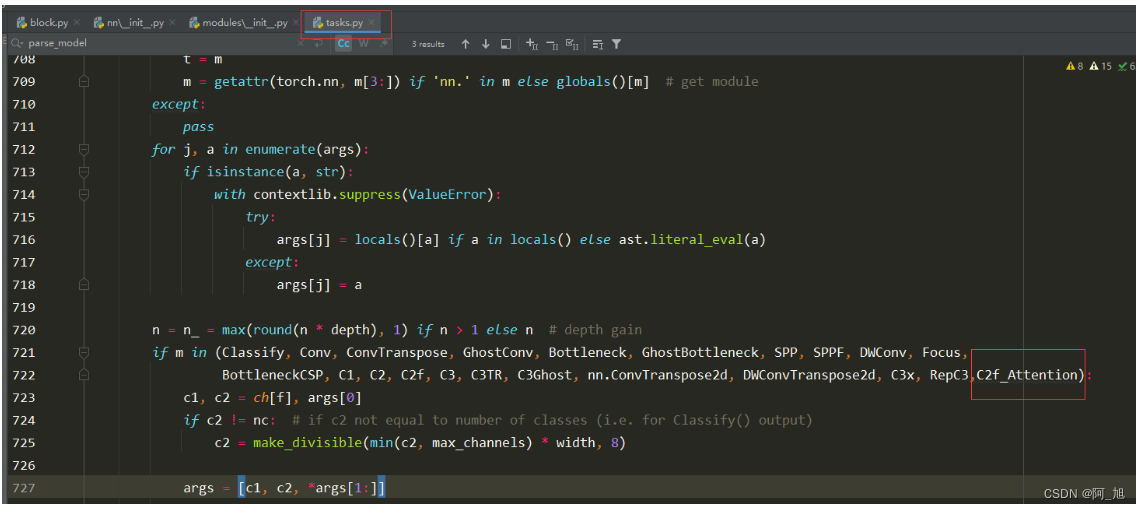
在parse_model解析函数中添加C2f类
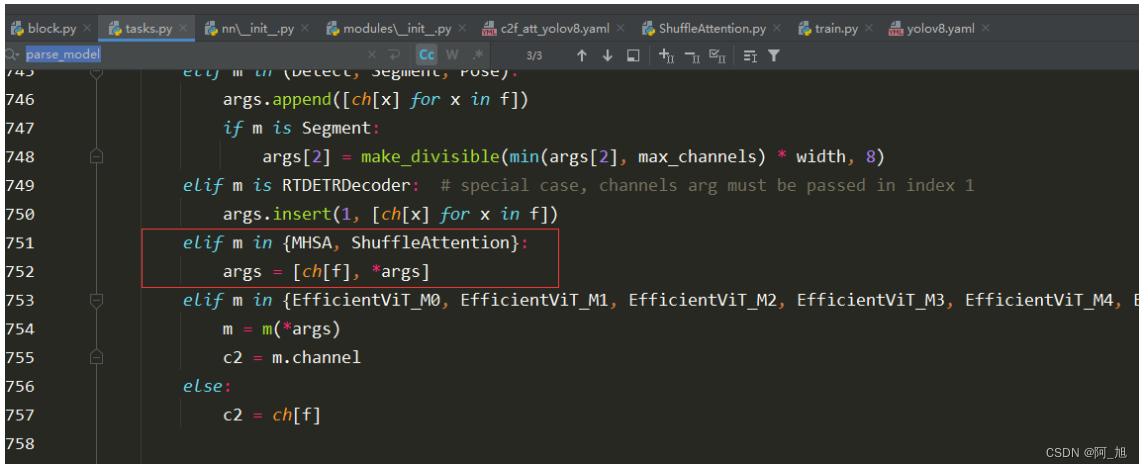
在ultralytics/nn/tasks.py的parse_model解析网络结构的函数中,加入c2f_Attention类,如下图:
创建新的配置文件c2f_att_yolov8.yaml
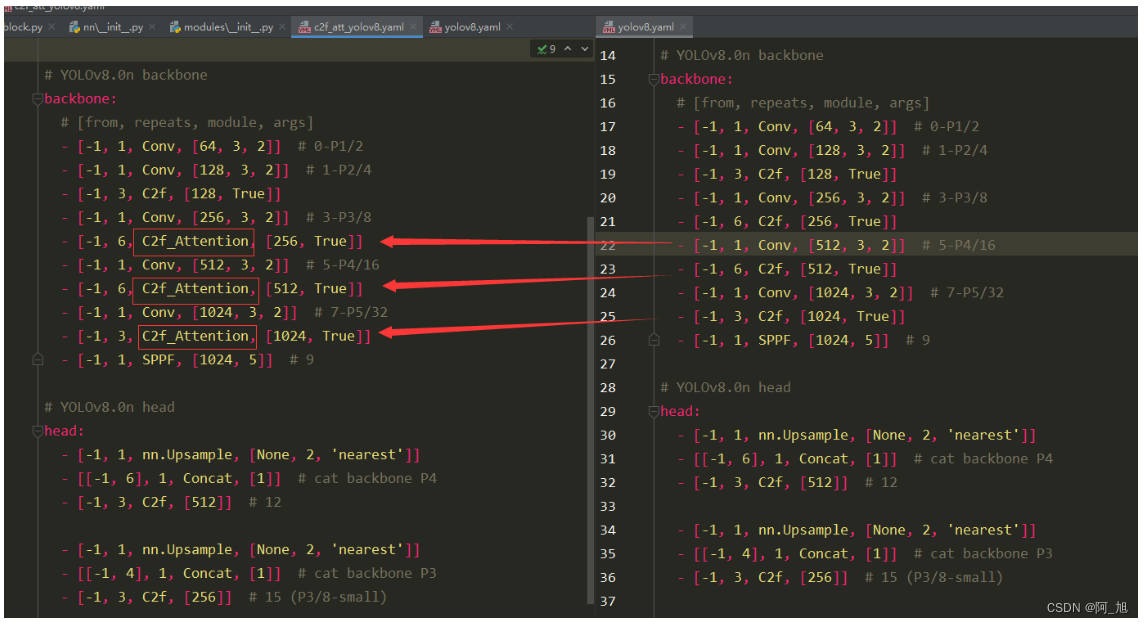
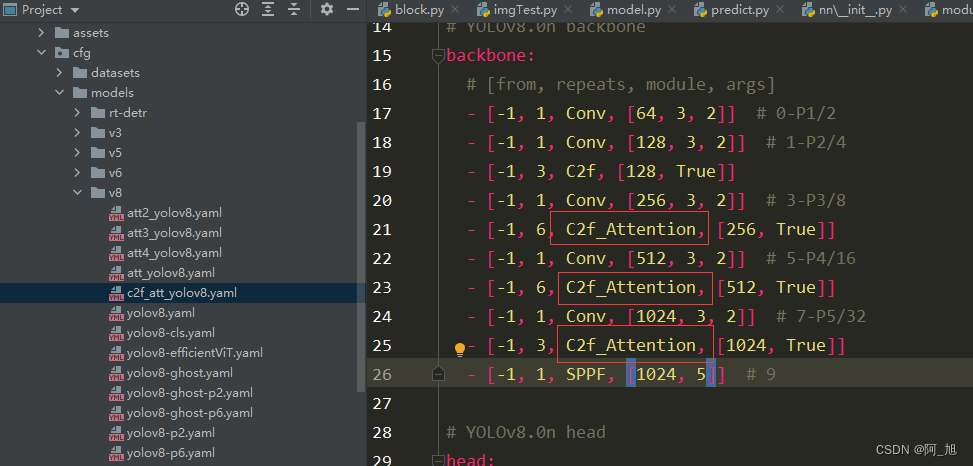
在ultralytics/cfg/models/v8目录下新建c2f_att_yolov8.yaml配置文件,内容如下:
# Ultralytics YOLO 🚀, AGPL-3.0 license
# YOLOv8 object detection model with P3-P5 outputs. For Usage examples see https://docs.ultralytics.com/tasks/detect

# Parameters
nc: 80  # number of classes
scales: # model compound scaling constants, i.e. 'model=yolov8n.yaml' will call yolov8.yaml with scale 'n'
  # [depth, width, max_channels]
  n: [0.33, 0.25, 1024]  # YOLOv8n summary: 225 layers,  3157200 parameters,  3157184 gradients,   8.9 GFLOPs
  s: [0.33, 0.50, 1024]  # YOLOv8s summary: 225 layers, 11166560 parameters, 11166544 gradients,  28.8 GFLOPs
  m: [0.67, 0.75, 768]   # YOLOv8m summary: 295 layers, 25902640 parameters, 25902624 gradients,  79.3 GFLOPs
  l: [1.00, 1.00, 512]   # YOLOv8l summary: 365 layers, 43691520 parameters, 43691504 gradients, 165.7 GFLOPs
  x: [1.00, 1.25, 512]   # YOLOv8x summary: 365 layers, 68229648 parameters, 68229632 gradients, 258.5 GFLOPs

# YOLOv8.0n backbone
backbone:
  # [from, repeats, module, args]
  - [-1, 1, Conv, [64, 3, 2]]  # 0-P1/2
  - [-1, 1, Conv, [128, 3, 2]]  # 1-P2/4
  - [-1, 3, C2f, [128, True]]
  - [-1, 1, Conv, [256, 3, 2]]  # 3-P3/8
  - [-1, 6, C2f_Attention, [256, True]]
  - [-1, 1, Conv, [512, 3, 2]]  # 5-P4/16
  - [-1, 6, C2f_Attention, [512, True]]
  - [-1, 1, Conv, [1024, 3, 2]]  # 7-P5/32
  - [-1, 3, C2f_Attention, [1024, True]]
  - [-1, 1, SPPF, [1024, 5]]  # 9

# YOLOv8.0n head
head:
  - [-1, 1, nn.Upsample, [None, 2, 'nearest']]
  - [[-1, 6], 1, Concat, [1]]  # cat backbone P4
  - [-1, 3, C2f, [512]]  # 12

  - [-1, 1, nn.Upsample, [None, 2, 'nearest']]
  - [[-1, 4], 1, Concat, [1]]  # cat backbone P3
  - [-1, 3, C2f, [256]]  # 15 (P3/8-small)

  - [-1, 1, Conv, [256, 3, 2]]
  - [[-1, 12], 1, Concat, [1]]  # cat head P4
  - [-1, 3, C2f, [512]]  # 18 (P4/16-medium)

  - [-1, 1, Conv, [512, 3, 2]]
  - [[-1, 9], 1, Concat, [1]]  # cat head P5
  - [-1, 3, C2f, [1024]]  # 21 (P5/32-large)

  - [[15, 18, 21], 1, Detect, [nc]]  # Detect(P3, P4, P5)
新的c2f_att_yolov8.yaml配置文件与原yolov8.yaml文件的对比如下:
在C2f中添加注意力:ShuffleAttention
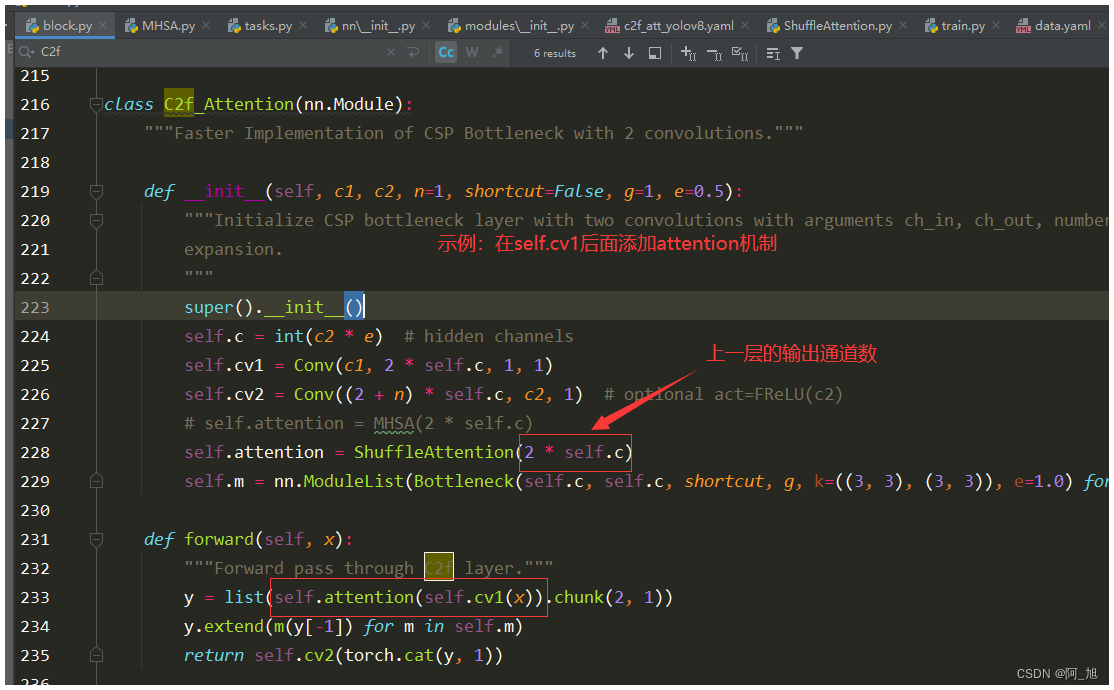
注意:对于有通道数参数的注意力机制,其输入通道数为其上层的输出通道数。这个注意力添加的位置有关。
在路径ultralytics/nn下新建注意力模块,ShuffleAttention.py文件。内容如下:
import numpy as np
import torch
from torch import nn
from torch.nn import init
from torch.nn.parameter import Parameter


class ShuffleAttention(nn.Module):

    def __init__(self, channel=512, reduction=16, G=8):
        super().__init__()
        self.G = G
        self.channel = channel
        self.avg_pool = nn.AdaptiveAvgPool2d(1)
        self.gn = nn.GroupNorm(channel // (2 * G), channel // (2 * G))
        self.cweight = Parameter(torch.zeros(1, channel // (2 * G), 1, 1))
        self.cbias = Parameter(torch.ones(1, channel // (2 * G), 1, 1))
        self.sweight = Parameter(torch.zeros(1, channel // (2 * G), 1, 1))
        self.sbias = Parameter(torch.ones(1, channel // (2 * G), 1, 1))
        self.sigmoid = nn.Sigmoid()

    def init_weights(self):
        for m in self.modules():
            if isinstance(m, nn.Conv2d):
                init.kaiming_normal_(m.weight, mode='fan_out')
                if m.bias is not None:
                    init.constant_(m.bias, 0)
            elif isinstance(m, nn.BatchNorm2d):
                init.constant_(m.weight, 1)
                init.constant_(m.bias, 0)
            elif isinstance(m, nn.Linear):
                init.normal_(m.weight, std=0.001)
                if m.bias is not None:
                    init.constant_(m.bias, 0)

    @staticmethod
    def channel_shuffle(x, groups):
        b, c, h, w = x.shape
        x = x.reshape(b, groups, -1, h, w)
        x = x.permute(0, 2, 1, 3, 4)

        # flatten
        x = x.reshape(b, -1, h, w)

        return x

    def forward(self, x):
        b, c, h, w = x.size()
        # group into subfeatures
        x = x.view(b * self.G, -1, h, w)  # bs*G,c//G,h,w

        # channel_split
        x_0, x_1 = x.chunk(2, dim=1)  # bs*G,c//(2*G),h,w

        # channel attention
        x_channel = self.avg_pool(x_0)  # bs*G,c//(2*G),1,1
        x_channel = self.cweight * x_channel + self.cbias  # bs*G,c//(2*G),1,1
        x_channel = x_0 * self.sigmoid(x_channel)

        # spatial attention
        x_spatial = self.gn(x_1)  # bs*G,c//(2*G),h,w
        x_spatial = self.sweight * x_spatial + self.sbias  # bs*G,c//(2*G),h,w
        x_spatial = x_1 * self.sigmoid(x_spatial)  # bs*G,c//(2*G),h,w

        # concatenate along channel axis
        out = torch.cat([x_channel, x_spatial], dim=1)  # bs*G,c//G,h,w
        out = out.contiguous().view(b, -1, h, w)

        # channel shuffle
        out = self.channel_shuffle(out, 2)
        return out
在ultralytics/nn/tasks.py中导入,并修改在parse_model解析网络结构的函数中,添加解析代码:
注意力不同位置添加方法
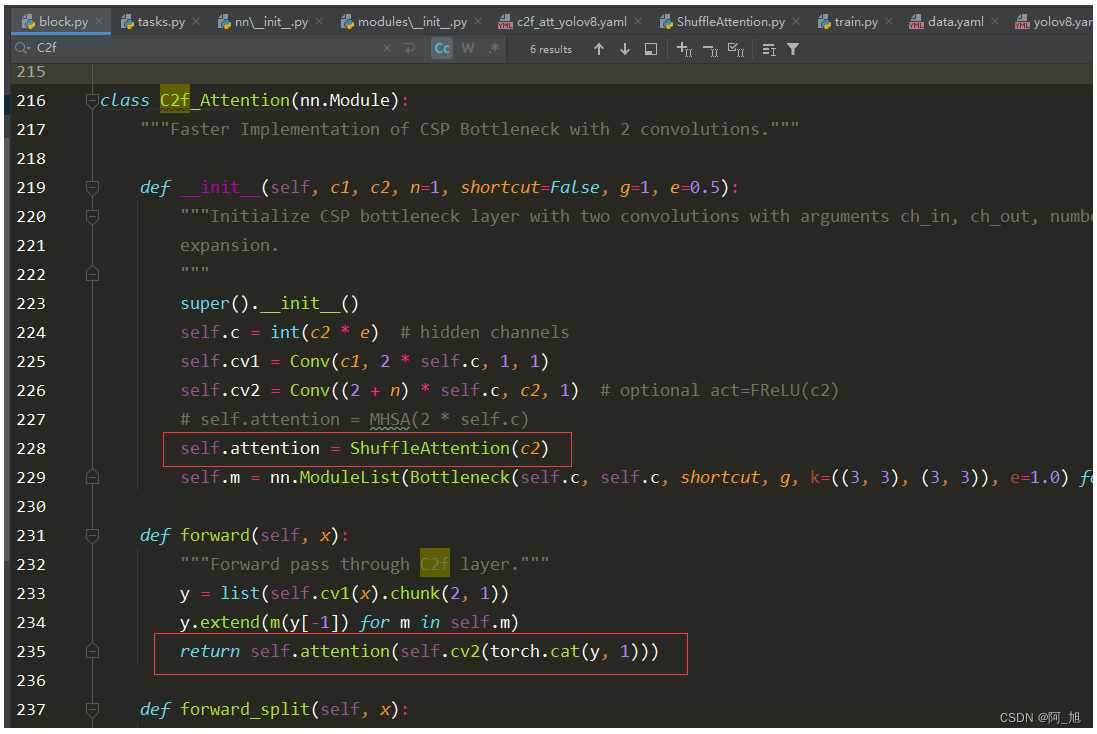
在ultralytics/nn/modules/block.py中的c2f_Attention类中代码相应位置添加注意力机制:
1 . 方式一:在self.cv1后面添加注意力机制
2.方式二:在self.cv2后面添加注意力机制
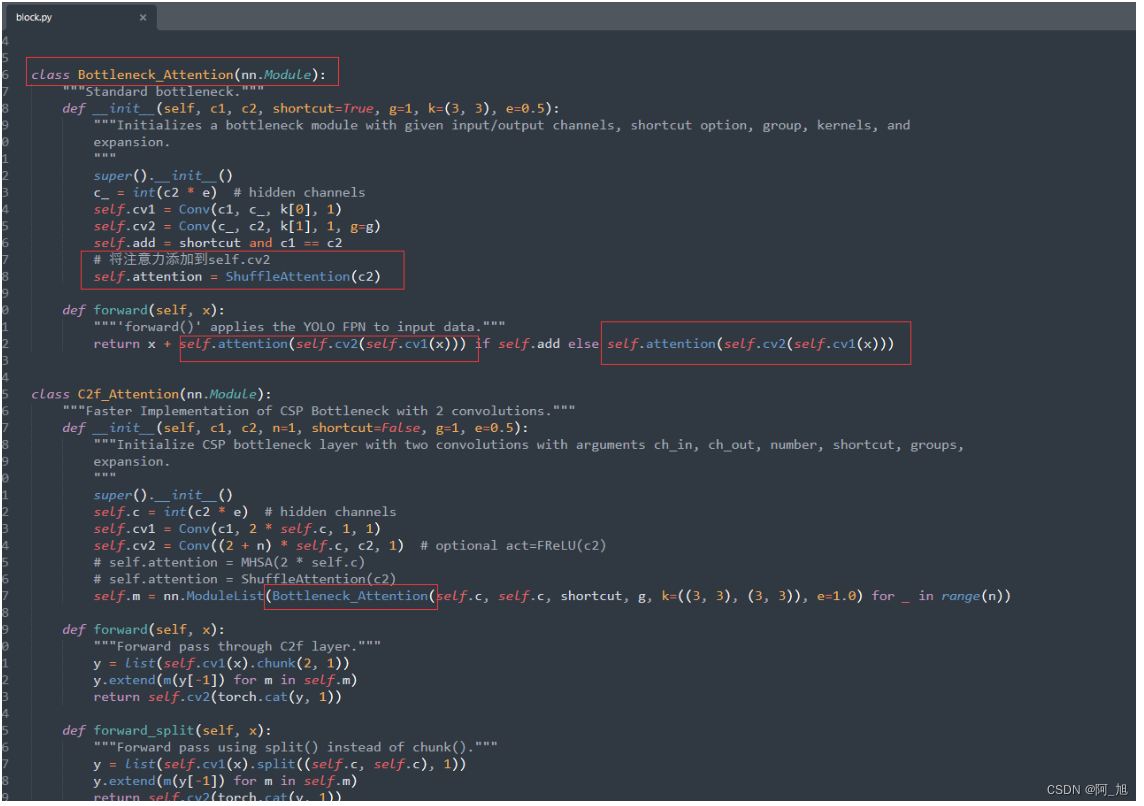
3.方式三:在c2f的bottleneck中添加注意力机制,将Bottleneck类,复制一份,并命名为Bottleneck_Attention,然后,在Bottleneck_Attention的cv2后面添加注意力机制,同时修改C2f_Attention类别中的Bottleneck为Bottleneck_Attention。如下图所示:
加载配置文件并训练
加载c2f_att_yolov8.yaml配置文件,并运行train.py训练代码:
#coding:utf-8
from ultralytics import YOLO

if __name__ == '__main__':
    model = YOLO('ultralytics/cfg/models/v8/c2f_att_yolov8.yaml')
    model.load('yolov8n.pt') # loading pretrain weights
    model.train(data='datasets/TomatoData/data.yaml', epochs=150, batch=2)
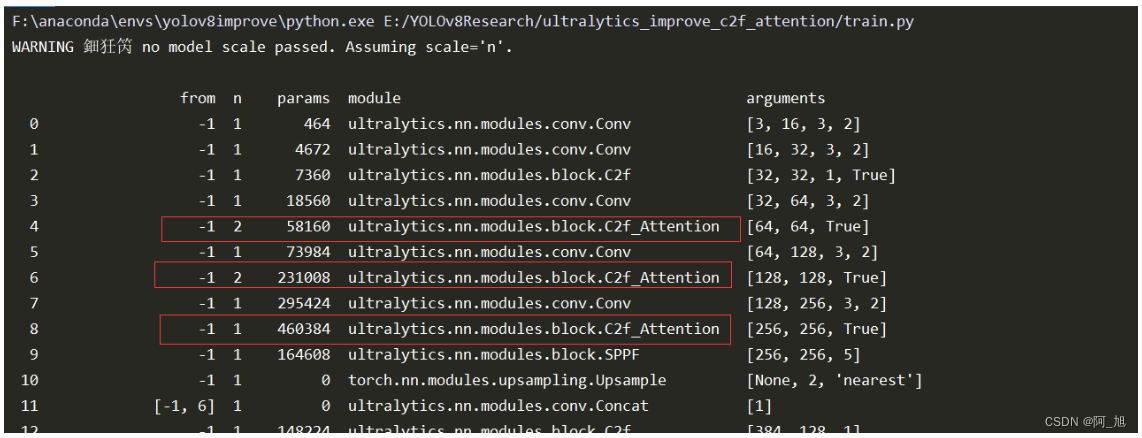
注意观察,打印出的网络结构是否正常修改,如下图所示:
【源码免费获取】
为了小伙伴们能够,更好的学习实践,本文已将所有代码、示例数据集、论文等相关内容打包上传,供小伙伴们学习。获取方式如下:
结束语
关于本篇文章大家有任何建议或意见,欢迎在评论区留言交流!
觉得不错的小伙伴,感谢点赞、关注加收藏哦!
本文来自互联网用户投稿,该文观点仅代表作者本人,不代表本站立场。本站仅提供信息存储空间服务,不拥有所有权,不承担相关法律责任。 如若内容造成侵权/违法违规/事实不符,请联系我的编程经验分享网邮箱:chenni525@qq.com进行投诉反馈,一经查实,立即删除!
- Python教程
- 深入理解 MySQL 中的 HAVING 关键字和聚合函数
- Qt之QChar编码(1)
- MyBatis入门基础篇
- 用Python脚本实现FFmpeg批量转换
- 复盘理解/实验报告梳理 数据结构PTA实验三
- 六、高效并发
- CC工具箱使用指南:【检查用地用海字段】
- 低代码开发:塑造供应链管理未来的5个数字趋势
- GitLab存在任意用户密码重置漏洞(CVE-2023-7028)
- 目标检测-Two Stage-Faster RCNN
- [矩阵论]哈尔滨工业大学全72讲
- C语言编译器(C语言编程软件)完全攻略(第十三部分:VS2010使用教程(使用VS2010编写C语言程序))
- Web前端-CSS(样式美化)
- C/C++ 知识点:类静态成员初始化