Yolov5训练自己的数据集(最详细教程)
发布时间:2023年12月28日
一、环境配置部分
默认使用anaconda来管理python环境。
1.创建虚拟环境
conda create -n yolov5 python=3.82.根据自己安装的CUDA版本去pytorch官网下载torch等。
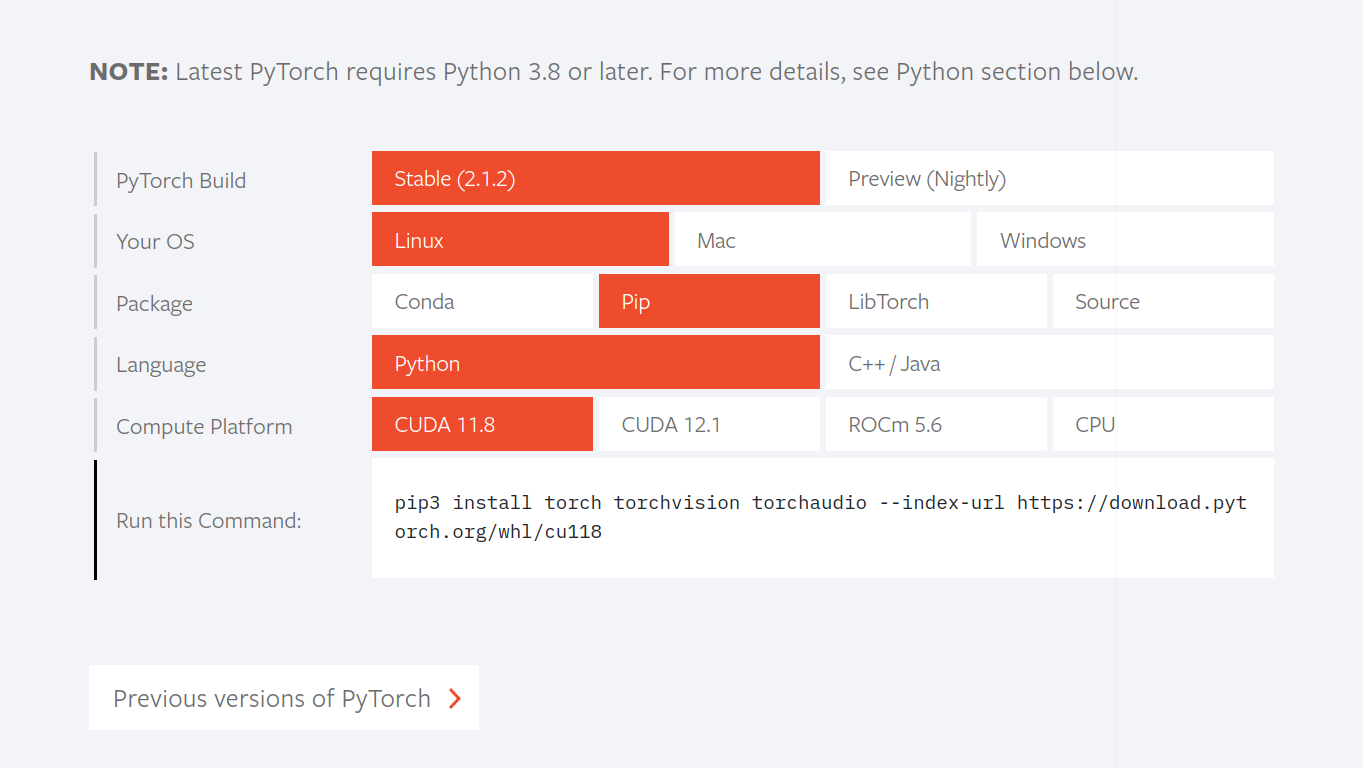
因为我的CUDA是11.1,默认的没有,点击下面的previous versions of pytorch看以前的版本。发现torch1.10.1可以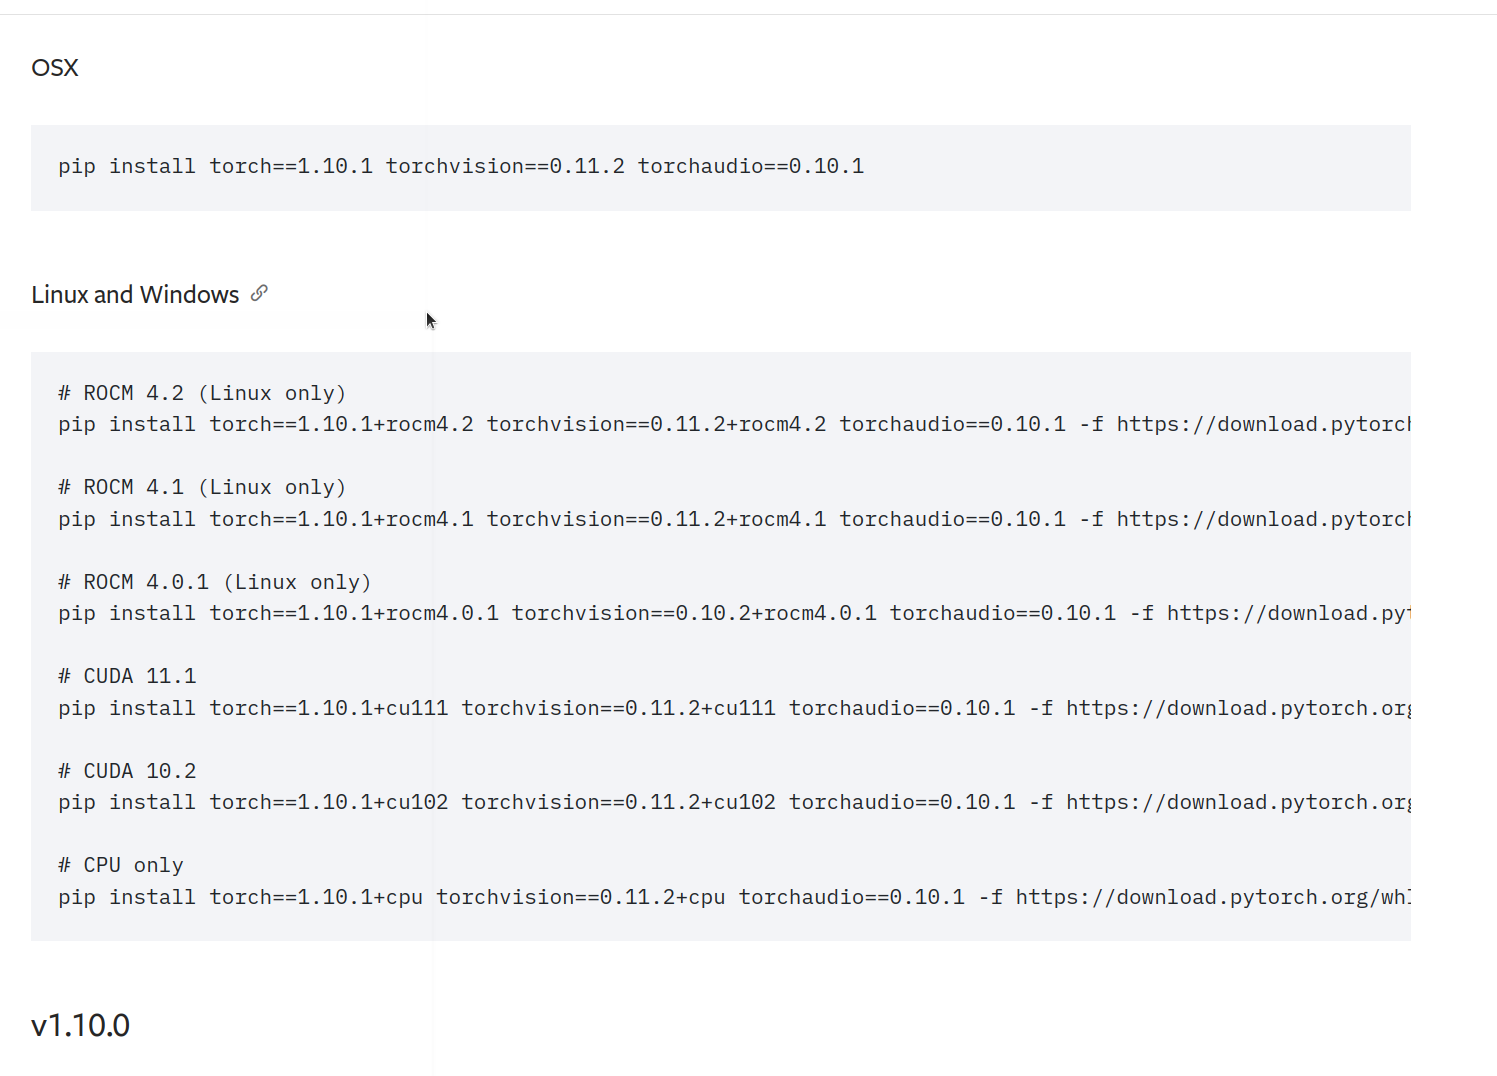
pip install torch==1.10.1+cu111 torchvision==0.11.2+cu111 torchaudio==0.10.1 -f https://download.pytorch.org/whl/cu111/torch_stable.html3.下载yolov5代码
git clone https://github.com/ultralytics/yolov5  # clone
cd yolov5
pip install -r requirements.txt  # install
二、数据集制作部分
先用labelimage标注自己的数据,尽量是yolo格式的,也就是标注文件是txt形式,如果有voc格式也没关系,可以进行转换。
2.1voc格式
?第一步:把JPEGImages、Annotations、ImageSets(他们的说明见下面代码)和下面的代码放在一个目录下。运行下面的代码,就会在ImageSets/Main/下得到训练和验证的txt文件。
import os
import random

images_path = "JPEGImages/"       #里面放的图片
xmls_path = "Annotations/"        #里面放的xml格式标注文件
train_val_txt_path = "ImageSets/Main/"   #这个就是一个空的文件夹,运行这个代码后在Main文件夹下有两个训练的txt文件
val_percent = 0.1     #验证集的比例。

images_list = os.listdir(images_path)
random.shuffle(images_list)

train_images_count = int((1 - val_percent) * len(images_list))
val_images_count = int(val_percent * len(images_list))

train_txt = open(os.path.join(train_val_txt_path, "train.txt"), "w")
train_count = 0
for i in range(train_images_count):
    text = images_list[i].split(".png")[0] + "\n"
    train_txt.write(text)
    train_count += 1
    print("train_count : " + str(train_count))
train_txt.close()

val_txt = open(os.path.join(train_val_txt_path, "val.txt"), "w")
val_count = 0
for i in range(val_images_count):
    text = images_list[i + train_images_count].split(".png")[0] + "\n"
    val_txt.write(text)
    val_count += 1
    print("val_count : " + str(val_count))
val_txt.close()第二步:标注文件voc格式转yolo格式
我们只需要在main函数里指定两个参数,一个是VOC标注文件地址,一个是yolo输出文件地址
import os
import xml.etree.ElementTree as ET

def convert_folder_to_yolov5(input_folder, output_folder):
    # Ensure output folder exists
    if not os.path.exists(output_folder):
        os.makedirs(output_folder)

    # Loop through each XML file in the input folder
    for xml_file_name in os.listdir(input_folder):
        if xml_file_name.endswith('.xml'):
            xml_file_path = os.path.join(input_folder, xml_file_name)

            # Generate corresponding output txt file path
            txt_file_name = os.path.splitext(xml_file_name)[0] + '.txt'
            txt_file_path = os.path.join(output_folder, txt_file_name)

            # Convert XML to Yolov5 format and save to txt file
            convert_to_yolov5(xml_file_path, txt_file_path)

def convert_to_yolov5(xml_file, output_file):
    tree = ET.parse(xml_file)
    root = tree.getroot()

    with open(output_file, 'w') as f:
        for obj in root.findall('object'):
            class_name = obj.find('name').text
            if class_name == 'cone':  # Assuming 'disease' is the class of interest
                xmin = int(obj.find('bndbox/xmin').text)
                ymin = int(obj.find('bndbox/ymin').text)
                xmax = int(obj.find('bndbox/xmax').text)
                ymax = int(obj.find('bndbox/ymax').text)

                width = xmax - xmin
                height = ymax - ymin
                x_center = (xmin + xmax) / 2.0
                y_center = (ymin + ymax) / 2.0

                # Normalize coordinates and dimensions
                x_center /= int(root.find('size/width').text)
                y_center /= int(root.find('size/height').text)
                width /= int(root.find('size/width').text)
                height /= int(root.find('size/height').text)

                line = f"{0} {x_center} {y_center} {width} {height}\n"
                f.write(line)

if __name__ == "__main__":
    input_folder_path = "/home/wangchen/YOLOX/cone/Annotations"  #voc格式标注文件
    output_folder_path = "/home/wangchen/YOLOX/cone/YOLOLabels"   #yolo格式保存地址

convert_folder_to_yolov5(input_folder_path, output_folder_path)第三步:根据第一步的生成的voc索引,来将yolo数据划分为train和val两部分。
下面这个代码运行完,会在output_dataset_path里面产生两个文件夹,一个train,一个val,每一个里面又都有一个images和labels。这个数据集目录结构是不对的,需要调整一下。改成下图结构
import os
import random
from shutil import copyfile


def split_dataset(image_folder, txt_folder, output_folder, split_index):
    # Ensure output folders exist
    for dataset in ['train', 'val']:
        if not os.path.exists(os.path.join(output_folder, dataset, 'images')):
            os.makedirs(os.path.join(output_folder, dataset, 'images'))
        if not os.path.exists(os.path.join(output_folder, dataset, 'txt')):
            os.makedirs(os.path.join(output_folder, dataset, 'txt'))
    train_index = os.path.join(split_index, 'train.txt')
    val_index = os.path.join(split_index, 'val.txt')
    with open(train_index, 'r') as file:
        train_images = [i.strip() for i in file.readlines()]
    with open(val_index, 'r') as file:
        val_images = [i.strip() for i in file.readlines()]

    # Copy images to respective folders
    for dataset, images_list in zip(['train', 'val'], [train_images, val_images]):
        for image_file in images_list:
            image_path = os.path.join(image_folder, image_file + '.png')
            copyfile(image_path, os.path.join(output_folder, dataset, 'images', image_file + '.png'))
            txt_file = image_file + '.txt'
            txt_path = os.path.join(txt_folder, txt_file)

            # Copy corresponding txt file if exists
            if os.path.exists(txt_path):
                copyfile(txt_path, os.path.join(output_folder, dataset, 'txt', txt_file))


if __name__ == "__main__":
    image_folder_path = "/home/wangchen/YOLOX/cone/JPEGImages"
    txt_folder_path = "/home/wangchen/YOLOX/cone/YOLOLabels"
    output_dataset_path = "/home/wangchen/YOLOX/yolo_data"
    split_index = "/home/wangchen/YOLOX/cone/ImageSets/Main"

    split_dataset(image_folder_path, txt_folder_path, output_dataset_path, split_index)
2.2YOLO格式
直接按照上面第三步目录结构划分就行。
三、yolov5配置文件修改
?修改data/VOC.yaml.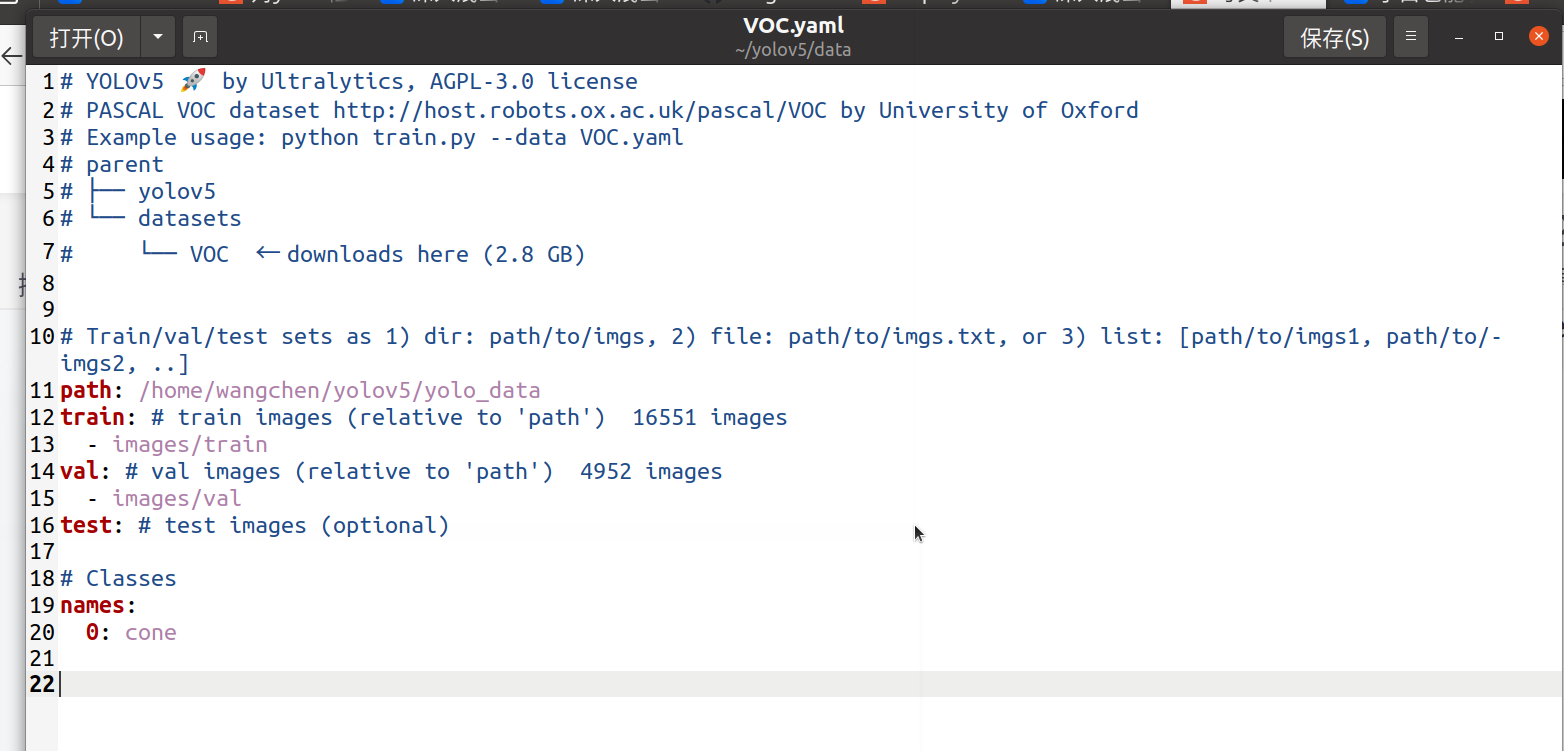
修改models/yolov5_s.yaml里面的类别个数。修改train.py里面的相关超参数即可。
文章来源:https://blog.csdn.net/slamer111/article/details/135255502
本文来自互联网用户投稿,该文观点仅代表作者本人,不代表本站立场。本站仅提供信息存储空间服务,不拥有所有权,不承担相关法律责任。 如若内容造成侵权/违法违规/事实不符,请联系我的编程经验分享网邮箱:chenni525@qq.com进行投诉反馈,一经查实,立即删除!
本文来自互联网用户投稿,该文观点仅代表作者本人,不代表本站立场。本站仅提供信息存储空间服务,不拥有所有权,不承担相关法律责任。 如若内容造成侵权/违法违规/事实不符,请联系我的编程经验分享网邮箱:chenni525@qq.com进行投诉反馈,一经查实,立即删除!
最新文章
- Python教程
- 深入理解 MySQL 中的 HAVING 关键字和聚合函数
- Qt之QChar编码(1)
- MyBatis入门基础篇
- 用Python脚本实现FFmpeg批量转换
- 纯干货!最全WebGL框架及Web3D图形库
- 约瑟夫环问题
- Kafka的分区和副本机制
- Linux-nginx(安装配置nginx、配置反向代理、Nginx配置负载均衡、动静分离)
- N字形变换(麻烦的方法)
- 新型招聘系统(JSP+java+springmvc+mysql+MyBatis)
- 【Linux进程 (一) 】冯诺依曼体系结构&&OS管理
- 类型特质和静态断言
- mysql5.7之从入门到放弃
- Web网页开发-总结笔记2