threejs 光棱锥效果(支持生成多个)
发布时间:2024年01月11日
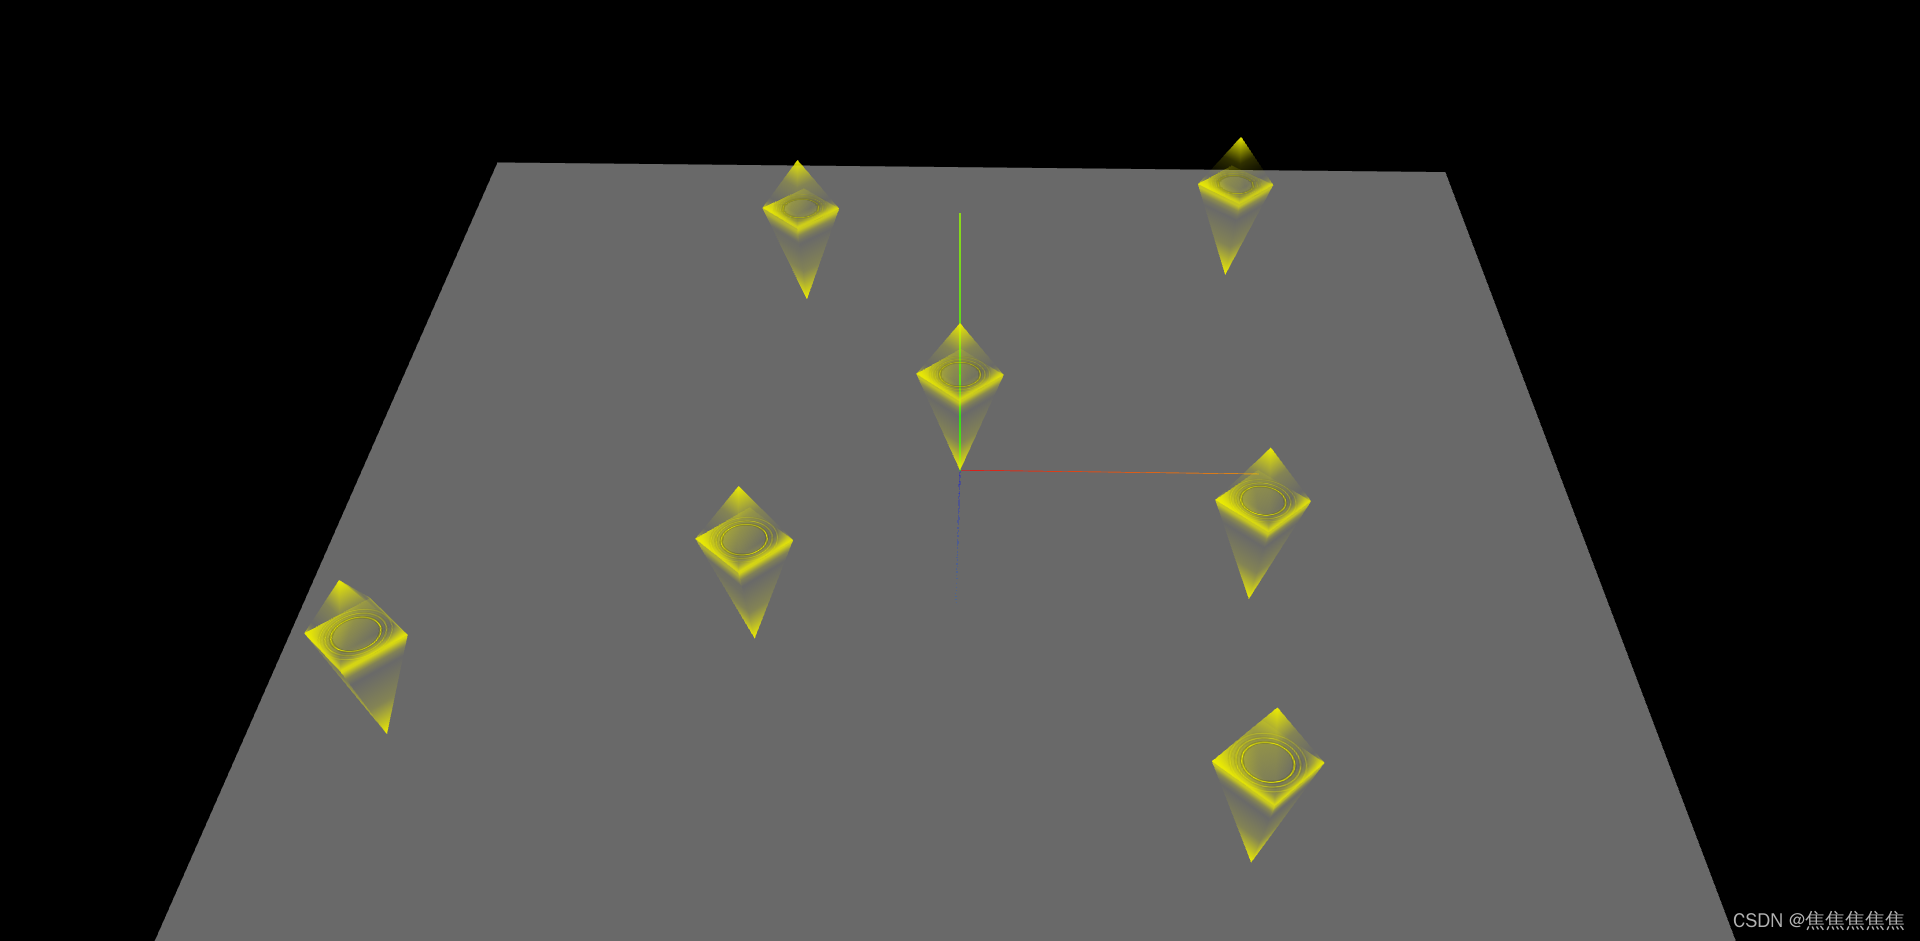
此案例的光棱锥是由两个圆锥几何体ConeGeometry和一个平面几何体PlaneGeometry构成,并且支持创建多个,下面是这次案例的展示效果:
threejs光棱锥效果
一、创建光棱锥
(1) 引入纹理贴图
案例中使用到了纹理贴图,放在文章里会有水印,需要的可以私信我
// 圆环纹理贴图
const ringTexture = new THREE.TextureLoader().load('./ring.png');
// 渐变纹理贴图
const gradientTexture = new THREE.TextureLoader().load('./gradient.png');
// 光棱锥数组
const lightPyramidArr = [];
(2) 创建光棱锥函数
首先要想能多次生成光棱锥,代码就一定得写在函数内部来调用
// 创建光棱锥,参数分别为位置、高度、宽度
function createLightPyramid (pos, height, width) {}| pos | 光棱锥位置 |
| height | 底部棱锥的高度,光棱锥的高度为此值的1.5倍 |
| width | 圆锥底边宽度 |
(3) 棱锥效果
首先创建好圆锥几何体和普通网格材质,材质中设置颜色贴图map属性为前面引入的gradientTexture渐变纹理贴图,并且开启透明度
// 创建圆锥几何体
const coneGeometry = new THREE.ConeGeometry(width, height, 4);
const material = new THREE.MeshBasicMaterial({
    color: '#EEEE00',
    map: gradientTexture,
    transparent: true,
});
然后就是创建棱锥了,这里创建了两个圆锥(底部园锥和顶部园锥)来构成一个棱锥,顶部圆锥的高度为低部圆锥高度的一半;
// 底部圆锥
const bottomCone = new THREE.Mesh(coneGeometry, material);
bottomCone.position.copy(pos);
bottomCone.rotateX(-Math.PI / 2);
bottomCone.position.z += height / 2;

// 顶部圆锥
const topCone = new THREE.Mesh(coneGeometry, material);
topCone.scale.y = 0.5;
topCone.position.copy(pos);
topCone.rotateX(Math.PI / 2);
topCone.position.z += height + height * 0.25;
(4) 圆环效果
这里的圆环,其实是一个矩形平面上使用了前面加载进的纹理贴图后的效果,最后创建一个组对象将底部圆锥、顶部圆锥、和圆环添加进去;另外这个组对象需要push到前面创建的光棱锥数组里面,后面的动画需要用到
    // 创建平面几何体
    const plane = new THREE.PlaneGeometry(height / 2, height / 2);
    const markerMaterial = new THREE.MeshBasicMaterial({
        map: ringTexture,
        side: THREE.DoubleSide,
        color: '#EEEE00',
        transparent: true,
        depthTest: false,
    })
    // 圆环
    const ring = new THREE.Mesh(plane, markerMaterial);
    ring.position.copy(pos);
    ring.position.z += height;

    // 光棱锥组对象
    const lightPyramidGroup = new THREE.Group();
    lightPyramidGroup.rotateX(-Math.PI / 2);
    lightPyramidGroup.add(bottomCone, topCone, ring);
    scene.add(lightPyramidGroup);

    // 将这个光棱锥添加到数组中去
    lightPyramidArr.push(lightPyramidGroup);
(5) 调用函数查看效果
createLightPyramid(new THREE.Vector3(0, 0, 0), 20, 7);
createLightPyramid(new THREE.Vector3(50, 60, 0), 20, 7);
createLightPyramid(new THREE.Vector3(40, -80, 0), 20, 7);
createLightPyramid(new THREE.Vector3(-30, 50, 0), 20, 7);
createLightPyramid(new THREE.Vector3(45, -30, 0), 20, 7);
createLightPyramid(new THREE.Vector3(-80, -60, 0), 20, 7);
createLightPyramid(new THREE.Vector3(-30, -40, 0), 20, 7);
此时光棱锥已经显现出来了,但是还是静态的,没有动画效果?
?二、光棱锥动画
光棱锥动画可以分为棱锥动画和圆环动画;
先说圆锥动画,每次改变两个圆锥rotation属性的y值使其自转起来,注意由于两个圆锥朝向不同,所以一个是增加一个是减少;
然后就是圆环动画了,声明圆环放大的最大范围,并不断累加;在通过if语句来让达到圆环逐渐显示和逐渐消失的效果
// 渲染循环
function render () {
    lightPyramidArr.map(group => {
        // 底部圆锥和顶部圆锥自转
        group.children[0].rotation.y += 0.01;
        group.children[1].rotation.y -= 0.01;
        // 光圈缩放值,初始值为1
        let scale = group.children[2].scale.x;
        // 光圈放大范围,从1倍放大到6倍
        let range = 6;
        // 累加缩放值
        scale += 0.02;
        // 光圈透明度
        let opacity;
        // 光圈的透明度从0.0逐渐过渡到1.0,逐渐显示
        if (scale < range * 0.3) {
            opacity = (scale - 1) / (range * 0.3 - 1);
        }
        // 光圈的透明度从1.0逐渐过渡到0.0,逐渐消失
        else if (scale > range * 0.3 && scale <= range) {
            opacity = 1 - (scale - range * 0.3) / (range - range * 0.3);
        }
        // 重置缩放值
        else {
            scale = 1.0;
        }
        group.children[2].scale.set(scale, scale, scale);
        group.children[2].material.opacity = opacity;
    })
    renderer.render(scene, camera);
    requestAnimationFrame(render);
}
render();
完整代码
html代码
<!DOCTYPE html>
<html lang="en">

<head>
    <meta charset="UTF-8">
    <meta http-equiv="X-UA-Compatible" content="IE=edge">
    <meta name="viewport" content="width=device-width, initial-scale=1.0">
    <title>Document</title>
</head>
<style>
    body {
        overflow: hidden;
        margin: 0;
    }
</style>

<body>
    <div id="webgl"></div>
    <script type="importmap">
        {
            "imports":{
                "three":"../../build/three.module.js",
                "three/addons/": "../../examples/jsm/"
            }
        }
    </script>
    <script src="./index.js" type="module"></script>
</body>

</html>
js代码
import * as THREE from 'three';
import { OrbitControls } from 'three/addons/controls/OrbitControls.js';

const width = window.innerWidth;
const height = window.innerHeight;

// 创建场景
const scene = new THREE.Scene();

const axex = new THREE.AxesHelper(50);
scene.add(axex);

// 设置光源
const pointLight = new THREE.PointLight('#ffffff', 1, 0);
pointLight.position.set(200, 0, 200);
scene.add(pointLight);
const ambientLight = new THREE.AmbientLight(0xffffff, 0.2);
scene.add(ambientLight);

// 创建透视相机
const camera = new THREE.PerspectiveCamera(30, width / height, 1, 3000);
camera.position.set(0, 0, 100);
camera.lookAt(0, 0, 0);

// 创建渲染器
const renderer = new THREE.WebGLRenderer({
    antialias: true,
});
renderer.setPixelRatio(window.devicePixelRatio);
renderer.setSize(width, height);
document.body.appendChild(renderer.domElement);

const planeGeometry = new THREE.PlaneGeometry(200, 200);
const planeMaterial = new THREE.MeshBasicMaterial({ color: '#696969', side: THREE.DoubleSide });
const plane = new THREE.Mesh(planeGeometry, planeMaterial);
plane.rotateX(-Math.PI / 2);
scene.add(plane);


// 圆环纹理贴图
const ringTexture = new THREE.TextureLoader().load('./ring.png');
// 渐变纹理贴图
const gradientTexture = new THREE.TextureLoader().load('./gradient.png');
// 光棱锥数组
const lightPyramidArr = [];
// 创建光棱锥,参数分别为位置、高度、宽度
function createLightPyramid (pos, height, width) {
    // 创建圆锥几何体
    const coneGeometry = new THREE.ConeGeometry(width, height, 4);
    const material = new THREE.MeshBasicMaterial({
        color: '#EEEE00',
        map: gradientTexture,
        transparent: true,
    });

    // 底部圆锥
    const bottomCone = new THREE.Mesh(coneGeometry, material);
    bottomCone.position.copy(pos);
    bottomCone.rotateX(-Math.PI / 2);
    bottomCone.position.z += height / 2;

    // 顶部圆锥
    const topCone = new THREE.Mesh(coneGeometry, material);
    topCone.scale.y = 0.5;
    topCone.position.copy(pos);
    topCone.rotateX(Math.PI / 2);
    topCone.position.z += height + height * 0.25;

    // 创建平面几何体
    const plane = new THREE.PlaneGeometry(height / 2, height / 2);
    const markerMaterial = new THREE.MeshBasicMaterial({
        map: ringTexture,
        side: THREE.DoubleSide,
        color: '#EEEE00',
        transparent: true,
        depthTest: false,
    })
    // 标记光圈
    const ring = new THREE.Mesh(plane, markerMaterial);
    ring.position.copy(pos);
    ring.position.z += height;

    const lightPyramidGroup = new THREE.Group();
    lightPyramidGroup.rotateX(-Math.PI / 2);
    lightPyramidGroup.add(bottomCone, topCone, ring);
    scene.add(lightPyramidGroup);
    lightPyramidArr.push(lightPyramidGroup);
}
createLightPyramid(new THREE.Vector3(0, 0, 0), 20, 7);
createLightPyramid(new THREE.Vector3(50, 60, 0), 20, 7);
createLightPyramid(new THREE.Vector3(40, -80, 0), 20, 7);
createLightPyramid(new THREE.Vector3(-30, 50, 0), 20, 7);
createLightPyramid(new THREE.Vector3(45, -30, 0), 20, 7);
createLightPyramid(new THREE.Vector3(-80, -60, 0), 20, 7);
createLightPyramid(new THREE.Vector3(-30, -40, 0), 20, 7);

// 渲染循环
function render () {
    lightPyramidArr.map(group => {
        // 底部圆锥和顶部圆锥自转
        group.children[0].rotation.y += 0.01;
        group.children[1].rotation.y -= 0.01;
        // 光圈缩放值,初始值为1
        let scale = group.children[2].scale.x;
        // 光圈放大范围,从1倍放大到6倍
        let range = 6;
        // 累加缩放值
        scale += 0.02;
        // 光圈透明度
        let opacity;
        // 光圈的透明度从0.0逐渐过渡到1.0,逐渐显示
        if (scale < range * 0.3) {
            opacity = (scale - 1) / (range * 0.3 - 1);
        }
        // 光圈的透明度从1.0逐渐过渡到0.0,逐渐消失
        else if (scale > range * 0.3 && scale <= range) {
            opacity = 1 - (scale - range * 0.3) / (range - range * 0.3);
        }
        // 重置缩放值
        else {
            scale = 1.0;
        }
        group.children[2].scale.set(scale, scale, scale);
        group.children[2].material.opacity = opacity;
    })
    renderer.render(scene, camera);
    requestAnimationFrame(render);
}
render();

// 创建相机轨道控制器
const controls = new OrbitControls(camera, renderer.domElement);
controls.addEventListener('change', () => {
    renderer.render(scene, camera);
})

// 设置界面跟随窗口自适应
window.onresize = function () {
    renderer.setSize(window.innerWidth, window.innerHeight);
    camera.aspect = window.innerWidth / window.innerHeight;
    camera.updateProjectionMatrix();
}
文章来源:https://blog.csdn.net/weixin_60645637/article/details/135520320
本文来自互联网用户投稿,该文观点仅代表作者本人,不代表本站立场。本站仅提供信息存储空间服务,不拥有所有权,不承担相关法律责任。 如若内容造成侵权/违法违规/事实不符,请联系我的编程经验分享网邮箱:chenni525@qq.com进行投诉反馈,一经查实,立即删除!
本文来自互联网用户投稿,该文观点仅代表作者本人,不代表本站立场。本站仅提供信息存储空间服务,不拥有所有权,不承担相关法律责任。 如若内容造成侵权/违法违规/事实不符,请联系我的编程经验分享网邮箱:chenni525@qq.com进行投诉反馈,一经查实,立即删除!
最新文章
- Python教程
- 深入理解 MySQL 中的 HAVING 关键字和聚合函数
- Qt之QChar编码(1)
- MyBatis入门基础篇
- 用Python脚本实现FFmpeg批量转换
- linux安装软件
- web前端javaScript笔记——(5)原型对象和垃圾回收
- 数据结构——队列
- springboot配置yml与对应的java config
- 深入了解鸿鹄工程项目管理系统源码:功能清单与项目模块的深度解析
- Python源码23:海龟画图turtle画小狗狗
- 西门子智能分拣系统实现(博途17)
- 股票套牢,如何解套?当下行情怎么赚钱?
- CPU 如何识别用户空间不同进程的虚拟地址
- VMware12.1.1安装Centos7