如何使用three.js集成令人羡慕的局部坐标系
示例
官方源码
https://github.com/mrdoob/three.js/blob/dev/examples/webgl_geometry_spline_editor.html
- 使用源码的方法:
直接将源码copy到项目中的htmldoge,然后如果你用了react框架,你要把App.jsx文件恢复到原来的样子 - 项目的业务
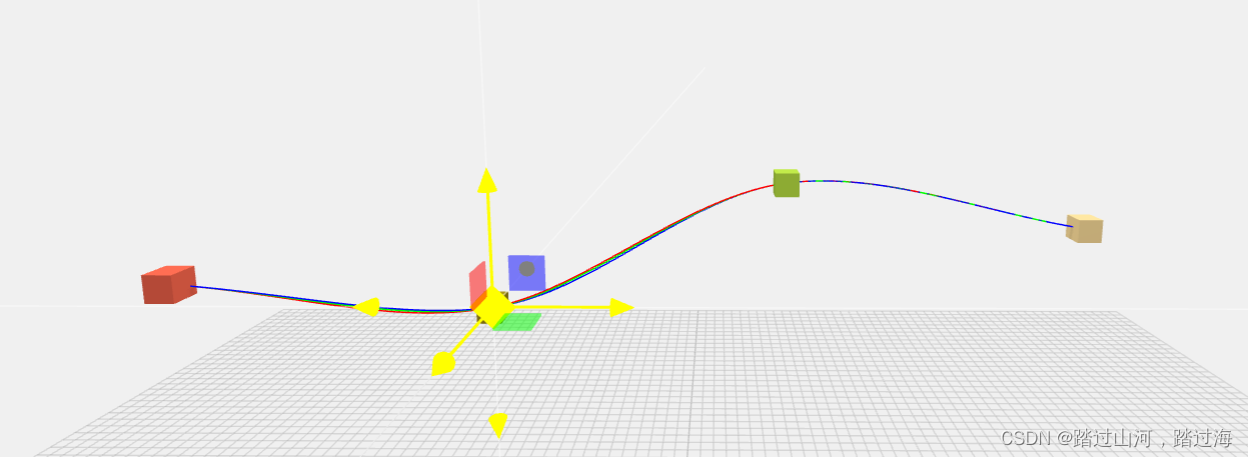
你把鼠标悬停在上面,坐标系就出来了,
坐标系出来后,你才可以移动他,
他并不是靠鼠标点击来实现的
阅读源码
(假设你是第一次接触前端代码,没错,我也是一次,so,作为一个对前端一无所知的萌新,接下来让我们一起来剖析官方的源代码,如果我们可以搞懂这问题,那这对于前端版本的opengl来说,你对模型与鼠标交互的理解,将大幅度提升,而且我想这段代码应该也是可以复用的,俗话说:“知道如何写代码值1分钱”,“知道把别人的某一部分代码放到自己几万行的屎山代码中,值百万dollars”.[doge])
<!DOCTYPE html>
<html lang="en">
	<head>
		<title>three.js webgl - geometry - catmull spline editor</title>
		<meta charset="utf-8">
		<meta name="viewport" content="width=device-width, user-scalable=no, minimum-scale=1.0, maximum-scale=1.0">
		<link type="text/css" rel="stylesheet" href="main.css">
		<style>
			body {
				background-color: #f0f0f0;
				color: #444;
			}
			a {
				color: #08f;
			}
		</style>
	</head>
	<body>

		<div id="container"></div>
		<div id="info">
			<a href="https://threejs.org" target="_blank" rel="noopener">three.js</a> - geometry - catmull spline editor
		</div>

		<script type="importmap">
			{
				"imports": {
					"three": "../build/three.module.js",
					"three/addons/": "./jsm/"
				}
			}
		</script>

		<script type="module">

			import * as THREE from 'three';

			import { GUI } from 'three/addons/libs/lil-gui.module.min.js';

			import { OrbitControls } from 'three/addons/controls/OrbitControls.js';
			import { TransformControls } from 'three/addons/controls/TransformControls.js';

			let container;
			let camera, scene, renderer;
			const splineHelperObjects = [];
			let splinePointsLength = 4;
			const positions = [];
			const point = new THREE.Vector3();

			const raycaster = new THREE.Raycaster();
			const pointer = new THREE.Vector2();
			const onUpPosition = new THREE.Vector2();
			const onDownPosition = new THREE.Vector2();

			const geometry = new THREE.BoxGeometry( 20, 20, 20 );
			let transformControl;

			const ARC_SEGMENTS = 200;

			const splines = {};

			const params = {
				uniform: true,
				tension: 0.5,
				centripetal: true,
				chordal: true,
				addPoint: addPoint,
				removePoint: removePoint,
				exportSpline: exportSpline
			};

			init();

			function init() {

				container = document.getElementById( 'container' );

				scene = new THREE.Scene();
				scene.background = new THREE.Color( 0xf0f0f0 );

				camera = new THREE.PerspectiveCamera( 70, window.innerWidth / window.innerHeight, 1, 10000 );
				camera.position.set( 0, 250, 1000 );
				scene.add( camera );

				scene.add( new THREE.AmbientLight( 0xf0f0f0, 3 ) );
				const light = new THREE.SpotLight( 0xffffff, 4.5 );
				light.position.set( 0, 1500, 200 );
				light.angle = Math.PI * 0.2;
				light.decay = 0;
				light.castShadow = true;
				light.shadow.camera.near = 200;
				light.shadow.camera.far = 2000;
				light.shadow.bias = - 0.000222;
				light.shadow.mapSize.width = 1024;
				light.shadow.mapSize.height = 1024;
				scene.add( light );

				const planeGeometry = new THREE.PlaneGeometry( 2000, 2000 );
				planeGeometry.rotateX( - Math.PI / 2 );
				const planeMaterial = new THREE.ShadowMaterial( { color: 0x000000, opacity: 0.2 } );

				const plane = new THREE.Mesh( planeGeometry, planeMaterial );
				plane.position.y = - 200;
				plane.receiveShadow = true;
				scene.add( plane );

				const helper = new THREE.GridHelper( 2000, 100 );
				helper.position.y = - 199;
				helper.material.opacity = 0.25;
				helper.material.transparent = true;
				scene.add( helper );

				renderer = new THREE.WebGLRenderer( { antialias: true } );
				renderer.setPixelRatio( window.devicePixelRatio );
				renderer.setSize( window.innerWidth, window.innerHeight );
				renderer.shadowMap.enabled = true;
				container.appendChild( renderer.domElement );

				const gui = new GUI();

				gui.add( params, 'uniform' ).onChange( render );
				gui.add( params, 'tension', 0, 1 ).step( 0.01 ).onChange( function ( value ) {

					splines.uniform.tension = value;
					updateSplineOutline();
					render();

				} );
				gui.add( params, 'centripetal' ).onChange( render );
				gui.add( params, 'chordal' ).onChange( render );
				gui.add( params, 'addPoint' );
				gui.add( params, 'removePoint' );
				gui.add( params, 'exportSpline' );
				gui.open();

				// Controls
				const controls = new OrbitControls( camera, renderer.domElement );
				controls.damping = 0.2;
				controls.addEventListener( 'change', render );

				transformControl = new TransformControls( camera, renderer.domElement );
				transformControl.addEventListener( 'change', render );
				transformControl.addEventListener( 'dragging-changed', function ( event ) {

					controls.enabled = ! event.value;

				} );
				scene.add( transformControl );

				transformControl.addEventListener( 'objectChange', function () {

					updateSplineOutline();

				} );

				document.addEventListener( 'pointerdown', onPointerDown );
				document.addEventListener( 'pointerup', onPointerUp );
				document.addEventListener( 'pointermove', onPointerMove );
				window.addEventListener( 'resize', onWindowResize );

				/*******
				 * Curves
				 *********/

				for ( let i = 0; i < splinePointsLength; i ++ ) {

					addSplineObject( positions[ i ] );

				}

				positions.length = 0;

				for ( let i = 0; i < splinePointsLength; i ++ ) {

					positions.push( splineHelperObjects[ i ].position );

				}

				const geometry = new THREE.BufferGeometry();
				geometry.setAttribute( 'position', new THREE.BufferAttribute( new Float32Array( ARC_SEGMENTS * 3 ), 3 ) );

				let curve = new THREE.CatmullRomCurve3( positions );
				curve.curveType = 'catmullrom';
				curve.mesh = new THREE.Line( geometry.clone(), new THREE.LineBasicMaterial( {
					color: 0xff0000,
					opacity: 0.35
				} ) );
				curve.mesh.castShadow = true;
				splines.uniform = curve;

				curve = new THREE.CatmullRomCurve3( positions );
				curve.curveType = 'centripetal';
				curve.mesh = new THREE.Line( geometry.clone(), new THREE.LineBasicMaterial( {
					color: 0x00ff00,
					opacity: 0.35
				} ) );
				curve.mesh.castShadow = true;
				splines.centripetal = curve;

				curve = new THREE.CatmullRomCurve3( positions );
				curve.curveType = 'chordal';
				curve.mesh = new THREE.Line( geometry.clone(), new THREE.LineBasicMaterial( {
					color: 0x0000ff,
					opacity: 0.35
				} ) );
				curve.mesh.castShadow = true;
				splines.chordal = curve;

				for ( const k in splines ) {

					const spline = splines[ k ];
					scene.add( spline.mesh );

				}

				load( [ new THREE.Vector3( 289.76843686945404, 452.51481137238443, 56.10018915737797 ),
					new THREE.Vector3( - 53.56300074753207, 171.49711742836848, - 14.495472686253045 ),
					new THREE.Vector3( - 91.40118730204415, 176.4306956436485, - 6.958271935582161 ),
					new THREE.Vector3( - 383.785318791128, 491.1365363371675, 47.869296953772746 ) ] );

				render();

			}

			function addSplineObject( position ) {

				const material = new THREE.MeshLambertMaterial( { color: Math.random() * 0xffffff } );
				const object = new THREE.Mesh( geometry, material );

				if ( position ) {

					object.position.copy( position );

				} else {

					object.position.x = Math.random() * 1000 - 500;
					object.position.y = Math.random() * 600;
					object.position.z = Math.random() * 800 - 400;

				}

				object.castShadow = true;
				object.receiveShadow = true;
				scene.add( object );
				splineHelperObjects.push( object );
				return object;

			}

			function addPoint() {

				splinePointsLength ++;

				positions.push( addSplineObject().position );

				updateSplineOutline();

				render();

			}

			function removePoint() {

				if ( splinePointsLength <= 4 ) {

					return;

				}

				const point = splineHelperObjects.pop();
				splinePointsLength --;
				positions.pop();

				if ( transformControl.object === point ) transformControl.detach();
				scene.remove( point );

				updateSplineOutline();

				render();

			}

			function updateSplineOutline() {

				for ( const k in splines ) {

					const spline = splines[ k ];

					const splineMesh = spline.mesh;
					const position = splineMesh.geometry.attributes.position;

					for ( let i = 0; i < ARC_SEGMENTS; i ++ ) {

						const t = i / ( ARC_SEGMENTS - 1 );
						spline.getPoint( t, point );
						position.setXYZ( i, point.x, point.y, point.z );

					}

					position.needsUpdate = true;

				}

			}

			function exportSpline() {

				const strplace = [];

				for ( let i = 0; i < splinePointsLength; i ++ ) {

					const p = splineHelperObjects[ i ].position;
					strplace.push( `new THREE.Vector3(${p.x}, ${p.y}, ${p.z})` );

				}

				console.log( strplace.join( ',\n' ) );
				const code = '[' + ( strplace.join( ',\n\t' ) ) + ']';
				prompt( 'copy and paste code', code );

			}

			function load( new_positions ) {

				while ( new_positions.length > positions.length ) {

					addPoint();

				}

				while ( new_positions.length < positions.length ) {

					removePoint();

				}

				for ( let i = 0; i < positions.length; i ++ ) {

					positions[ i ].copy( new_positions[ i ] );

				}

				updateSplineOutline();

			}

			function render() {

				splines.uniform.mesh.visible = params.uniform;
				splines.centripetal.mesh.visible = params.centripetal;
				splines.chordal.mesh.visible = params.chordal;
				renderer.render( scene, camera );

			}

			function onPointerDown( event ) {

				onDownPosition.x = event.clientX;
				onDownPosition.y = event.clientY;

			}

			function onPointerUp( event ) {

				onUpPosition.x = event.clientX;
				onUpPosition.y = event.clientY;

				if ( onDownPosition.distanceTo( onUpPosition ) === 0 ) {

					transformControl.detach();
					render();

				}

			}

			function onPointerMove( event ) {

				pointer.x = ( event.clientX / window.innerWidth ) * 2 - 1;
				pointer.y = - ( event.clientY / window.innerHeight ) * 2 + 1;

				raycaster.setFromCamera( pointer, camera );

				const intersects = raycaster.intersectObjects( splineHelperObjects, false );

				if ( intersects.length > 0 ) {

					const object = intersects[ 0 ].object;

					if ( object !== transformControl.object ) {

						transformControl.attach( object );

					}

				}

			}

			function onWindowResize() {

				camera.aspect = window.innerWidth / window.innerHeight;
				camera.updateProjectionMatrix();

				renderer.setSize( window.innerWidth, window.innerHeight );

				render();

			}

		</script>

	</body>
</html>
- 总体分析:(作为一个萌新,我们肯定是逐行的分析喽!)
此代码是一个完整的HTML文档,其中嵌入了JavaScript,使用Three.js创建基于Web的Catmull-Rom样条编辑器。我们一节一节来分析。
Catmull-Rom是样条曲线的意思,啥是样条曲线?大家可以看我的上一篇文章,有写到. - HTML Structure(结构)
- DOCTYPE、html、head和body标签:标准HTML结构。(这个没问题,就算是萌新,这个应该是知道的)
- 标题标签:设置网页的标题。
<title>three.js webgl - geometry - catmull spline editor</title> - Meta Tags:字符集用于字符编码,视口设置用于响应。
<meta charset="utf-8">
<meta name="viewport" content="width=device-width, user-scalable=no, minimum-scale=1.0, maximum-scale=1.0"> - 链接标记:包含外部CSS文件“main.css”。
<link type="text/css" rel="stylesheet" href="main.css"> - 样式标记:设置正文的背景颜色和字体颜色,以及样式锚标记。(其实,4和5可以放在一起的,当然分开更加清晰明了)
<style>
    body {
      background-color: #f0f0f0;
      color: #444;
    }

    a {
      color: #08f;
    }
  </style>
- Div标签:两个div,'container’用于3D场景,'info’用于信息和Three.js网站链接。
<div id="container"></div>
<div id="info">
  <a href="https://threejs.org" target="_blank" rel="noopener">three.js</a> - geometry - catmull spline editor
</div>
这里有一个小技巧,我也是刚知道的:你在div中标好了之后,你可以在js的部分添加交互,比如说container标签(info咱就不讲了,其实就是点击后跳转到three.js官方的页面):
var container = document.getElementById('container');
//通过container拿到这个标签,然后你就可用使用`var container`这个变量了!!!
至此,相信很多萌新已经对前端的html与css有所了解了!!!(因为我们已经将这个项目的html和css讲完了!!!)
- JavaScript(Three.js)实现
-
Script for Import Map(导入映射脚本): 定义模块导入的路径,为Three.js模块设置基本路径。
-
Import Statements(导入语句): 从Three.js导入必要的模块,包括核心库、GUI库、OrbitControls和TransformControls。(其实7和8是一样的,都是import引入我们需要的东西)
-
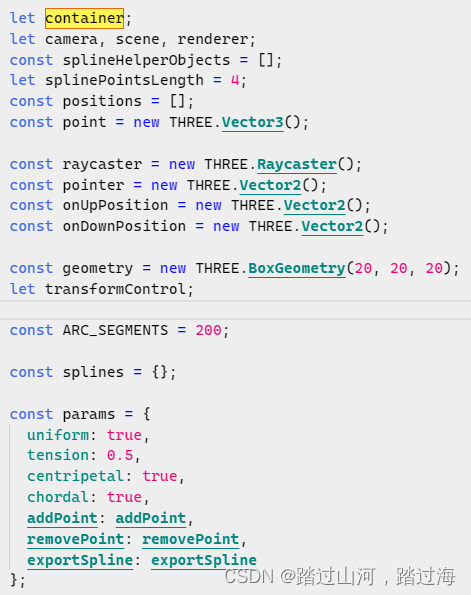
再然后,它在最开始的位置定义了一堆变量,这是一个很好的习惯,然后经常学习js的萌新都知道,js的变量可以到处定义,然后全局使用(var是这样的,let不太清楚)
- 初始化函数
- 场景设置: 创建场景(scene)、摄影机(camera)和光源l(ighting)。添加环境光(ambient light) 和聚光灯(spotlight)。
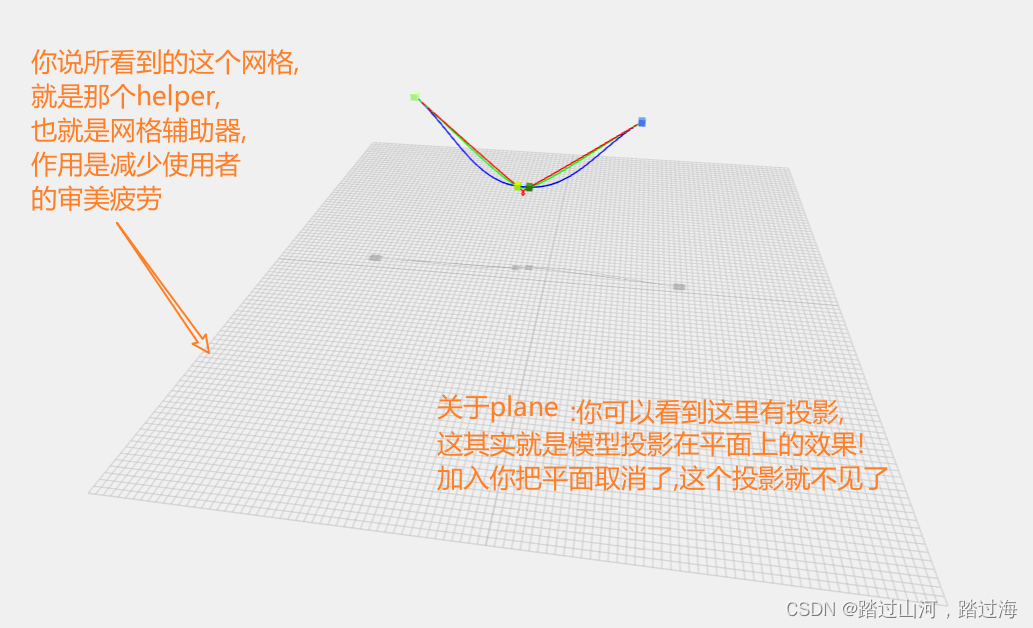
- Plane and Helper Objects: Adds a plane and a grid helper to the scene for reference.平面和辅助对象:将平面和栅格辅助对象添加到场景中以供参考。
//1.平面几何体
const planeGeometry = new THREE.PlaneGeometry(2000, 2000);
planeGeometry.rotateX(- Math.PI / 2);
//2.平面材料
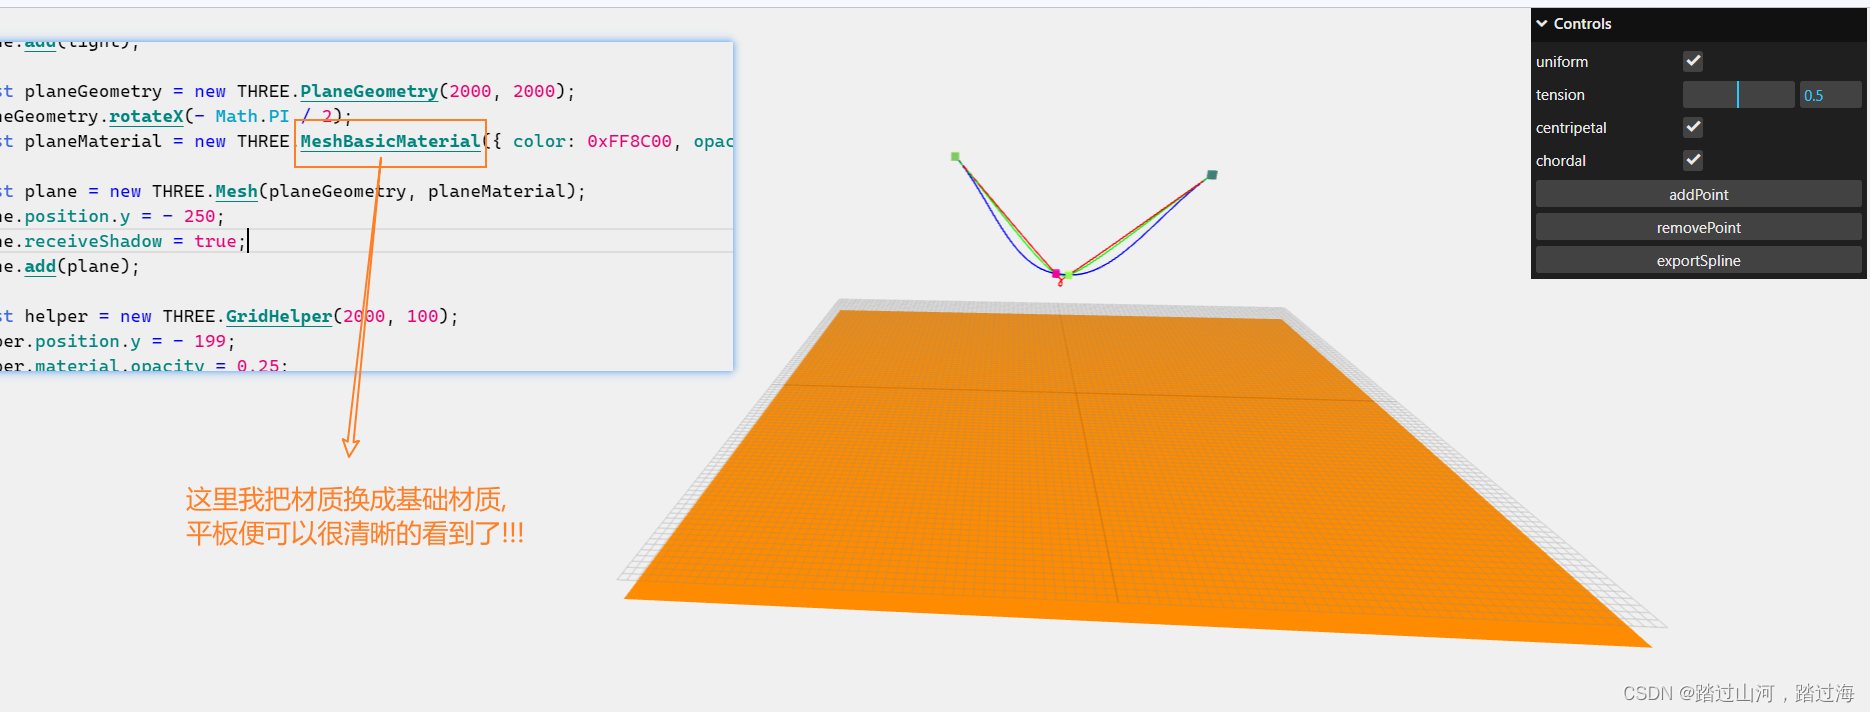
//ShadowMaterial是一种极为特殊的材质,它只会显示阴影而不显示材质本身!!!
const planeMaterial = new THREE.ShadowMaterial({ color: 0x000000, opacity: 0.2 });
//3.平面网格 = 平面几何体 + 平面材质
const plane = new THREE.Mesh(planeGeometry, planeMaterial);
plane.position.y = - 200;
plane.receiveShadow = true;
scene.add(plane);
//3.GridHelper
const helper = new THREE.GridHelper(2000, 100);
helper.position.y = - 199;
helper.material.opacity = 0.25;
helper.material.transparent = true;
scene.add(helper);
3) Renderer Configuration: Sets up the WebGL renderer with antialiasing and shadow mapping.渲染器配置:设置WebGL渲染器的抗锯齿和阴影映射。
renderer = new THREE.WebGLRenderer({ antialias: true });
renderer.setPixelRatio(window.devicePixelRatio);
renderer.setSize(window.innerWidth, window.innerHeight);
renderer.shadowMap.enabled = true;
container.appendChild(renderer.domElement);
- GUI Controls: Adds GUI controls for various spline parameters and actions.
GUI控件:为各种样条曲线参数和动作添加GUI控件。
const gui = new GUI();
gui.add(params, 'uniform').onChange(render);
gui.add(params, 'tension', 0, 1).step(0.01).onChange(function (value) {

splines.uniform.tension = value;
updateSplineOutline();
render();

});
gui.add(params, 'centripetal').onChange(render);
gui.add(params, 'chordal').onChange(render);
gui.add(params, 'addPoint');
gui.add(params, 'removePoint');
gui.add(params, 'exportSpline');
gui.open();
- Orbit and Transform Controls: Implements camera orbit controls and object transform controls.
动态观察和变换控制:实现相机动态观察控制和对象变换控制。
// Controls
const controls = new OrbitControls(camera, renderer.domElement);
controls.damping = 0.2;
controls.addEventListener('change', render);

transformControl = new TransformControls(camera, renderer.domElement);
transformControl.addEventListener('change', render);
transformControl.addEventListener('dragging-changed', function (event) {
   controls.enabled = !event.value;
});
scene.add(transformControl);

transformControl.addEventListener('objectChange', function () {
   updateSplineOutline();
});

document.addEventListener('pointerdown', onPointerDown);
document.addEventListener('pointerup', onPointerUp);
document.addEventListener('pointermove', onPointerMove);
window.addEventListener('resize', onWindowResize);
- Spline Object Management(样条线对象管理)
- Spline Helper Objects: Manages an array of objects that act as control points for the spline.样条线辅助对象:管理用作样条线控制点的对象数组。
- Spline Geometry and Curves: Sets up the spline geometry and three types of Catmull-Rom curves (uniform, centripetal, chordal).样条曲线几何体和曲线:设置样条曲线几何体和三种类型的Catmull-Rom曲线(均匀、向心、弦)。
- Load Function: A function to load new positions into the spline editor.加载函数:将新位置加载到样条曲线编辑器中的函数。
- Rendering and Interaction(渲染和交互)
- Render Function: A function that updates the visibility of splines and renders the scene.(渲染函数:更新样条线的可见性并渲染场景的函数。)
- Event Listeners: For pointer and window resize events to handle user interaction and responsive behavior.(事件监听器:用于指针和窗口调整大小事件,以处理用户交互和响应行为。)
- Spline Manipulation(样条线操作)
1)Add/Remove Points: Functions to add or remove points from the spline.(添加/删除点:从样条曲线添加或删除点的功能。)
2)Update Spline Outline: Updates the spline visualization when the control points are moved.(更新样条曲线轮廓:移动控制点时更新样条曲线可视化。)
3)Export Spline Function: Exports the current spline configuration as a formatted string.(导出样条函数:将当前样条配置导出为格式化字符串。)
剥离源码中的功能
其中最重要的功能是:鼠标悬停在模型上(不需要点击),坐标系就会出现该模型上,然后你的鼠标离开模型后,坐标系依旧不会消失,除非你的鼠标悬停在另一个模型上时,坐标系才会出现在新悬停模型上的位置;然后鼠标点击空白的位置,坐标系就会消失,这个功能如何实现?

分析…
等我研究一会,之后会更新在这
本文来自互联网用户投稿,该文观点仅代表作者本人,不代表本站立场。本站仅提供信息存储空间服务,不拥有所有权,不承担相关法律责任。 如若内容造成侵权/违法违规/事实不符,请联系我的编程经验分享网邮箱:chenni525@qq.com进行投诉反馈,一经查实,立即删除!
- Python教程
- 深入理解 MySQL 中的 HAVING 关键字和聚合函数
- Qt之QChar编码(1)
- MyBatis入门基础篇
- 用Python脚本实现FFmpeg批量转换
- opencv mask后处理方法
- Java版本spring cloud + spring boot企业电子招投标系统源代码
- 便携式小型气象站-科普知识
- 通过浏览器URL地址,5分钟内渗透你的网站!很刑很可拷!
- Android Matrix绘制PaintDrawable设置BitmapShader,手指触点为圆心scale放大原图,Kotlin
- Windows系统下安装MobaXterm23.6终端工具软件
- Python写冒泡
- OpenSource - 基于 DFA 算法实现的高性能 java 敏感词过滤工具框架
- Type-C接口显示器PD协议芯片方案-LDR6020
- 2048小游戏