11.1 pcl_ros的点云学习
本文是看了两个博主的内容,整理在这里是为了以后用时方便查找,更容易理解。引用的博文路径如下:
ROS入门——PCL激光雷达点云处理(1)_pcl::torosmsg-CSDN博客
以下功能的实现是我在ubuntu20.04的环境下,搭建好了ros环境后进行的。ros环境的搭建可以参考以下博文:
3.ubuntu20.04环境的ros搭建-CSDN博客? ? 或者
4.livox hap(大疆激光雷达)环境搭建_livox hap激光雷达-CSDN博客
下面进行pcl的实现
1、在home下新建文件夹
mkdir -p ~/catkin_ws/src
2、进入src文件夹并初始化
cd ~/catkin_ws/src
catkin_init_workspace
执行完该命令后,src目录下会多出一个 CMakeLists.txt 文件,这个文件一般不需要我们修改。
3、 返回到catkin_ws下,进行编译(注意:每次编译必须在这个ws工作空间下才能编译成功!)
cd ~/catkin_ws/
catkin_make
执行完该命令后,发现工作空间catkin_ws中有三个目录: build? devel? src。可以从5、看到它们的作用。
4、source一下将工作空间加入环境变量
source devel/setup.bash注意: 这一步只重新加载了setup.bash文件。如果关闭并打开一个新的命令行窗口,也需要再输入该命令将得到同样的效果。
所以建议采用一劳永逸的方法:.
5、.bashrc文件在用户的home文件夹(/home/USERNAME/.bashrc)下。每次用户打开终端,这个文件会加载命令行窗口或终端的配置。所以可以添加命令或进行配置以方便用户使用。在bashrc文件添加source命令:
?
echo "source ~/catkin_ws/devel/setup.bash">> ~/.bashrc或者也可以打开.bashrc文件采用手动修改的方式添加source ~/catkin_ws/devel/setup.bash:
gedit ~/.bashrc添加完毕,你的bashrc文件应该有两句source:

添加完后,在 .bashrc的同目录下运行
~/.bashrc?5、理解工作空间
工作空间结构:

源空间(src文件夹),放置了功能包、项目、复制的包等。在这个空间中,,最重要的一个文件是CMakeLists.txt。当在工作空间中配置包时,src文件夹中有CMakeLists.txt因为cmake调用它。这个文件是通过catkin_init_workspace命令创建的。
编译空间(build space):在build文件夹里,cmake和catkin为功能包和项目保存缓存信息、配置和其他中间文件。
开发空间(Development(devel)space):devel文件夹用来保存编译后的程序,这些是无须安装就能用来测试的程序。一旦项目通过测试,就可以安装或导出功能包从而与其他开发人员分享。
?
一、创建节点发布点云数据并可视化
1、在ros工作空间的src目录下新建包(包含依赖项)
catkin_create_pkg chapter10_tutorials pcl_conversions pcl_ros pcl_msgs sensor_msgs2、在软件包中新建src目录
rospack profile
roscd chapter10_tutorials
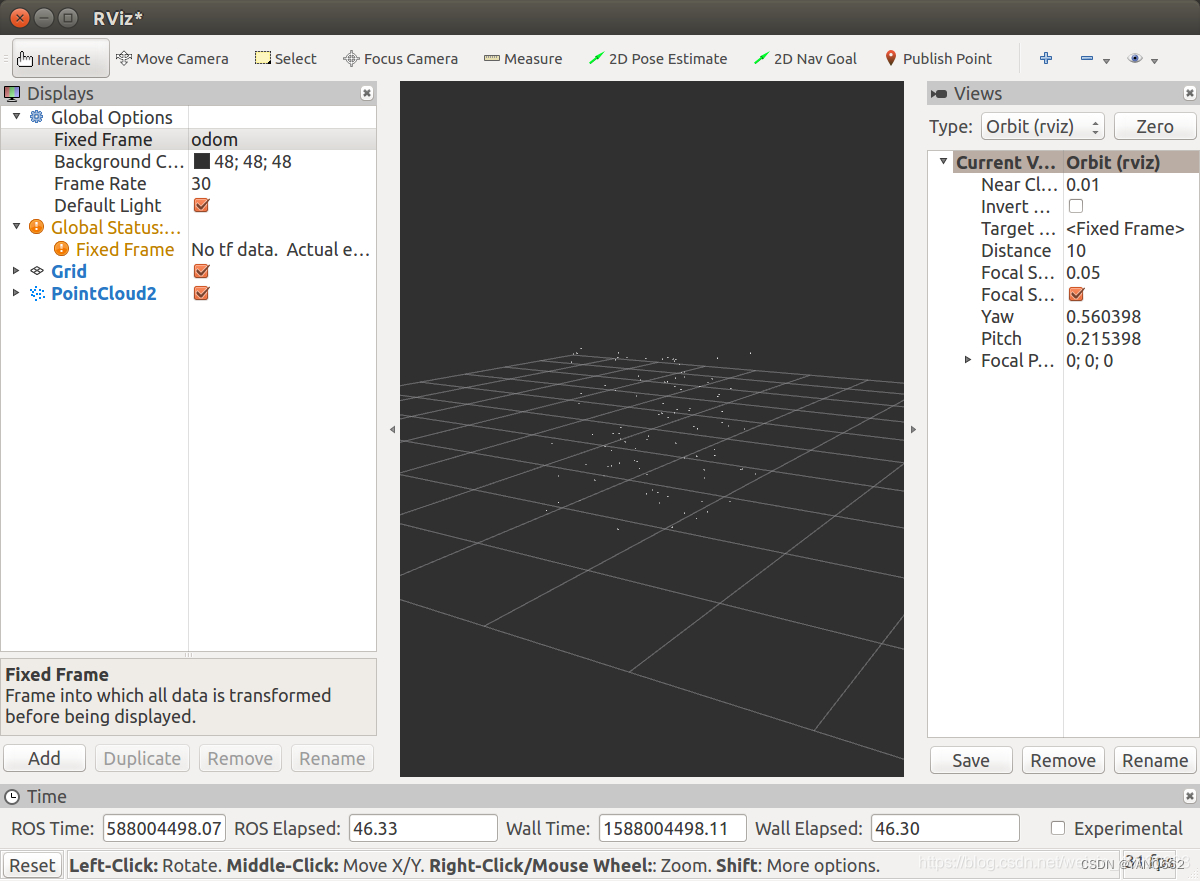
mkdir src3、在src目录下新建pcl_create.cpp,该程序创建了100个随机坐标的点云并以1Hz的频率,topic为“pcl_output"发布。frame设为odom。
#include <ros/ros.h>
#include <pcl/point_cloud.h>
#include <pcl_conversions/pcl_conversions.h>
#include <sensor_msgs/PointCloud2.h>

main (int argc, char **argv)
{
    ros::init (argc, argv, "pcl_create");

    ros::NodeHandle nh;
    ros::Publisher pcl_pub = nh.advertise<sensor_msgs::PointCloud2> ("pcl_output", 1);
    pcl::PointCloud<pcl::PointXYZ> cloud;
    sensor_msgs::PointCloud2 output;

    // Fill in the cloud data
    cloud.width  = 100;
    cloud.height = 1;
    cloud.points.resize(cloud.width * cloud.height);

    for (size_t i = 0; i < cloud.points.size (); ++i)
    {
        cloud.points[i].x = 1024 * rand () / (RAND_MAX + 1.0f);
        cloud.points[i].y = 1024 * rand () / (RAND_MAX + 1.0f);
        cloud.points[i].z = 1024 * rand () / (RAND_MAX + 1.0f);
    }

    //Convert the cloud to ROS message
    pcl::toROSMsg(cloud, output);
    output.header.frame_id = "odom";

    ros::Rate loop_rate(1);
    while (ros::ok())
    {
        pcl_pub.publish(output);
        ros::spinOnce();
        loop_rate.sleep();
    }

    return 0;
}
4、修改cmakelist.txt内容
cmake_minimum_required(VERSION 2.8.3)
project(chapter10_tutorials)
find_package(catkin REQUIRED COMPONENTS
  pcl_conversions
  pcl_ros
  roscpp
  sensor_msgs
  rospy
)

find_package(PCL REQUIRED)
catkin_package()

include_directories(
  ${catkin_INCLUDE_DIRS}
  ${PCL_INCLUDE_DIRS}
)

link_directories(${PCL_LIBRARY_DIRS})


add_executable(pcl_create src/pcl_create.cpp)
target_link_libraries(pcl_create ${catkin_LIBRARIES} ${PCL_LIBRARIES})
5、进入工作空间编译包
cd ~/catkin_ws
catkin_make --pkg chapter10_tutorials
6、若编译成功,新窗口打开ros,新窗口运行pcl_create节点
roscore
rosrun chapter10_tutorials pcl_create
7、新窗口打开rviz,add topic"pcl_output",Global options 设置Frame为odom
rviz
本文来自互联网用户投稿,该文观点仅代表作者本人,不代表本站立场。本站仅提供信息存储空间服务,不拥有所有权,不承担相关法律责任。 如若内容造成侵权/违法违规/事实不符,请联系我的编程经验分享网邮箱:chenni525@qq.com进行投诉反馈,一经查实,立即删除!
- Python教程
- 深入理解 MySQL 中的 HAVING 关键字和聚合函数
- Qt之QChar编码(1)
- MyBatis入门基础篇
- 用Python脚本实现FFmpeg批量转换
- uniapp的H5如何实现全局组件加载,类似uni.showToast?
- CC工具箱使用指南:【三调_土地利用现状分类面积汇总表】
- SpringMVC概述、SpringMVC 的入门
- Windows 10 Manager v3.9.0.0
- 2024年【道路运输企业主要负责人】找解析及道路运输企业主要负责人模拟考试题库
- 华为机试真题实战应用【赛题代码篇】-路灯照明问题(附Java、C++和python代码)
- 抽象工厂模式?就是分门别类
- Kubernets(K8S)启动和运行 01-01 Kubernetes简介
- PHP的Laravel的数据库迁移
- 学习C语言为嵌入式打基础