SpringBoot集成Camunda
发布时间:2024年01月08日
一:pom.xml
因camunda集成SpringBoot对SpringBoot的版本和JDK的版本都有一定的要求,所以这里贴个完整的依赖。可以去官网找每个SpringBoot的版本对应的camunda版本。
<?xml version="1.0" encoding="UTF-8"?>
<project xmlns="http://maven.apache.org/POM/4.0.0" xmlns:xsi="http://www.w3.org/2001/XMLSchema-instance"
         xsi:schemaLocation="http://maven.apache.org/POM/4.0.0 https://maven.apache.org/xsd/maven-4.0.0.xsd">
    <modelVersion>4.0.0</modelVersion>
    <parent>
        <groupId>org.springframework.boot</groupId>
        <artifactId>spring-boot-starter-parent</artifactId>
        <version>2.6.4</version>
        <relativePath/> <!-- lookup parent from repository -->
    </parent>
    <groupId>com.example</groupId>
    <artifactId>springboot-camunda</artifactId>
    <version>0.0.1-SNAPSHOT</version>
    <name>springboot-camunda</name>
    <description>springboot-camunda</description>

    <properties>
        <camunda.spring-boot.version>7.17.0</camunda.spring-boot.version>
        <maven.compiler.source>1.8</maven.compiler.source>
        <maven.compiler.target>1.8</maven.compiler.target>
    </properties>

    <dependencies>
        <dependency>
            <groupId>org.springframework.boot</groupId>
            <artifactId>spring-boot-starter</artifactId>
        </dependency>

        <dependency>
            <groupId>org.camunda.bpm.springboot</groupId>
            <artifactId>camunda-bpm-spring-boot-starter</artifactId>
            <version>${camunda.spring-boot.version}</version>
        </dependency>
        <dependency>
            <groupId>org.camunda.bpm.springboot</groupId>
            <artifactId>camunda-bpm-spring-boot-starter-webapp</artifactId>
            <version>${camunda.spring-boot.version}</version>
        </dependency>
        <dependency>
            <groupId>org.camunda.bpm.springboot</groupId>
            <artifactId>camunda-bpm-spring-boot-starter-rest</artifactId>
            <version>${camunda.spring-boot.version}</version>
        </dependency>
        <dependency>
            <groupId>org.camunda.bpm.springboot</groupId>
            <artifactId>camunda-bpm-spring-boot-starter-external-task-client</artifactId>
            <version>${camunda.spring-boot.version}</version>
        </dependency>


        <dependency>
            <groupId>org.mybatis.spring.boot</groupId>
            <artifactId>mybatis-spring-boot-starter</artifactId>
            <version>2.2.0</version>
        </dependency>
        <dependency>
            <groupId>mysql</groupId>
            <artifactId>mysql-connector-java</artifactId>
            <version>8.0.32</version>
        </dependency>
        <dependency>
            <groupId>org.springframework.boot</groupId>
            <artifactId>spring-boot-starter-test</artifactId>
            <scope>test</scope>
        </dependency>
    </dependencies>


    <build>
        <plugins>
            <plugin>
                <groupId>org.springframework.boot</groupId>
                <artifactId>spring-boot-maven-plugin</artifactId>
            </plugin>
        </plugins>
    </build>

</project>
二:application.yml
server:
  port: 8080

spring:
  datasource:
    url: jdbc:mysql://localhost:3306/camunda?useUnicode=true&characterEncoding=utf8&serverTimezone=GMT&&nullCatalogMeansCurrent=true
    username: root
    password: root123
    driver-class-name: com.mysql.cj.jdbc.Driver

camunda.bpm:
  admin-user:
    id: admin
    password: 123456
  filter:
    create: All tasks
camunda:
  bpm:
    database:
      type: mysql
      schema-update: true
    auto-deployment-enabled: false
    history-level: full

logging:
  level:
    org.camunda.bpm.engine.impl.persistence.entity: trace
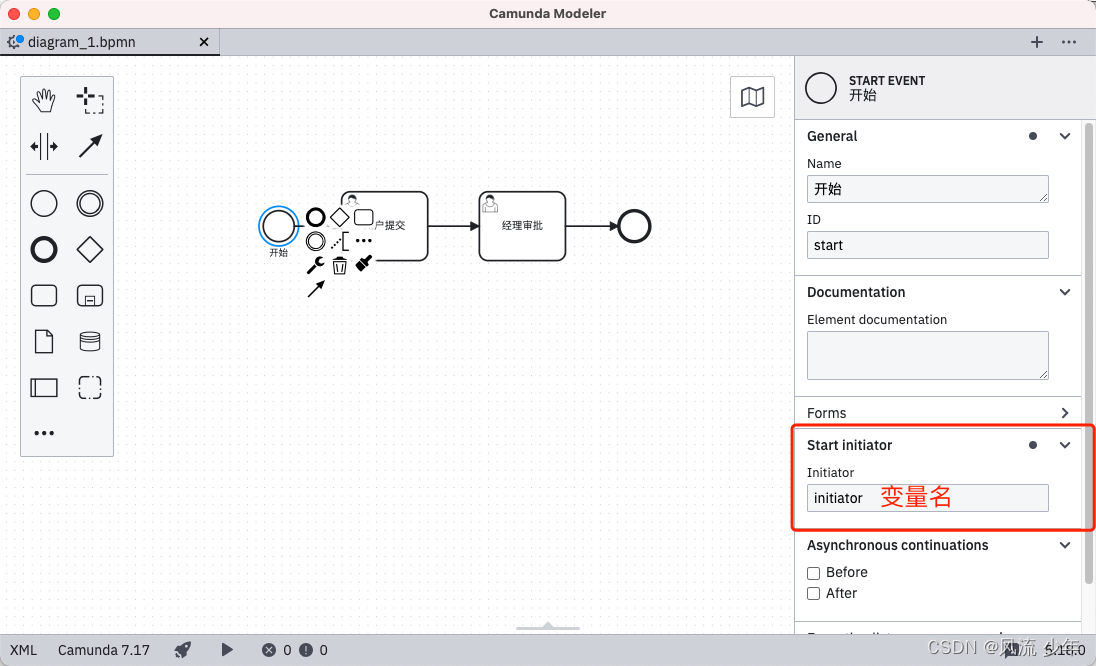
三:bpmn
将bpmn文件放到src/main/resources/bpmn目录下。

四:部署启动
启动项目时会自动生成表结构,数据库先创建好。
Deployment deploy = repositoryService.createDeployment()
                .name("请假流程")
                .addClasspathResource("bpmn/diagram_1.bpmn")
                .deploy();
// 赋值给StartEvent中的Initiator变量中的值。
identityService.setAuthenticatedUserId("huihui");
ProcessInstance processInstance = runtimeService.startProcessInstanceByKey("HelloWordProcess");

Task task = taskService.createTaskQuery().processInstanceId(processInstance.getId())
        .singleResult();
taskService.complete(task.getId());
可以看到表结构比activiti6多了很多。


文章来源:https://blog.csdn.net/vbirdbest/article/details/135466447
本文来自互联网用户投稿,该文观点仅代表作者本人,不代表本站立场。本站仅提供信息存储空间服务,不拥有所有权,不承担相关法律责任。 如若内容造成侵权/违法违规/事实不符,请联系我的编程经验分享网邮箱:chenni525@qq.com进行投诉反馈,一经查实,立即删除!
本文来自互联网用户投稿,该文观点仅代表作者本人,不代表本站立场。本站仅提供信息存储空间服务,不拥有所有权,不承担相关法律责任。 如若内容造成侵权/违法违规/事实不符,请联系我的编程经验分享网邮箱:chenni525@qq.com进行投诉反馈,一经查实,立即删除!
最新文章
- Python教程
- 深入理解 MySQL 中的 HAVING 关键字和聚合函数
- Qt之QChar编码(1)
- MyBatis入门基础篇
- 用Python脚本实现FFmpeg批量转换
- stm32---输入捕获实验实操(巨详细)
- 访问服务器上的 Jupyter Notebook
- mysql 26day 数据库双主双从 搭建mycat 数据库负载均衡 读写分离
- 一次性查询多家不同快递公司技巧:快速掌握物流信息的关键
- 十七、如何将MapReduce程序提交到YARN运行
- 程序猿的面试技巧
- 利用CHAT写个easywechat4 支付回调代码
- mac 系统中vscode 返回上一次文件编辑位置快捷键
- ARP相关记录
- 聚道云软件连接器助力某新能源行业公司实现付款流程自动化