C++提高编程---模板---类模板
目录
一、类模板
1.模板
模板是C++支持参数化多态的工具,使用模板可以使用户为类或者函数声明一种一般模式,使得类中的某些数据成员或者成员函数的参数、返回值取得任意类型。
模板是一种对类型进行参数化的工具;
通常有两种形式:函数模板和类模板;
函数模板针对仅参数类型不同的函数;
类模板针对仅数据成员和成员函数类型不同的类。
使用模板的目的就是能够让程序员编写与类型无关的代码。比如编写了一个交换两个整型int 类型的swap函数,这个函数就只能实现int 型,对double,字符这些类型无法实现,要实现这些类型的交换就要重新编写另一个swap函数。使用模板的目的就是要让这程序的实现与类型无关,比如一个swap模板函数,即可以实现int 型,又可以实现double型的交换。模板可以应用于函数和类。
注意:模板的声明或定义只能在全局,命名空间或类范围内进行。即不能在局部范围,函数内进行,比如不能在main函数中声明或定义一个模板。
2.类模板的作用
建立一个通用类,类中的成员? 数据类型可以不具体制定,用一个虚拟的类型来代表
3.语法
template <typename? T>
类
4.声明
template? -- 声明创建模板
typename? --? 表明其后的符号是一种数据类型,可以用clss代替
T????? --? 通用的数据类型,名称可以替换,通常为大写字母
示例
#include<iostream>
using namespace std;
// 类模板
template<class name_type,class age_type>
class person
{
public:
person(name_type name,age_type age)
{
this->name=name;
this->age=age;
}
void show()
{
cout<<"姓名:"<<this->name<<"\t年龄:"<<this->age<<endl;
}
?
name_type name;
age_type age;
};
void test01()
{
// 类型参数化
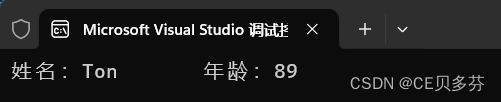
person<string,int> p1("Ton",89);
p1.show();
}
int main()
{
test01();
return 0;
}运行结果:
总结:类模板和函教模板语法相似。在声明模板template后面加类,此类称为类模板
二、类模板和函数模板的区别
区别:
- 类模板没有自动类型推导的使用方式
- 类模板在模板参数列表中可以有默认参数
示例:
#include<iostream>

using namespace std;

// 类模板

template<class name_type,class age_type? = int> // 可以指定某一个通用类型具体的类型

class person

{

public:

    person(name_type name,age_type age)

    {

        this->name=name;

        this->age=age;

    }

    void show()

    {

        cout<<"姓名:"<<this->name<<"\t年龄:"<<this->age<<endl;

    }

?

    name_type name;

    age_type age;

};

void test01()

{

    // 自动类型推导不行

    // person p1("TON",23);

    // 只能用指定类型

    person<string,int> p1("Ton",89);

    p1.show();

}

void test02()

{

    // 类模板在模板参数列表中可以有默认值

    person<string> p2("Jack",90);

    p2.show();

}

int main()

{

    test01();

    test02();

    return 0;

}
运行结果:

三、类模板中成员函数的创建时机
类模板中成员函数和普通类中成员函数创建时机的区别:
- 普通类中的成员函数一开始就可以创建
- 类模板中的成员函数是在调用的时候才创建的
示例:
#include<iostream>

using namespace std;

class person1

{

public:

    void showperson1()

    {

        cout<<"person1的调用"<<endl;

    }

};

class person2

{

public:

    void showperson2()

    {

        cout<<"person2的调用"<<endl;

    }

};

template<class T>

class my_class

{

public:

    T obj;

?

    // 类模板中的成员函数

    // ??在运行前都不会创建这两个成员函数

    void func1()

    {

        obj.showperson1();

    }

?

    void func2()

    {

        obj.showperson2();

    }

};

?

void test01()

{

    my_class<person1> m;

    m.func1();

    //m.func2();? 运行出错,说明函数调用才会去创建成员函数

    my_class<person2> m1;

    m1.func2();

}

int main()

{

    test01();

    return 0;

}
运行结果:

四、类模板对象做函数参数
类模板实例化出的对象,向函数传参的方式
三种传入方式:
- 指定传入的类型 --- 直接显示对象的数据类型(**常用)**
- 参数模板化???????? --- 将对象中的参数变为模板进行传递
- 整个类模板化???? --- 将这个对象类型?? 模板化进行传递
示例:
#include<iostream>
#include<typeinfo>
using namespace std;
/*
三种传入方式:
?
1. 指定传入的类型 --- 直接显示对象的数据类型
2. 参数模板化???????? --- 将对象中的参数变为模板进行传递
3. 整个类模板化???? --- 将这个对象类型?? 模板化进行传递
*/
template<class T1,class T2>
class person
{
public:
person(T1 name, T2 age)
{
this->name = name;
this->age = age;
}
void show()
{
cout<<"姓名:"<<this->name<<"\t年龄:"<<this->age<<endl;
}
T1 name;
T2 age;
};
?
// 1.指定传入类型
void print1(person<string ,int> &p)
{
p.show();
}
void test01()
{
// 1. 指定传入的类型 --- 直接显示对象的数据类型
person<string ,int> p ("TOM",99);
print1(p);
}
?
// 2.参数模板化
template<class T1,class T2>
void print2( person<T1,T2> &p1)
{
p1.show();
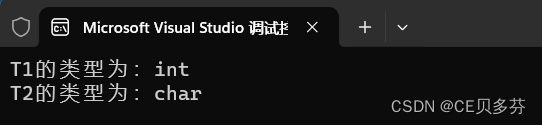
cout<<"看编译器推断的模板是什么类型"<<endl;
cout<<"T1的类型为:"<<typeid(T1).name()<<endl;
cout<<"T2的类型为:"<<typeid(T2).name()<<endl;
}
void test02()
{
// 2. 参数模板化???????? --- 将对象中的参数变为模板进行传递
person <string ,int> p1 ("JACK",78);
print2(p1);
}
?
// 3.将整个类模板化
template<class T>
void print3(T &p2)
{
p2.show();
cout<<"T的数据类型"<<endl;
cout<<"T的类型为:"<<typeid(T).name()<<endl;
}
void test03()
{
person<string,int> p2("LILY",45);
print3(p2);
}
int main()
{
test01();
test02();
test03();
return 0;
}运行结果:

总结:
- 通过类模板创建的对象。可以有三种方式向函数中进行传参
- 使用比较广泛是第一种:指定传入的类型
五、类模板与继承
注意:
- 当子类继承父类是一个类模板时,子类在声明的时候,要指定出父类T的类型
- 如果不能确定,编译器无法给予子类分配内存
- 如果想灵活指定父类中T的类型,子类也需要变为类模板
示例1:
#include<iostream>

#include<typeinfo>

using namespace std;

// 类模板与继承

template<class T>

class Base

{

    T m;

};

// class Son:public Base? // 必须要知道父类中T的类型,才能继承给子类

class Son:public Base<int>

{

?

};

int main()

{

    Son s1;

    return 0;

}
生成成功:

示例2:
#include<iostream>

#include<typeinfo>

using namespace std;

template<class T>

class Base

{

    T m;

};

// 如果想要灵活指定父类中T的类型,子类需要变类模板

template<class T1,class T2>

class Son2:public Base<T2>

{

public:

??? Son2()

??? {

          cout<<"T1的类型为:"<<typeid(T1).name()<<endl;
??????? ? cout<<"T2的类型为:"<<typeid(T2).name()<<endl;

??? }

    T1 ojb;

};

void test02()

{

??? Son2<int ,char>s2;// char 传给父类,int 传给子类

}

int main()

{

    test02();

    return 0;

}
运行结果:
六、类模板成员函数类外实现
示例:
#include<iostream>

using namespace std;

?

// 类模板成员函数类外实现

template<class T1,class T2>

class person

{

public:

    person(T1 name,T2 age);

    /*{

        this->name=name;

        this->age=age;

    }*/

    void show();

    /*{

        cout<<"姓名:"<<this->name<<"\t年龄:"<<this->age<<endl;

    }*/

??? T1 name;

??? T2 age;

};

// 构造函数的类外实现

template<class T1,class T2>

person<T1,T2>::person(T1 name,T2 age)

{

    this->name=name;

    this->age=age;

}

?

// 成员函数的类外实现

template<class T1,class T2>

void person<T1,T2>::show()

{

    cout<<"姓名:"<<this->name<<"\t年龄:"<<this->age<<endl;

}

void test01()

{

    person<string,int>p("TOM",28);

    p.show();

}

int main()

{

    test01();

    return 0;

}
运行结果:

七、类模板分文件编写
问题:
类模板中成员函数创建的时机是在调用阶段,导致分文件编写时连接不到
解决
- 直接包含 .cpp 源文件
- 将声明和实现写到同一个文件中,并更改后缀名为 .hpp , hpp 是约定的名称,并不是强制
示例:
person.hpp文件
#include<iostream>

using namespace std;


// 类模板成员函数类外实现

template<class T1, class T2>

class person

{

public:

    person(T1 name, T2 age);

    T1 name;

    T2 age;

};

// 构造函数的类外实现

template<class T1, class T2>

person<T1, T2>::person(T1 name, T2 age)

{

    this->name = name;

    this->age = age;

}


// 成员函数的类外实现

template<class T1, class T2>

void person<T1, T2>::show()

{

    cout << "姓名:" << this->name << "\t年龄:" << this->age << endl;

}
.cpp文件
#include<iostream>

#include"person.hpp"

using namespace std;

void test01()

{

    person<string, int>p("TOM", 28);

    p.show();

}

int main()

{

    test01();

    return 0;

}
八、类模板与友元
类模板配合友元函数的类内实现和类外实现
- 全局函数类内实现 -- 直接在类内声明友元即可
- 全局函数类外实现 -- 需要提前让编译器知道全局函数的存在
示例:
#include<iostream>

using namespace std;

?

template<class T1,class T2>

class person;

?

// 类外实现

template<class T1,class T2>

void print2(person<T1,T2> p)

{

    cout<<"类外实现---姓名:"<<p.name<<"\t年龄:"<<p.age<<endl;

}

?

// 类模板与友元

template<class T1,class T2>

class person

{

?

    // 通过全局函数打印输出

    // 全局函数类内实现

    friend void print1(person<T1,T2> p)

    {

        cout<<"姓名:"<<p.name<<"\t年龄:"<<p.age<<endl;

    }

    // 全局函数类外实现

    // 需要加空模板的参数列表

    // 如果全局函数是类外实现,需要让编译器提前知道这个函数的存在

    friend void print2<>(person<T1,T2> p);

    public:

    person(T1 name,T2 age)

    {

        this->name=name;

        this->age=age;

    }

?

private:

??? T1 name;

??? T2 age;

};

?

?

void test01()

{

    person<string,int>p("TOM",28);

    print1(p);

    print2(p);

}

int main()

{

    test01();

    return 0;

}
运行结果:

九、类模板案例
目的:
- 可以对内置数据类型以及自定义数据类型的数据进行存储
- 将数组中的数据存储到堆区
- 构造函数中可以传入数组的容量
- 提供对应的拷贝构造函数以及operator=防止浅拷贝问题
- 提供尾插法和尾删除法对数组中的数据进行增加和删除
- 可以通过下标的方式访问数组中的元素
- 可以获取数组中当前元素的个数和数组的容量
my_array.hpp
#pragma once

#include<iostream>

using namespace std;

// 自己的通用的数组类

?

template<class T>

class my_array

{

public:

    // 有参构造, 传入容量

    my_array(int copacity)

    {

        cout << "my_array的有参构造" << endl;

        this->m_Capacity = copacity;

        this->m_Size = 0;

        this->p_Address = new T[this->m_Capacity];

    }

?

    //拷贝构造

    my_array(const my_array& arr)

    {

        this->m_Capacity = arr.m_Capacity;

        this->m_Size = arr.m_Size;

        // 浅拷贝 this->p_Address = arr. p_Address;

        // 深拷贝

        this->p_Address = new T[arr.m_Capacity];

?

        //? 将arr中的数据拷贝进来

        for (int i = 0; i < this->m_Size; i++)

        {

            this->p_Address[i] = arr.p_Address[i];

        }

    }

?

    // operator = 防止浅拷贝的问题

    my_array& operator=(const my_array& arr)

    {

        // 先判断原来堆区是否有数据,先释放堆区数据

        if (this->p_Address != NULL)

        {

            delete[]this->p_Address;

            this->p_Address = NULL;

            this->m_Capacity = 0;

            this->m_Size = 0;

        }

        this->m_Capacity = arr.m_Capacity;

        this->m_Size = arr.m_Size;

        this->p_Address = new T[arr.m_Capacity];

        for (int i = 0; i < this->m_Size; i++)

        {

            this->p_Address[i] = arr.p_Address[i];

        }

        return *this;

    }

?

    // 尾插法

    void Push_Back(const T& Val )

    {

        // 判断容量是否最大了

        if (this->m_Capacity == this->m_Size)

        {

            return;

        }

        this->p_Address[this->m_Size] = Val;? // 在数组的末尾插入数据

        this->m_Size++;? // 更新数组的大小

    }

?

    // 尾删法

    void Pop_Back()

    {

        // 让用户访问不到最后一个元素,就是删除

        if (this->m_Size == 0)

        {

            return;

        }

        this->m_Size--;

    }

?

    // 可以通过下标的方式访问数组

    T& operator[](int index)

    {

        return this->p_Address[index];

    }

?

    // 返回数组的容量

    int get_Caoacity()

    {

        return this->m_Capacity;

    }

?

    // 返回数组大小

    int get_Size()

    {

        return this->m_Size;

    }

?

    // 析构函数

    ~my_array()

    {

        if (this->p_Address != NULL)

        {

            delete[] this->p_Address;

            this->p_Address = NULL;

        }

    }

private:

    T* p_Address;?? // 指针指向堆区开辟的真实数据

?

    int m_Capacity;?? // 数组容量

?

    int m_Size;? // 数组大小

};
模板array.cpp
#include"my_array.hpp"
#include<iostream>
using namespace std;
void print_arr(my_array<int>& arr)
{
for (int i = 0; i < arr.get_Size(); i++)
{
cout << arr[i] << endl;
}
}
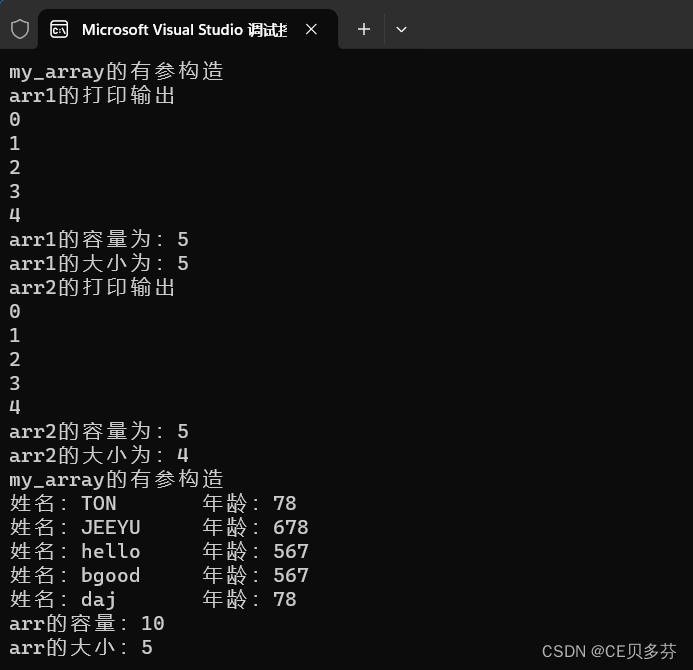
void test01()
{
my_array<int> arr1(5);
for (int i = 0; i < 5; i++)
{
// 利用尾插法向数组中插入数据
arr1.Push_Back(i);
}
cout << "arr1的打印输出" << endl;
print_arr(arr1);
cout << "arr1的容量为:" <<arr1.get_Caoacity()<< endl;
cout << "arr1的大小为:" << arr1.get_Size() << endl;
?
cout << "arr2的打印输出" << endl;
my_array<int> arr2(arr1);
print_arr(arr2);
// 尾删
arr2.Pop_Back();
cout << "arr2的容量为:" << arr2.get_Caoacity() << endl;
cout << "arr2的大小为:" << arr2.get_Size() << endl;
}
?
// 测试自定义的数据类型
class person
{
public:
person() {};
person(string name,int age)
{
this->name = name;
this->age = age;
}
string name;
int age;
};
?
void print_person_arr(my_array<person>& arr)
{
for (int i = 0; i < arr.get_Size(); i++)
{
cout << "姓名:" << arr[i].name << "\t年龄:" << arr[i].age << endl;
}
}
?
void test02()
{
my_array<person> arr(10);
person p1("TON", 78);
person p2("JEEYU", 678);
person p3("hello", 567);
person p4("bgood", 567);
person p5("daj", 78);
?
// 将数据插入到数组中
arr.Push_Back(p1);
arr.Push_Back(p2);
arr.Push_Back(p3);
arr.Push_Back(p4);
arr.Push_Back(p5);
// 打印数组
print_person_arr(arr);
// 输出容量
cout << "arr的容量:" << arr.get_Caoacity() << endl;
// 输出大小
cout << "arr的大小:" << arr.get_Size() << endl;
}
int main()
{
test01();
test02();
return 0;
}运行结果:
本文来自互联网用户投稿,该文观点仅代表作者本人,不代表本站立场。本站仅提供信息存储空间服务,不拥有所有权,不承担相关法律责任。 如若内容造成侵权/违法违规/事实不符,请联系我的编程经验分享网邮箱:chenni525@qq.com进行投诉反馈,一经查实,立即删除!
- Python教程
- 深入理解 MySQL 中的 HAVING 关键字和聚合函数
- Qt之QChar编码(1)
- MyBatis入门基础篇
- 用Python脚本实现FFmpeg批量转换
- gulimall-001项目介绍
- (Matlab)基于小波神经网络的时间序列预测-短时交通流量预测
- Factory Method工厂模式(对象创建)
- SpringBoot定时监听RocketMQ的NameServer
- linux同步文件到百度云盘
- 去水印软件哪个好用?用他们就够了
- 2023年后,AI 还有什么研究方向有前景?
- 基于FPGA的74HC595数码管驱动
- 群多多社群人脉H5-2.1.4多开插件+小程序独立前端+搭建教程
- 【星海草稿】DPDK 后期会继续更新