Dobbo --- HelloWorld项目搭建
发布时间:2024年01月18日
Dobbo-HelloWorld
1. demo – spring方式集成
提供一个可被调用的接口
提供方:实现接口的方法逻辑,启动应用程序,接收消费方的调用
消费方:确认要调用的接口,找到注册中心,调用提供方,获取接口的返回结果
示例文档参考:https://github.com/apache/dubbo
1.1 实现步骤

- 启动zookeeper

- 引入相关依赖
    <properties>
        <dubbo.version>3.2.5</dubbo.version>
    </properties>
	<dependencies>
        <dependency>
            <groupId>org.apache.dubbo</groupId>
            <artifactId>dubbo</artifactId>
            <version>${dubbo.version}</version>
        </dependency>
        <dependency>
            <groupId>org.apache.dubbo</groupId>
            <artifactId>dubbo-dependencies-zookeeper</artifactId>
            <version>${dubbo.version}</version>
            <type>pom</type>
        </dependency>
    </dependencies>
- 声明接口及其实现类
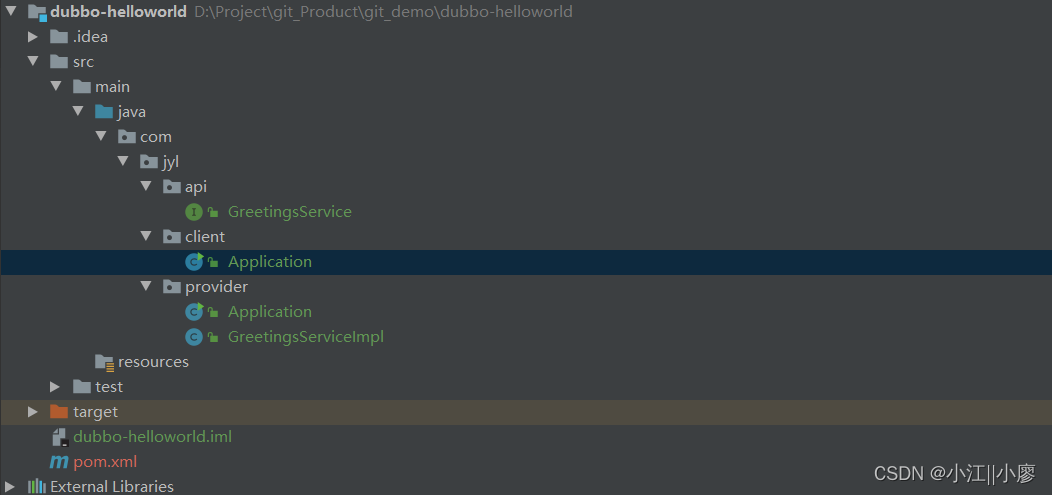
声明GreetingsService 接口
public interface GreetingsService {
    String sayHi(String name);
}
GreetingsService 具体实现类
import com.jyl.api.GreetingsService;

public class GreetingsServiceImpl implements GreetingsService {

    public String sayHi(String name) {
        return "hi, " + name;
    }
}
- 创建提供方和消费方的应用程序
服务端Application
import com.jyl.api.GreetingsService;
import org.apache.dubbo.config.ApplicationConfig;
import org.apache.dubbo.config.RegistryConfig;
import org.apache.dubbo.config.ServiceConfig;

import java.util.concurrent.CountDownLatch;

public class Application {
    // 先获取zookeeper部署的ip地址
    private static String zookeeperHost = System.getProperty("zookeeper.address", "127.0.0.1");

    public static void main(String[] args) throws Exception {
        // 创建服务配置 服务对应的接口类GreetingsService 设置泛型
        ServiceConfig<GreetingsService> service = new ServiceConfig<GreetingsService>();
        // 设置应用程序的名称
        service.setApplication(new ApplicationConfig("first-dubbo-provider"));
        // 设置注册中心 指定zookeeper的连接地址
        service.setRegistry(new RegistryConfig("zookeeper://" + zookeeperHost + ":2181"));
        // 设置提供的接口
        service.setInterface(GreetingsService.class);
        // 设置提供具体的实现类
        service.setRef(new GreetingsServiceImpl());
        // 设置完成 执行导出命令
        service.export();

        System.out.println("dubbo service started");
        // 保证线程一直挂起
        new CountDownLatch(1).await();
    }
}
客户端Application
import com.jyl.api.GreetingsService;
import org.apache.dubbo.config.ApplicationConfig;
import org.apache.dubbo.config.ReferenceConfig;
import org.apache.dubbo.config.RegistryConfig;


public class Application {
    // 先获取zookeeper部署的ip地址
    private static String zookeeperHost = System.getProperty("zookeeper.address", "127.0.0.1");


    public static void main(String[] args) {
        // 创建客户配置 服务对应的接口类GreetingsService 设置泛型
        ReferenceConfig<GreetingsService> reference = new ReferenceConfig<GreetingsService>();
        // 设置应用程序的名称
        reference.setApplication(new ApplicationConfig("first-dubbo-consumer"));
        // 设置注册中心 指定zookeeper的连接地址
        reference.setRegistry(new RegistryConfig("zookeeper://" + zookeeperHost + ":2181"));
        // 设置提供的接口
        reference.setInterface(GreetingsService.class);
        // 获取到远程的 接口调用
        GreetingsService service = reference.get();
        String message = service.sayHi("dubbo");
        System.out.println(message);
    }
}
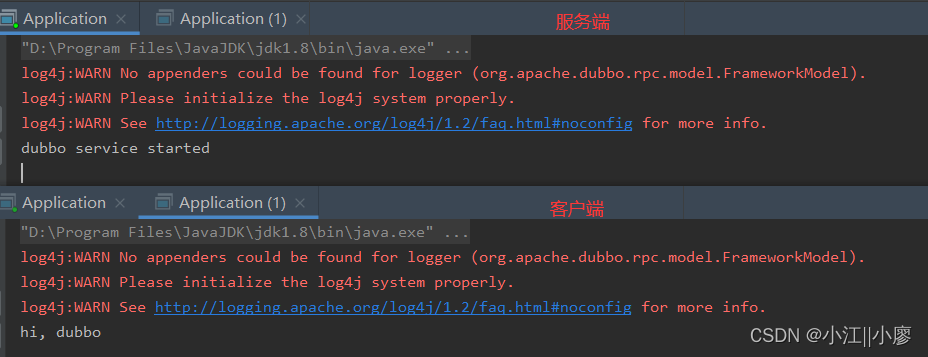
- 启动服务端Application 和 客户端 Application

2. demo – springboot方式集成
示例文档参考地址:https://github.com/apache/dubbo-spring-boot-project/tree/master/dubbo-spring-boot-samples
2.1 实现provider

- 启动zookeeper
- 创建dubbo-demo-provider SpringBoot项目
- 引入依赖(dubbo-springboot、 dubbo-zookeeper、要使用的api的依赖)
   <properties>
        <dubbo.version>2.7.7</dubbo.version>
    </properties>
    <dependencies>
        <dependency>
            <groupId>org.springframework.boot</groupId>
            <artifactId>spring-boot-starter</artifactId>
        </dependency>


        <dependency>
            <groupId>org.apache.dubbo</groupId>
            <artifactId>dubbo-spring-boot-starter</artifactId>
            <version>${dubbo.version}</version>
        </dependency>

        <dependency>
            <groupId>com.jyl</groupId>
            <artifactId>dubbo-demo-api</artifactId>
            <version>1.0-SNAPSHOT</version>
        </dependency>

        <dependency>
            <groupId>org.apache.dubbo</groupId>
            <artifactId>dubbo-dependencies-zookeeper</artifactId>
            <version>${dubbo.version}</version>
            <type>pom</type>
            <exclusions>
                <exclusion>
                    <groupId>org.slf4j</groupId>
                    <artifactId>slf4j-log4j12</artifactId>
                </exclusion>
            </exclusions>
        </dependency>
    </dependencies>
- 实现provider, 实现接口逻辑,增加配置参数
// 说明这个类是作为dubbo的服务被调用的
@DubboService(version = "1.0.0")
public class DemoServiceImpl implements DemoService {

    @Override
    public String sayHello(String name) {
        return "Hello," + name;
    }
}
- application.properties配置文件
server.port=8090
# 配置dubbo涉及的相关参数

spring.application.name=dubbo-demo-provider

# 配置dubbo服务的扫描路径
dubbo.scan.base-packages=com.jyl.provider.service

# 协议名称
dubbo.protocol.name=dubbo
dubbo.protocol.port=23456

# dubbo注册中心地址
dubbo.registry.address=zookeeper://127.0.0.1:2181
2.2 实现consumer

-
创建dubbo-demo-consumer SpringBoot项目
-
引入依赖 和 dubbo-demo-provider项目依赖一致
-
实现consumer,注意配置类和主程序入口
@SpringBootApplication
public class DubboDemoConsumerApplication {

    //对于调用端
    @DubboReference(version = "1.0.0")
    DemoService demoService;

    public static void main(String[] args) {
        SpringApplication.run(DubboDemoConsumerApplication.class,args);
    }

    @Bean
    public ApplicationRunner runner(){

        return args -> System.out.println(demoService.sayHello("dubbo-spring-boot xxx"));
    }
}
- application.properties
# 设置端口 避免端口号占用
server.port=8899

spring.application.name=dubbo-demo-consumer

# dubbo注册中心地址
dubbo.registry.address=zookeeper://127.0.0.1:2181
2.3 项目测试
先启动demo-provider ,后启动 demo-consumer

寄语【自勉】:想要成功,必须甩掉所有懒惰的借口,起不来、跑不动、戒不掉……成功的路上只需要我可以,一定行!拼搏的滋味最甜美!新的一天,为梦想全力以赴!
希望可以帮助到@你
文章来源:https://blog.csdn.net/weixin_46171048/article/details/135570511
本文来自互联网用户投稿,该文观点仅代表作者本人,不代表本站立场。本站仅提供信息存储空间服务,不拥有所有权,不承担相关法律责任。 如若内容造成侵权/违法违规/事实不符,请联系我的编程经验分享网邮箱:chenni525@qq.com进行投诉反馈,一经查实,立即删除!
本文来自互联网用户投稿,该文观点仅代表作者本人,不代表本站立场。本站仅提供信息存储空间服务,不拥有所有权,不承担相关法律责任。 如若内容造成侵权/违法违规/事实不符,请联系我的编程经验分享网邮箱:chenni525@qq.com进行投诉反馈,一经查实,立即删除!
最新文章
- Python教程
- 深入理解 MySQL 中的 HAVING 关键字和聚合函数
- Qt之QChar编码(1)
- MyBatis入门基础篇
- 用Python脚本实现FFmpeg批量转换
- 一个功能强大的分布式锁框架:Lock4j
- 定制自己的GPTs,及使用ChatGPT/GPT4写程序的注意事项
- Hive分区表实战 - 单分区字段
- 第二十一章总结
- 利用Composer安装ThinkPHP6
- springboot(ssm旅游信息管理系统 在线旅游系统 Java系统
- 【注解】@RestController、@GetMapping、@PostMapping、@RequestMapping等RESTful风格的Web服务的注解
- class_10:this关键字
- 大数据机器学习与深度学习—— 生成对抗网络(GAN)
- 倾斜摄影三维模型重建的几何坐标变换技术方法浅析