SpringBoot原理解析(超详细)
SpringBoot原理解析
1.@SpringBootApplication原理解析
首先,我们直接追踪@SpringBootApplication的源码
@Target({ElementType.TYPE})
@Retention(RetentionPolicy.RUNTIME)
@Documented
@Inherited
@SpringBootConfiguration
@EnableAutoConfiguration
@ComponentScan(
    excludeFilters = {@Filter(
    type = FilterType.CUSTOM,
    classes = {TypeExcludeFilter.class}
), @Filter(
    type = FilterType.CUSTOM,
    classes = {AutoConfigurationExcludeFilter.class}
)}
)
这些注解虽然看起来很多,但是除去元注解,真正起作用的注解只有以下三个注解:
@SpringBootConfiguration
@EnableAutoConfiguration
@ComponentScan
1.1?@SpringBootConfiguration
@Target({ElementType.TYPE})
@Retention(RetentionPolicy.RUNTIME)
@Documented
@Configuration
@Indexed
public @interface SpringBootConfiguration {
    @AliasFor(
        annotation = Configuration.class
    )
    boolean proxyBeanMethods() default true;
}?可以看到,除去元注解,剩下的@Configuration注解,它的作用就是将当前类申明为配置类,同时还可以使用@bean注解将类以方法的形式实例化到spring容器,而方法名就是实例名,springboot靠这个注解去除了xml配置。
1.2?@ComponentScan
@ComponentScan作用就是扫描当前包以及子包,将有@Component,@Controller,@Service,@Repository等注解的类注册到容器中,以便调用。
注:如果@ComponentScan不指定basePackages,那么默认扫描当前包以及其子包,而@SpringBootApplication里的@ComponentScan就是默认扫描,所以我们一般都是把springboot启动类放在最外层,以便扫描所有的类。
1.3@EnableAutoConfiguration
@Target({ElementType.TYPE})
@Retention(RetentionPolicy.RUNTIME)
@Documented
@Inherited
@AutoConfigurationPackage
@Import({AutoConfigurationImportSelector.class})
public @interface EnableAutoConfiguration {
    String ENABLED_OVERRIDE_PROPERTY = "spring.boot.enableautoconfiguration";

    Class<?>[] exclude() default {};

    String[] excludeName() default {};
}
@EnableAutoConfiguration是借助@Import的帮助导入AutoConfigurationImportSelector,将所有符合自动配置条件的bean定义加载到IoC容器
注:在AutoConfigurationImportSelector中使用SpringFactoriesLoader加载bean
?上图就是从SpringBoot的autoconfigure依赖包中的META-INF/spring.factories配置文件中摘录的一段内容,可以很好地说明问题。
从classpath中搜寻所有的META-INF/spring.factories配置文件,并将其中org.springframework.boot.autoconfigure.EnableutoConfiguration对应的配置项通过反射实例化为对应的标注了@Configuration的JavaConfig形式的IoC容器配置类,然后汇总为一个并加载到IoC容器。
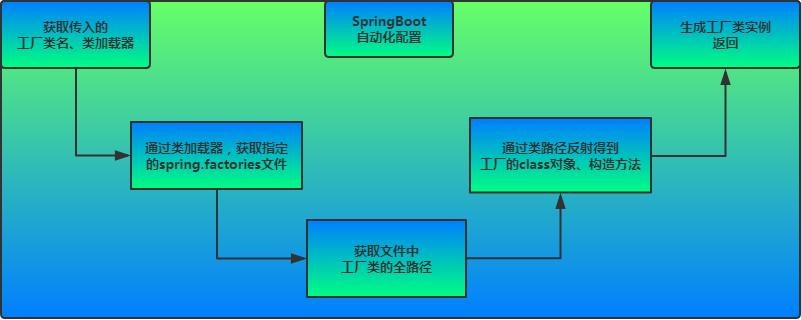
SpringBoot自动配置

?
starter机制
1.springboot的启动原理
创建一个SpringApplication对象,并调用了run方法
public SpringApplication(ResourceLoader resourceLoader, Class<?>... primarySources) {
        this.sources = new LinkedHashSet();
        this.bannerMode = Mode.CONSOLE;
        this.logStartupInfo = true;
        this.addCommandLineProperties = true;
        this.addConversionService = true;
        this.headless = true;
        this.registerShutdownHook = true;
        this.additionalProfiles = Collections.emptySet();
        this.isCustomEnvironment = false;
        this.lazyInitialization = false;
        this.applicationContextFactory = ApplicationContextFactory.DEFAULT;
        this.applicationStartup = ApplicationStartup.DEFAULT;
        this.resourceLoader = resourceLoader;
        Assert.notNull(primarySources, "PrimarySources must not be null");
        this.primarySources = new LinkedHashSet(Arrays.asList(primarySources));
        this.webApplicationType = WebApplicationType.deduceFromClasspath();
        this.bootstrapRegistryInitializers = this.getBootstrapRegistryInitializersFromSpringFactories();
        //获取所有初始化器
        this.setInitializers(this.getSpringFactoriesInstances(ApplicationContextInitializer.class));
        //获取所有监听器
        this.setListeners(this.getSpringFactoriesInstances(ApplicationListener.class));
        //定位main方法
        this.mainApplicationClass = this.deduceMainApplicationClass();
    }
1.1?获取初始化器
跟踪进入getSpringFactoriesInstances方法
private <T> Collection<T> getSpringFactoriesInstances(Class<T> type, Class<?>[] parameterTypes, Object... args) {
        ClassLoader classLoader = this.getClassLoader();
        //获取所有初始化器的名称集合
        Set<String> names = new LinkedHashSet(SpringFactoriesLoader.loadFactoryNames(type, classLoader));
?       //根据名称集合实例化这些初始化器(通过反射)
        List<T> instances = this.createSpringFactoriesInstances(type, parameterTypes, classLoader, args, names);
        AnnotationAwareOrderComparator.sort(instances);
        return instances;
    }
从源码可以看出,该配置模块的主要使用到了SpringFactoriesLoader,即Spring工厂加载器,该对象提供了loadFactoryNames方法,SpringFactoriesLoader在META-INF/spring.factories配置文件里收集到文件中的类全名并返回一个类全名的数组,返回的类全名通过反射被实例化,就形成了具体的工厂实例,工厂实例来生成组件具体需要的bean。
1.2 获取初监听器
同样跟踪源码,发现其实监听器和初始化的操作是基本一样的,这里就不细说了
1.3定位main方法
跟踪源码进入deduceMainApplicationClass方法
    private Class<?> deduceMainApplicationClass() {
        try {
            //通过创建运行时异常的方式获取栈
            StackTraceElement[] stackTrace = (new RuntimeException()).getStackTrace();
            StackTraceElement[] var2 = stackTrace;
            int var3 = stackTrace.length;
            //遍历获取main方法所在的类并且返回
            for(int var4 = 0; var4 < var3; ++var4) {
                StackTraceElement stackTraceElement = var2[var4];
                if ("main".equals(stackTraceElement.getMethodName())) {
                    return Class.forName(stackTraceElement.getClassName());
                }
            }
        } catch (ClassNotFoundException var6) {
        }

        return null;
}本文来自互联网用户投稿,该文观点仅代表作者本人,不代表本站立场。本站仅提供信息存储空间服务,不拥有所有权,不承担相关法律责任。 如若内容造成侵权/违法违规/事实不符,请联系我的编程经验分享网邮箱:chenni525@qq.com进行投诉反馈,一经查实,立即删除!