vue+springboot(前后端分离项目)
发布时间:2024年01月20日
目录
JAVA后端项目
一、创建项目
1、使用aliyun的server url
https://start.aliyun.com
2、初始化项目结构

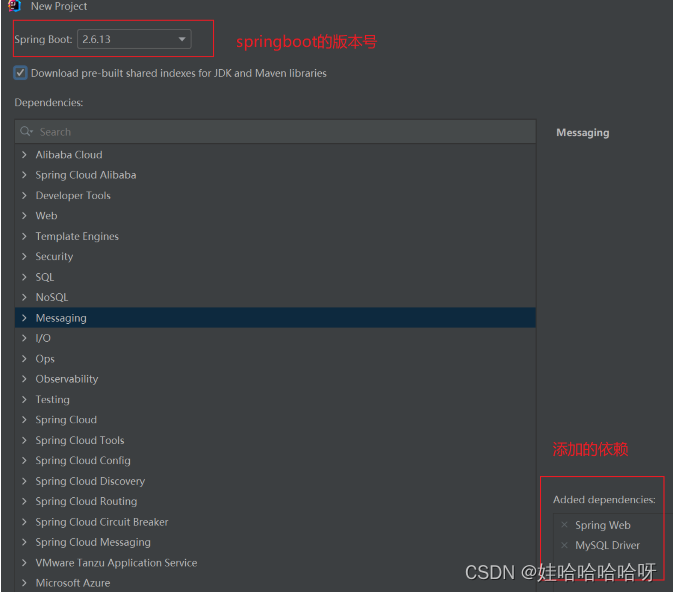
3、添加依赖

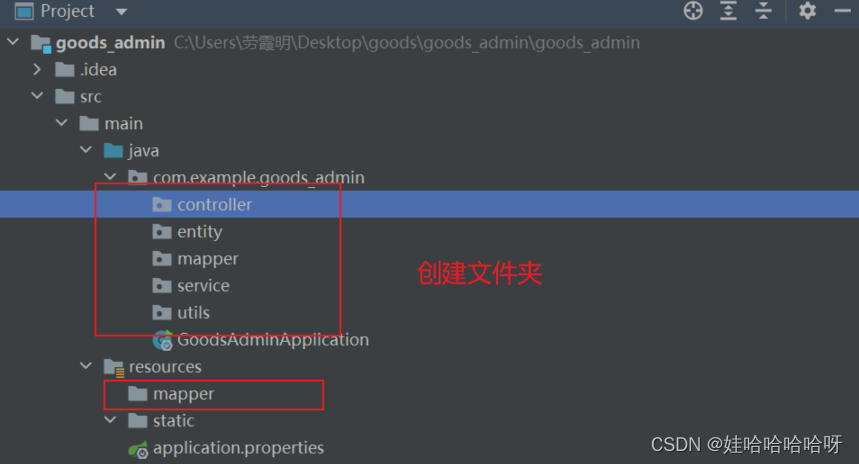
4、创建文件夹

5、把mapper类交给spring容器管理
5.1、方法1
在每一个mapper类上加上注解@Mapper
@Mapper
public class UserMapper {
}
缺点:每个mapper文件都得添加
5.2、方法2
在主程序启动类上添加扫描所有mapper
@MapperScan("com.example.goods_admin.mapper")注意:路径可以是指定文件,或者文件夹。
6、在yaml文件中配置数据库信息
server:
  port: 9090
?
spring:
  datasource:
 ?  url: jdbc:mysql://localhost:3306/goods_admin?useUnicode=true&characterEncoding=utf8&serverTimezone=UTC
 ?  username: root
 ?  password: root
 ?  driverClassName: com.mysql.cj.jdbc.Driver
7、在yaml文件中配置mapper的xml文件的路径
mybatis:
  mapper-locations: classpath:mapper/*.xml  //classpath是resources文件夹
8、配置mapper的xml文件
<!--XML头部(固定的)-->
<?xml version="1.0" encoding="UTF-8"?>
<!DOCTYPE mapper PUBLIC "-//mybatis.org//DTD Mapper 3.0//EN" "http://mybatis.org/dtd/mybatis-3-mapper.dtd">
<mapper namespace="com.example.goods_admin.mapper.UserMapper">
<!-- ?  结果映射:数据库字段与实体类字段的映射关系-->
 ? ?<resultMap id="BaseResultMap" type="com.example.goods_admin.entity.User">
 ? ? ? ?<id column="id" jdbcType="VARCHAR" property="id" />
 ? ? ? ?<result column="userId" jdbcType="VARCHAR" property="userId" />
 ? ? ? ?<result column="userName" jdbcType="VARCHAR" property="userName" />
 ? ? ? ?<result column="password" jdbcType="VARCHAR" property="password" />
 ? ? ? ?<result column="sex" jdbcType="TINYINT" property="sex" />
 ? ? ? ?<result column="age" jdbcType="INTEGER" property="age" />
 ? ? ? ?<result column="location" jdbcType="VARCHAR" property="location" />
 ? ?</resultMap>
?
</mapper>
二、编写程序
user实体类
package com.example.goods_admin.entity;

public class User {
    private String id;
    private String userId;
    private String userName;
    private String password;
    private String sex;
    private int age;
    private String location;
    //无参构造函数
    public User() {
    }
    //构造函数:用来实例化对象的
    //有参构造函数
    public User(String id, String userId, String userName, String password, String sex, int age, String location) {
        this.id = id;
        this.userId = userId;
        this.userName = userName;
        this.password = password;
        this.sex = sex;
        this.age = age;
        this.location = location;
    }
    public String getId() {
        return id;
    }
    public void setId(String id) {
        this.id = id;
    }
    public String getUserId() {
        return userId;
    }
    public void setUserId(String userId) {
        this.userId = userId;
    }
    public String getUserName() {
        return userName;
    }
    public void setUserName(String userName) {
        this.userName = userName;
    }
    public String getPassword() {
        return password;
    }
    public void setPassword(String password) {
        this.password = password;
    }
    public String getSex() {
        return sex;
    }
    public void setSex(String sex) {
        this.sex = sex;
    }
    public int getAge() {
        return age;
    }
    public void setAge(int age) {
        this.age = age;
    }
    public String getLocation() {
        return location;
    }
    public void setLocation(String location) {
        this.location = location;
    }


}
1、登录功能
1.1、编写UserController
?
@RestController
//@RequestMapping用于将 HTTP 请求映射到控制器方法上
@RequestMapping("/user")
public class UserController {
?
 ? ?@Autowired
 ? ?Userservice userservice;
 ? ?/*
 ? ?**登录
 ? ? */
 ? ?@PostMapping("/login")
 ? ?public Result login(@RequestBody User user){
 ? ?return userservice.login(user);
 ?  }

?
}
1.2、编写UserserviceImpl
@Service
public class UserserviceImpl implements Userservice {
?
 ? ?@Autowired
 ? ?UserMapper userMapper;
?
 ? ?@Override
 ? ?public Result login(User user) {
 ? ? ? ?/**
 ? ? ? ? * 1、先根据账号查询,是否账号存在
 ? ? ? ? * 2、不存在,显示该账户未注册,先注册再登录
 ? ? ? ? * 3、存在,查询该账户的密码是不是数据库中的密码
 ? ? ? ? * 4、如果传入的密码和数据库的密码不一样,说明密码错误,请重新输入密码
 ? ? ? ? * 5、如果传入的密码和数据库的密码一样,说明账号密码都正确,显示登录成功,跳转到首页
 ? ? ? ? */
?
 ? ? ? ?//1、根据账号查询,是否账号存在
 ? ? ? ?User user2 = userMapper.seleteUserByUserId(user.getUserId());
?
 ? ? ? ?//2、不存在,显示该账户未注册,先注册再登录
 ? ? ? ?if (user2 == null) {
 ? ? ? ? ? ?return Result.failed("用户不存在,请注册");
 ? ? ?  } else {
 ? ? ? ? ? ?//3、存在,查询该账户的密码是不是数据库中的密码
 ? ? ? ? ? ?User user3 = userMapper.seleteUserByPassword(user);
 ? ? ? ? ? ?if (user3 != null && user3.getPassword().equals(user.getPassword())) {
 ? ? ? ? ? ? ? ?return Result.succeed("登录成功");
 ? ? ? ? ?  } else {
 ? ? ? ? ? ? ? ?return Result.failed("密码错误");
 ? ? ? ? ?  }
?
 ? ? ?  }
?
 ?  }
?
 ? ?
?
?
}
1.3、编写接口Userservice
public interface Userservice {
?
 ? ?Result login(User user);
?
}
1.4、编写mapper
@Mapper
public interface UserMapper {
?
 ? ?User seleteUserByUserId(String userId);
?
 ? ?void login(User user);
?
 ?
}
1.5、编写xml
<select id="seleteUserByUserId" resultType="com.example.goods_admin.entity.User">
 ? ? ?  select * from user where userId=#{userId}
 ? ?</select>
 ? ?<select id="login">
 ? ? ?  select * from user where userId=#{userId}
 ? ?</select>
1.6、前端发请求
? ?login() {
 ? ? ? ? ? ?if (this.userId === '') {
 ? ? ? ? ? ? ? ?this.$message.error("请输入账号");
 ? ? ? ? ? ? ? ?return;
 ? ? ? ? ?  } else if (this.password === '') {
 ? ? ? ? ? ? ? ?this.$message.error("请输入密码");
 ? ? ? ? ? ? ? ?return;
 ? ? ? ? ?  }
 ? ? ? ? ? ?// 判断是否勾选协议
 ? ? ? ? ? ?if (this.agreementChecked) {
 ? ? ? ? ? ? ? ?// 发送登录请求
 ? ? ? ? ? ? ? ?this.$axios({
 ? ? ? ? ? ? ? ? ? ?method: "post",
 ? ? ? ? ? ? ? ? ? ?url: "http://localhost:8080/api/user/login",
 ? ? ? ? ? ? ? ? ? ?data: {
 ? ? ? ? ? ? ? ? ? ? ? ?userId: this.userId,
 ? ? ? ? ? ? ? ? ? ? ? ?password: this.password,
 ? ? ? ? ? ? ? ? ?  },
 ? ? ? ? ? ? ?  })
 ? ? ? ? ? ? ? ? ?  .then((res) => {
 ? ? ? ? ? ? ? ? ? ? ? ?console.log(res);
 ? ? ? ? ? ? ? ? ? ? ? ?if (res.data.code == "200") {
 ? ? ? ? ? ? ? ? ? ? ? ? ? ?// 登录成功,显示成功提示信息
 ? ? ? ? ? ? ? ? ? ? ? ? ? ?this.$message({
 ? ? ? ? ? ? ? ? ? ? ? ? ? ? ? ?message: res.data.message,
 ? ? ? ? ? ? ? ? ? ? ? ? ? ? ? ?type: "success",
 ? ? ? ? ? ? ? ? ? ? ? ? ?  });
?
 ? ? ? ? ? ? ? ? ? ? ? ? ? ?//1、储存token(令牌) ? 保存到浏览器
 ? ? ? ? ? ? ? ? ? ? ? ? ? ?window.sessionStorage.setItem("token", res.data.token);
 ? ? ? ? ? ? ? ? ? ? ? ? ? ?//2、储存user
 ? ? ? ? ? ? ? ? ? ? ? ? ? ?window.sessionStorage.setItem(
 ? ? ? ? ? ? ? ? ? ? ? ? ? ? ? ?"user",
 ? ? ? ? ? ? ? ? ? ? ? ? ? ? ? ?JSON.stringify(res.data.user)
 ? ? ? ? ? ? ? ? ? ? ? ? ?  );
 ? ? ? ? ? ? ? ? ? ? ? ? ? ?//3、跳转到后台主页 (编程式导航)
 ? ? ? ? ? ? ? ? ? ? ? ? ? ?this.$router.push("./home"); //
 ? ? ? ? ? ? ? ? ? ? ?  } else if (res.data.code == "500") {
 ? ? ? ? ? ? ? ? ? ? ? ? ? ?this.$message({
 ? ? ? ? ? ? ? ? ? ? ? ? ? ? ? ?message: res.data.message,
 ? ? ? ? ? ? ? ? ? ? ? ? ? ? ? ?type: "error",
 ? ? ? ? ? ? ? ? ? ? ? ? ?  });
 ? ? ? ? ? ? ? ? ? ? ?  }
 ? ? ? ? ? ? ? ? ?  })
 ? ? ? ? ? ? ? ? ?  .catch(() => {
 ? ? ? ? ? ? ? ? ? ? ? ?// 登录失败,显示提示信息
 ? ? ? ? ? ? ? ? ? ? ? ?this.$message({
 ? ? ? ? ? ? ? ? ? ? ? ? ? ?message: "该登录失败",
 ? ? ? ? ? ? ? ? ? ? ? ? ? ?type: "error",
 ? ? ? ? ? ? ? ? ? ? ?  });
 ? ? ? ? ? ? ? ? ?  });
 ? ? ? ? ?  } else {
 ? ? ? ? ? ? ? ?// 未勾选协议,不执行登录逻辑
 ? ? ? ? ? ? ? ?this.$message({
 ? ? ? ? ? ? ? ? ? ?message: "请同意用户协议和隐私政策!",
 ? ? ? ? ? ? ? ? ? ?type: "error",
 ? ? ? ? ? ? ?  });
 ? ? ? ? ?  }
 ? ? ?  },
注意:先解决跨域问题(vue.config.js文件)
module.exports = {
?
 ?devServer: {
 ? ?proxy: {
 ? ? ?'/api': {//表示拦截以/api开头的请求路径
 ? ? ? ?target: 'http://localhost:9090',
 ? ? ? ?changOrigin: true,//是否开启跨域
 ? ? ? ?pathRewrite: {
 ? ? ? ? ?'^/api': '' //重写api,把api变成空字符,因为我们真正请求的路径是没有api的
 ? ? ?  }
 ? ?  }
 ?  }
  }
?
};
?
文章来源:https://blog.csdn.net/karlaofsky/article/details/135597580
本文来自互联网用户投稿,该文观点仅代表作者本人,不代表本站立场。本站仅提供信息存储空间服务,不拥有所有权,不承担相关法律责任。 如若内容造成侵权/违法违规/事实不符,请联系我的编程经验分享网邮箱:chenni525@qq.com进行投诉反馈,一经查实,立即删除!
本文来自互联网用户投稿,该文观点仅代表作者本人,不代表本站立场。本站仅提供信息存储空间服务,不拥有所有权,不承担相关法律责任。 如若内容造成侵权/违法违规/事实不符,请联系我的编程经验分享网邮箱:chenni525@qq.com进行投诉反馈,一经查实,立即删除!
最新文章
- Python教程
- 深入理解 MySQL 中的 HAVING 关键字和聚合函数
- Qt之QChar编码(1)
- MyBatis入门基础篇
- 用Python脚本实现FFmpeg批量转换
- K8S三台服务器一键部署总结
- vue-springboot基于Java的医院分时段挂号预约综合管理系统
- Linux 硬件配置
- android Glide加载长图
- orange3,一个无敌的 Python 库!
- 为什么v-if和v-for不建议放一起?v-if和v-for的优先级是什么?
- VUE2入门教程
- SpringMVC controller方法返回值见解3
- 8868体育携手国际米兰 劳塔罗有望登顶队史射手榜
- flink on yarn任务启停脚本(实现一键读取ck启动,保存ck停止)