node实战——koa给邮件发送验证码并缓存到redis服务(node后端储备知识)
文章目录

?前言
大家好,我是yma16,本文分享关于node实战——koa给邮件发送验证码缓存到redis。
本文适用对象:前端初学者转node方向,在线大学生,应届毕业生,计算机爱好者。
node系列往期文章
node_windows环境变量配置
node_npm发布包
linux_配置node
node_nvm安装配置
node笔记_http服务搭建(渲染html、json)
node笔记_读文件
node笔记_写文件
node笔记_连接mysql实现crud
node笔记_formidable实现前后端联调的文件上传
node笔记_koa框架介绍
node_koa路由
node_生成目录
node_读写excel
node笔记_读取目录的文件
node笔记——调用免费qq的smtp发送html格式邮箱
node实战——搭建带swagger接口文档的后端koa项目(node后端就业储备知识)
node实战——后端koa结合jwt连接mysql实现权限登录(node后端就业储备知识)
邮件smtp
SMTP(Simple Mail Transfer Protocol,简单邮件传输协议)是一种用于发送电子邮件的网络协议,它定义了客户端与服务器端之间的通信规则,以保证电子邮件能够准确、高效地发送。SMTP协议最初由RFC 821定义,后来又有RFC 2821、RFC 5321等对其进行了更新和完善。
SMTP协议的基本原理是:发送邮件的客户端将邮件内容发送至SMTP服务器,SMTP服务器再将邮件转发到接收方的邮箱服务器,最终接收方通过POP3或IMAP等协议来下载邮件。SMTP协议采用典型的客户端-服务器模型,客户端向服务器发送请求,服务器响应请求,双方通过交互式消息传输实现通信。
SMTP协议包括邮件格式、邮件地址、邮件传输、错误处理等方面的内容,其主要特点是简单、灵活、可扩展。SMTP协议在互联网上一直得到广泛应用,而且随着电子邮件的快速发展,SMTP协议也在不断改进和完善。
redis是什么
Redis是一个开源的内存数据库系统,其名称是REmote DIctionary Server的缩写。它支持多种数据结构,如字符串、哈希、列表、集合、有序集合等。Redis数据可以被持久化到磁盘,以保证数据的可靠性和持久性。
Redis最大的特点是快速读写,因为数据都存储在内存中,可以快速地访问。此外,Redis还提供了各种高级功能,如发布/订阅、Lua脚本、事务等。
Redis还可以作为缓存服务器使用,可以缓存各种类型的数据,以提高应用程序的性能。Redis还具有伸缩性好,支持分布式架构,可以进行集群部署,以满足大规模高并发的需求。
?koa 封装发送邮件api
原理:
在koa调用smtp服务实现发送邮件
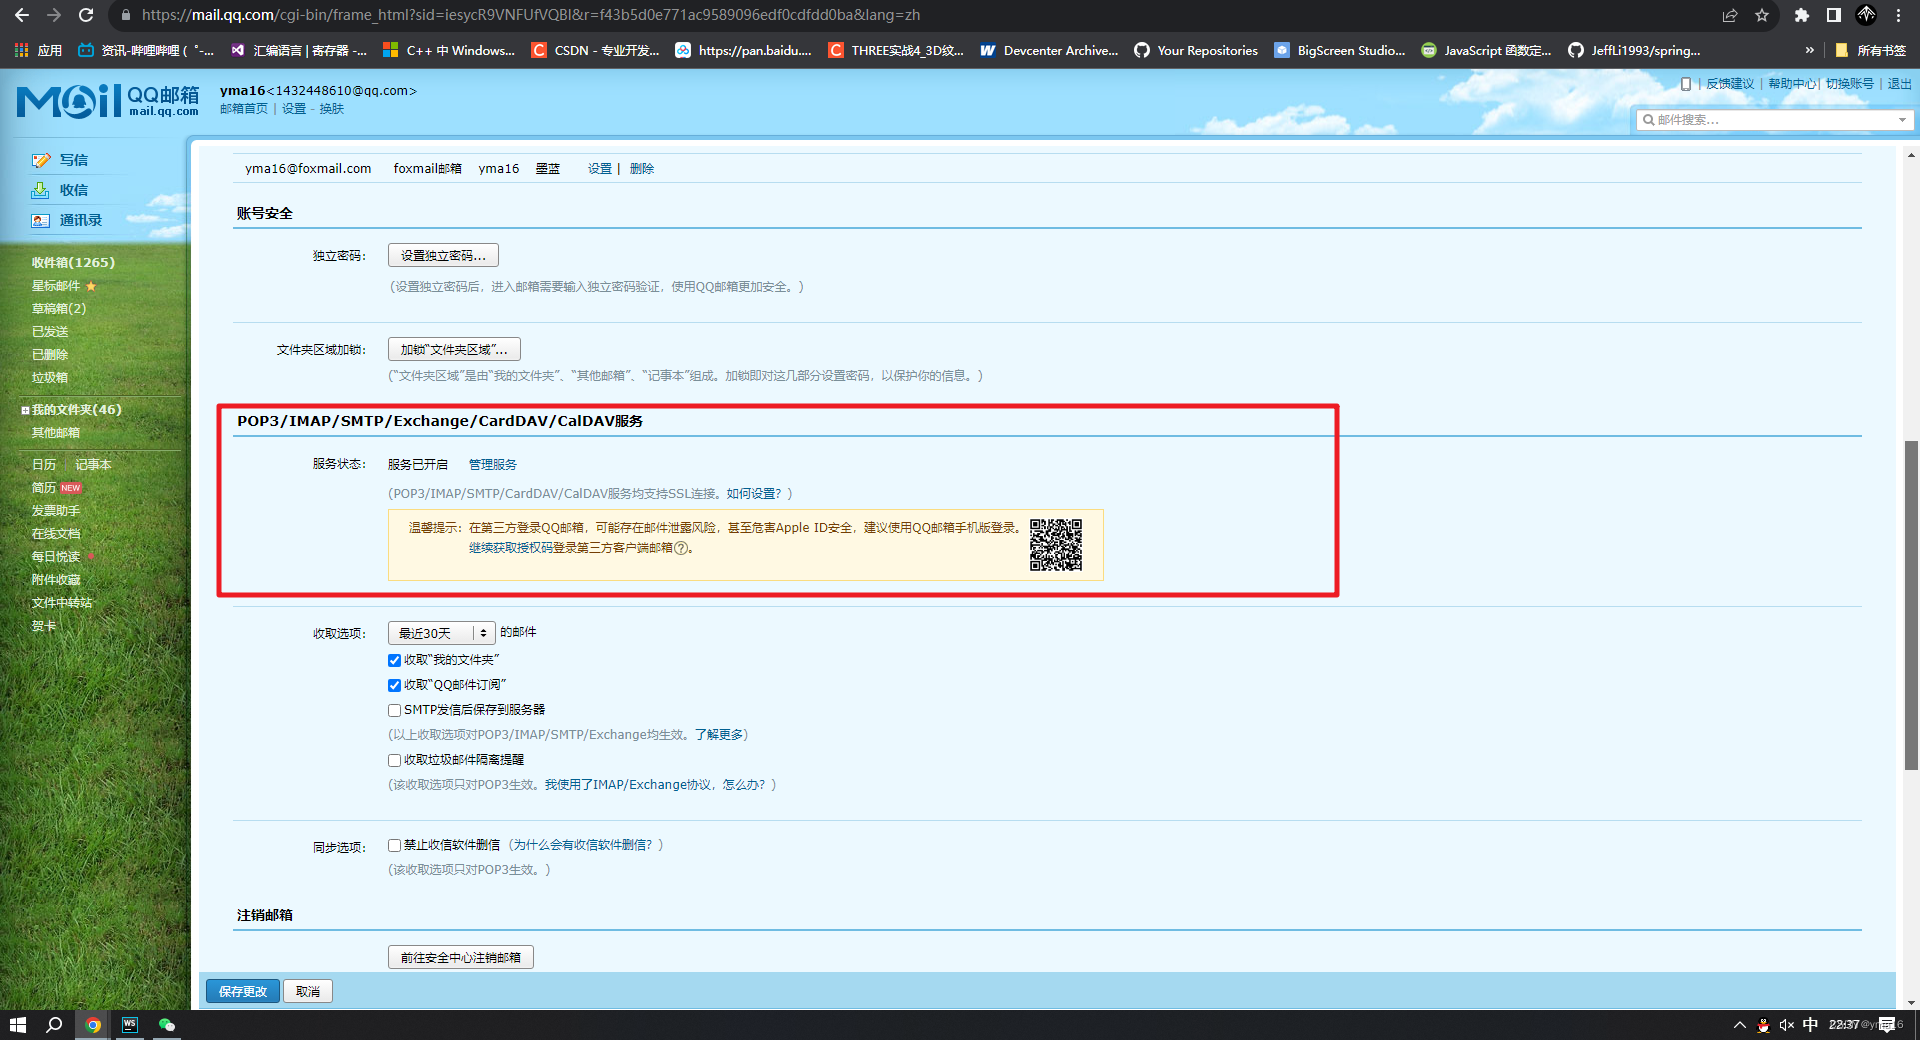
💖 引用qq的免费smtp服务
在qq邮箱的账号模块配置smtp验证码
💖 nodemailer库发送邮件
koa封装的 sendEmail方法
const nodemailer = require('nodemailer')

//创建一个SMTP客户端配置对象
const transporter = nodemailer.createTransport({
    // 默认支持的邮箱服务包括:”QQ”、”163”、”126”、”iCloud”、”Hotmail”、”Yahoo”等
    service: "QQ",
    auth: {
        // 发件人邮箱账号
        user: '***@qq.com',
        //发件人邮箱的授权码 需要在自己的邮箱设置中生成,并不是邮件的登录密码
        pass: '***'
    }
})
const sendEmail=(toUserEmail,title,content)=>{
    return new Promise(resolve=>{
        // 配置收件人信息
        const receiver = {
            // 发件人 邮箱  '昵称<发件人邮箱>'
            from: `***@qq.com`,
            // 主题
            subject:title,
            // 收件人 的邮箱 可以是其他邮箱 不一定是qq邮箱
            to:toUserEmail,
            // 可以使用html标签
            html: content
        };

        // 发送邮件
        transporter.sendMail(receiver, (error, info) => {
            if (error) {
                resolve({
                    code:0,
                    msg:error
                })
            }
            transporter.close()
            resolve({
                code:200,
                msg:'success'
            })
        })
    })
};
module.exports={
    sendEmail
}
?koa 连接redis
node运行环境连接redis服务
💖 下载redis
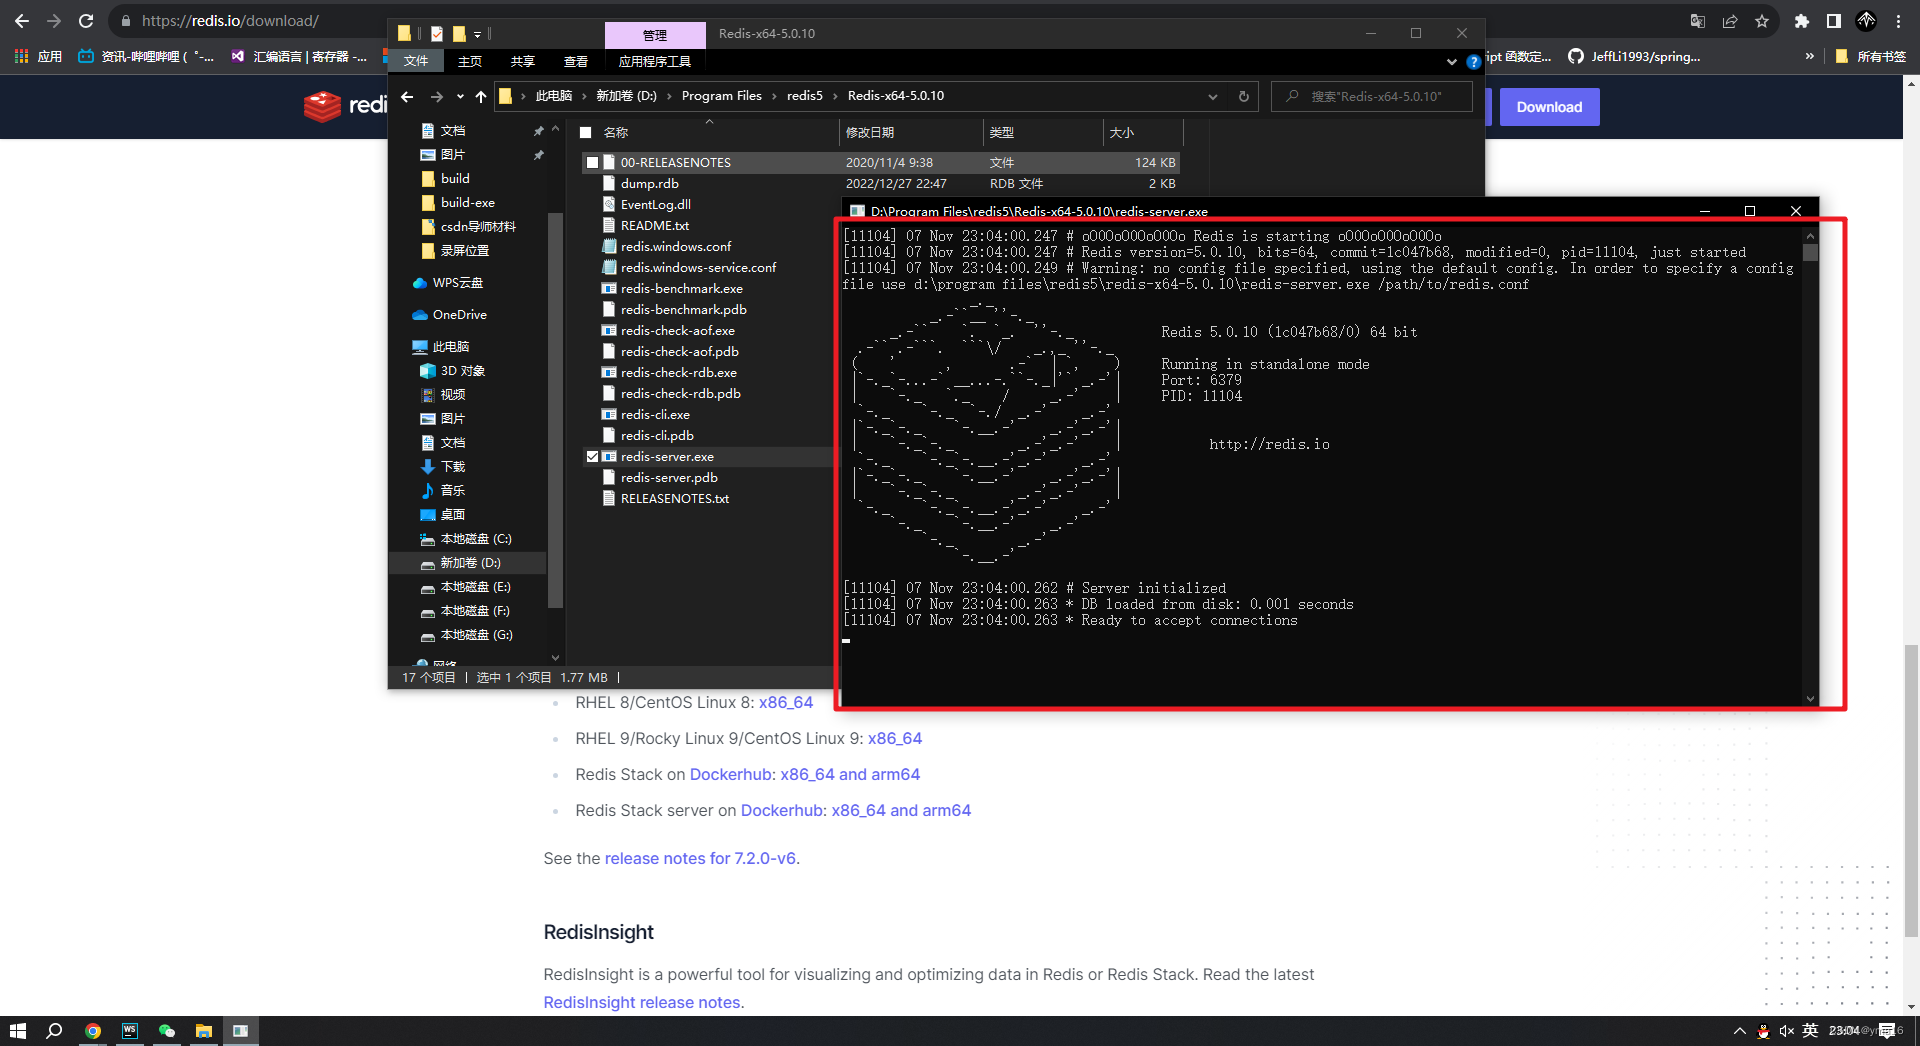
下载redis
https://redis.io/download/
运行redis.exe
💖 ioredis 库连接redis
npm install ioredis
官方使用示例
// Import ioredis.
// You can also use `import { Redis } from "ioredis"`
// if your project is a TypeScript project,
// Note that `import Redis from "ioredis"` is still supported,
// but will be deprecated in the next major version.
const Redis = require("ioredis");

// Create a Redis instance.
// By default, it will connect to localhost:6379.
// We are going to cover how to specify connection options soon.
const redis = new Redis();

redis.set("mykey", "value"); // Returns a promise which resolves to "OK" when the command succeeds.

// ioredis supports the node.js callback style
redis.get("mykey", (err, result) => {
  if (err) {
    console.error(err);
  } else {
    console.log(result); // Prints "value"
  }
});

// Or ioredis returns a promise if the last argument isn't a function
redis.get("mykey").then((result) => {
  console.log(result); // Prints "value"
});

redis.zadd("sortedSet", 1, "one", 2, "dos", 4, "quatro", 3, "three");
redis.zrange("sortedSet", 0, 2, "WITHSCORES").then((elements) => {
  // ["one", "1", "dos", "2", "three", "3"] as if the command was `redis> ZRANGE sortedSet 0 2 WITHSCORES`
  console.log(elements);
});

// All arguments are passed directly to the redis server,
// so technically ioredis supports all Redis commands.
// The format is: redis[SOME_REDIS_COMMAND_IN_LOWERCASE](ARGUMENTS_ARE_JOINED_INTO_COMMAND_STRING)
// so the following statement is equivalent to the CLI: `redis> SET mykey hello EX 10`
redis.set("mykey", "hello", "EX", 10);
封装redis
const Redis = require('ioredis')

// 创建 Redis 客户端实例, 连接指定的 Redis 服务器
const redis = new Redis({
  port: 6379, // redis服务器默认端口号
  host: '127.0.0.1' // redis服务器的IP地址
})
?koa封装的api
发送邮件api配置文件
const Router = require('koa-router');
const router = new Router();
const {sendEmail}=require('../../utils/email/index');
const {getRedisKey,setRedisConfig}=require('../../utils/redis/index');

// 随机字符串
function randomString(length) {
    const chars='0123456789'
    let result = '';
    for (let i = length; i > 0; --i) result += chars[Math.floor(Math.random() * chars.length)];
    return result;
}


// 发送邮件验证码
router.post('/getEmailCode', async (ctx) => {
    try{
        const bodyParams =  ctx.request.body
        const {email}=bodyParams
        const code=randomString(4)
        const content=`<p>验证码:<span style="color:lightskyblue">${code}</span><p>`
        const title='欢迎注册!'
        setRedisConfig(email,code)
        const res=await sendEmail(email,title,content)
        ctx.body = {
            code:res.code,
            data:{
                emailRes:res,
                code:await getRedisKey(email)
            },
            msg:'success'
        };
    }
    catch(r){
        ctx.body={
            code:0,
            msg:r
        }
    }
});

module.exports = router;
?postman+redismanager验证
postman生成验证码发送邮件
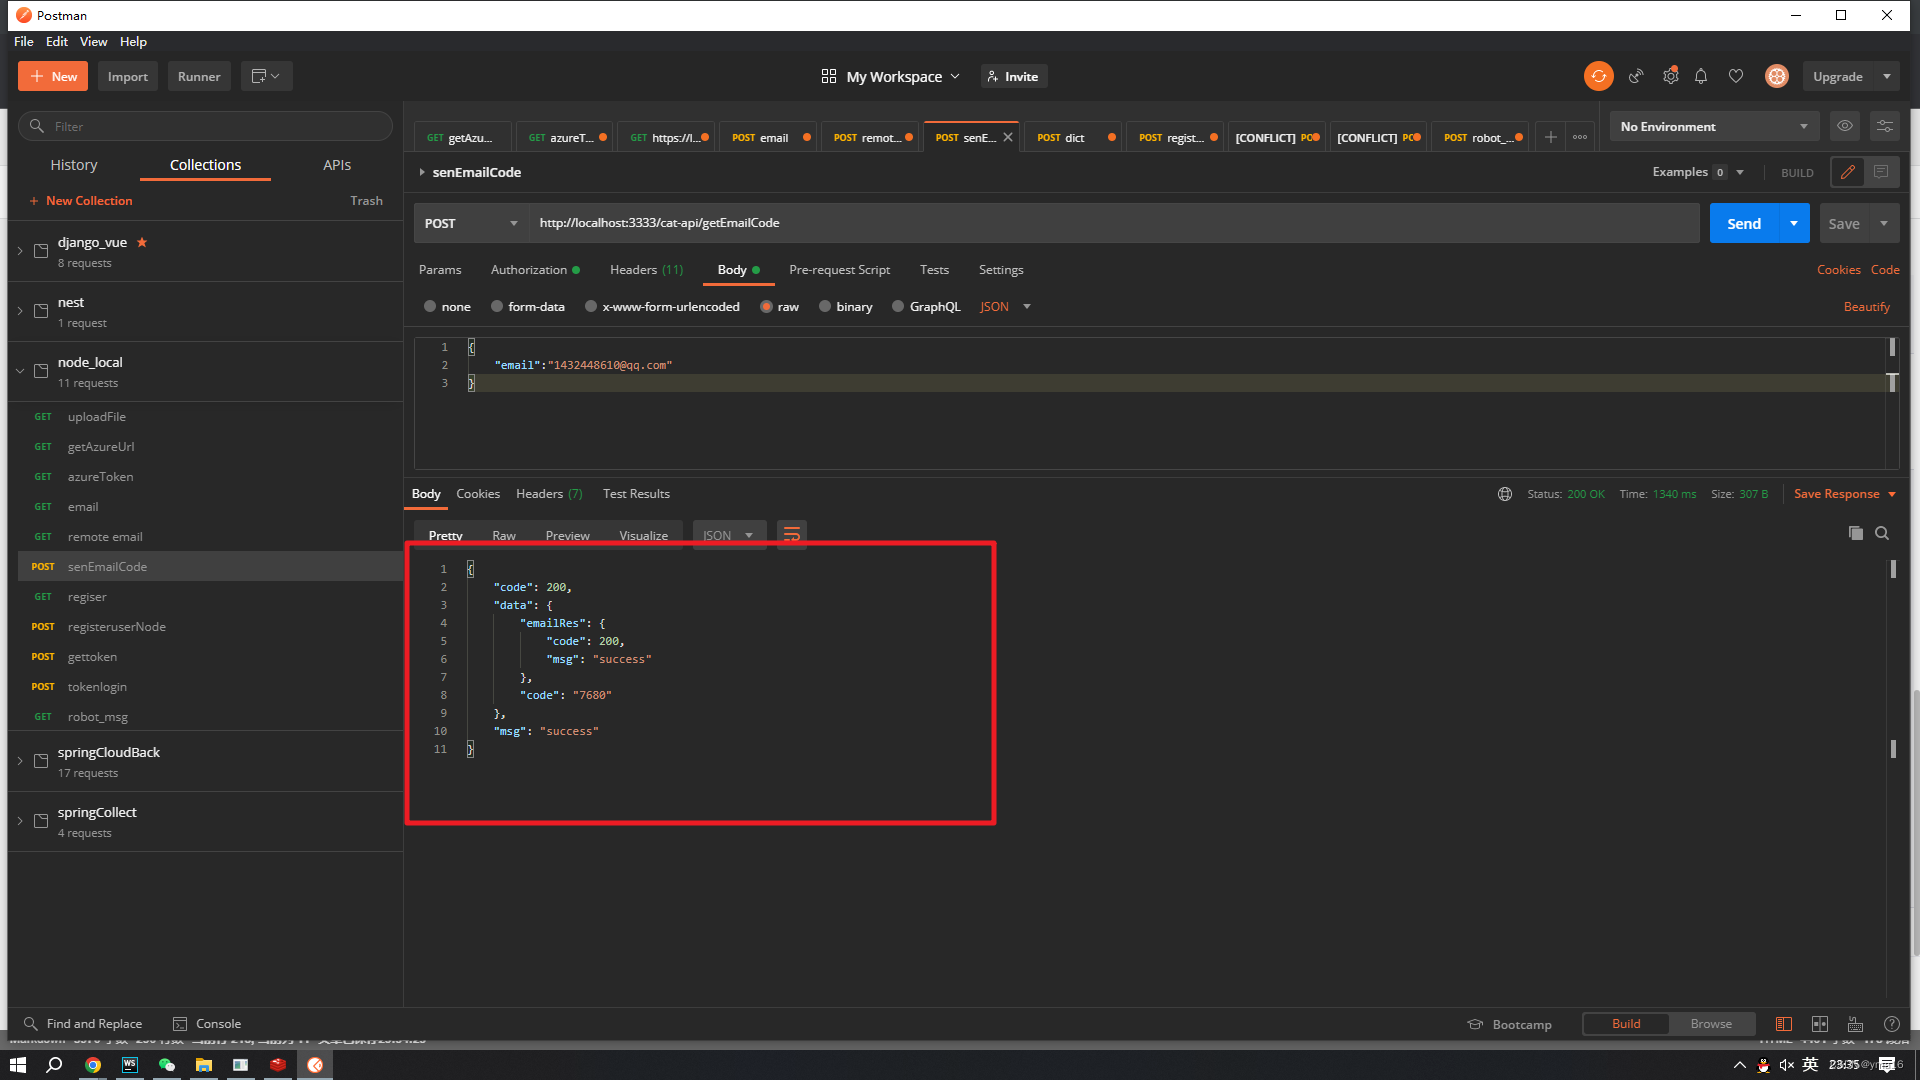
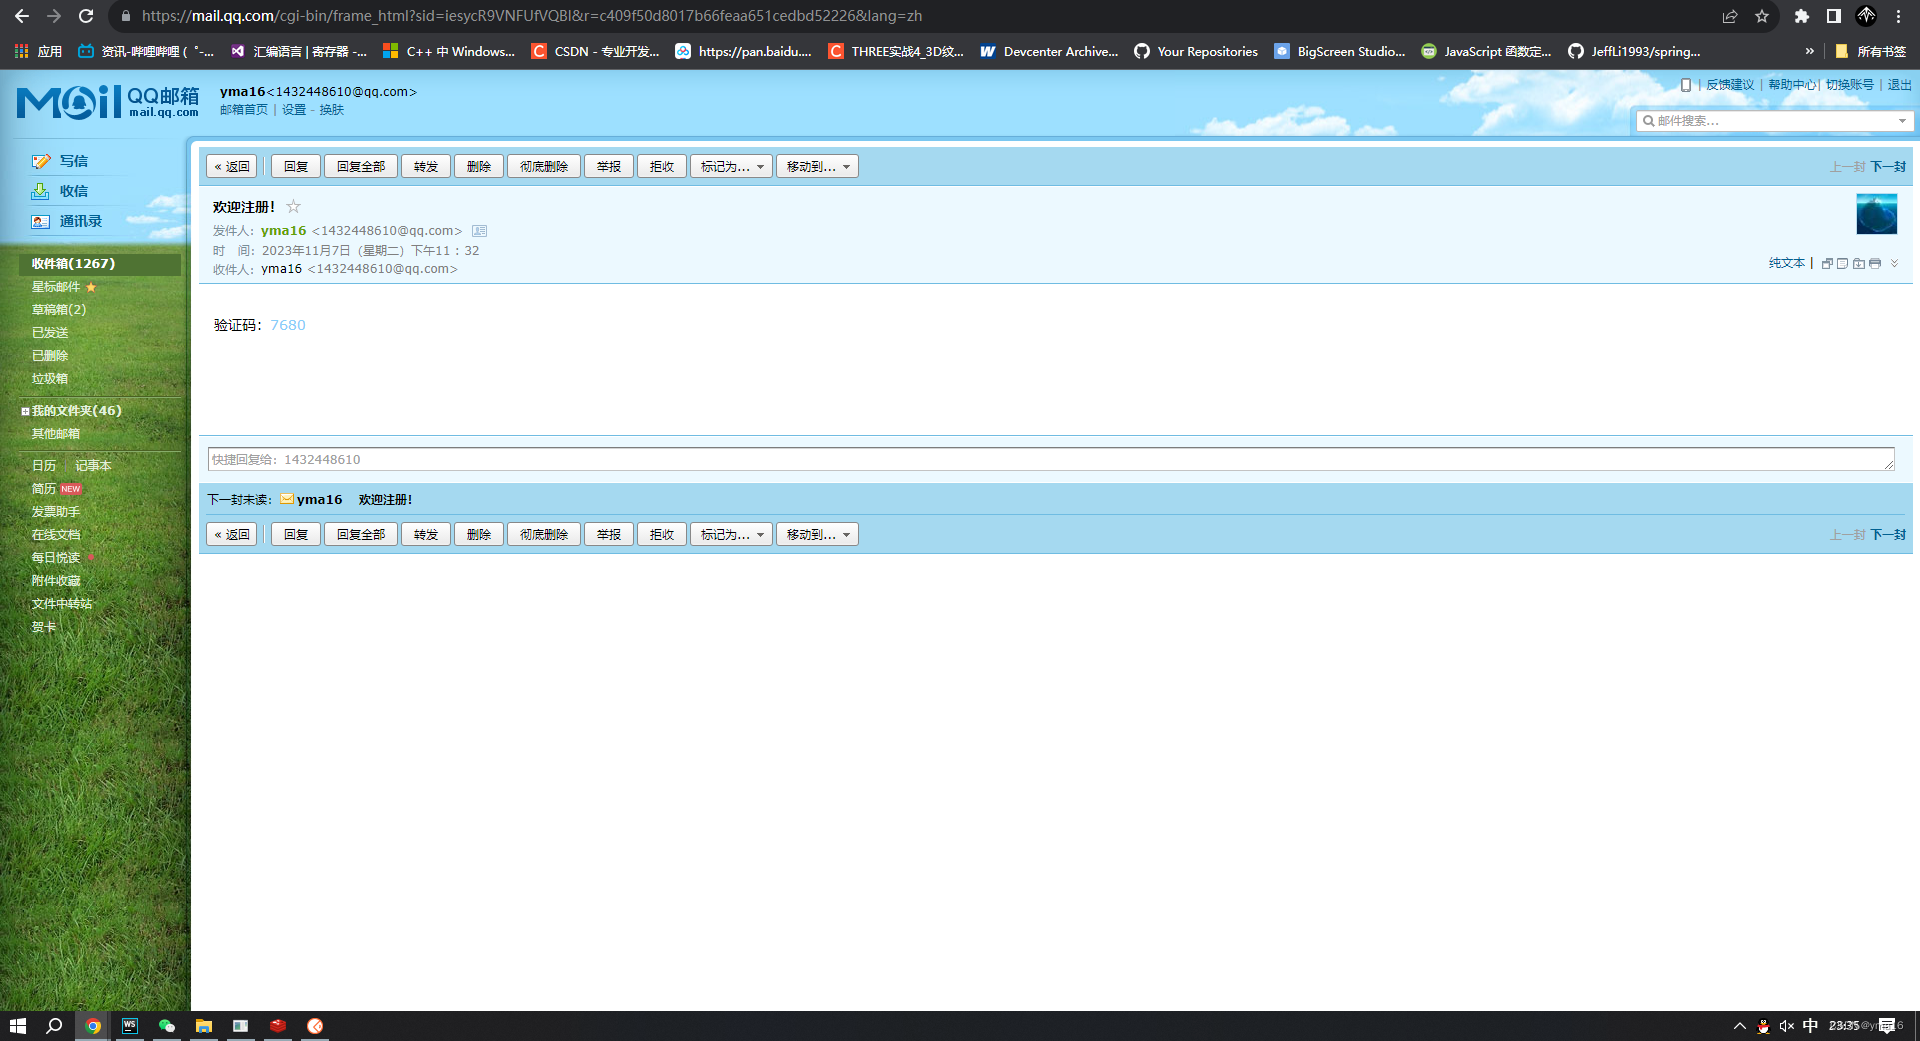
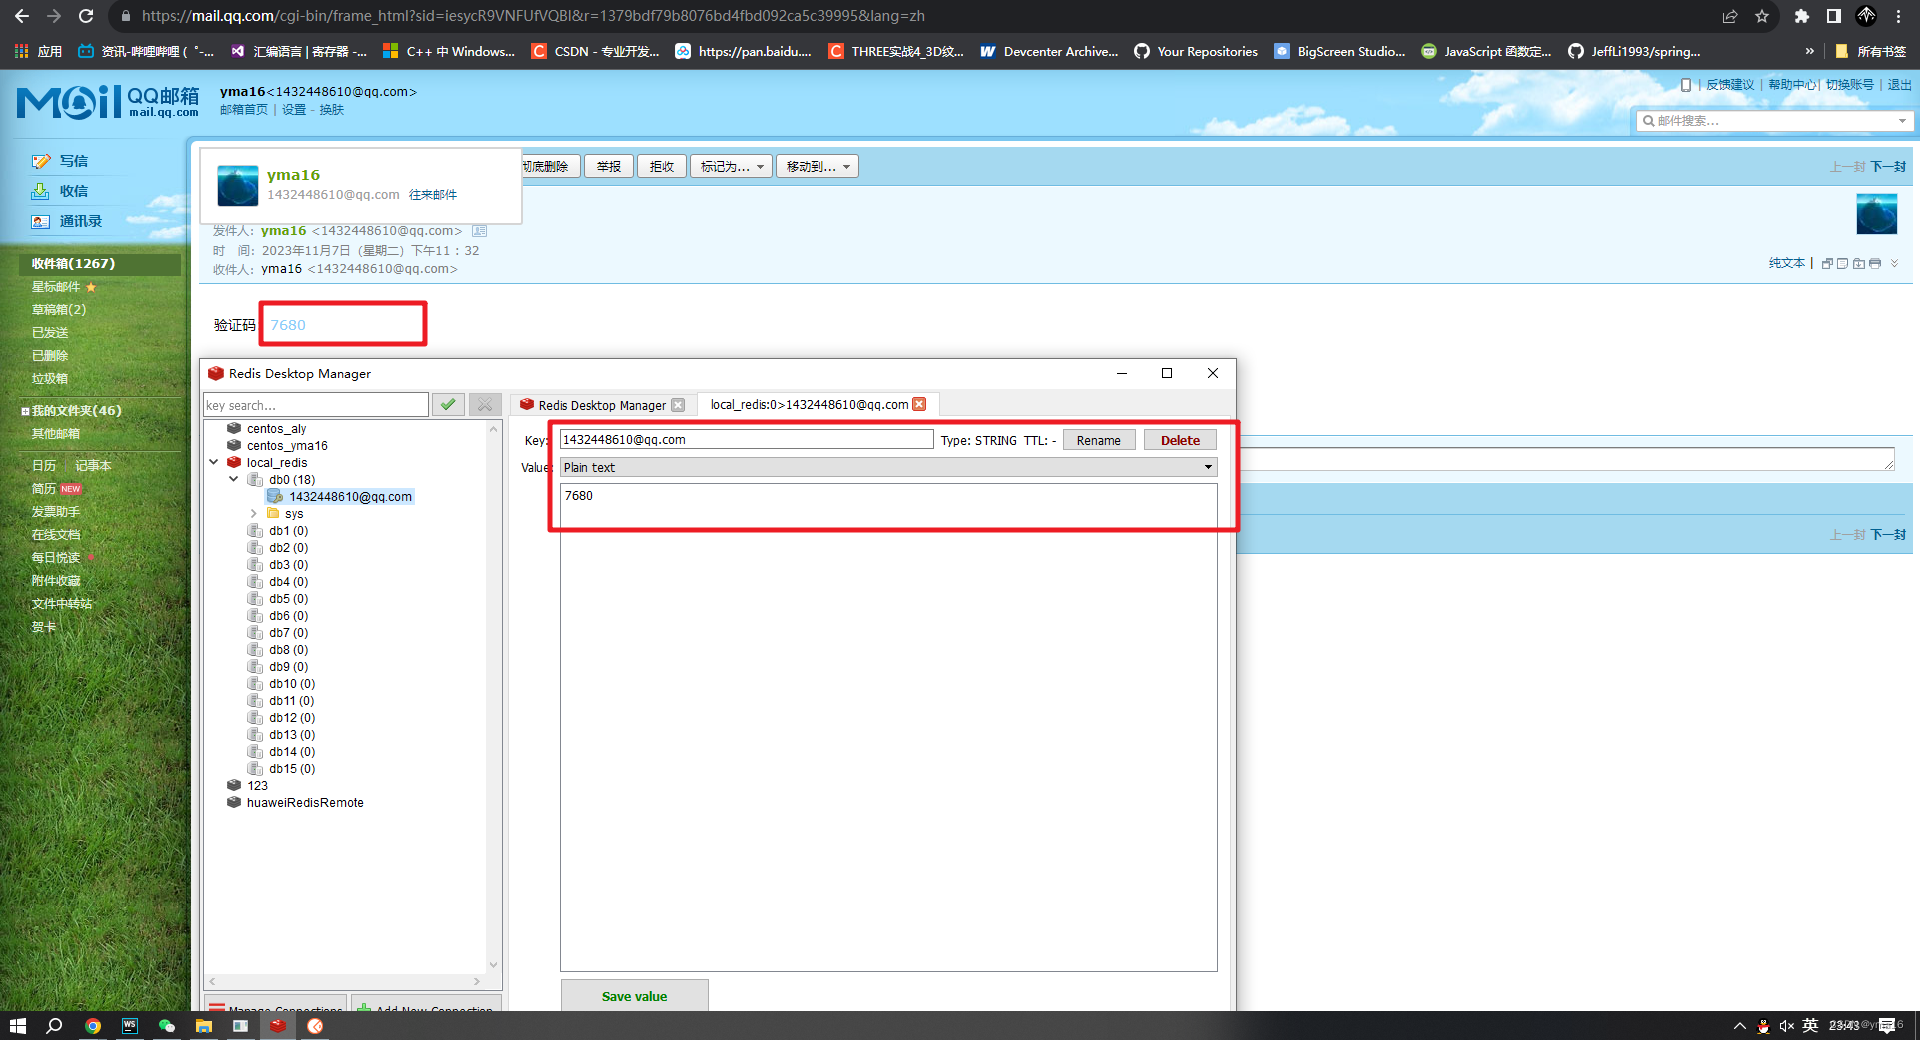
qq邮件收到验证码 7680
redis查看邮箱的key值为7680
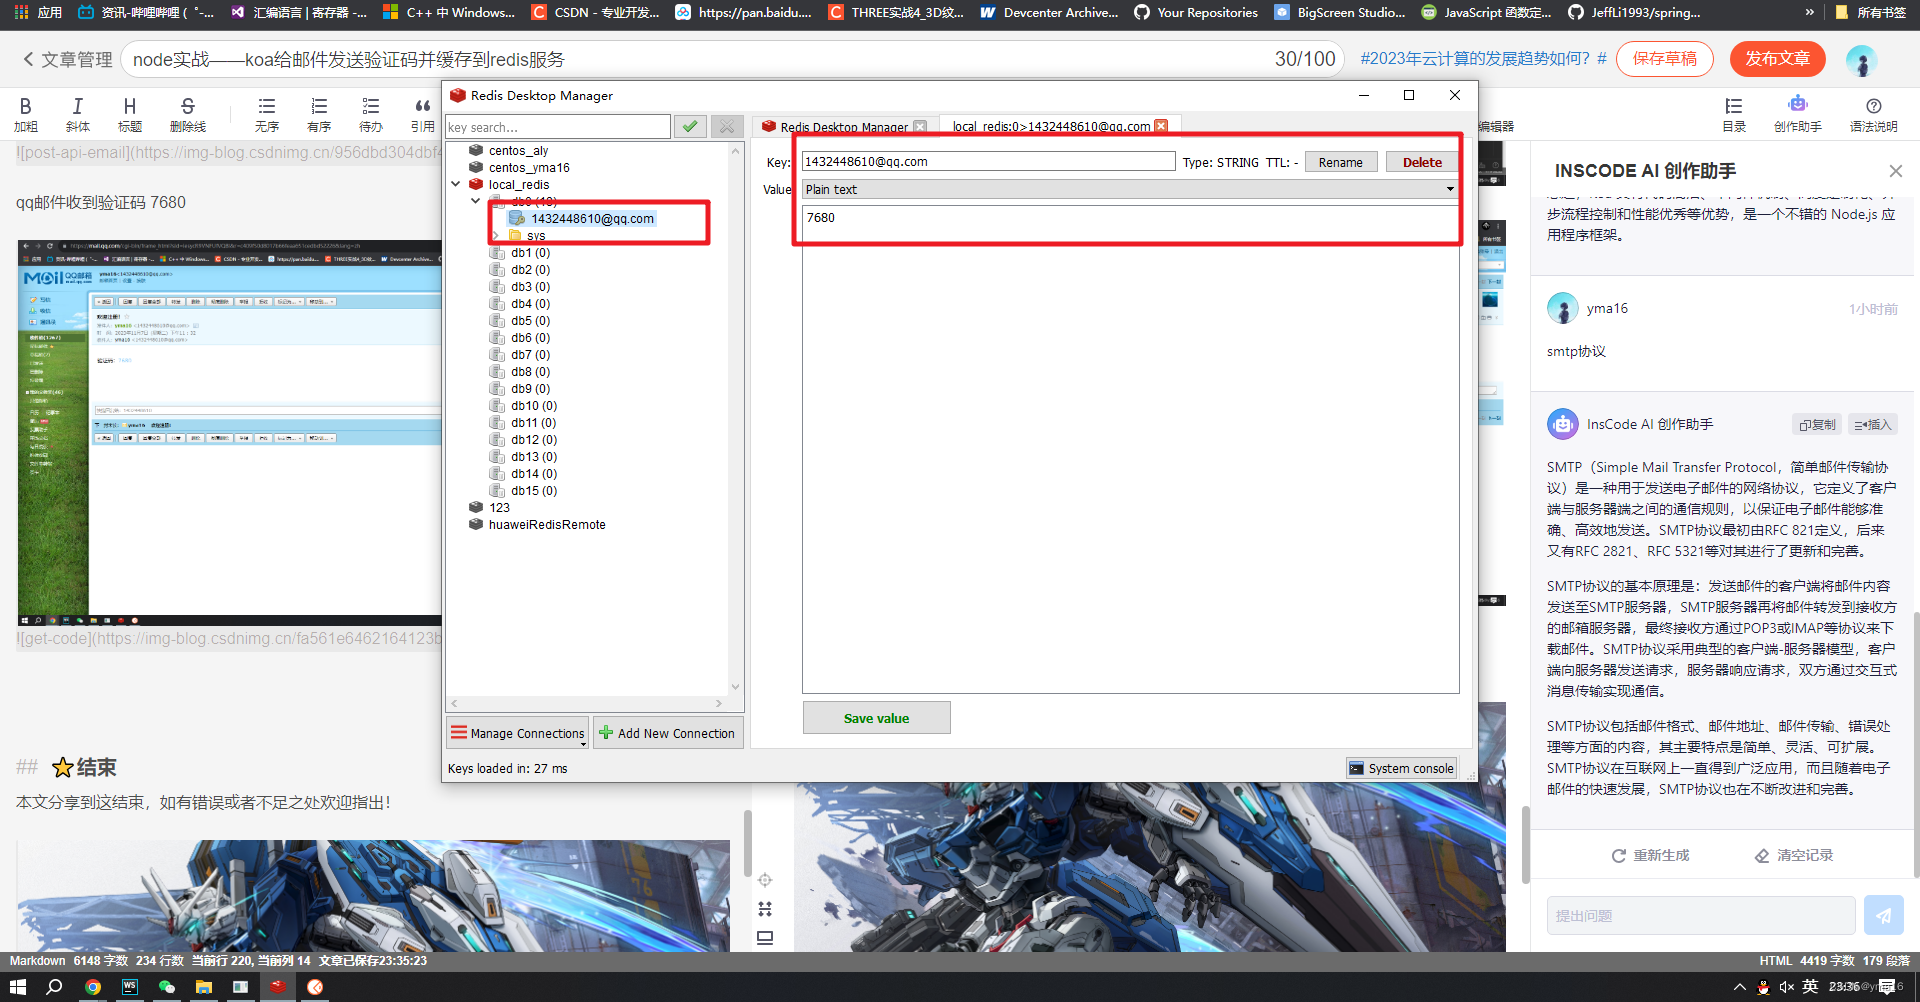
数据一致验证成功!
?总结
redis的特性
Redis是一个内存数据存储系统,它提供了一系列特性,可以被用于缓存、消息队列、计数器等多个应用场景。以下是Redis的一些特性和其应用场景:
-
快速的键值存储:Redis的主要功能是存储键值对数据,支持多种数据类型(字符串、哈希、列表、集合、有序集合等),存取速度非常快。这使它非常适合作为缓存系统。
-
发布订阅模式:Redis支持发布订阅模式,可以让多个消费者订阅一个或多个频道,生产者向频道发送消息,消费者接收消息并做出相应的处理。这个特性常用于构建消息队列系统。
-
事务支持:Redis支持事务操作,可以将多个命令打包成一个事务,然后一起执行,这样可以保证操作的原子性。
-
持久化:Redis提供了两种持久化方式,即RDB快照和AOF日志。RDB快照可以将内存中的数据保存到磁盘上,AOF日志则记录每个写操作,用于系统恢复。
-
分布式锁:Redis可以使用基于SETNX命令的方式实现简单的分布式锁。这种锁的实现比较轻量级,适合于对性能要求较高的场景。
-
计数器:Redis支持对指定键值进行原子增减操作,可以用来实现计数器等功能。
本文主要是使用了redis得快速键值对来存储邮件对应得验证码,同理手机发送邮件验证码也可以采用该方案。
?结束
本文分享到这结束,如有错误或者不足之处欢迎指出!

👍 点赞,是我创作的动力!
?? 收藏,是我努力的方向!
?? 评论,是我进步的财富!
💖 最后,感谢你的阅读!
本文来自互联网用户投稿,该文观点仅代表作者本人,不代表本站立场。本站仅提供信息存储空间服务,不拥有所有权,不承担相关法律责任。 如若内容造成侵权/违法违规/事实不符,请联系我的编程经验分享网邮箱:chenni525@qq.com进行投诉反馈,一经查实,立即删除!
- Python教程
- 深入理解 MySQL 中的 HAVING 关键字和聚合函数
- Qt之QChar编码(1)
- MyBatis入门基础篇
- 用Python脚本实现FFmpeg批量转换
- Python中的集合
- 【Linux】—— 命名管道详解
- 不良人大电影——天罡传,讲述的是袁天罡的故事,不是不良帅的故事
- java springboot讲解NoSql解决方案 带大家简单了解Redis基本存储方式
- cKDTree中的query_ball_point()函数用法
- 如何防止SQL注入和跨站脚本攻击?
- 手把手带你死磕ORBSLAM3源代码(十六)System.cc void System::SaveTrajectoryEuRoC类代码分析
- 【软件工程大题】PAD图
- 卡尔曼滤波
- 进位模拟数位拆分和最大公约数最小公倍数