使用TensorRT对Yolov5进行部署【基于Python】
如果还未配置TensorRT,请看这篇博文:Win11下TensorRT环境部署
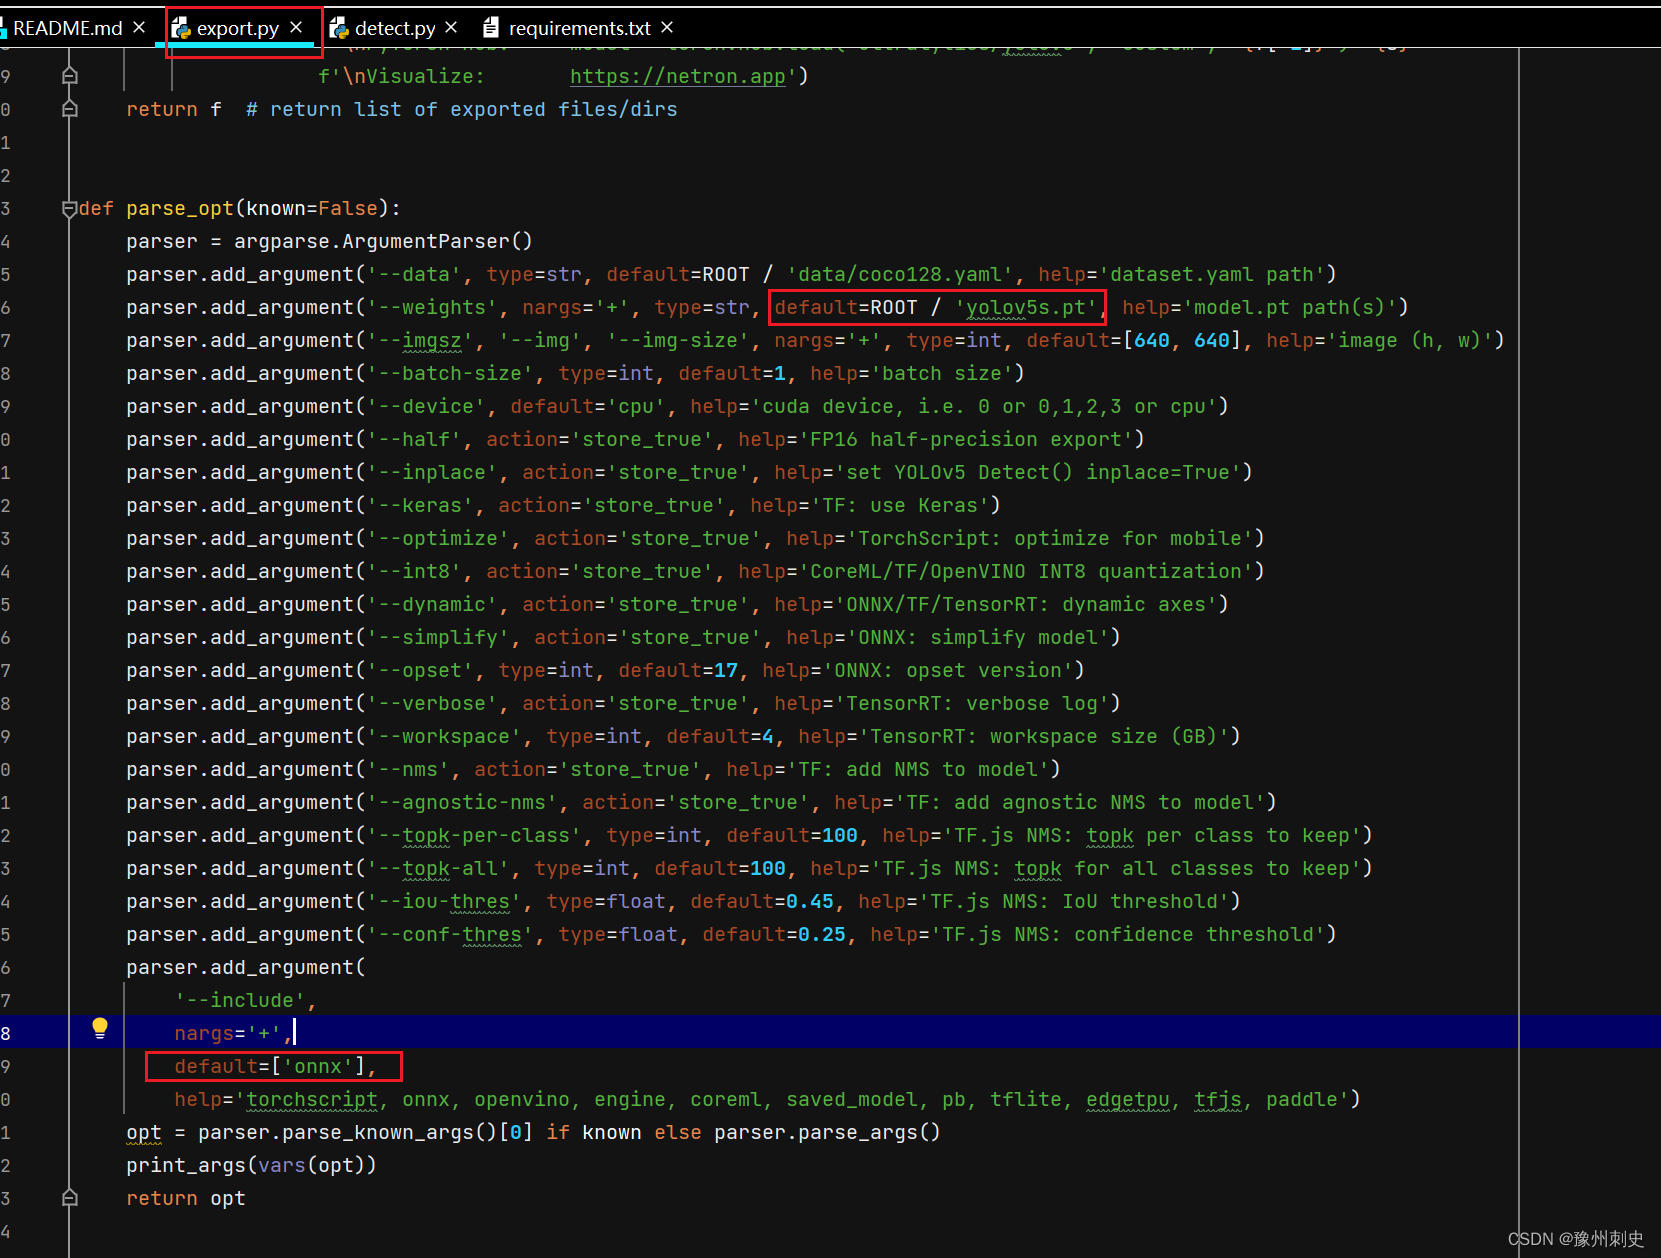
这里使用TensorRT对Yolov5进行部署流程比较固定:先将pt模型转换为onnx,再将onnx模型转为engine,所以在执行export.py时要将onnx、engine给到include。
PT模型转换为ONNX模型
PT模型地址:
方法一
python path/to/export.py --weights yolov5s.pt --include torchscript onnx coreml saved_model pb tflite tfjs
方法二

我们可以看到:
- –weight 使用的是我们需要优化的权重,我这里yolov5s.pt为例
- –opset 这里的参数如果你报错的话可以试着改小一点
- –include 填写的是我们第一步生成的onnx文件

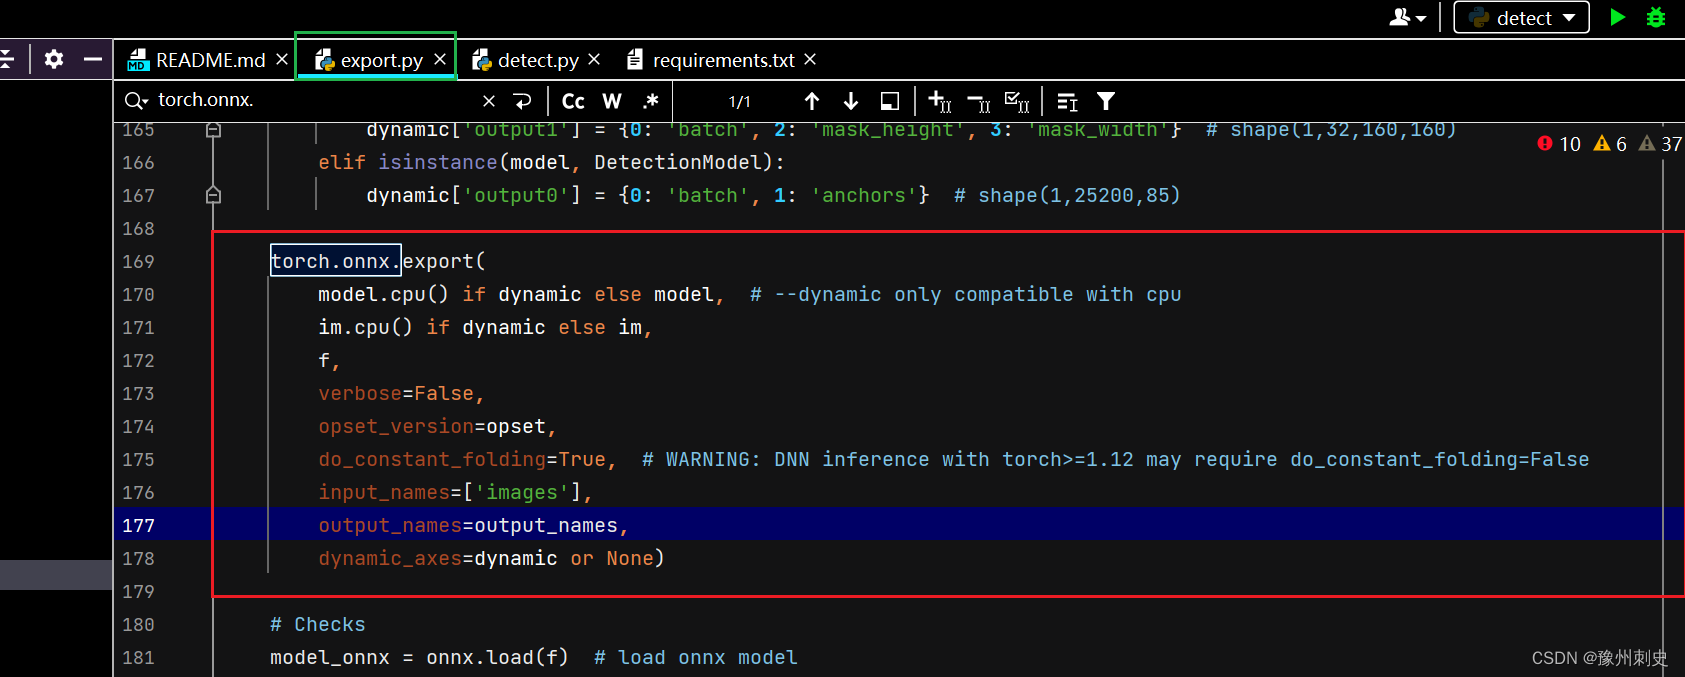
下面我们介绍以下ONNX的构建流程:

这里介绍一下其中每个参数的含义:
- model:就是需要转为ONNX的pth模型,只有源模型的结构和权重,才能转化为有效的ONNX模型。
- model.cpu() if dynamic else model:如果启用了动态模式(dynamic=True),则将模型转移到CPU上进行导出;否则使用原始的模型。
- im.cpu() if dynamic else im: 如果启用了动态模式,将输入张量转移到CPU上进行导出;否则使用原始的输入张量。
为什么要把模型和输入数据转移到CPU上?
CPU 是所有计算环境中最通用和兼容的硬件。当你将一个模型导出为一个通用格式,如 ONNX,目的通常是确保它可以在不同的环境和硬件上运行。使用 CPU 可以确保最大程度的兼容性,因为不是所有的环境都有 GPU 支持。这有助于确保模型能够在各种不同的硬件和软件环境中一致和可靠地工作。
- f:这是输出文件的路径或文件对象,表示ONNX模型应该保存的位置
- verbose = False:这个参数控制是否打印出详细的导出信息
- opset_version=opset:指定ONNX的操作集版本,不同的版本的ONNX支持不同的特性集
- do_constant_folding=True:控制是否进行常量折叠。表示常量折叠优化,默认为 False。如果为 True,则在导出时进行常量折叠优化。常量折叠优化将用预先计算的常量节点来替换那些所有都是常量输入的操作,在torch>=1.12版本中,进行DNN推理可能需要将do_constant_folding设置为False。这是因为在这个版本中,对一些操作进行了更多的优化。
- input_names=[‘images’]: 定义输入节点的名称。
- output_names=output_names: 定义输出节点的名称列表。
- dynamic_axes=dynamic or None: 如果 dynamic 为真,则启用动态轴特性。动态轴允许模型在不同的推理请求中处理不同大小的输入。
- keep_initializers_as_inputs:默认为 None。如果为 True,那么就导出图中的所有初始值的设定项,一般对应到参数,最后也会作为输入,添加到图中。如果为 False,那么初始值的设定项就不会作为输入添加到图中,而只是将非参数作为输入进行添加。
- custom_opsets:用于在导出时指示自定义 opset 域和版本的字典。如果模型包含自定义的操作集,那么就可以选择在字典中指定域和操作集版本:其中KEY为操作集域名,它的 VALUE为操作集版本。注意的是,如果在这个字典中没有提供自定义的操作集,那么操作集版本就默认设置为1。
- enable_onnx_checker:默认为 True。如果为 True,onnx 模型检查器将作为导出的一部分运行,以确保导出的模型是没有问题的 ONNX 模型。
- use_external_data_format:默认为 False。如果为 True,那么模型就会以 ONNX 外部数据格式导出,比方说,有些模型的参数是存储在二进制文件中的,而不是存储在 ONNX 模型文件中。
onnxsim的使用

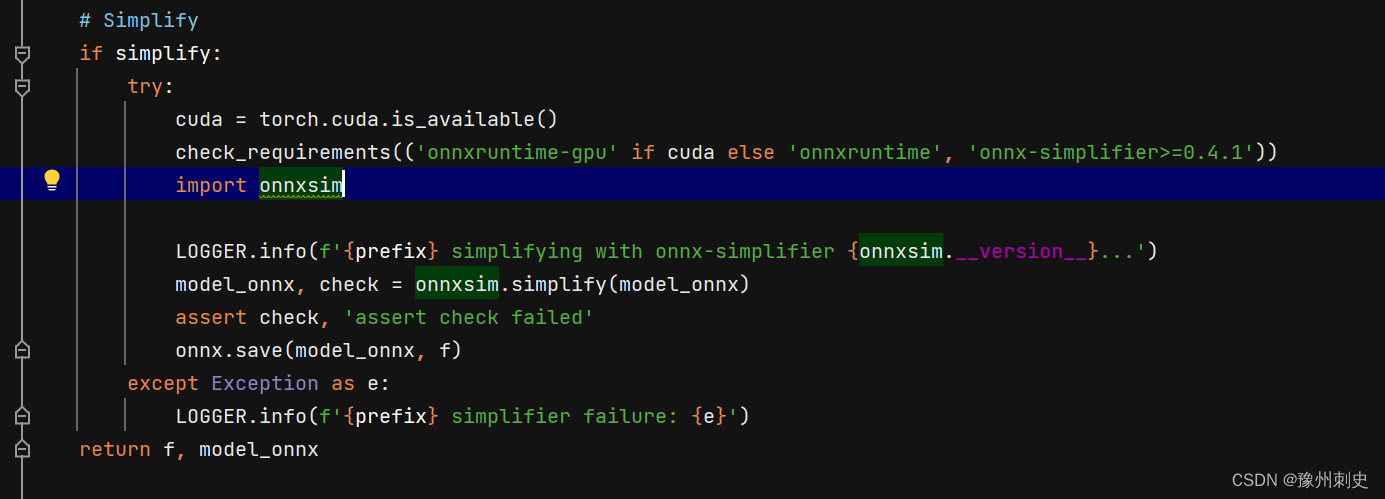
如果要精简onnx,就可以将simplify设置为True。设置为True,就会调用onnxsim来对原来onnx去除不必要的op操作,也叫去除胶水,在使用之前需要安装onnx-simplifer。
精简完之后可以把简化前和简化后的模型放进netron看优化了哪些地方。netron 就是一个网络结构的可视化神器。我们可以通过它来查看网络的结构。因为这里的模型太大,会占用较长的篇幅,所以本文就不展示了。
构建TensorRT引擎
构建完onnx后,就开始从onnx转为engine。在TensorRT上主要存在以下几个对象:
- builder:用于创建 config、network、engine 等其它对象。
- network:在其它框架的模型解析之后,就会被用于填充到网络 network中去。
- config:主要用于配置builder。
- OnnxParser:用于解析onnx的模型文件,对 ONNX 进行解析并填充到 tensorrt network 的结构当中。
- engine:根据特定的config 与特定的硬件上编译出来的引擎,只能应用于特定的 config 与硬件上。此外,引擎可以持久化保存到本地,以节省下次使用时,不必要的编译时间。engine 集成了模型结构、模型参数 与可以实现最优计算 的kernel 配置。但是于此同时,engine 与硬件和 TensorRT的版本有着强绑定,所以要求进行engine编译与执行的硬件上的TensorRT 版本要保持一致。
- engine:根据特定的config 与特定的硬件上编译出来的引擎,只能应用于特定的 config 与硬件上。此外,引擎可以持久化保存到本地,以节省下次使用时,不必要的编译时间。engine 集成了模型结构、模型参数 与可以实现最优计算 的kernel 配置。但是于此同时,engine 与硬件和 TensorRT的版本有着强绑定,所以要求进行engine编译与执行的硬件上的TensorRT 版本要保持一致。
LOGGER.info(f'\n{prefix} starting export with TensorRT {trt.__version__}...')
    assert onnx.exists(), f'failed to export ONNX file: {onnx}'
    f = file.with_suffix('.engine')  # TensorRT engine file
    logger = trt.Logger(trt.Logger.INFO)
    if verbose:
        logger.min_severity = trt.Logger.Severity.VERBOSE

    builder = trt.Builder(logger)
    config = builder.create_builder_config()
    config.max_workspace_size = workspace * 1 << 30
    # config.set_memory_pool_limit(trt.MemoryPoolType.WORKSPACE, workspace << 30)  # fix TRT 8.4 deprecation notice

    flag = (1 << int(trt.NetworkDefinitionCreationFlag.EXPLICIT_BATCH))
    network = builder.create_network(flag)
    parser = trt.OnnxParser(network, logger)
    if not parser.parse_from_file(str(onnx)):
        raise RuntimeError(f'failed to load ONNX file: {onnx}')

    inputs = [network.get_input(i) for i in range(network.num_inputs)]
    outputs = [network.get_output(i) for i in range(network.num_outputs)]
    for inp in inputs:
        LOGGER.info(f'{prefix} input "{inp.name}" with shape{inp.shape} {inp.dtype}')
    for out in outputs:
        LOGGER.info(f'{prefix} output "{out.name}" with shape{out.shape} {out.dtype}')

    if dynamic:
        if im.shape[0] <= 1:
            LOGGER.warning(f'{prefix} WARNING ?? --dynamic model requires maximum --batch-size argument')
        profile = builder.create_optimization_profile()
        for inp in inputs:
            profile.set_shape(inp.name, (1, *im.shape[1:]), (max(1, im.shape[0] // 2), *im.shape[1:]), im.shape)
        config.add_optimization_profile(profile)

    LOGGER.info(f'{prefix} building FP{16 if builder.platform_has_fast_fp16 and half else 32} engine as {f}')
    if builder.platform_has_fast_fp16 and half:
        config.set_flag(trt.BuilderFlag.FP16)
    with builder.build_engine(network, config) as engine, open(f, 'wb') as t:
        t.write(engine.serialize())
    return f, None
推理代码
使用engine推理和使用pt推理的流程是大同小异的,同样是使用detect.py。区别就在于model = DetectMultiBackend(weights, device=device, dnn=dnn)中的weight是pt模型还是onnx模型还是engine模型
进入到DetectMultiBackend这个类中查看,直接跳转【ctrl + click】到构建engine的部分:
        elif engine:  # TensorRT
            LOGGER.info(f'Loading {w} for TensorRT inference...')
            import tensorrt as trt  # https://developer.nvidia.com/nvidia-tensorrt-download
            check_version(trt.__version__, '7.0.0', hard=True)  # require tensorrt>=7.0.0
            if device.type == 'cpu':
                device = torch.device('cuda:0')
            Binding = namedtuple('Binding', ('name', 'dtype', 'shape', 'data', 'ptr'))
            logger = trt.Logger(trt.Logger.INFO)
            with open(w, 'rb') as f, trt.Runtime(logger) as runtime:
                model = runtime.deserialize_cuda_engine(f.read())
            context = model.create_execution_context()
            bindings = OrderedDict()
            output_names = []
            fp16 = False  # default updated below
            dynamic = False
            for i in range(model.num_bindings):
                name = model.get_binding_name(i)
                dtype = trt.nptype(model.get_binding_dtype(i))
                if model.binding_is_input(i):
                    if -1 in tuple(model.get_binding_shape(i)):  # dynamic
                        dynamic = True
                        context.set_binding_shape(i, tuple(model.get_profile_shape(0, i)[2]))
                    if dtype == np.float16:
                        fp16 = True
                else:  # output
                    output_names.append(name)
                shape = tuple(context.get_binding_shape(i))
                im = torch.from_numpy(np.empty(shape, dtype=dtype)).to(device)
                bindings[name] = Binding(name, dtype, shape, im, int(im.data_ptr()))
            binding_addrs = OrderedDict((n, d.ptr) for n, d in bindings.items())
            batch_size = bindings['images'].shape[0]  # if dynamic, this is instead max batch size
在进行前向推理时,就会调用DetectMultiBackend的forward方法:

其中y返回的就是推理结果。这个结果会返回到detect.py中,当detect.py捕获到结果之后,就正常走目标检测的后处理流程了。
最后
–weight填写 yolov5s.onnx
–include 填写 engine
注:如果输入.onnx生成engine报错的话可以直接在–weight填我们需要优化的权重
–include 直接填写engine,因为直接生成engine的过程中也会升成一个.onnx。
参考链接:
https://zhuanlan.zhihu.com/p/607601799
https://blog.csdn.net/m0_64524798/article/details/129187608
本文来自互联网用户投稿,该文观点仅代表作者本人,不代表本站立场。本站仅提供信息存储空间服务,不拥有所有权,不承担相关法律责任。 如若内容造成侵权/违法违规/事实不符,请联系我的编程经验分享网邮箱:chenni525@qq.com进行投诉反馈,一经查实,立即删除!