SpringBoot-基础篇02
发布时间:2024年01月22日
上次使用springBoot搭建整个项目框架,实现登录逻辑,今天使用springBoot整合mybatis实现增删改查,关于项目搭建,可以查看上一篇博客:
废话不多说,直接开始。
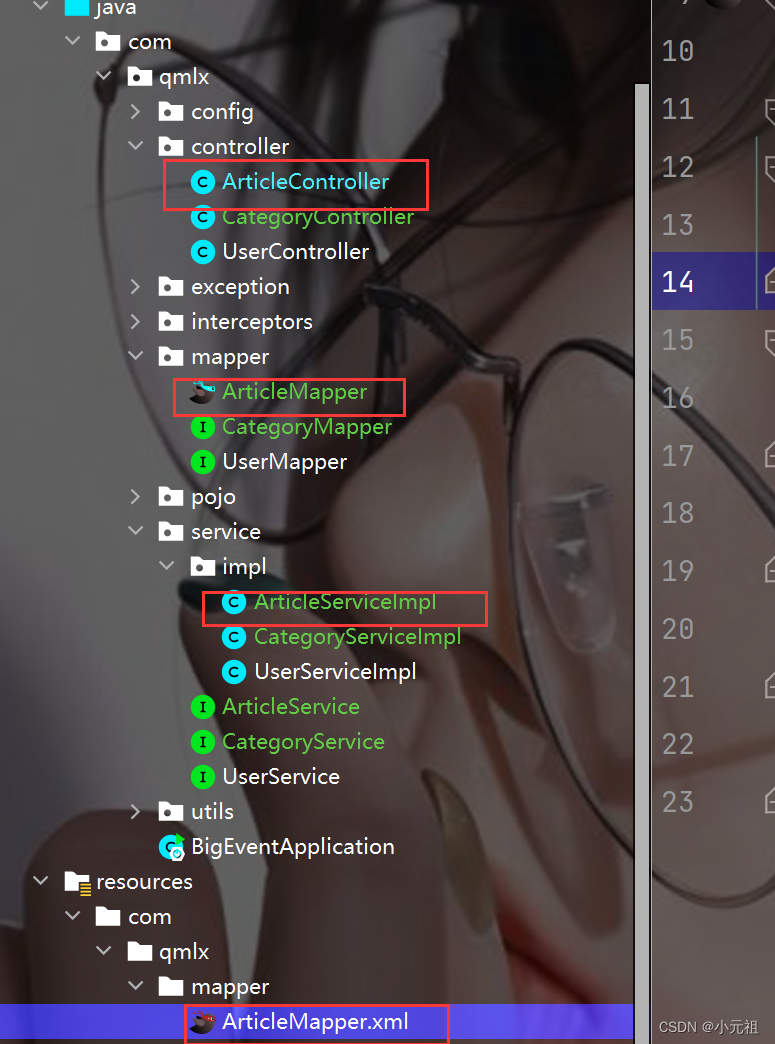
整个项目包结构如下:

?
第一步,引入依赖
?引入mysql驱动依赖(注意我这里使用的mysql版本是8)mybatis依赖:
<!--mybatis依赖-->
<dependency>
    <groupId>org.mybatis.spring.boot</groupId>
    <artifactId>mybatis-spring-boot-starter</artifactId>
    <version>3.0.0</version>
</dependency>
<!--mysql驱动依赖-->
<dependency>
    <groupId>com.mysql</groupId>
    <artifactId>mysql-connector-j</artifactId>
</dependency>
第二步,封装查询的实体类
我们使用Article也就是文章这个实体类进行代码演示,Article实体类如下,注意这里使用lombok注解简化构造器get? set等方法的编写:
@Data
@AllArgsConstructor
@NoArgsConstructor
public class Article {
    private Integer id;//主键ID
    private String title;//文章标题
    private String content;//文章内容
    private String coverImg;//封面图像
    private String state;//发布状态 已发布|草稿
    private Integer categoryId;//文章分类id
    private Integer createUser;//创建人ID
    private LocalDateTime createTime;//创建时间
    private LocalDateTime updateTime;//更新时间
}
?第三步,书写代码实现增删改查
1,增删改查controller层代码实现:
@RestController
@RequestMapping("/article")
public class ArticleController {
    @Autowired
    private ArticleService articleService;
    @GetMapping("/list")
    public Result<String> list(){
        return Result.success("测试成功!!");
    }

    //新增文章
    @PostMapping
    public Result addArticle(@RequestBody Article article){
        articleService.addArticle(article);
        return Result.success();
    }
    //获取文章详情
    @GetMapping("/detail")
    public Result<Article> getArticleDetail(Integer id){
        Article article=articleService.getArticleDetail(id);
        return Result.success(article);
    }
    //更新文章详情
    @PutMapping
    public Result update(@RequestBody Article article){
        articleService.update(article);
        return Result.success();
    }
    //删除文章
    @DeleteMapping
    public Result deleteById(Integer id){
        articleService.deleteById(id);
        return Result.success();
    }
}
注意:@RequestBody作用是将前端传递过来的json数据转化为为实体类进行封装?
2,增删改查serviece层代码实现:
@Service
public class ArticleServiceImpl implements ArticleService {
    @Autowired
    private ArticleMapper articleMapper;
    public void addArticle(Article article) {
        article.setCreateUser(ThreadLocalUtil.getId());
        articleMapper.insert(article);
    }
    //获取文章详情
    public Article getArticleDetail(Integer id) {
        return articleMapper.selectById(id);
    }
    //更新文章详情
    public void update(Article article) {
        articleMapper.update(article);
    }

    //删除文章
    public void deleteById(Integer id) {
        articleMapper.deleteById(id);
    }

}
注意*:上述代码中ThreadLocalUtil.getId()基于我上述博客中的工具类进行优化后的代码,在ThreadLocalUtils中增加了getId以及getUsername用于返回解析后的jwt令牌中携带的userid以及username信息,ThreadLocalUtils实现如下,不理解之处可以查看我的上一篇博客:、
并且这里给出的serviece层代码实现只有实现类并没有给出接口的代码
/**
 * ThreadLocal 工具类
 */
@SuppressWarnings("all")
public class ThreadLocalUtil {
    //提供ThreadLocal对象,
    private static final ThreadLocal THREAD_LOCAL = new ThreadLocal();

    //根据键获取值
    public static <T> T get(){
        return (T) THREAD_LOCAL.get();
    }
    //存储键值对
    public static void set(Object value){
        THREAD_LOCAL.set(value);
    }
    //清除ThreadLocal 防止内存泄漏
    public static void remove(){
        THREAD_LOCAL.remove();
    }
    //获取当前线程中存储的用户的id
    public static Integer getId(){
        Map<String,Object> map = ThreadLocalUtil.get();
        Integer id = (Integer) map.get("id");
        return id;
    }
    //获取当前线程中存储的用户的用户名
    public static String getUsername(){
        Map<String,Object> map = ThreadLocalUtil.get();
        String username = (String) map.get("username");
        return username;
    }
}
?
3,实现mapper层代码:
package com.qmlx.mapper;

import com.qmlx.pojo.Article;
import org.apache.ibatis.annotations.*;

import java.util.List;

@Mapper
public interface ArticleMapper {
    @Insert("insert into article (title, content, cover_img, state, " +
            "category_id, create_user, create_time, update_time)" +
            " VALUES (#{title},#{content},#{coverImg},#{state},#{categoryId}," +
            "#{createUser},now(),now())")
    void insert(Article article);

    @Select("select * from article where id=#{id}")
    Article selectById(Integer id);

    @Update("update article set title=#{title},content=#{content},cover_img=#{coverImg}," +
            "state=#{state},category_id=#{categoryId},update_time=now() where id=#{id}")
    void update(Article article);

    @Delete("delete from article where id=#{id}")
    void deleteById(Integer id);
}
这里使用注解查询,后续会给出使用mapper.xml文件进行查询的例子,持续更新ing~~
如果你觉得对你有帮助吗,不妨给个赞吧!!?
文章来源:https://blog.csdn.net/qq_63837759/article/details/135737225
本文来自互联网用户投稿,该文观点仅代表作者本人,不代表本站立场。本站仅提供信息存储空间服务,不拥有所有权,不承担相关法律责任。 如若内容造成侵权/违法违规/事实不符,请联系我的编程经验分享网邮箱:chenni525@qq.com进行投诉反馈,一经查实,立即删除!
本文来自互联网用户投稿,该文观点仅代表作者本人,不代表本站立场。本站仅提供信息存储空间服务,不拥有所有权,不承担相关法律责任。 如若内容造成侵权/违法违规/事实不符,请联系我的编程经验分享网邮箱:chenni525@qq.com进行投诉反馈,一经查实,立即删除!